I almost never buy tools off eBay. Not used ones, anyway. I usually stick to the “New Old Stock” variety. So it was particularly out of character for me to take a leap of faith on a random Stanley No. 4.

I think it came out okay.
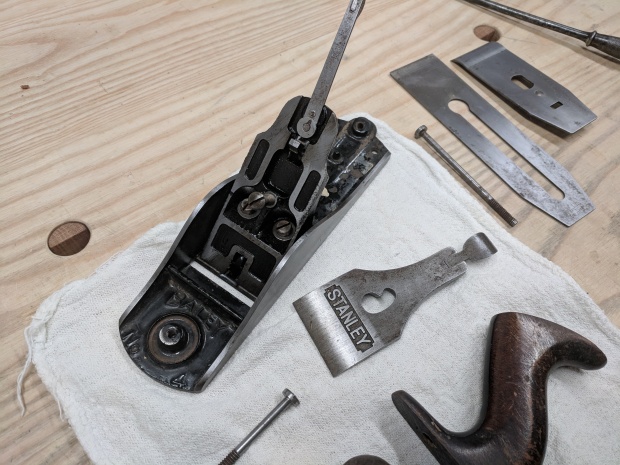
The tool in question is almost certainly a Type 17 from 1942-1945. It has a hardwood knob/tote and a steel depth adjustment knob, plus a heavier casting. Its heft feels more like a modern Bedrock copy than a vintage Stanley. I’m willing to bet this plane helped defeat the Nazis.
You can really see the thickness of the walls in this shot.
The tool was either (i) well-loved and cared for in its former life or (ii) used a little bit and then squirreled away. My vote is for well-loved and cared for. There was a hanging hole in the heel of the sole. All the arrises were carefully broken with a file. The lateral adjustment lever showed signs of re-peening. The depth adjustment knob was caked with sawdust. All the signs of a craftsman’s tool.
My only reservation is that the iron seems off. There is just so much steel left. It could be a replacement iron. And the shape of the cutting edge was strange, with a very slight hollow along the width. Not a hollow grind on the bevel. The cutting edge itself had the opposite shape of a smoothing plane camber. If it had been sharp, you could have beaded with the plane when it arrived in the mail. Perhaps the skilled craftsman was two owners ago.
Easily fixed in the honing process, though.
Also a surprise: the sole was very flat to begin with. It took less than 30 seconds with 120 grit on the granite slab to get it as flat as it ever needs to be. This is not exaggeration. 20 or so passes and it was flatter than most new planes. And the sides were very square to the sole. Another 30 seconds on the granite slab with a squaring block and it was good to go for shooting.

Strange place for a hollow. But completely harmless on a smoothing plane.
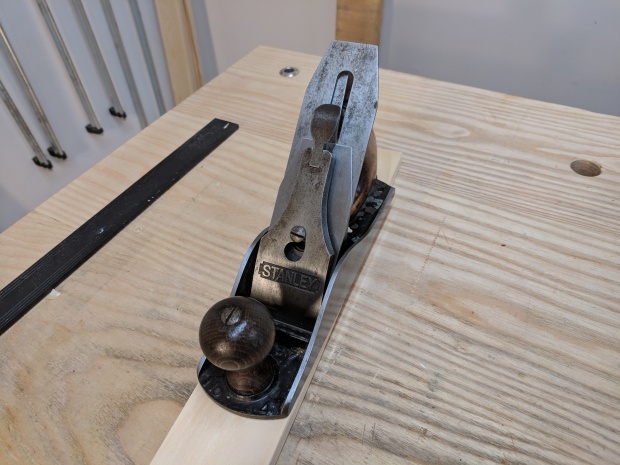
I was pleasantly surprised at every turn. In fact, tuning was going so well, I developed the intention of making this one of my main worker planes. But then, after all the scrubbing and sanding and honing, I moved the frog forward and extended the blade to take a thin shaving and what did I see? Wood. Lots of it.
It was like looking under the hood of an old car and seeing asphalt. My heart sank.

Tearout will always be a problem with this plane.
On a hand plane, the blade, in its cutting motion, lifts under the wood fibers. As I understand it, the leading edge of the mouth presses down on the fibers while the blade cuts. The wider the mouth, the more likely the fibers will lift and split ahead of the blade edge. This is called tearout.
On a smoothing plane, you want the narrowest mouth possible. The opening between blade and sole should be barely wider than the shaving taken. A perfectly tuned and set smoothing plane can take a tearout-free shaving in any direction on even the most figured or swirling grain because of this narrow opening. That is, the leading edge of the mouth applies downward pressure so close to the cutting edge that there is no opportunity for fibers to lift and split as the cut progresses. No opportunity for tearout.
But with a mouth this size, this particular plane would eat figured food. Literally tear it up and spit it out. So, with a heavy heart, I have put this plane in the reserve bin (i.e., my Craftsman Top Chest). But I will name it James, Jr., for it has a mouth so big that it ruins everything it comes in contact with.
Perhaps it will one day find life as a scrub plane. It certainly has the mouth for heavy shavings.
JPG

Fill that big mouth with a thicker than standard blade. Pmv-11 would probably work very well, but Hock also makes a sweet blade.
LikeLiked by 1 person
I already have a well tuned modern plane as a smoother (not to mention a type 11 No. 3). I feel like throwing a replacement blade at the problem is an unnecessary expense. I’m only out about $50 (plus the de minimis cost of sandpaper and shop rags) at this point.
I have a buddy who might get into hand tool work. If so, this would make an excellent addition to a starter set of hand tools.
LikeLike
Like the comment above, the wide mouth and thicker blades can be matched up. Don’t get too disappointed with the narrow mouth. I find that the cap iron setting is more useful for figured wood than the mouth setting.
Looking at the mouth picture, I am surprised you can’t close it up anymore. Check for sawdust behind the adjusting screw and tab.
Enjoy your new find.
LikeLiked by 1 person
Frog adjustment is as far forward as it can go. Not a speck of dust survived the full on mineral spirits bath everything got when disassembled. I could try filing the fork thinner or hacking off some of the thread (in case the frog adjustment screw is bottoming out), but the frog is already protruding slightly beyond the trailing edge of the mouth.
LikeLike
I think you are fine without filing anything. A super fine mouth will clog like crazy on a double iron plane.
The mouth in the pic doesn’t look overly large compared to how I set my planes. Is it set to cut?
LikeLike
Ditto Steve’s comment about the cap iron. I’ve set it really close to the iron edge and gotten smooth surfaces going against the grain. The Schwarz and Richard Maguire have both written about it. The plane pushes pretty hard, though, and a less then perfect fit allows (encourages) chips to jam in between the irons.
LikeLike