It’s been a struggle putting together a design for a workbench. Not because I don’t know what I want to make, but because I need to figure out the best way to make it by hand from construction lumber. I have about 60 linear feet of Douglas Fir 2×10’s that will become the frame, and I plan to laminate over a dozen Douglas Fir 2×4’s for the top, but creating a step-by-step plan has been elusive.
And for me, that means taking a step back from the theoretical and diving into some practical research. And what could be a better practice run than those Japanese-style Saw Horses I’ve always wanted? And what better place to start than the feet, which are a perfect scale analogue for the laminated workbench legs?
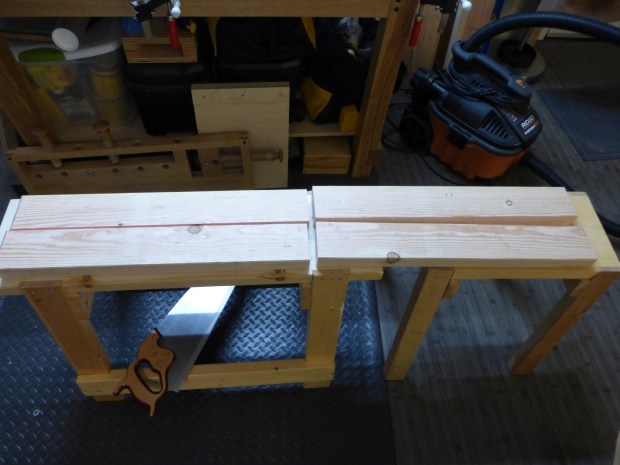
Each foot is approximately 24″ long and consists of two boards. I don’t have any 2×4’s, but I do have some 2×8’s and a panel saw, so here we go!
Step one: rip a 48″ 2×8 into two lengths of 2×4, then crosscut to 24″ each and reassemble in sequence.
Hand sawing gets the blood pumping.
Step two: carefully mark where the boards meet, and stack each right board on top of the corresponding left board without changing orientation.

This ensures consistent grain direction, just like a single board.
Step three: surface plane the two faces where the boards will meet, then square up one edge to each reference face.
![IMG_20160128_204049456[1]](https://theapartmentwoodworker.com/wp-content/uploads/2016/01/img_20160128_2040494561.jpg?w=620)
And mark carefully.
[Picture not found…yet.]
Before I actually glue up the feet, though, I should create the mortises for the legs by cutting dadoes in the reference faces. The bottoms are already square to those reference faces, so there is no reason I can’t cut those joints in advance of thicknessing.
The legs, btw, will be made from approximately 30″ of Douglas Fir 2×6. But that, along with the top and bottom cross rails, is for another day.
JPG

Great information as always!
LikeLiked by 1 person
I laminated about 18 or so 2x3s for my top. The Gramercy holdfasts from TFWW only need about 2″ to grip, and the 2x3s were slightly less expensive.
Tip: glue the whole top up. Do it either a couple of 2x4s at a time or all at once, but don’t glue it in two parts thinking you will want to do the planing stop stick that Siemsen does in his Naked Woodworker DVD… it’s a pain to glue the two big chunks up later if you change your mind. I did it, and I exploded the glue-up. When the garage thaws I’ll give it another go but this time I will pay more attention to jointing that edge. Perhaps when the spring comes I will just redo the top completely and make a sharpening stand and a new sawbench from what’s already put together. Should cost about $30 in lumber.
LikeLiked by 1 person
Nah, it will be one slab: no split top. I’ve already done the planing slab, so I have experience gluing up a top from Douglas Fir (I did that one at a time over a couple days). But the big change this time around will be creating the mortises during the glue up, rather than chopping through the full top after it’s laminated. That’s really what I was practicing with the sawhorses.
LikeLiked by 1 person
Yeah, I chopped all of mine. They look.. uh. Great. (This is the point where I blur the focus on the camera slightly to hide just how little actually got done “properly”).
The plan was (and still is) to rabbet the skirts into the top, and to house the legs in them with a giant lapped dado. It’ll never rack even if it tries, but I’m doing it more for the experience of fitting all that at once at that scale than for ease of construction. Before that can happen though the top has to go on and stay on. I’m not using any carriage bolts or nails to hold anything in.. just glue and joinery.
LikeLike
Benches are tools, not works of art. I’ve seen pretty workbenches before. Not my style.
LikeLike