*Editors note: This is James’ first attempt at a long-form woodworking article. He is aware it is a departure from his usual format and tone.
There is an idiom, often attributed to either Benjamin Franklin or the anonymous Shaker craftsman, that goes, “A place for everything, [and] everything in its place”. I doubt Old Richard Scary actually came up with the phrase. I also doubt the Shakers would disagree with the notion. After all, if you can be one thing, you should be efficient. And for those of us who have small shops, this is more than just an aesthetic; it’s a way of life.
There are, as far as I can tell, there are two main approaches to tool storage in woodworking (although I would imagine these concepts apply to all crafts and shops). The first, just keep it open and pile everything in, works fine for things like full size, stationary English floor chests with banks of sliding tills and ample room for everything. The other, divide it up and create slots for individual tools (sometimes called “French Fitting” [double capitalization intended], which is the term I will use for the rest of this article), excels in chests that will travel or where space (read: organization) is at a premium. I prefer a hybrid of those approaches, but skewed heavily toward the latter.

When there is a place for everything, and everything is in its place, the tool you need is more likely to be easily findable and at hand. In addition, the tool is likely to remain set, tuned and sharp, having been protected from jostling against its neighbors. This is especially true for chests that get moved around, loading in and out of the car or dumped on the lawn for some sunshine woodworking. But even for stationary chests that live inside the shop, there is a level of French Fitting that I believe benefits everyone. It goes without saying that this is a handtool-focused approach. I only use a few machines, and each of them directly complements my handtool-first approach. If you are a machines-only woodworker, please feel free to keep reading. But this article might not have as much utility for you.
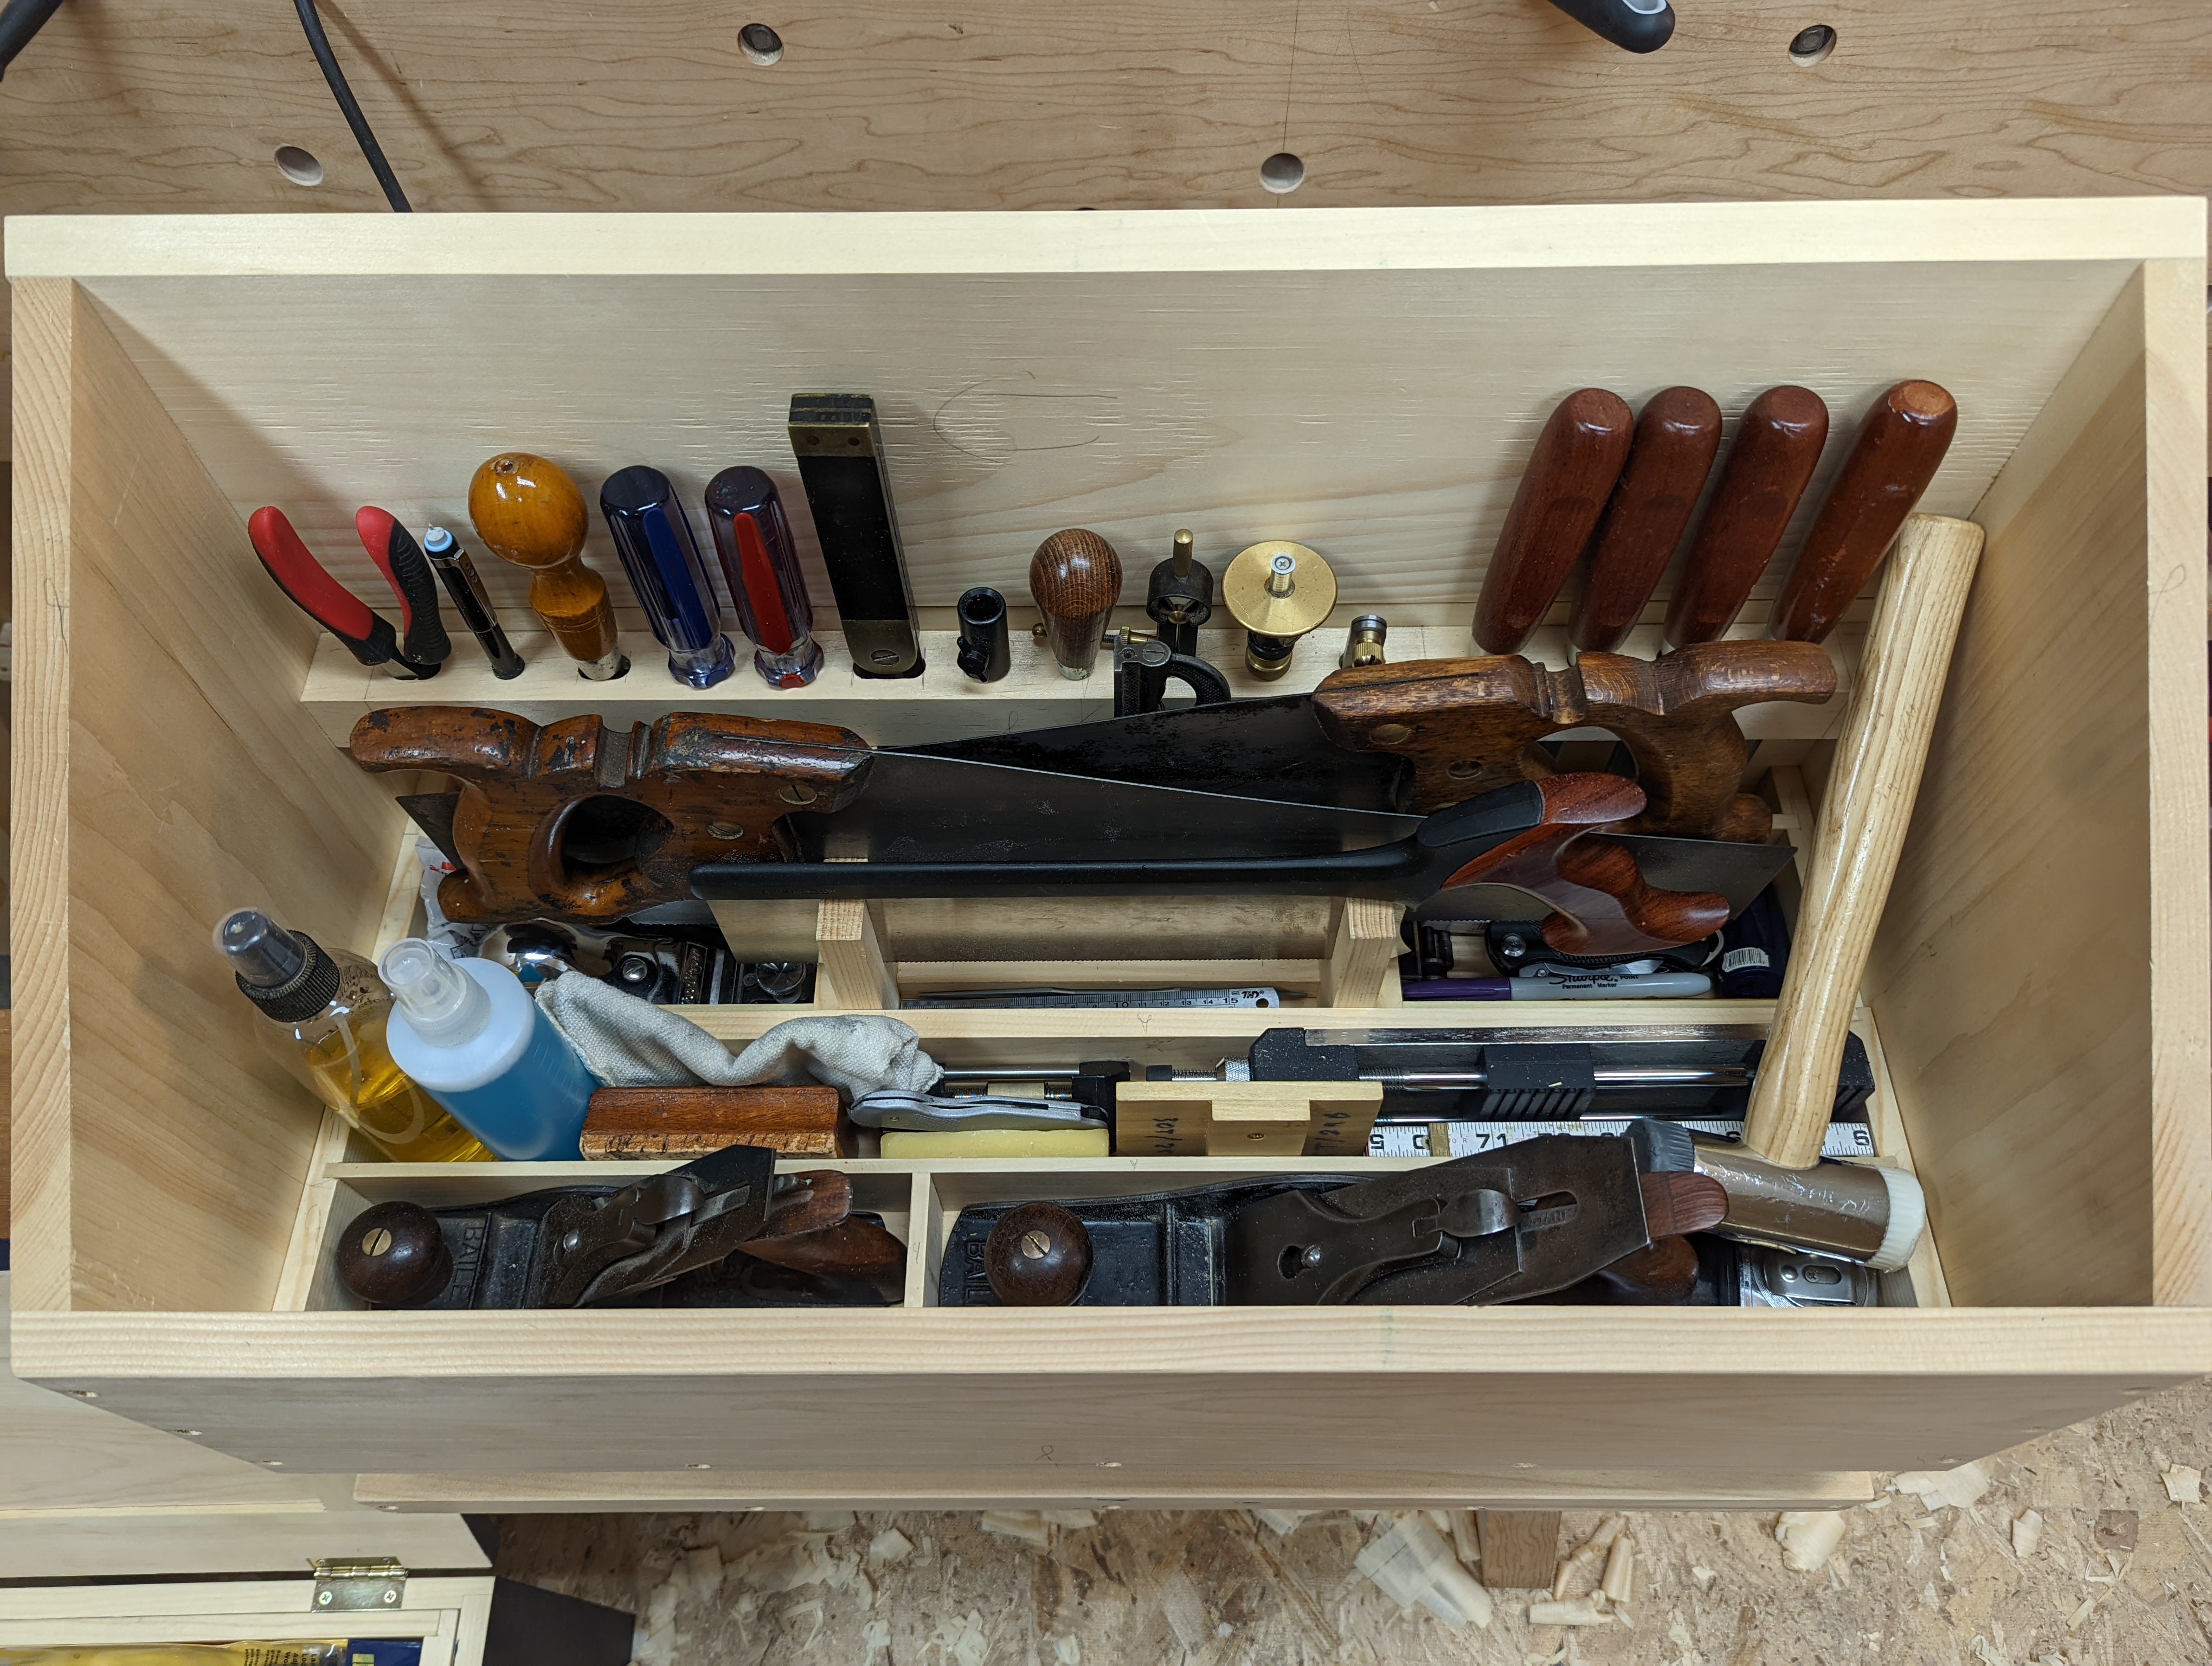
In my workshop (which is a 12×13 bedroom), I work out of a large Dutch tool chest (a “DTC”) in the Schwarz design from 2013. The chest lives to the left of the leg vise, pretty centered on the left wall of the room. In the main compartment of the chest (the “Well”), each of the primary tools (e.g., bench planes, back saws, hand saws, chisels, and other frequent-use tools) lives in a rack or a divided till and no other tool fits on that slot. A tool comes out, does its job, and goes back to its home. Directly below the Well is a drawer that holds longer, more fragile tools (e.g., rasps, paring chisels), as well as other small tools that wouldn’t fit nicely into the main well. This drawer is not French Fitted. And, honestly, it gets pretty cluttered.
The rest of the chest is two open compartments where tools are just piled in. The middle compartment holds tool rolls with augur bits, plane and joinery floats and gouges, plus the boring tools (braces and eggbeater drill). The bottom compartment holds a quarter set of hollows and rounds and my joinery planes, plus some drill and driver bits and sharpening slips (and a hammer that doesn’t fit anywhere else). A few odds and ends are strategically stashed throughout the chest.
But, like I said, that chest doesn’t ever move. When I woodwork outside or get called to a buddy’s house to fix something, I ask so much more of the tool chest I bring with me into the wild. That chest must not only hold (and organize) everything I need to do the job, but it must also keep everything secure and safe through the bumps and bruises of lugging it around. So let’s talk about French Fitting a DTC-style traveling tool chest.

Chisels and Other Handled Tools
When I begin planning tool storage in any tool chest, it starts first with a rack for chisels and other handled tools that attaches to an inner wall of the chest (the back wall, for a DTC). Christopher Schwarz has covered this topic in depth previously, but in my experience, starting with 1/2″ holes at 1 3/8″ centers does the trick. I like a 1 3/8″ x 1 3/8″ pine board for the rack. Although many tools will fit into the 1/2″ holes, a good portion of the holes must be elongated to fit, among other things, wider chisels. So a drill press is your friend here. Map out your strategy for this and pay attention to the width of the tool above the rack. For example, two marking gauges side by side will probably crowd each other even with 1 3/8″ spacing. So maybe find something with a narrower handle to put in between them to space things out. I like my chisels on the right side of the rack; others prefer the left side. Just don’t put them in the middle, though (for reasons that will be come clear in a bit).

Before I hang the rack to the inside wall of the DTC, I need two measurements. The first is how much below the top of the rack the largest chisel (in this case, 1″) will hang. Add 1″ to that and you get a rough height for the gap from the floor of the well to the underside of the rack. That extra inch should ensure both that your largest chisel will never hit the floor of the Well and also there is clearance for other, longer tools (e.g., a sliding bevel or brad awl). The second measurement is how much space that leaves to the top of the chest. If there is not enough clearance for the tallest tool in the rack, lower the rack until it the largest chisel doesn’t dig into the floor of the well but there is still clearance for the chest lid to close. Now affix this rack to the back wall of the chest with countersunk screws. I like to drive two from outside of the chest about 1″ from the ends of the rack, and one from the inside of the chest centered between the narrow chisel and the next tool to its left. This rack carries a lot of weight so attaching from both sides helps distribute the pressure.
Saws and Combination Square
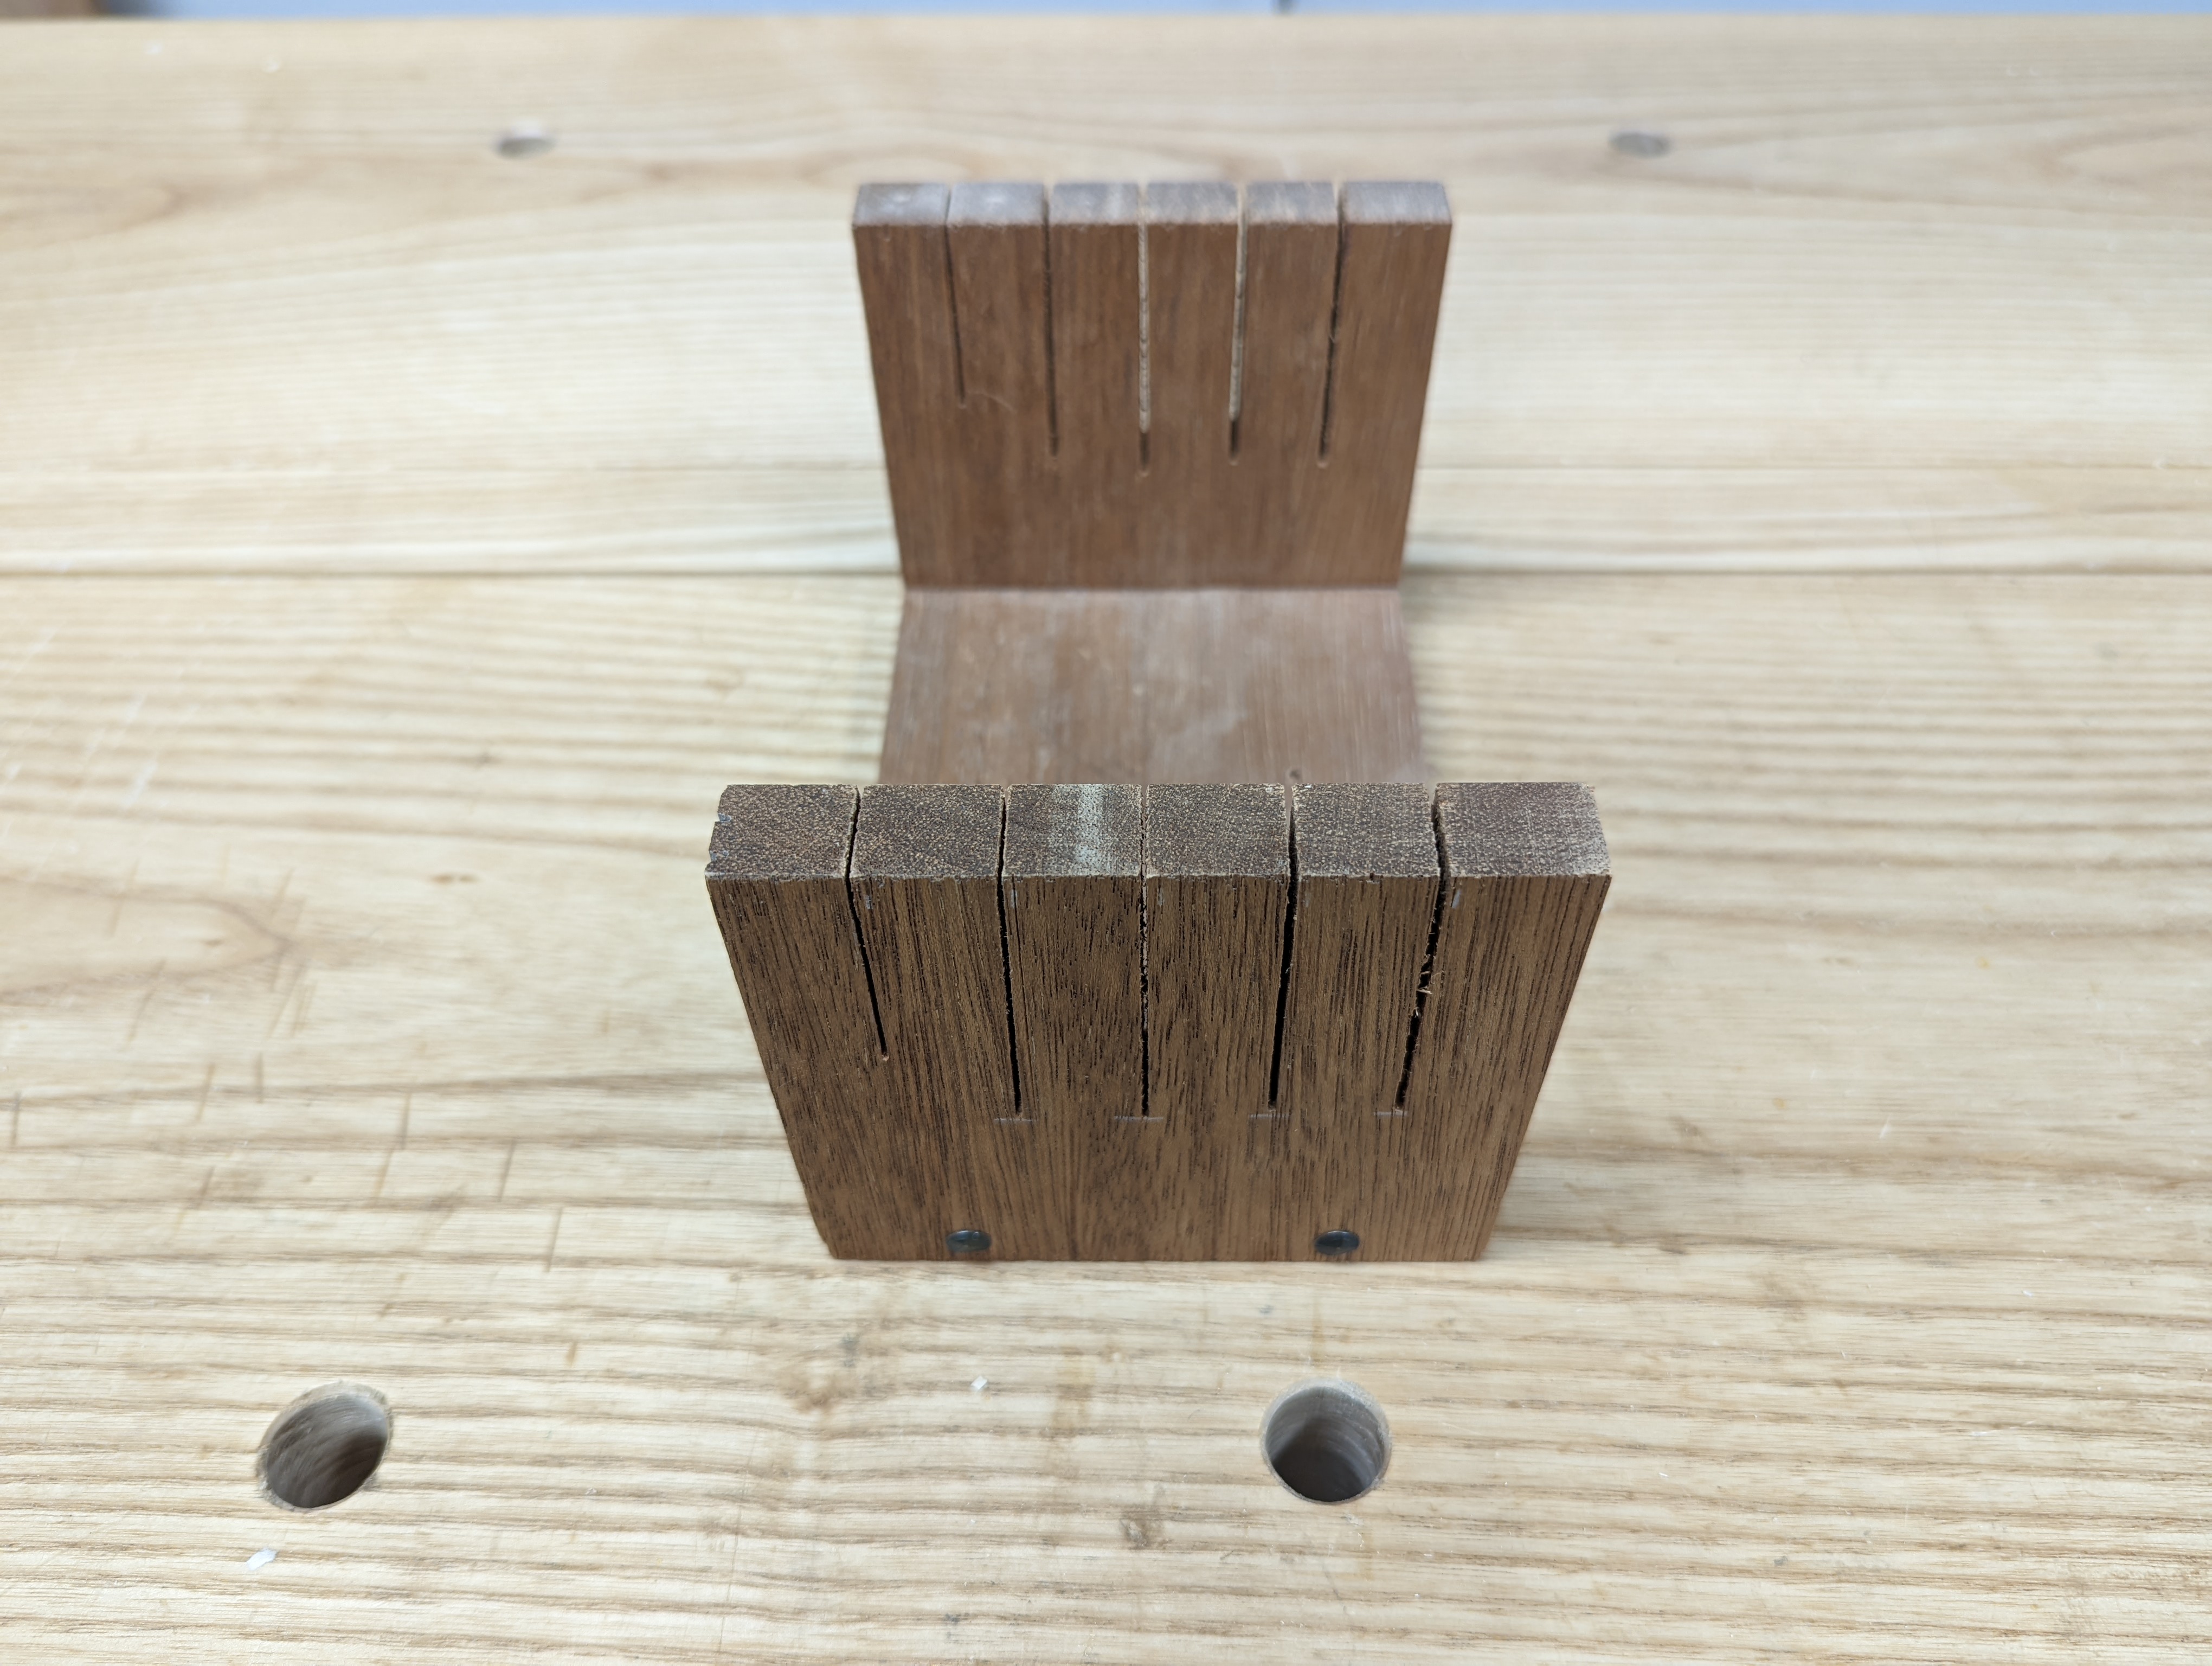
After the tool rack is attached, it’s time to make the saw till. When traveling, I carry three saws: a 12 TPI rip cut back saw (the Veritas ones are pretty nice and very durable), an 11 TPI rip cut panel saw (it also crosscuts) and a 6 TPI rip cut panel saw. The saw till I prefer is U-shaped and joined at the corners with either dovetails, finger joints or rabbets and nails. Pine is just fine here (and for eveything else), although any wood will work.
The saw till has slots cut with the saws that it will hold (3/4″ on center spacing works great for most saws) and its height is just whatever will friction fit below the tool rack (it adds even more support to prevent the tool rack from sagging). Remember to leave at least 2″ beneath the lowest slot and (at least for the backsaws) don’t make the slots so deep that the saw teeth don’t bite into the till itself. If there is room, I also add a 1/8″ slot for a combination square.
For this saw till, you can can just make ends and screw them in place from the outside of the chest and from the underneath. But I find a bridge in the middle makes the saw till easier to affix (and remove, if needed). Regardless, space the ends based on the saw plate of your shortest saw; an overall width of 2 inches less than the length of the saw plate should work for most saws. When you screw it in place, it should be roughly centered and tuck under the back till just 1/8″ or so. If done right, this saw till has the added benefit of also supporting the middle of the tool rack, which can sag over time.
General Small Tools
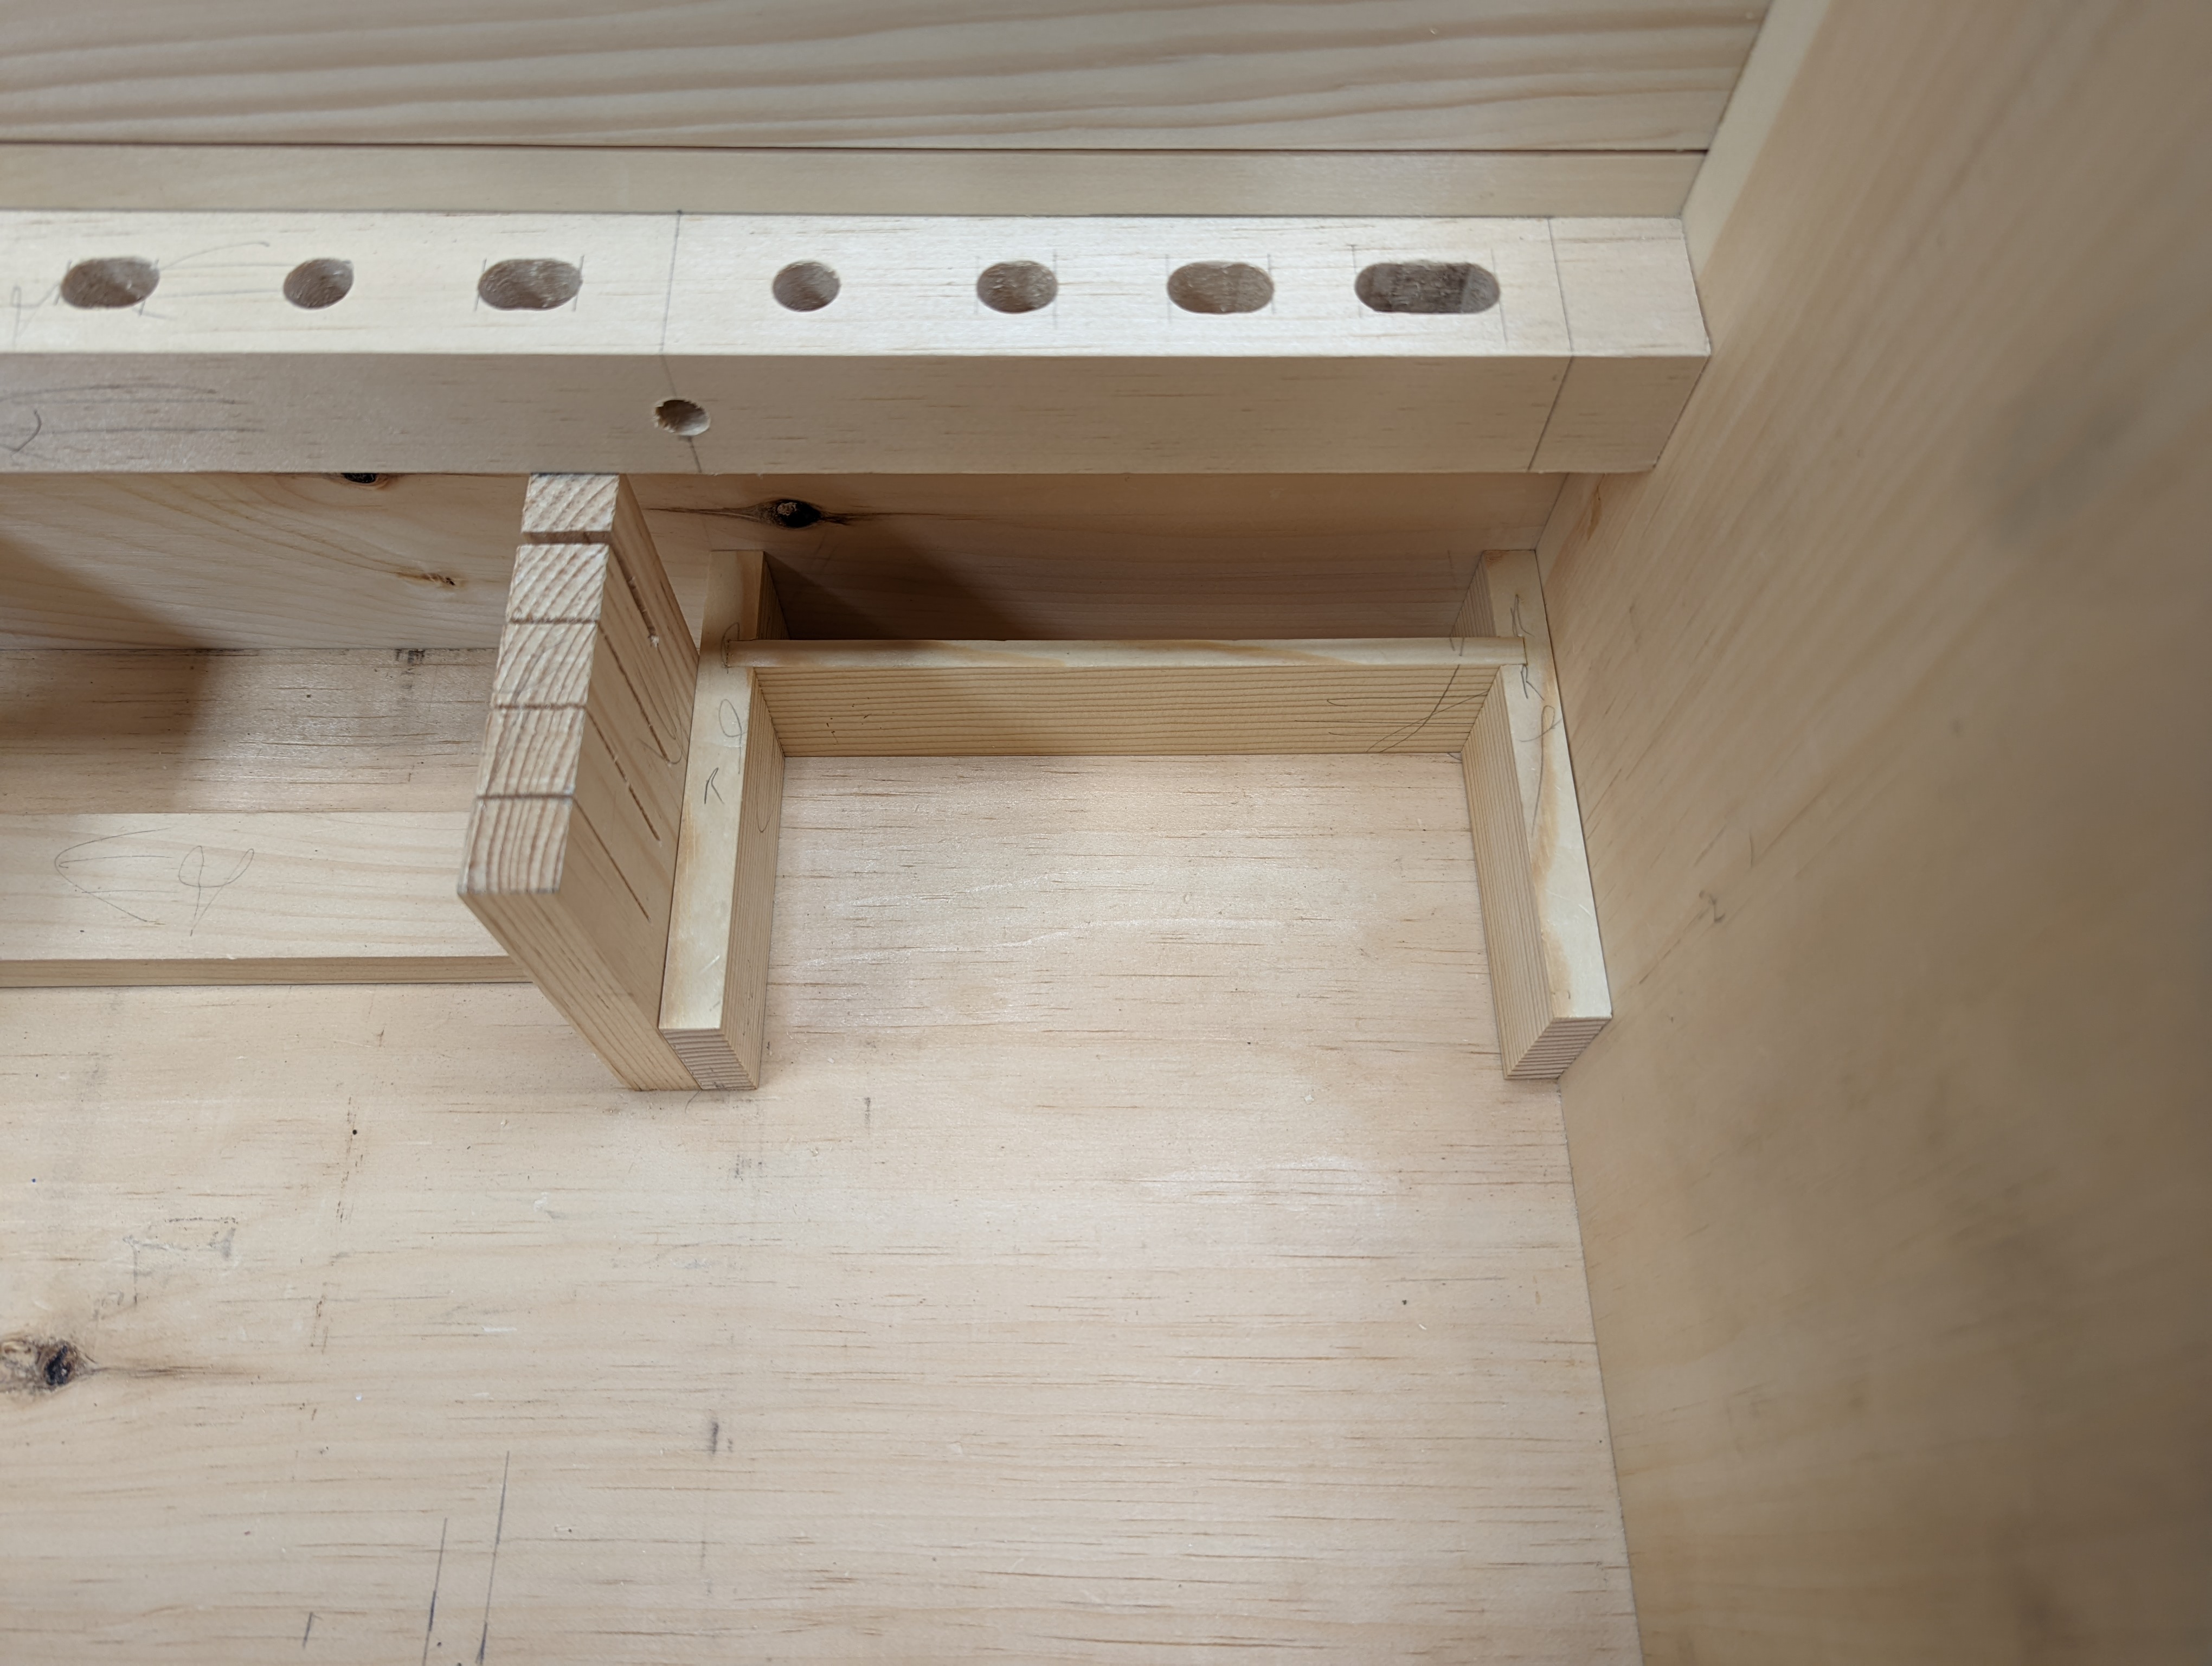
The tool rack and the saw till have now created 3 zones of tool storage. The front of the well is for planes and other large items (more on that in a moment). And on each side of the saw till (remember, you left at least 2″ beneath the saws) there is now a great place for general storage. I fill these zones with H-shaped semi boxes that are flush to the front of the saw till. The top of the H is a dead zone that protects the edges of the chisels and other edge tools as they hang down below the tool rack. We’ll call these the “general tills”.
These general tills are just friction fit into the spaces on each side of the saw till and will get closed off later. These general tills are a great place for things like nail punches, drill driver bits and other small items that don’t have edges to protect and can be piled in. You can also use the now-closed-in area below the rack and between the ends of the saw till for specialty storage. I keep my small router plane and dovetail guide there (both are tools I rarely use while outside or on site) that won’t damage anything if they rattle around a little bit.

Plane Till
We’ve now come to the most important part of the operation: the plane till. This is entirely based on the bench planes (and other items) you’ll have in the chest. In the case of my traveling tool set, I use a No. 5 1/2 and a No. 3, which (conveniently) fit in a single row of plane storage, so the second row in the plane till can be for other things. In a full size tool chest, you’ll probably need both rows for planes (I use a No. 7, No. 5 and No. 4 in my main DTC, for example). In fact, the length of these two planes, plus dividers, dictates the overall length of the tool chest itself.
Rabbets and nails are the order of the day when making the saw till. I used to dovetail these, but it’s too easy to undercut a baseline and get a bad fit lengthwise. If I used a table saw, I’d probably make these out of 1/4″ stock all around and just brad nail everything together after cutting VERY shallow rabbets. But with hand tools, 1/2″ stock feels better all around (except for the thin middle dividers).
When locating the divide between compartments that will hold planes, I find an extra 1/8″ of length all around works well for getting Bailey-pattern planes in and out of the plane till. For instance, a No. 5 1/2 is 15″ long and 2 3/4″ wide, so the compartment ends up being 15 1/8″ long and 2 7/8″ (or a hair under) wide. Don’t make them too tight, though; the difference between “secure” and “difficult to remove” is basically 1/16″ in each direction. Just FYI, the knob on smaller planes (like the No.3) extends past the toe. I learned that the hard way.

Aside from ensuring your planes sit snugly, the only other critical measurement here is ensuring the ends of the plane till take up whatever space is left between the front wall and the general tills, thereby locking everything in place. If you do have to build up part of the till to fit a smaller plane, glue that spacer to the plane till. That makes a pretty meaty strip for boring some more 1/2″ holes for extra general tool storage (when I get around to it, my nail punches and marking knife will live there). Just make sure the spacer is the same height as the rest of the plane till.

The last part of the plane till is (to use a Rex Krueger term) the “key”. It fits into the space between the general tills and the plane till and closes off the second row of the plane till. But don’t glue it to either the plane till or the general tills. As long as the fit is reasonably tight, it will lock everything in place but still allow you to pull the tills out if needed. I like like to add a couple of spacers to the back of the key, which complete the general till box and keep the general tills from pinching in on each other.


All things being equal, the Well should now be perfectly organized for the tools to be kept in there. There is space on the walls for pouches and magnets and whatnot to hold additional tools; just be sure not to obstruct anything coming in or out. You’ll probably need to remove a saw or two to reach the less commonly-used tools (like that block plane on the left side), but that’s just how traveling tool chests work. Success means striking a balance of security and accessibility.
With a little bit of thought, though, it’s possible to easily store everything you need for meaningful woodworking while also keeping your tools safe from the bumps and bruises of moving the chest around. All the same principles apply to shop storage, if you are so inclined (and I would posit that the edge tool rack and saw till are important for ANY type of tool chest, even with banks of sliding tills for everything).
This is all just a suggestion, of course. Use whatever organization method fits your style of work and tool set. I just want your tools to be safe, secure and ready when you need them.
And that’s it for now. Next week, we’ll examine in more detail the “just keep it open and pile it in” method. Natch.
JPG

So you have an editor now, nice!
LikeLiked by 1 person
Lol, no. It’s just me.
LikeLike