toolchest

Moulding Plane Cubby

When I first built my wall-hanging tool chest, I had only a handful of moulding planes. Basically a quarter set of hollows and rounds, plus a wooden fillister (rabbeting) plane. So the little cubbies at the bottom were more than sufficient for both those and my couple of joinery planes.

Being a 3/4 metal tongue and groove plane, large router plane, and combination plane.

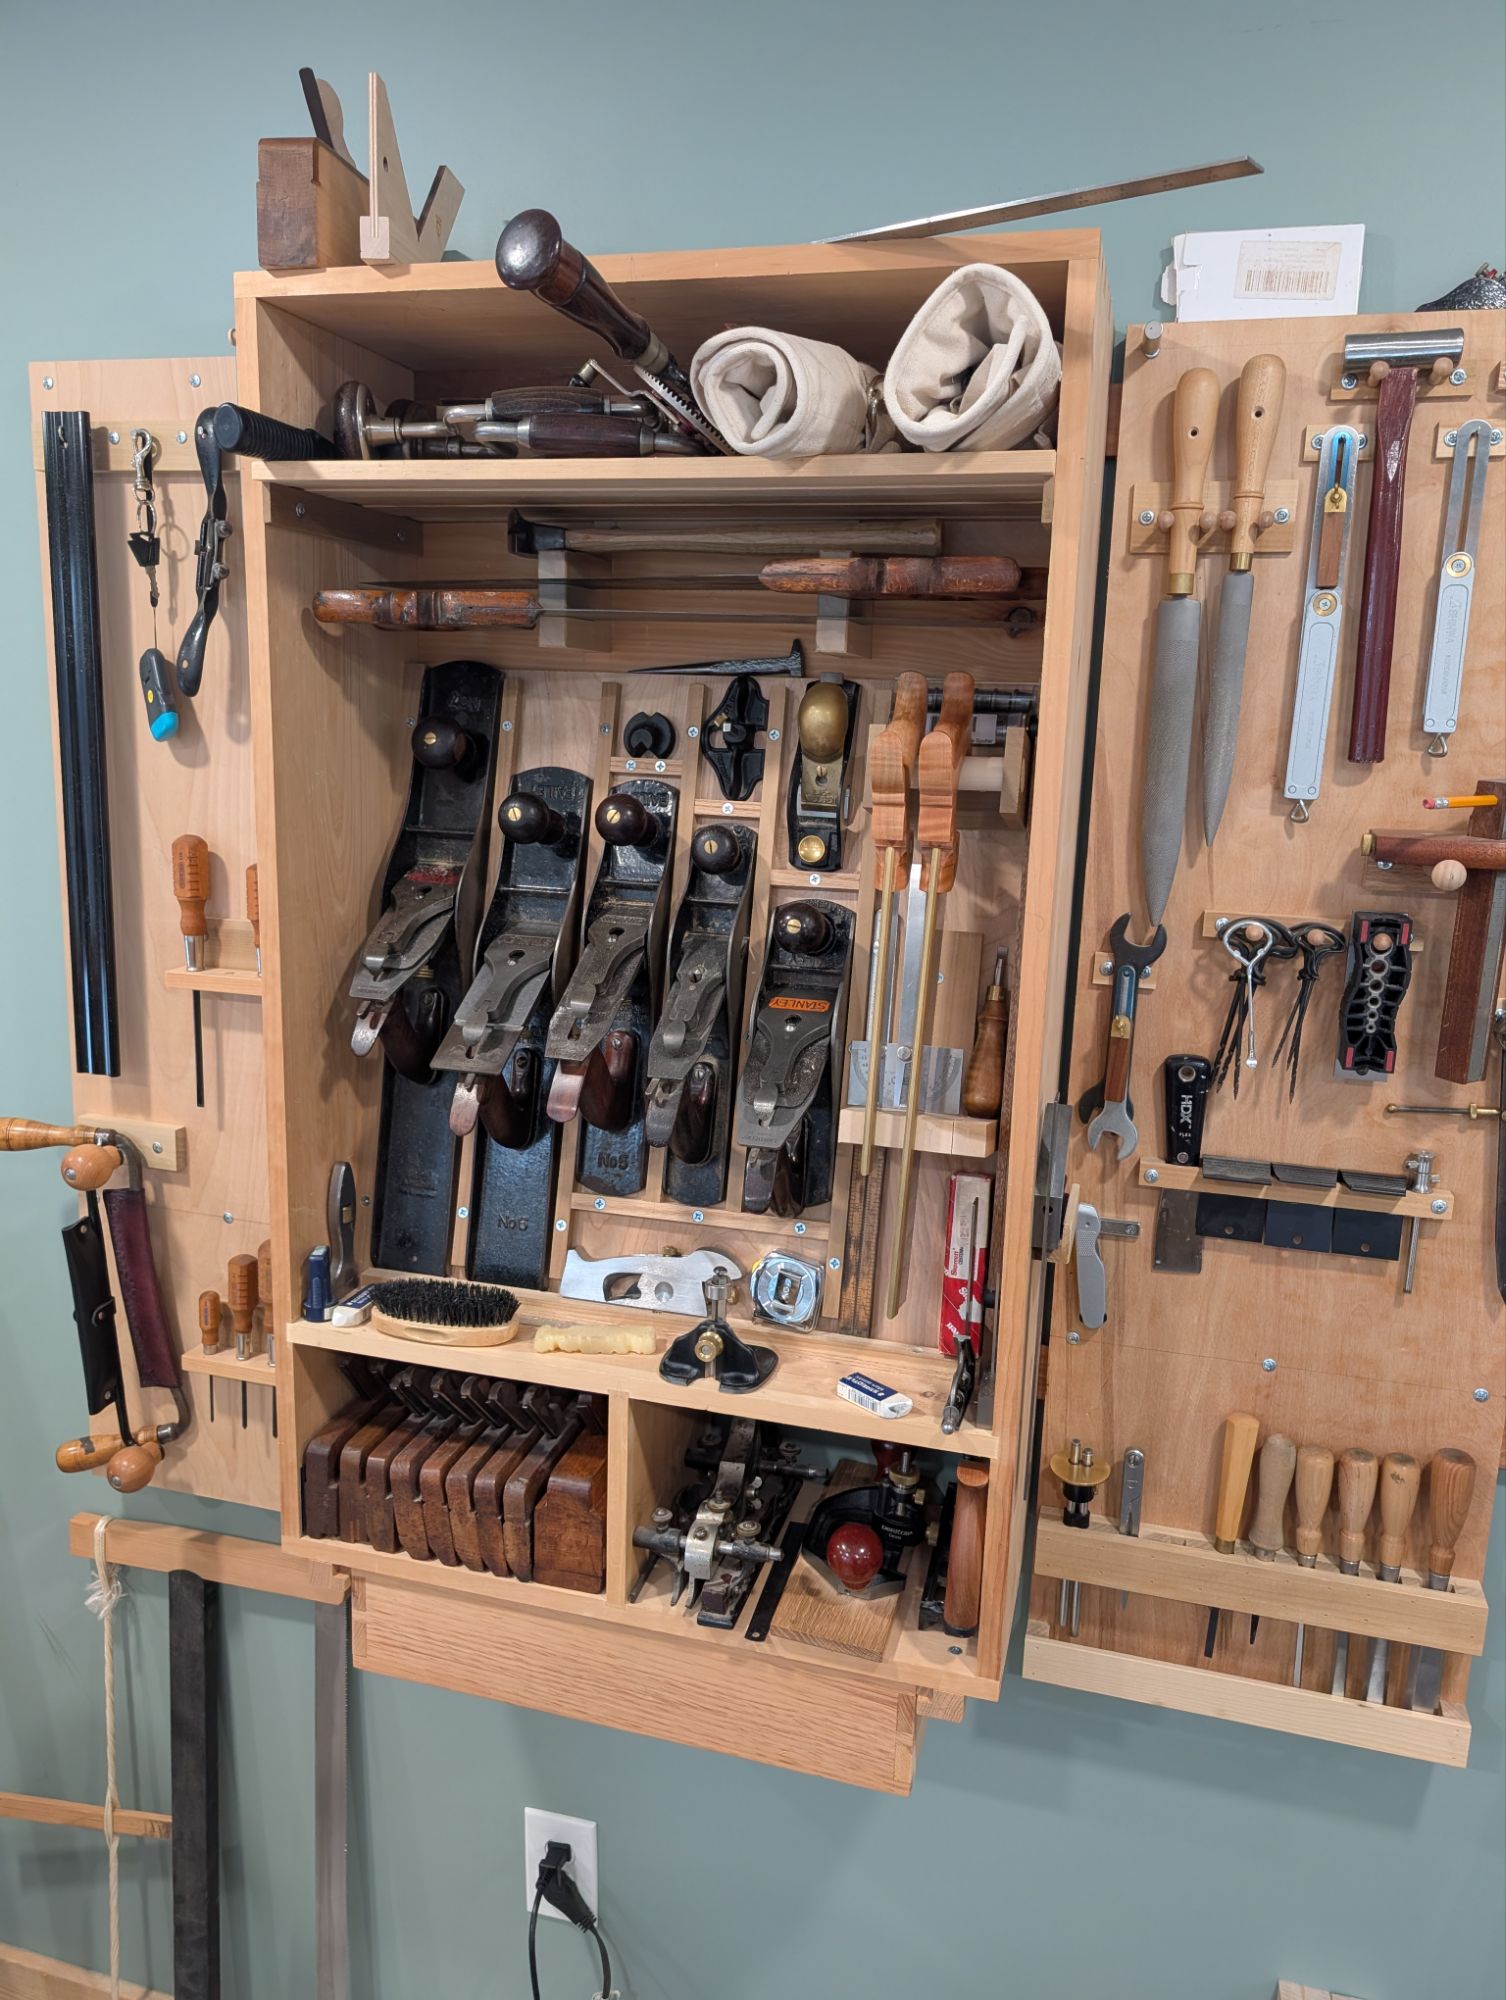
But since then, I’ve accumulated more worker moulding planes, including a few beading planes, two more tongue and groove double planes (for 9/16 and 7/8), some rabbet/shoulder planes, and so on. So on a snowy weekend in Southern New England, I made a new moulding plane cubby.

When your dovetails fit nicely, the clamp on the dado is all your need.

The dimensions are exactly the same as the lower cubbies, other than a little extra depth (since I don’t have to account for the French cleats. Once the glue dries, I’ll run a few screws into the dado board (more for peace of mind than actual fastening) and screw this new cubby down to the top of the current wall cabinet. The joinery is very much overkill (pocket screws or even rabbet and nails would have been more than sufficient for this, as it will experience no significant forces). But I needed the dovetail practice for another project.

I prefer larger pins. Larger than English style, anyway. Not quite Central European.

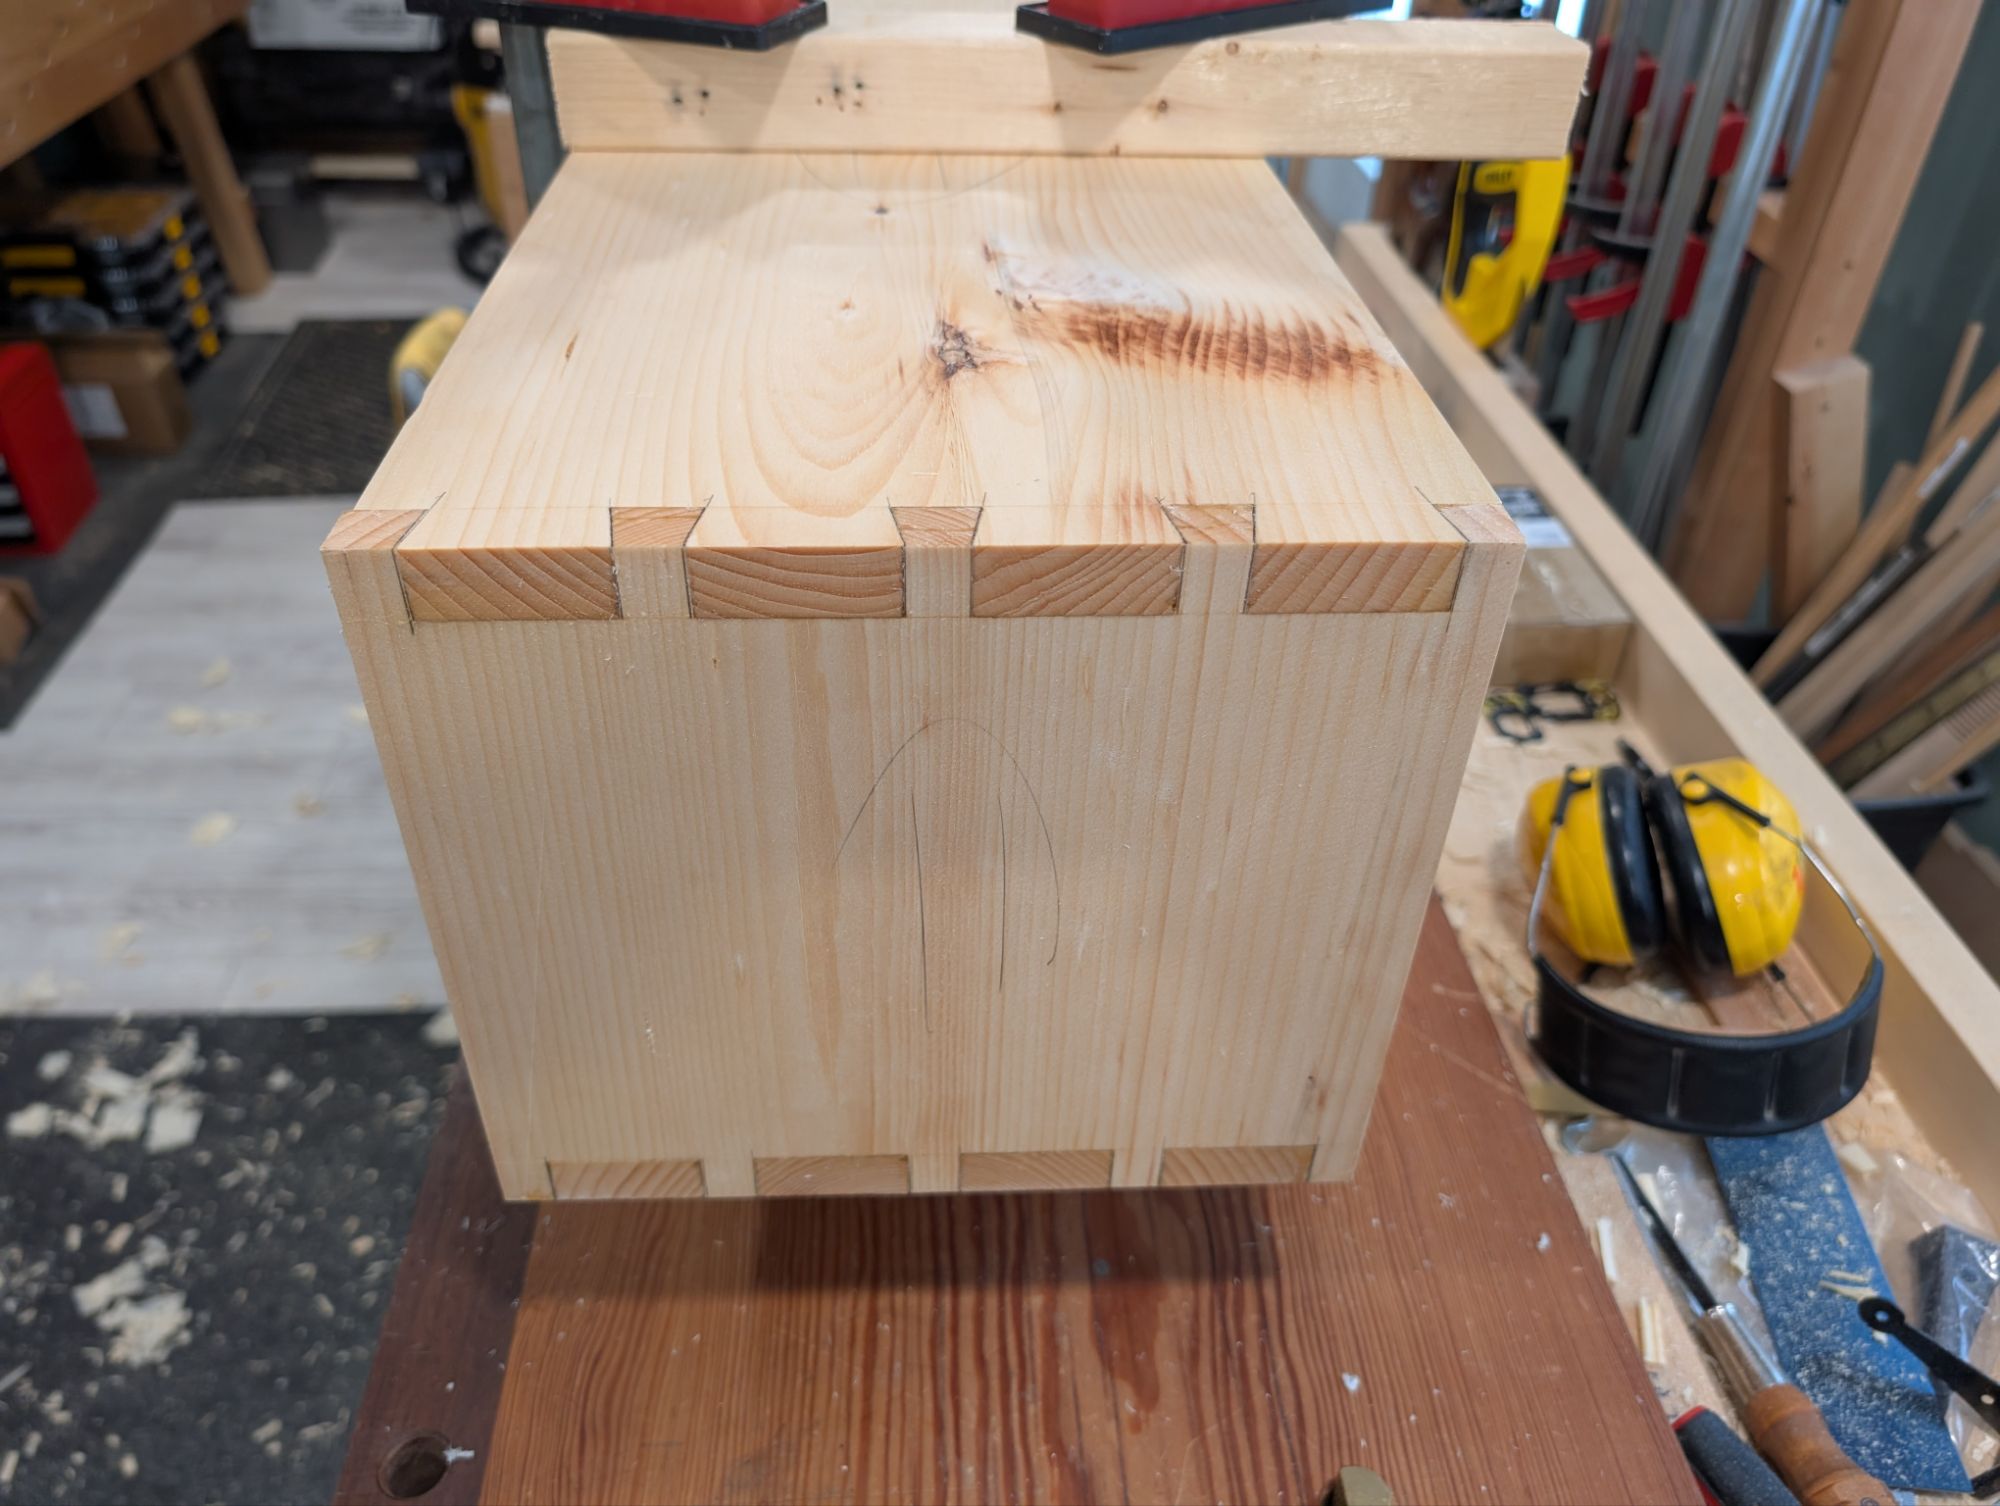
The wood for this little cubby is pretty scruffy. It’s just a home center white pine 1×12, planed flat and thicknessed to about 11/16. Even home center white pine isn’t usually this brittle and stringy, though. It’s basically the definition of “deal”. And deal is useful for many things, including shop projects.

If I ever get around to remaking my wall mounted tool chest in nicer wood (this was, after all, just a prototype), I will probably add this cubby into the main carcass. I have some old genuine mahogany that I’ve been saving for that in particular. But that’s a long way off.

In any event, I hope everyone is staying warm and dry.

JPG

New Year’s Day, 2022

Another year has passed. As is my heathen wont, I went to bed early last night, stone sober and well hydrated, and hit the shop early this morning. I like to begin each year on my own terms. And then ride out the downhill trajectory from there.

In advance of my regular January vacation, I’ve been making a “gentleman’s tool chest” for a core set of hand tools. Now I’m no gentleman (or so I’ve been told), but as I understand it, the “gentleman” refers simultaneously to (x) a non-professional woodworker and (y) the smaller set of tools a non-professional joiner or cabinetmaker would have in their chest. So maybe I am a gentleman.

This particular tool chest is a modest 25″ long, 11″ deep and 11″ high and will have 2 sliding tills. The planes and sharpening gear are french fit into the tool well and there won’t be too much lose gear rattling around. It’s also intended to be a general around-the-house toolbox holding my nicest spare tools so it will move around a fair bit.

Still one more sliding till to make.

In any tool storage build, like in life, there are compromises. For example, there is not any room for joinery saws in this chest, but I have modified a 10 tpi rip saw (it crosscuts too) and a 6 tpi rip saw to have shorter plates. I say modified; I cutoff about 5 inches from the toe of each saw with an angle grinder and filed off the burrs. The shorter plates are stiff enough for precise sawing as needed (and everything gets cleaned up with chisel or router plane anyway).

It’s also rabbeted and nailed, not dovetailed. Cauls help keep everything flat when nailing together.

The full kit this holds is as follows:

  • Planes: No. 5 jack plane, No. 3 smoothing plane, Low-angle block plane, small router plane
  • Saws: 10 tpi rip cut panel saw (18″ plate): 6 tpi rip cut panel saw (18″ plate)
  • Chisels: 1/4, 1/2, 3/4, 1 inch bench chisels, carver’s mallet
  • Marking and measuring: 12″ combination square, 8″ machinist square, wheel marking gauge, 12 foot tape measure, folding marking knife, mechanical pencils
  • Boring: Two jaw, short sweep brace, plus hex adapter, large diameter adjustable auger bit, drill bit set, hand countersink
  • Sharpening: 120, 220, 1200 grit diamond plates, side clamp honing guide and setup block, plus glass cleaner and jojoba oil
  • Miscellaneous: Warrington-pattern hammer, slotted and phillips screwdrivers, cork sanding block, foam ear plugs (lots of these)

I’m sure there is something I’m forgetting (I can supplement this later), but I find the above set of tools is everything one needs for general woodworking projects that aren’t intended to be the finest furniture. I can take rough lumber to dimension with these tools and do crisp joinery by hand without too much fuss. I will likely make or purchase a medium router plane to fit this chest, as well as a set of wooden winding sticks and a wooden straightedge.

As I write this, the second till is glued and nailed and drying in the shop. So that means only one thing: it’s lid time.

And that’s the point at which every tool chest build starts to get tedious.

Happy New Year, everyone!

JPG