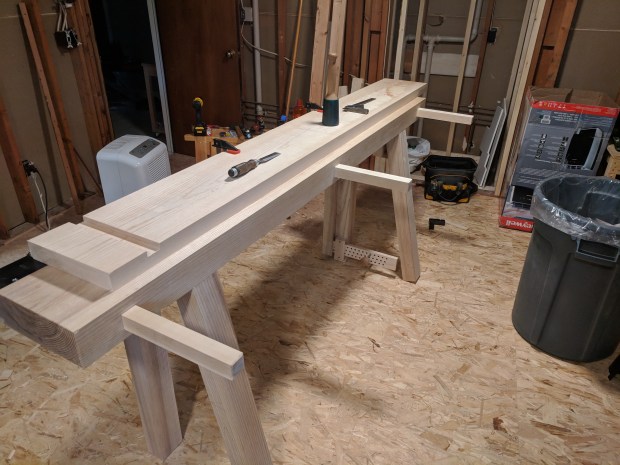
My new workbench is just about done. The only thing left to do is finish fitting the bench top extension to the posts that are now mortised into the back edge of the main slab.
My silly little workbench experiment.
When I say “fitting to the posts” what I really mean is jointing the edge of the extension to match the edge of the slab. I marked the dadoes in the extension against the posts themselves, so it’s really just an incremental trial-and-error process to get a good seam between the two benchtop pieces.

This is what it looks like when all pulled together.
There are a few things to address which have come to light as I use the bench to finish up the bench, most of which relate to its tendency to scoot a little bit under heavy hand-planing.
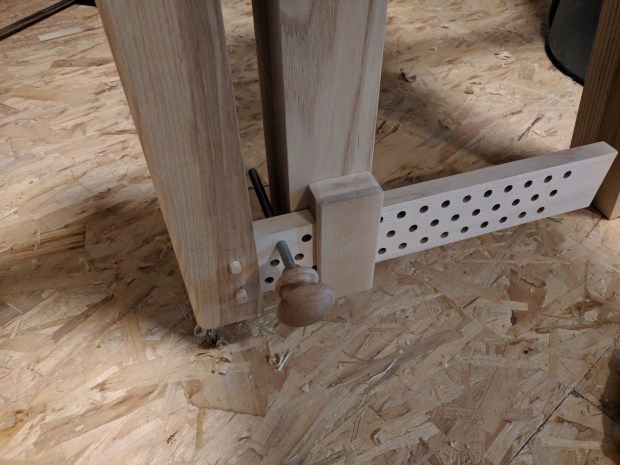
First, without stretchers or a shelf full of detritus, the bench is a smidge on the light side. To address this, I plan to do two things to add some mass: (i) add some mild steel bar stock (or maybe just laminate on some additional wood) to back face of the the angled rear legs, and (ii) add some steel angle iron to the underside of the seam between the main slab and the extension. The angle iron has the added benefit of shoring up the area between the posts, which can sag a little bit under heavy weight (I should have used four posts, honestly).
Second, the bench is a little bit taller overall than I’m used to (around 36.5″). As a result, and because of the limitations of the available stock, the back legs don’t have full contact on the ground. I’ll work with the bench a bit before I decide if I need to lower it, but doing so will have the added benefit of increasing surface contact under the back legs. If the height ends up working out, I may instead just fit and glue some overlong wedges onto the ends of the back legs (which will slightly extend the footprint). Either way, I plan to add some non-skid stair tape (i.e., adhesive backed, coarse grit sand paper) to everything to increase traction.
Finally, there will probably be at least one stretcher on the bench in order to reinforce the leg vise assembly. The front leg is mortised into the benchtop and the pin board is mortised into the vise chop (and both are drawbored and glued in place). But I still fear the pressure from the leg vise levering against the bottom of the leg will over-stress those joints. A single stretcher to complete the triangle should be enough to enforce the mechanics while still maintaining the integrity of the stretcher-less design for the workbench.
Probably to be added just above the level of the pin board.
All in all, this bench has turned out better than I could have hoped. There are some holes to bore and some surfaces to level, but I am genuinely pleased with how everything came together.
In the next installment, I’ll walk through the specifics of the leg vise, which is completely DIY (including a screw I turned myself on a Beall wood threader), as well as address the disparity between the depth of the benchtop and the overall footprint of the skewed back legs.
JPG

I have seen folks use a piece of tire tube contact cemented to the legs to help prevent movement which seemed novel. It might help reduced the wear from the anti skid tape on your wood floor. Just an alternative to think about.
Love the bench
LikeLiked by 1 person
Interesting. My floors are OSB so not too much if an issue, but I’m always looking for non-skid options.
LikeLike
Coming along nicely. This will be a great looking bench. Kudos!
LikeLiked by 1 person
The bench is looking really good.
An advantage of not having a stretcher is that it is much easier to fit e.g. a tool chest under the bench.
That s kind of hard to do if there’s a set of stretchers both on the front and the back.
Brgds
Jonas
LikeLiked by 1 person
Agreed. Although in this case it’s saw benches and a bench slave or two.
LikeLike
That’s cool and all, but can you build a foos table? Hope you are doing well James! – Fletch
LikeLiked by 1 person
I build a mean Beirut table, at least. You too! Will DM you on FB.
LikeLike