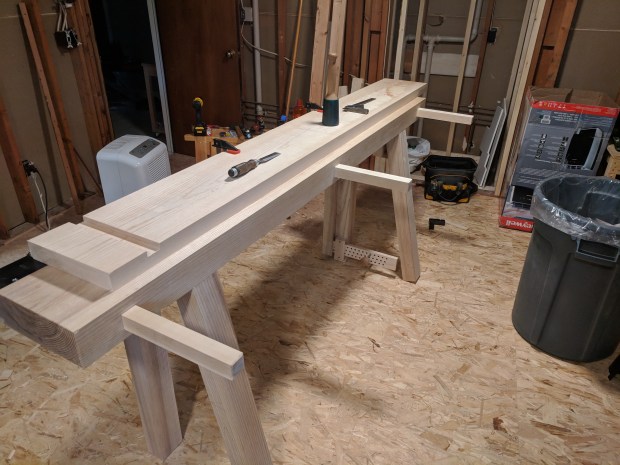
So I am substantially finished with my new work bench, which is a sort of reproduction of the weird, stretcherless Shaker, Stent Panel-esque workbench from Pleasant Hill.

Sorry for the shadows. I couldn’t find my front lighting bar.
Made entirely from Ash (other than the hard-wearing vise parts, which are Hard Maple), the main bench consists of a slab that is 86″ long, 12.5″ deep and a hair under 4″ thick. The legs, which are cut from the same piece of timber as the slab, are mortised into the slab. The front legs are flush with the front of the slab and double drawbored in place. The back legs, which are also mortised into the slab, splay outward at about a 14 degree angle and are further secured with two square head lag bolts each. The slab itself is oriented with the heart side up, with grain running left to right.

Yes, there is a leg vise.
The leg vise is based around a 1.5″ Hard Maple screw turned using a Beall Tool Company Big Threader. The vise chop is a single piece of 12/4 Ash with a bunch of runout (and so has a particularly nice figure on the face) that is about 6″ wide (compared to 4″ on the leg itself). The vise hub is Ash, made roughly round by hand with a spokeshave, some rasps, and much patience. A temporary handle of 3/4 walnut dowel pierces the hub.
The vise jaw is joined to the vise screw with a Hard Maple garter that is screwed to the face of the vise jaw. The leg vise has a depth of about 8.5″ and an overall capacity of about 5″, but I haven’t tested its limits. The vise works through a Hard Maple pin board, that accepts a 3/8″ mild steel rod that is epoxied into a Hard Maple Shaker-style drawer pull. The holes need to wear in a bit, but it works quite well from the outset. Other than the garter screws, the screws that hold on the vise nut to the back of the leg (which is also hard maple), the screws that hold on the parallel guide at the bottom of the leg, and the pin itself, there is no metal in the leg vise assembly.
The leg vise is accompanied by a Veritas inset vise with a row of holes for round 3/4″ bench dogs which are 2″ on center from the front edge of the benchtop. I will bore a few 1″ holes in the slab for my Crucible Tool holdfast, as well as some holes in the front right leg for some Grammercy Tools holdfasts, once I figure the layout. Please ignore the patch in the front light leg seen in the picture above, which covers a plugged and epoxied hole from an aborted bore. I was having a bad day.
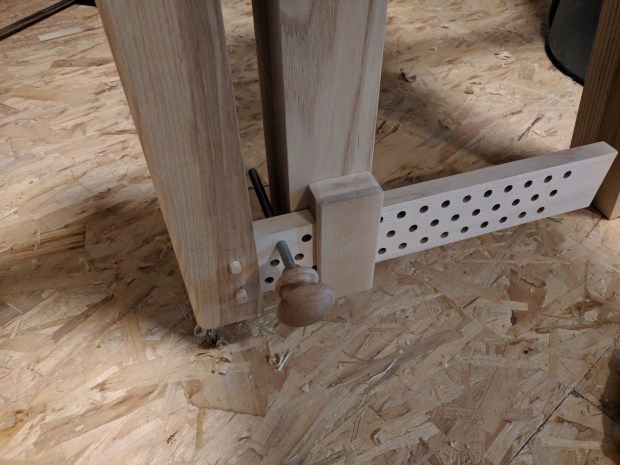
Prior to cleaning up the drawbores and actually securing the parallel guide.
The benchtop is extended by another 10″ or so through a length of 8/4 Ash, supported by three 1.5″ square posts which are mortised directly into the slab. The 8/4 extension is lightly glued along the edge joint and on the first 2 inches or so of each post. Angle iron lines the underside of the seam to prevent any sagging between the posts. Like the mains lab, the extension is oriented heart side up, with a grain direction that runs left to right.
Cutting these dadoes was the most enjoyable part of the entire build.
So let’s talk about this style of workbench, which has been an exhilarating intellectual exercise that I do not regret. That being said:
This is NOT the easiest way to build a workbench. Angled back legs, as pretty as they are, are not to be undertaken lightly. Going stretcher-less provides a bit of leeway on the exact angles, but I spent way too much time with a flashlight and a bevel gauge checking the angles on the mortises. Furthermore, angled mortises mean angled shoulders on the tenons, which must be closely matched to get a well-seated joint. In retrospect, I’d have been better off doing 2″ round tenons for the back legs, which would have saved me about 10 hours of fiddling.
In any event, adding the posts to support the benchtop extension was by far the most difficult and tedious part of the build (even more so than the angled mortises for the back legs). Getting the post to stick out from the back slab at exactly 90 degrees was no trivial task, either. It took several hours with a shoulder plane and winding sticks to get all three posts perfectly aligned. But all the work paid off and once the extension was in place it took only a few passes with a jointer plane to level the extension with the main slab.
So why would someone build a workbench this way? There can be literally only one answer: efficient use of the available materials. If the only thick timber I had at my disposal was a single, narrow-ish slab, this is exactly how I’d build a workbench. The bench is stout where it needs to be and good enough everywhere else. But because it is not thick timber all around, it suffers a bit in overall weight. With tools and work piled on the bench, it’s fine. But on its own, it scoots a tiny bit under heavy planing load.
One second thought, there may be another reason to build a bench this way: atonement for one’s sins. Because at times this build felt positively Sisyphusian.
Now to make the bench slave, after which I can officially get rid of my old workbench.
JPG

Nicely done. I wonder if the legs were tied together via stretchers whether it might walk. Legs flex a tiny bit when not interconnected with others but perhaps these are stout enough not to have that problem.
LikeLiked by 1 person
Seems like just a weight thing not a vibration thing. Will clamp on a board and test, though.
LikeLike
Very nice! I’d like some details on your tenons. Did you have the tenons follow the angle of the rear legs or make them 90 degrees to the bench top?
LikeLike