Once upon a time, I made a leg vise with a cog on a wooden screw instead of a pin board. I worked with it for about four months and can definitively say that I prefer it to a pin board. But 1.25″ for the wooden screw is a bit thin, in my opinion. So when it came to install a leg vise on the new workbench, I took the chance to perfect the form and use a full 1.5″ screw and a beefier cog.

Still need to shape the vise chop a bit.
The main screw for this leg vise is scavenged from the prior leg vise. It’s just one of those European screws marketed as a “tail vise” screw. I had intended to make a new wooden screw with my JJ Beall Big Threader, but none of my 1.5″ dowel stock is straight enough along. So I scavenged the screw from the leg vise on the reclaimed maple console table, which has over 12″ of thread.
The cog is 8/4 quartersawn white oak. It’s dense and stable and was honestly the only 8″+ wide stock I had already milled. What matters is it’s large enough that the teeth of the cog will protrude beyond the edges of the chop, so it is easily worked with your feet.
The cog is pretty easy to make, if you take it in steps. I began my marking and drilling out on the drill press the 1 3/8″ center hole for tapping, and eight 1.5″ holes to form the teeth. Eight teeth is plenty. Everything gets a light chamfer with a trim router.

I find it’s easier to do the boring when it’s part of the larger board.
It’s then trimmed to final size, first cut to square, then the corners taken off at 45 degrees. I ended up taking another 1/8″ or so off each side, so the teeth of the cog weren’t quite as sharp. Everything gets one more set of chamfers and hand sanding to break any more sharp edges.
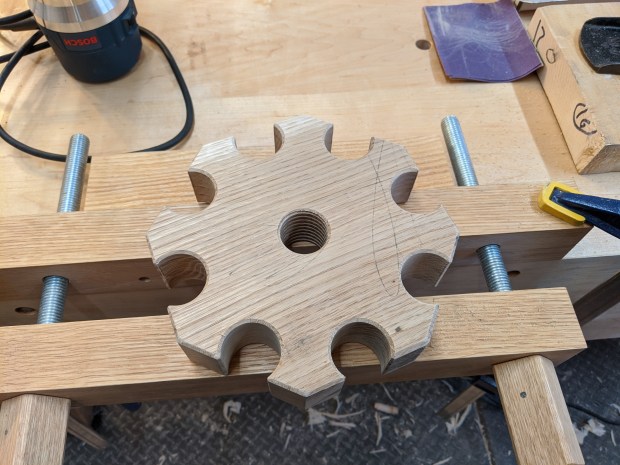
The flat face points inward, where it contacts the leg.
All that’s left is to bore the hole in the chop for the cog screw. Don’t bore it too deep. You need at least 1/2″ of wood for the screw to press again. Otherwise, it might blow out if you’re really cranking down. I just use wood glue (although epoxy would work too) and I make sure the screw is perfectly perpendicular to the vise chop. You could angle it slightly upward (to create natural toe-in alignment), but I don’t think it’s necessary if your main screw is otherwise perpendicular.

Keep track of your reference surfaces and alignment is a breeze.
This cog has some real heft to it. A decent spin with the foot and the cog spins under its own momentum. A real improvement over the 1′ hard maple cog on the last workbench. I will say the angled chop makes it a slightly harder to get at on the right side (the tightening side). But it’s not too much effort.
Is this method more economical than a criss-cross or a pin board? Not really. But it works great and I highly recommend it. Just remember to ream the hole in the leg vertically. Otherwise, the cog screw will bind if it’s not perfectly in alignment with the main screw.
JPG

I guess uhcvxccx cc you ç TC uhcvxccx don’t ok on I k
Em seg, 20 de abr de 2020 11:01, The Apartment Woodworker escreveu:
> The Apartment Woodworker posted: “Once upon a time, I made a leg vise with > a cog on a wooden screw instead of a pin board. I worked with it for about > four months and can definitively say that I prefer it to a pin board. But > 1.25″ for the wooden screw is a bit thin, in my opinion. So wh” >
LikeLike
Smart improvement.
LikeLiked by 1 person
Almost like doing a Bolt Circle. It’s not hard, like you said.
LikeLiked by 1 person