Making a marine cutting board with breadboard ends and don’t own a plow plane?
Solution: tiny mortises (with drawbores).

It’s a mortise and it’s tiny.
Two down. Two to go.
JPG
Making a marine cutting board with breadboard ends and don’t own a plow plane?
Solution: tiny mortises (with drawbores).
It’s a mortise and it’s tiny.
Two down. Two to go.
JPG
Today is my last day at the only law firm I’ve known so far. I have called this firm home since 2008 (plus the summer of 2007), and the leaving is bittersweet.
On the one hand, I am leaving behind some wonderful, brilliant and caring people who have accepted me and my quirks for most of a decade. On the other hand, it was time to make a lifestyle change – the hours at a large Manhattan law firm are arduous and I’m looking forward to more time in the shop.

There should be a whole lot more of this.
Once I join my new law firm in August, I should have a bit more time for woodworking and certainly added time for writing about woodworking.
Thanks for being a part of the Apartment Woodworker family. Small changes and big things are ahead.
First thing tomorrow, I’m hitting up the lumber yard for some tool chest carcase pine. But for now, it’s time for a nap.
JPG
Any sufficiently advanced technology is indistinguishable from magic.
I would daresay this adage also applies to craftsmanship. What I can do with a plane or a saw or a chisel would be, to 25-year-old me, a miracle. What some people can so with carving tools or a lathe is, to 33-year-old me, absolute witchcraft.
And that is why we practice and toil. So that we can be the sorcerers of tomorrow.
JPG
In prep for the medium-size wooden tool chest project, which I plan to knock out starting next week, I’ve been practicing my dovetails. Some benchtop tool storage was far overdue, so I took the liberty of knocking together a few dovetailed boxes.
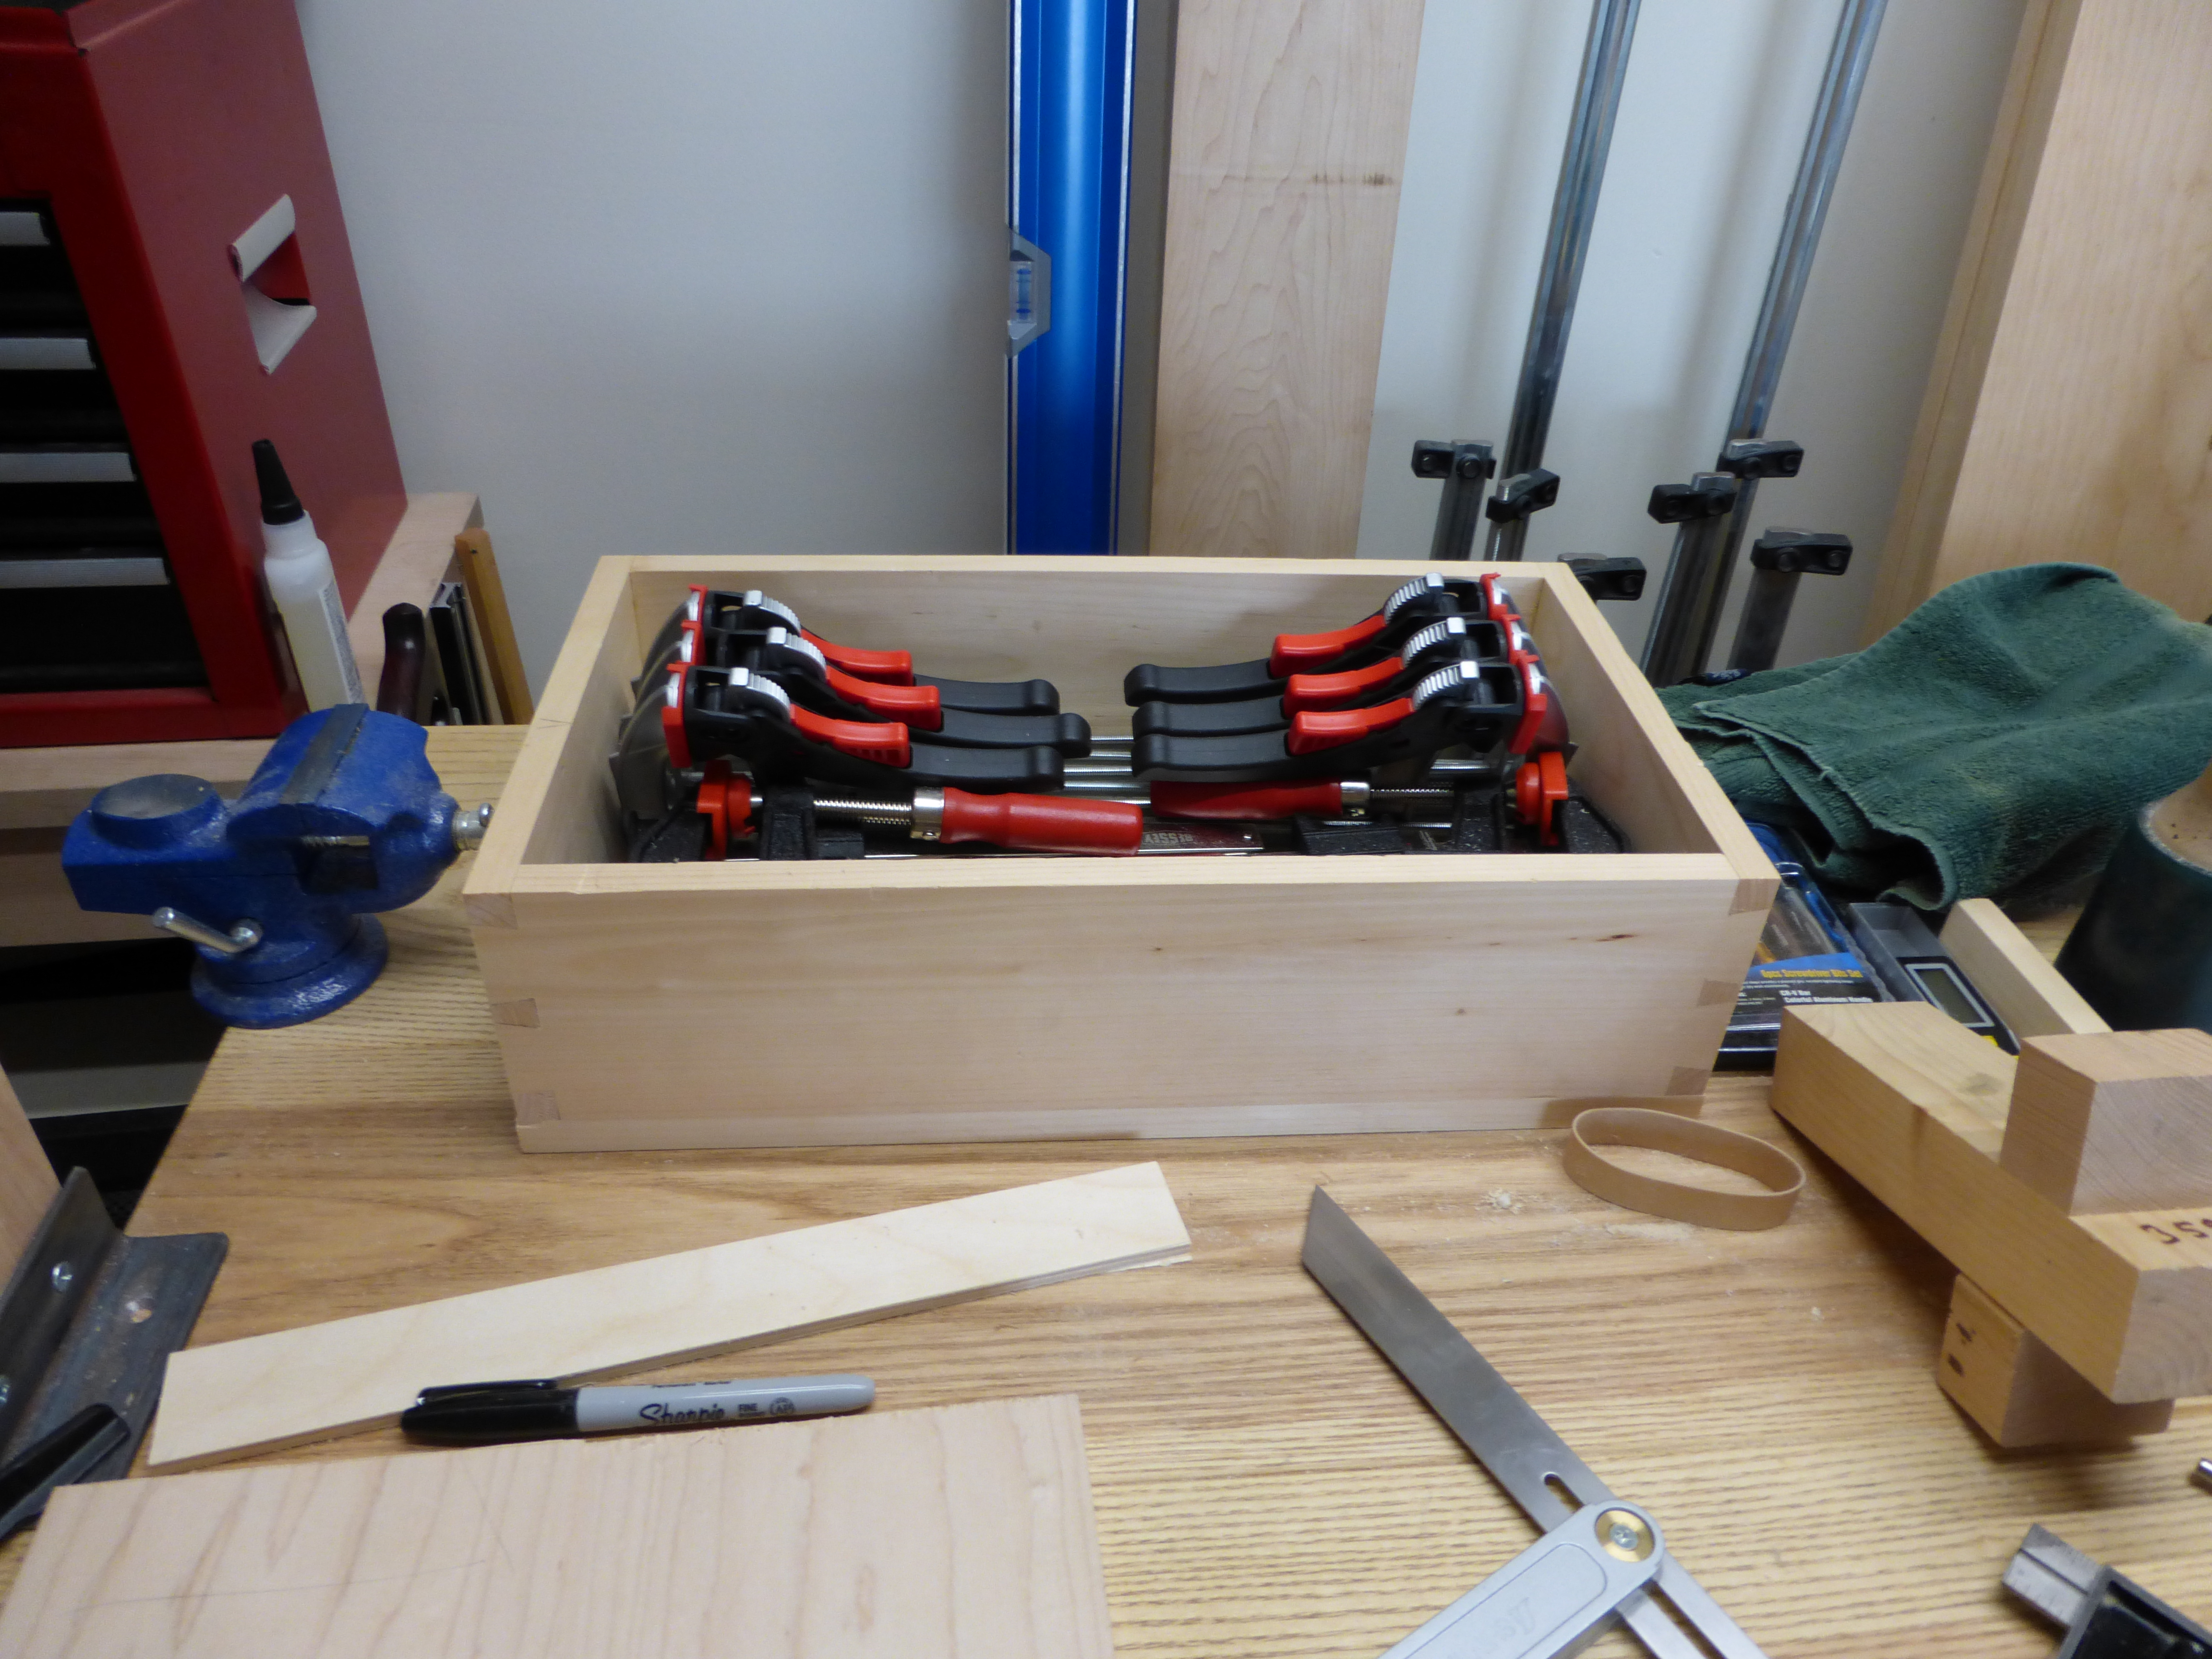
Some “every day clamp” storage. Don’t laugh at the bulk on my sharpening angle guide. It’s super wieldy.

And a “benchtop miscellany” tray (which was specifically built to be a benchtop chisel tray for my eventual full-size workbench).
I don’t own a plow plane, so in each case, the bottom is simply glued and nailed to the tray frame (wire brads, until my cut nails arrive in the mail). Don’t give into the hype: a heavy stone and a flat surface is sometimes all the clamp you need.

The lip is so the tray can be spring-clamped to my worktable top. I’ll rip it off at some point and re-purpose the tray.
I’ve found the pre-sized, 1/4″ birch plywood you can buy at big box craft stores (e.g., Michael’s) is perfect for drawer bottoms. Off the shelf, it has much less warp than a full 5′ x 5′ sheet from the lumber yard. Plus, the inevitable offcuts make great battens and holdfast cushions.
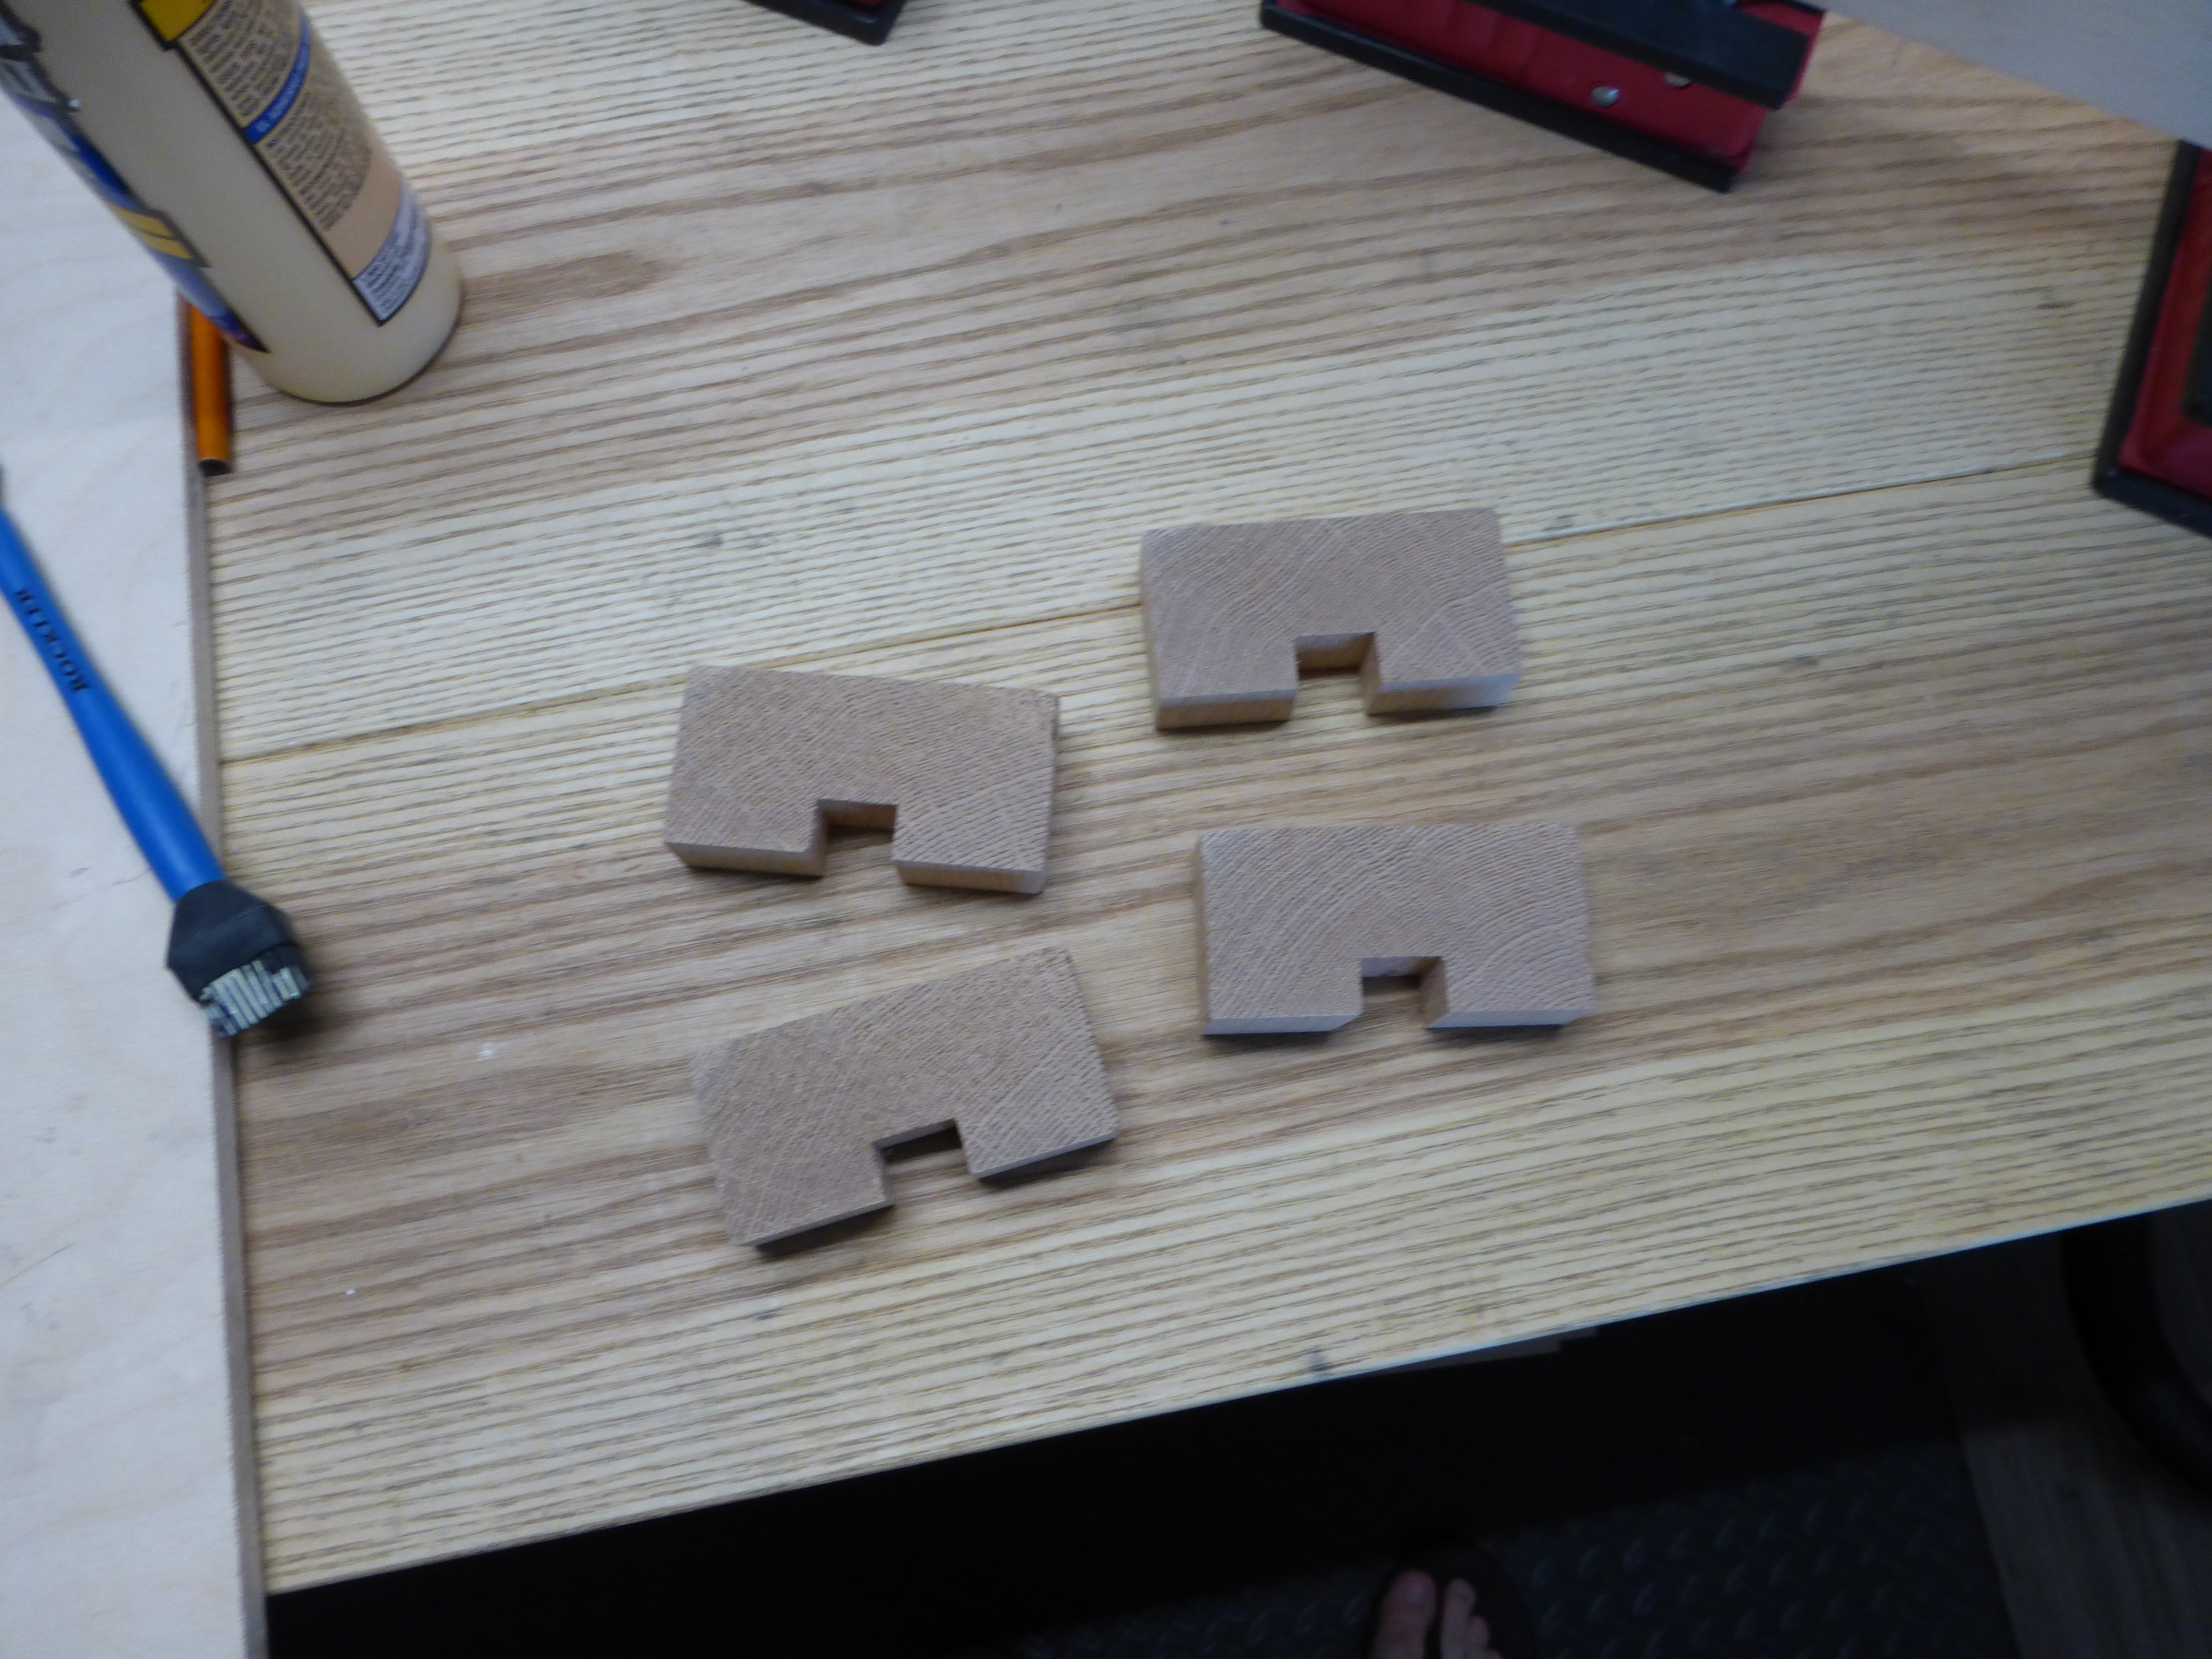
There is also a 12.5″ x 18″ x 4″ box (corner detail seen below) that might actually end up being a drawer for something. I’ve been experimenting with different pin sizes and techniques for hogging out waste (I’m back to the coping saw method) and they are the tightest I’ve ever cut dovetails thus far.

Practice makes better.
Even if I opt for the rabbeted and nailed version of the tool chest, I’m glad to have gotten the dovetailing practice. In addition, each of the boards used in these boxes was 100% hand-prepared. No thickness planer for once.
Happy Bastille Day everyone!
JPG
Handtool woodworking is awesome. It’s relatively quiet and significantly dust free. In fact, most of the time, “by hand and eye” is far faster and more accurate than “by power and jig”.
Except when it’s not. Like when trying to square a glued-up panel that is too large for your shooting board.

For my time and effort, this is still the fastest and most accurate way to square a panel.
No purest am I. I’ll use whatever tool makes the most sense under the circumstances. In my opinion, nothing beats a carpenter’s square, straight-edge clamp, trim router and flush trim router bit for squaring end-grain on a large panel.
Give it a try. There is a reason my trim router (and dust extraction unit) has survived every power-tool purge in my shop thus far.
JPG
I just purchased the August 2015 issue of Popular Woodworking (the issue with Christopher Schwarz’ Traveling Tool Chest on the cover) and can’t wait to start work on the tool chest. First, I need to fetch some 3/4″ pine from the lumber yard for the carcass and the trays. From there, I’ll figure out additional materials for the rest of the pieces on a rolling basis.
I like my Craftsman Top Chest set up and plan to continue using it as long as I’m in my current apartment. But I haven’t ever built a wooden tool chest before and would like to give it a try. The wooden tool chest will probably find a permanent home in my next shop.
I think I should build that benchtop bench first, so I have a moxon-style vise for gang-cutting the dovetails. I’m sure the Milkman’s Workbench is up to the task, but that might require double-sided taping the boards together because the screws on the Milkman’s can shift the work during tightening.
JPG
One of the woodworking tasks with which I struggle mightily is hand-planing the twist entirely out of thinner stock. I have found, though, that careful alignment during the glue-up is one way to manage (and maybe even eliminate) any remaining twist in a thinner board that is part of a larger panel (like a table top). This won’t work for boards that are majorly out of wind, but there is a very simple jig you can make from scrap to perfectly align two boards in a glued butt joint.
I think they are technically a type of caul. I don’t know if they have a proper name.
The alignment cauls pictured above are 1″ thick slices of red oak 2×4, with a 1/2″ x 1″ groove routed in them. The exact size isn’t critical, but you want them to be wide enough for a decent sized groove and thick enough to easily take a clamp. I recommend routing the groove first, then cutting the slices and truing the faces with the groove over some sandpaper on a flat surface.
The most important part, before any gluing up, is to make sure the two boards are planed as flat as you can get them and thicknessed to the exact same thickness (the thickness is the critical part). Once that is done, you clamp two cauls, opposite each other, to straddle the glue joint and perfectly align the outside edges of the boards. You use four cauls per glue joint (two on each end, pictured below). Once the glue dries, just dress the seams.

To avoid marring the work, go easy on the clamping pressure.
When doing the dry run for the angled-leg side table glue up, I noticed there was about 1/32″ twist in each of the boards. It would have been no problem to skip the cauls and just level the seams after glueup, but I had them handy and the boards are already thin enough (5/8″ after thicknessing) without any more dressing.

I will give the panel a couple hours to set and then I’ll attach it to the frame and be done.
You should always try and get as much twist out of the boards as you can, but in a pinch (nailed it!), these alignment cauls will get the job done.
I will post pictures on twitter of the finished table, once I figure out how to attach the top.
JPG
Among my favorite movies is Peter Jackson’s Lord of the Rings trilogy. On the special features, there is a discussion of the design for the Elvish armor and weaponry, where the conceptual artists were trying to communicate an elegant simplicity that would permit Elvish designs to cease evolving. I have a similar approach to furniture design.

Still need to thickness, glue up and attach the top.
Clean lines, attractive proportions and functional appointments. That’s my design style.
JPG
P.S. I know I’ve been sparse on posts, lately. It’s been a tough couple weeks, and I hope to get back to more regular posting soon. Thank you for bearing with me.
I first heard the term in the sailing context. “Boat-bite”: the bruises, cuts and pinches endured in the ordinary course of being out on the water.
I (voluntarily) don’t sail anymore, but a new “—–bite” has taken over my life. “Shop-bite”: the nicks, cuts and pinches endured in the ordinary course of being in the woodworking shop.
Woodworking is inherently dangerous. Sharp blades and bare skin do not mix well. Nor do flying chips and unprotected eyeballs. Handtool woodworking employs far fewer spinning blades of death than machine-based methods. Chips just don’t fly out from the chisel with the same velocity as from the plunge router. But the risks are similar and injuries can and will happen.
I am fortunate to have never had a serious injury in the shop. My worst injury was slicing off the tip of my middle finger with a marking knife, just shy of the nail (it grew back). But I suffer from shop-bite regularly.

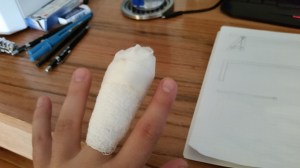
My usual injuries all relate to hand planing. I have a fairly loose grip on the knob, so I will often lose a chunk of skin on my palm or a finger between the work and the toe of the plane when starting a pass. And I still blister a bit during long stock preparation sessions.
I have a strictly-enforced ” sharps get put away when not in use” policy in my shop, so I’ve managed to significantly reduce edge-based injuries. I will still nick myself with a marking knife occasionally, but my finger-slicing incident scared me into great care when marking. To the extent I can, I mark at the start of a session, while my limbs are fresh.
“Shop-bite” is unavoidable, but with care and respect for the tools, serious injuries can be avoided.
JPG
The Woodworking Masterclasses video course on the housing joint carrying tote is one of my favorites. Not sure if it’s Paul Sellers in a santa cap or the beautiful simplicity of the project, but I’m a big fan of this particular set of videos. I watched it the other day, so one of the techniques Paul Sellers teaches in those videos was fresh in my mind and of use today.
The tabletop for the angled leg side table will consist of two 24″ x 12″ boards cut from the same piece of 1″ pine. As a result, I can use the double knifewall method shown in the housing joint carrying tote video. By sawing between the scribed lines, each end has its own knifewall to plane down to, guaranteeing square ends and eliminating chipping from the saw cut.

I haven’t used this marking knife in a while, either.
I don’t crosscut boards this wide very often, so it was nice to use my 22″ crosscut panel saw and some saw benches for a change (instead of my usual carcass saw and bench hook for smaller crosscuts). Using my least twisted, flattest piece of premium pine for will hopefully mean there won’t be a ton of mill work to be done once the boards are cut to length.

Mid-cut, for illustrative purposes.
On a side note, the table will end up overall 1/4″ shorter than it is wide/deep, which will allow me to use those felt furniture pads to get it back to cubed overall.
JPG
