I’ve had the same shooting board for 12 years. It’s a clone of the Lost Art Press plans (made of 1/2″ baltic birch plywood) and has served me very well. But after a dozen years, it’s pretty chewed up (mostly from being too lazy to flip it over when using it as a bench hook for sawing).
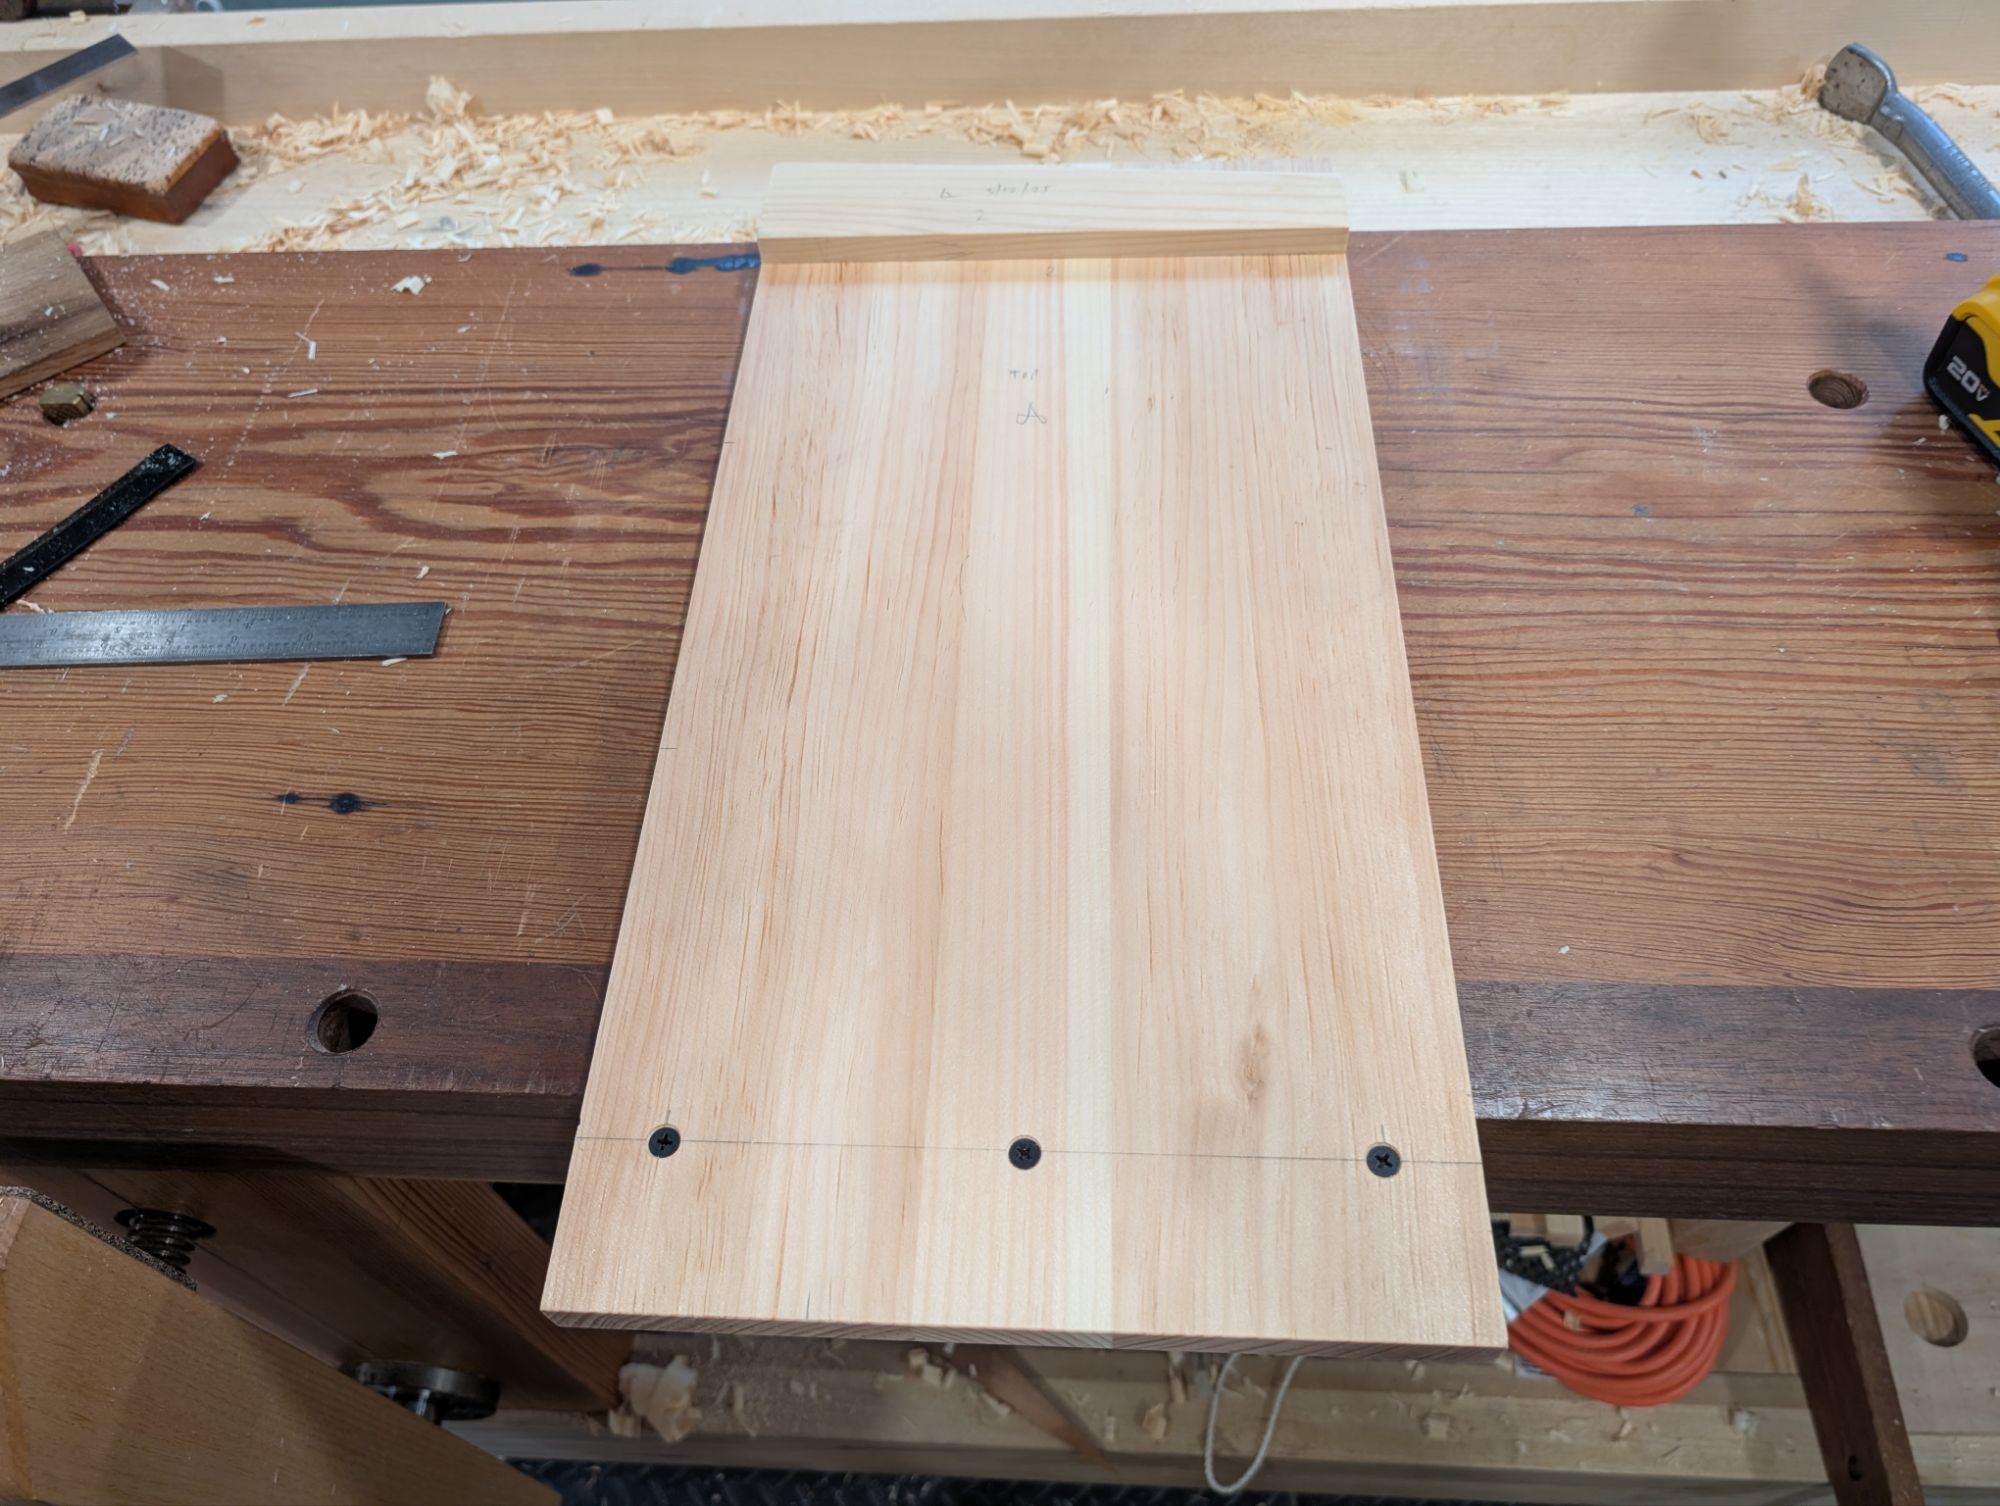
So, over the last week or so, I took the time (and some pine scraps) to make a new one. This is in the Richard Maguire style, with no bed (meaning the plane rides on the benchtop) and assembled with a wedged fence and cleat. I didn’t get any pictures during the making, but it’s all 3/4″ white pine throughout. You should click the link to Richard’s youtube video. He’s a great entertainer in addition to being a great craftsman and instructor.
No bed means your benchtop must be relatively flat across its depth to support the plane.
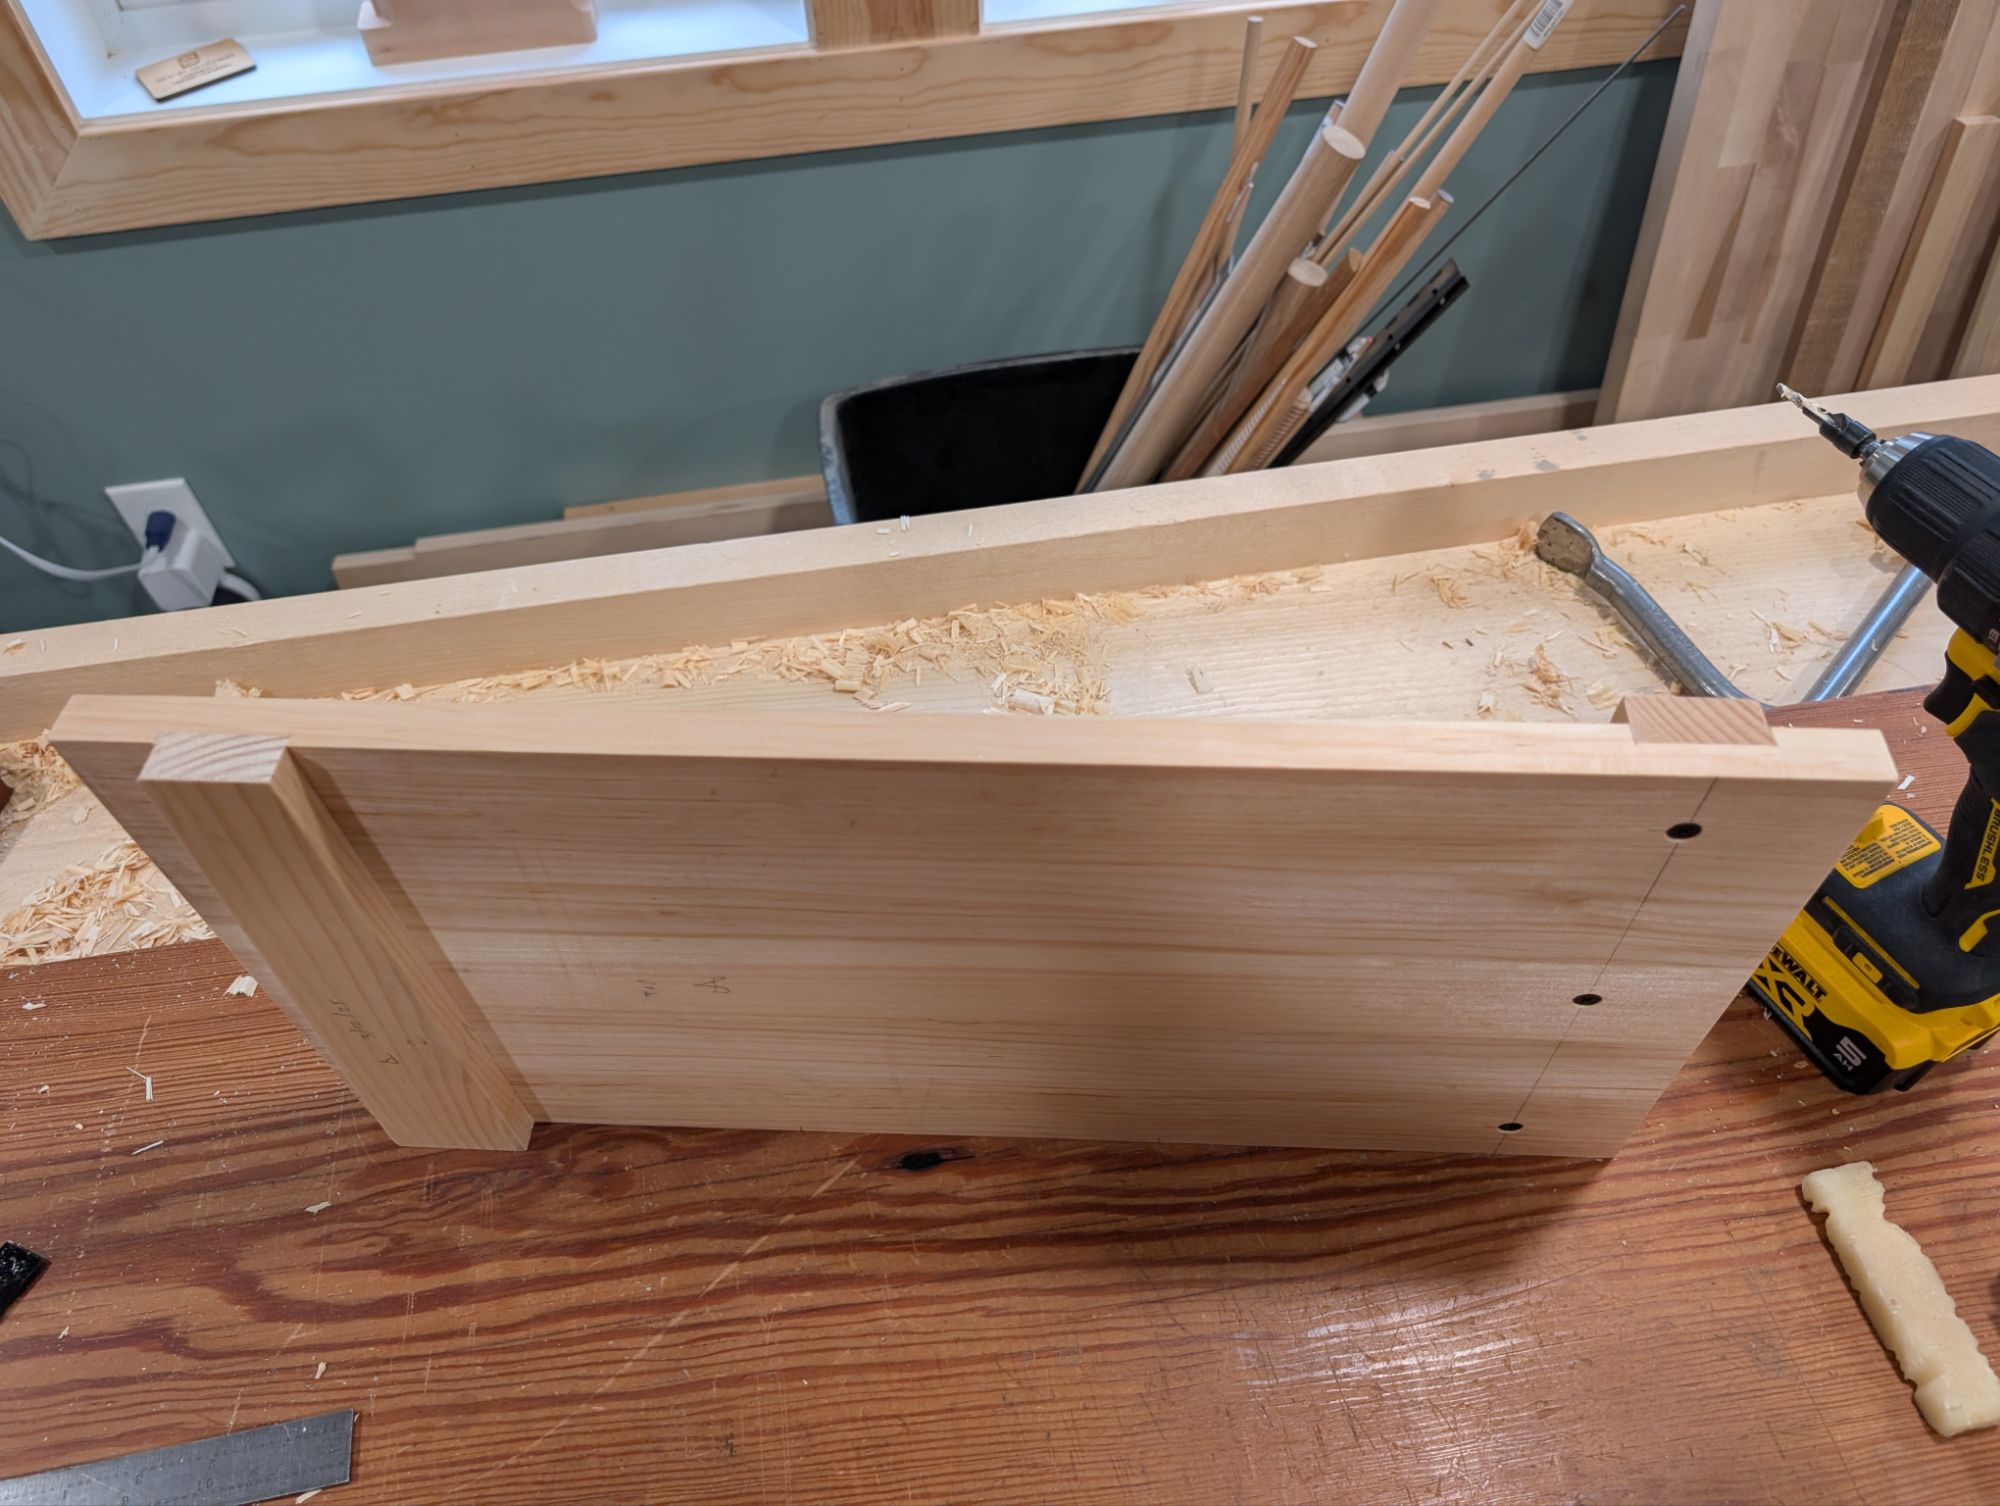
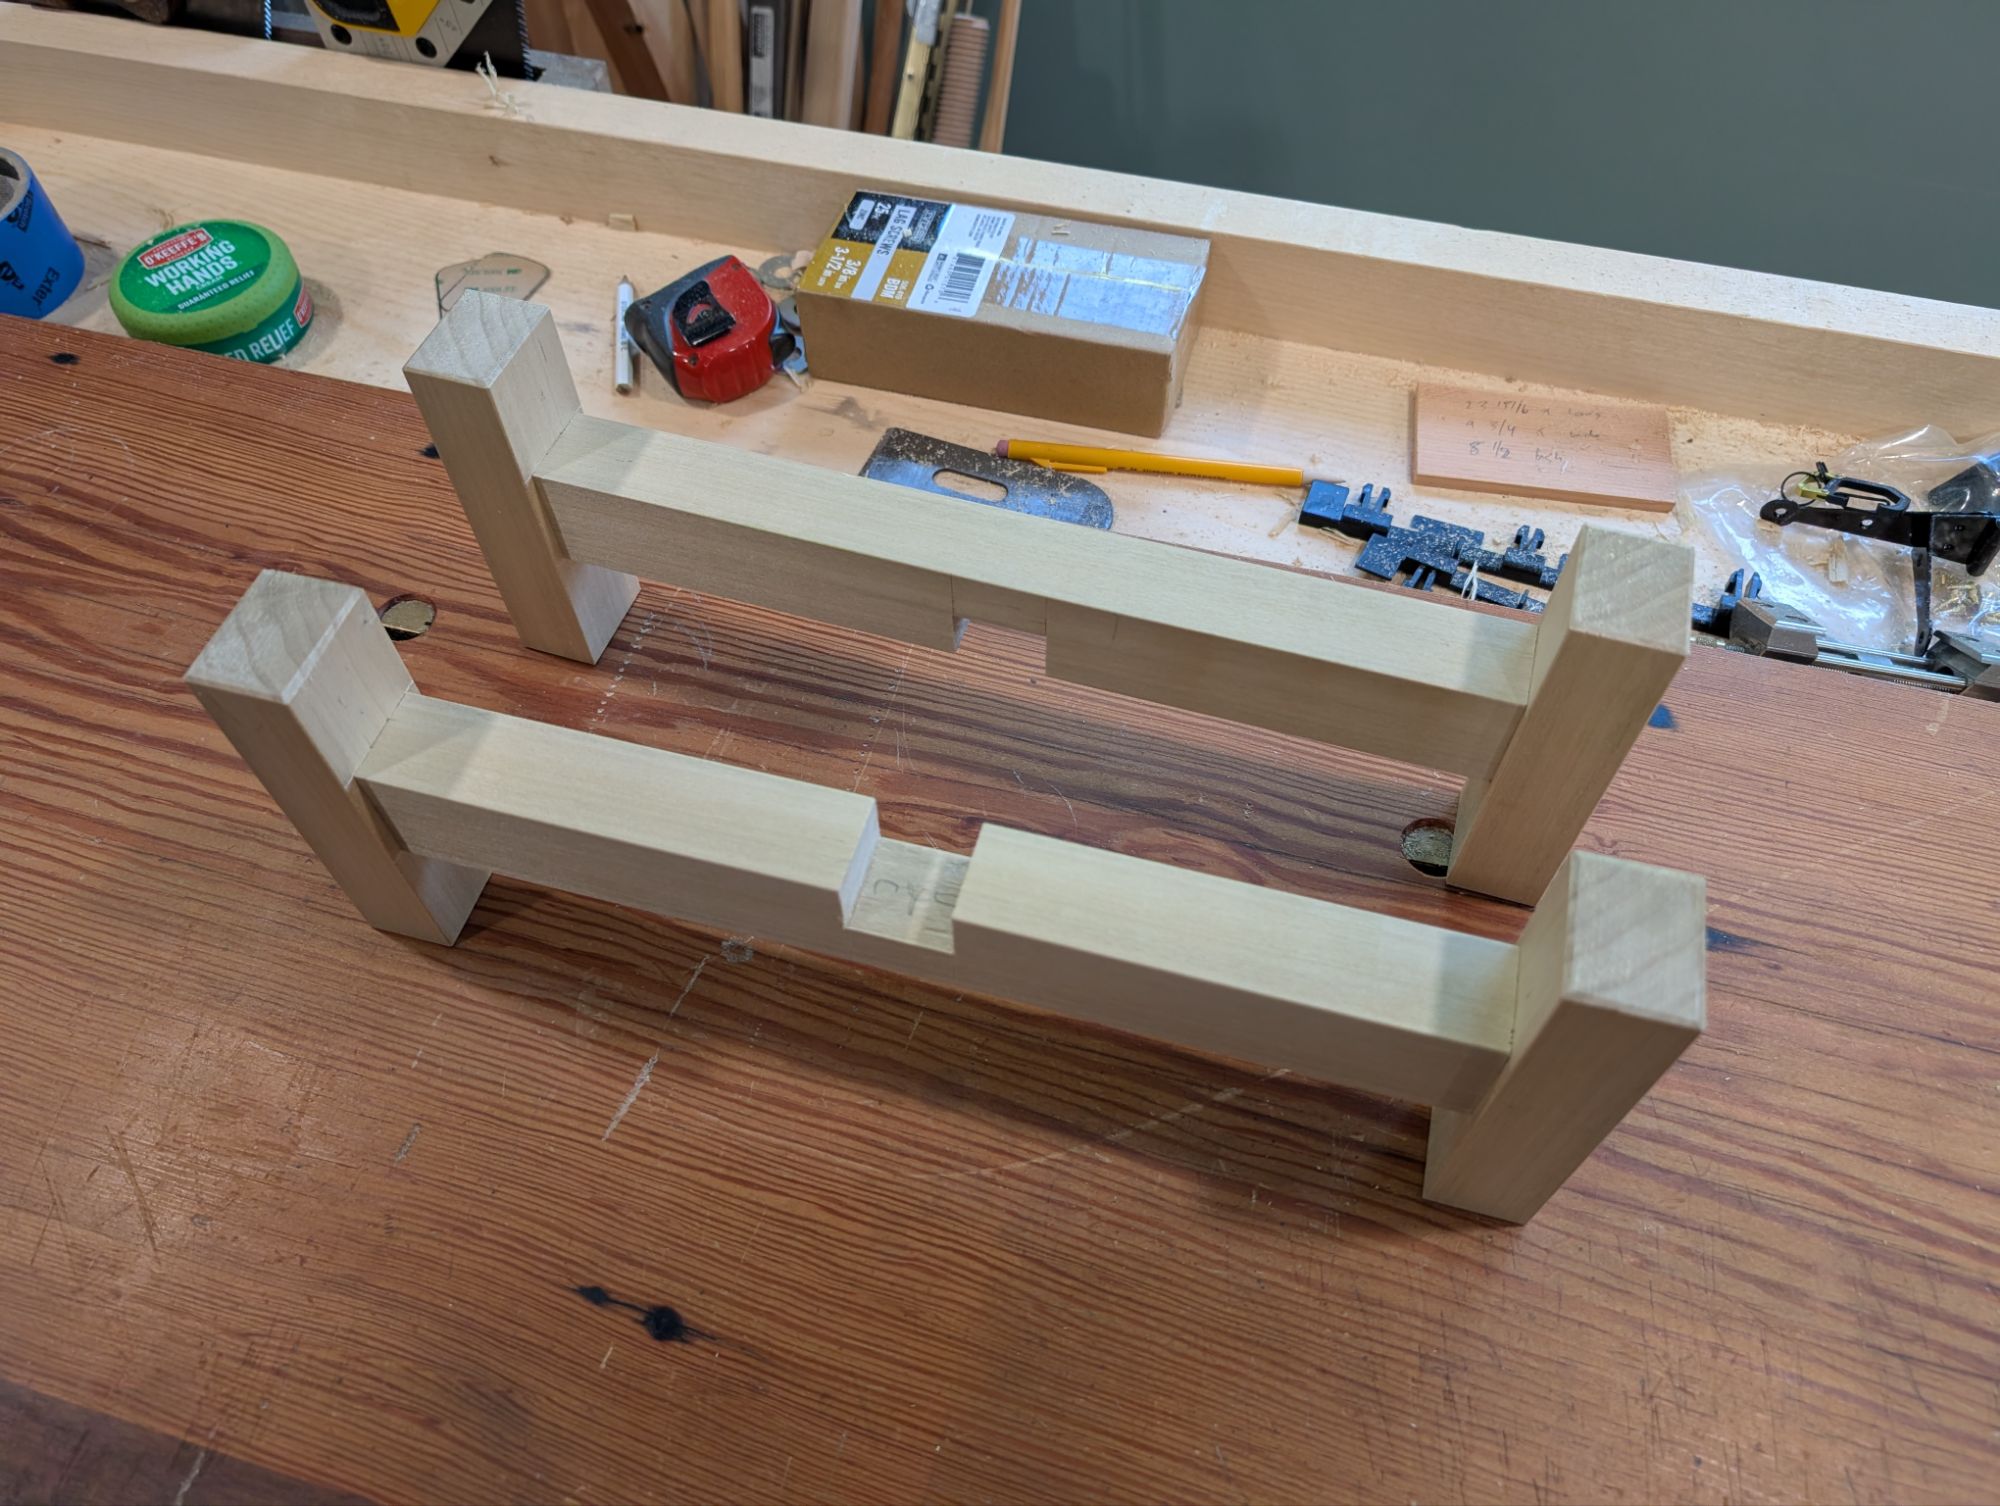
Each of the cleat (which hooks onto the bench in use) and the fence (which establishes the 90 degree reference for shooting things square) is recessed into the board with dado. The cleat dado is a full 1/4″ deep (for strength), while the fence dado is only 1/8″ (to preserve some additional height for the fence to function as an effective backer board. Recessing the fence and cleat cross grain into the board helps keep it flat over time (better explained in Richard in the linked video).
Better shot here showing the wedged fence and cleat.
I have worked on long shooting boards without fences in the past. But they are almost always used for squaring edges to a reference face; not for shooting end grain square. This one is shorter and specifically designed for end grain.
Work has been very busy so it was good just to get a little shop time. Hope you can do the same.
Happy New Year, everyone! Hopefully everyone has fully recovered from their New Year’s Eve partying and is back in the shop. I certainly am.
As with every new year, I try to tackle a few small but important projects (I call them “fixgasms“) around the shop. The term is not exclusive to the workshop. A fixgasm can be anything that’s been on the to-do list for too long and won’t really take a ton of effort to complete, but will have outsized impact when done.
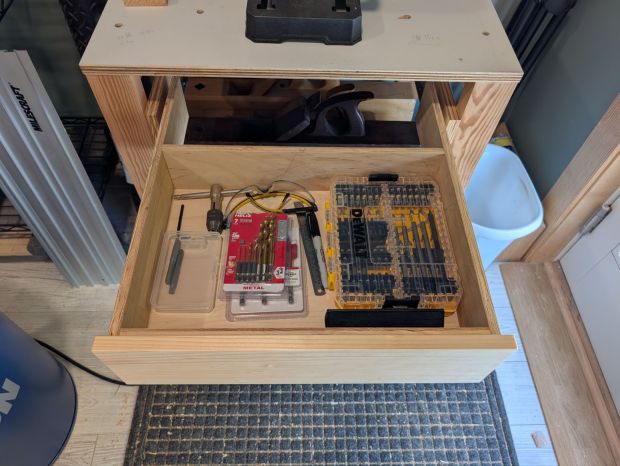
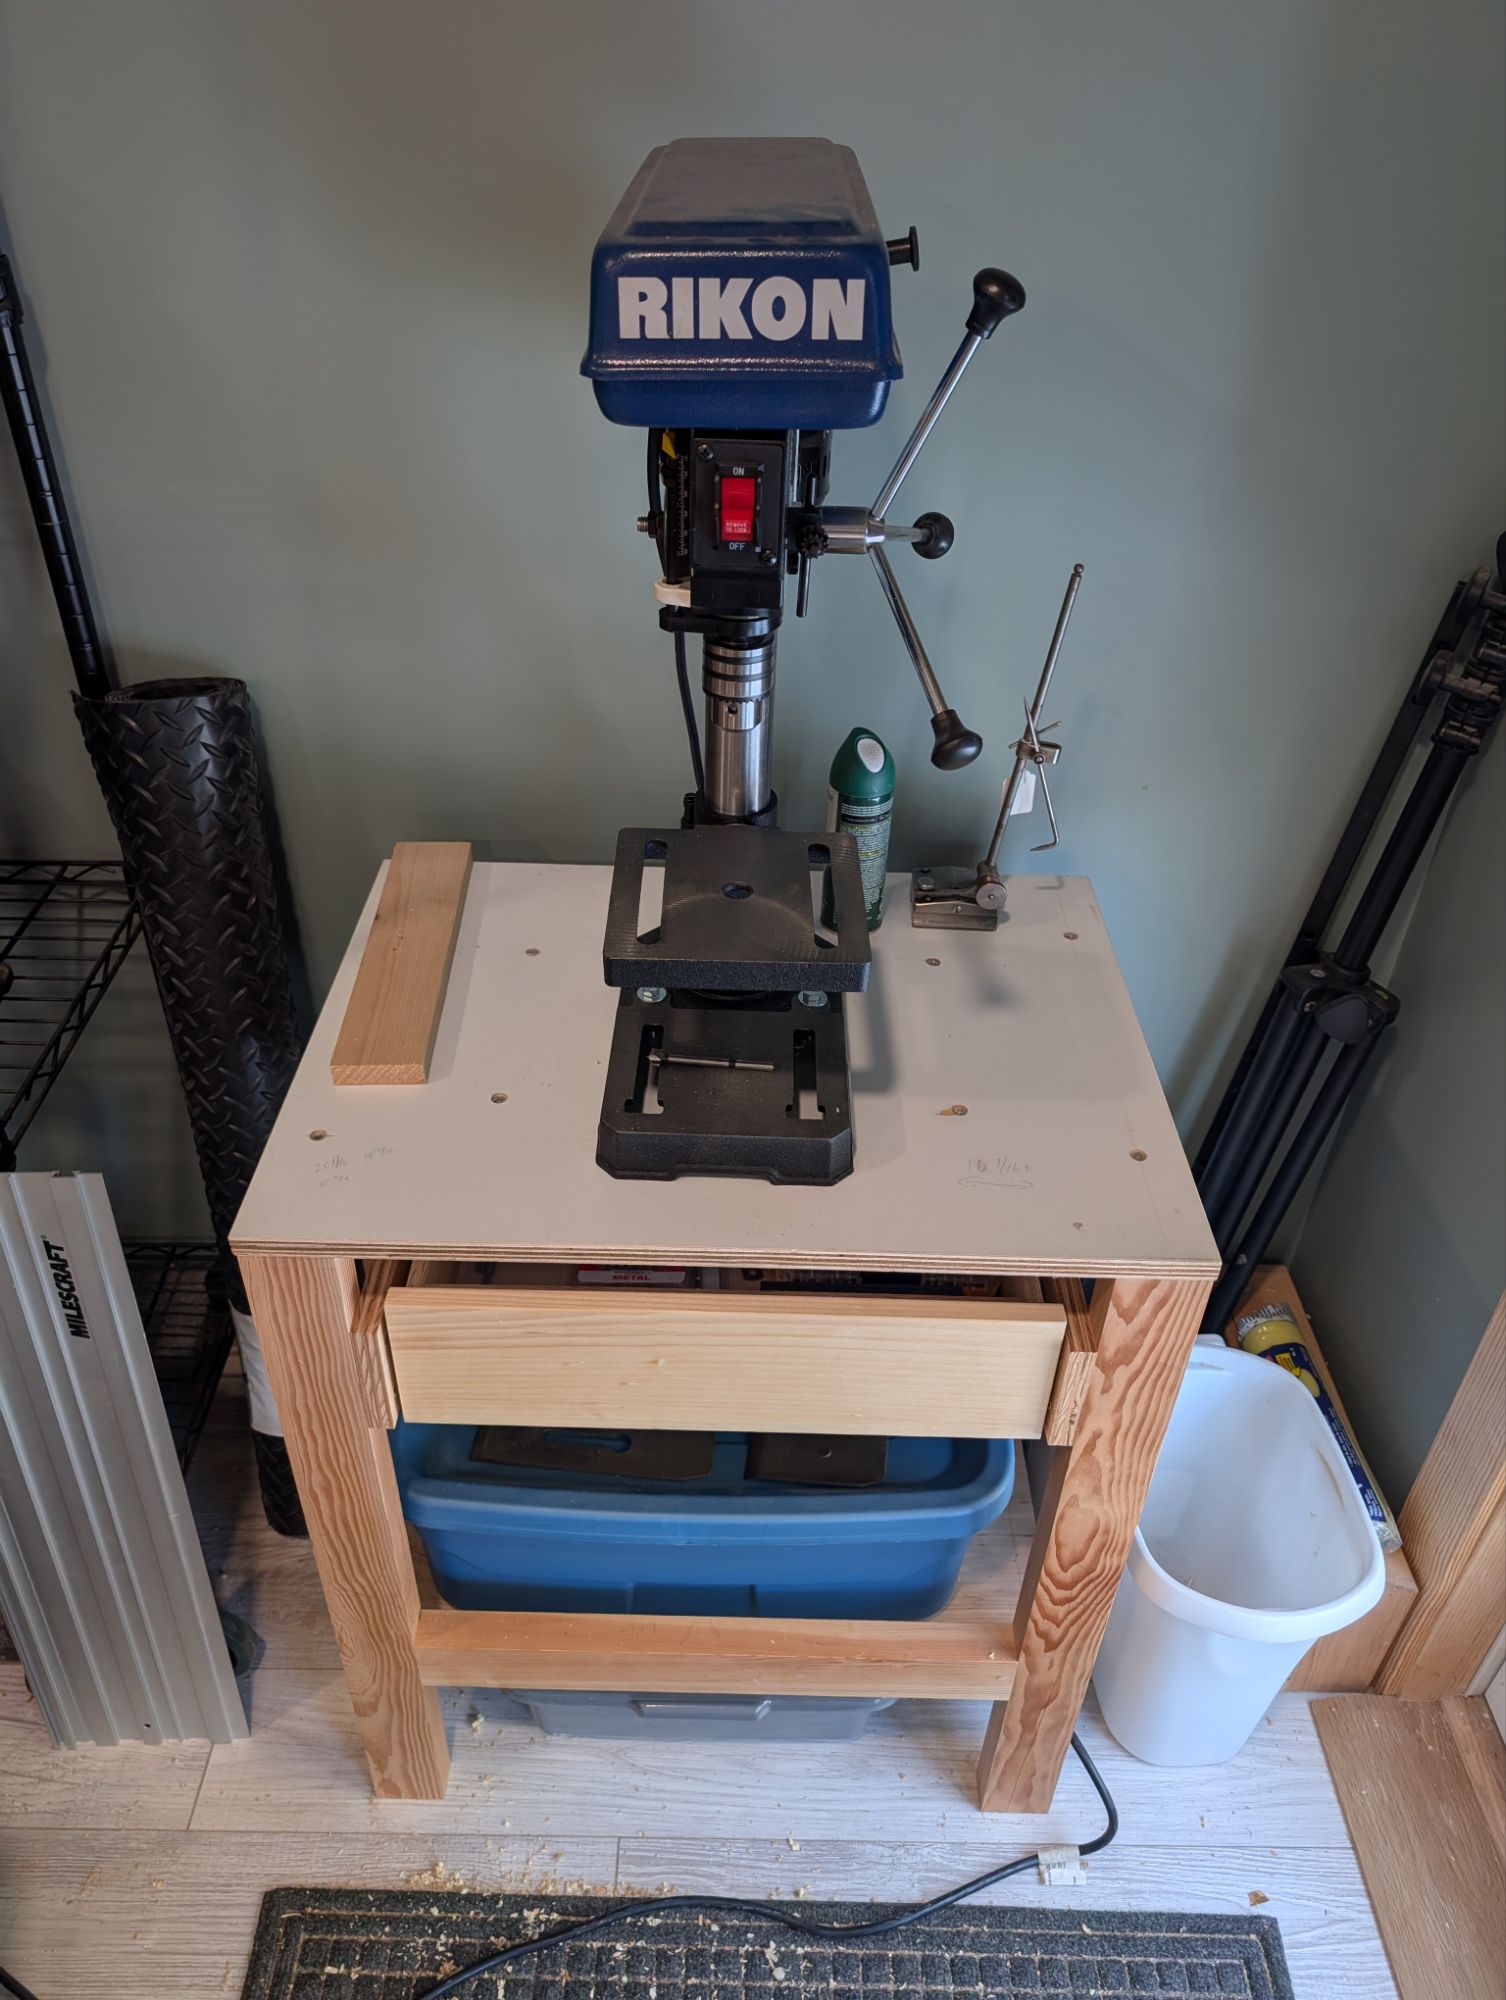
First one up is a drawer for the drill press table. The table frame is Douglas Fir and joined with glue and pocket screws. I’ve come to really appreciate pocket screws for these types of shop furniture. The top is 3/4″ painted plywood reclaimed from some kitchen cabinets. It’s slick but pretty water resistant.
An 8″ drill press is all I ever really need for the hand tool shop.
The drawer is made from scrap 1/2″ plywood, also joined with glue and pocket screws. The drawer bottom is 1/4″ plywood glued and nailed on. The drawer front is white pine and there is a 3/4″ lip underneath to use instead of a separate drawer pull. The drawer inside dimension are about 16×12 and 3.5″ or so deep. More than enough for drill bit sets and accessories.
I used some full extension drawer slides from the home center and they work well enough (they are “soft close” according the packaging). I contemplated making oak drawer runners, but laziness won out in the end.
I still need to migrate my Forstner bits from the garage Craftsman chest.
The next fixgasm on my list (for today or tomorrow) is to hang some wall mounted clamp racks and free up floor space. I never really move my mobile clamp cart around the shop, so it’s pretty much just in the way. It’s also way too big and not a super efficient use of space anyway.
I hope you all find some time in the coming weeks to tackle those little but important projects around the shop.
Happy [American] Thanksgiving to those who celebrate! It’s November 27, 2025 and things are in a weird place. It’s been a busy year for me, professionally. Workflow is good; the pipeline is strong. And all I want to do is spend some quiet time in the workshop and forget about the chaos out there.
It’s important to take some time for ourselves, if we can. Especially around the holidays.
This morning, I spent a couple hours turning an otherwise useless stick of poplar into a plant stand for a colleague of mine. Something that could certainly be acquired at the home center or a big box store for less than $20. And I have indeed bought my fair share of small wooden items even after I started woodworking, both for myself and as gifts.
But it’s the meditative process of making. The weight of the tools in my hands. The smell of the workshop. The empty space on the rack where the material used to be, in potentia. The smug satisfaction of seeing it get use at the office day to day.
Those protruding tenons will get trimmed when the hide glue dries.
I like these little plant stands because they are an efficient use of materials. Pretty much anything at least 1 inch square will work; I typically use poplar or spruce. And the only critical measurement is the length of the two beams (sized to fit the pot it will support). You can otherwise tailor the height of the legs as needed or desired. And they are collapsible, so they travel well.
Just a simple lap joint in the middle, well fitted but not glued.
You can make them with a basic kit of tools. I use just a No. 6 hand plane, a 1/2 inch chisel, a 1 inch chisel, a crosscut saw, and a router plane, plus a marking knife and a try square. I’ve always meant to do a Basic Projects post on these. Maybe in 2026.
In any event, I hope you and yours have a warm, safe, and happy Thanksgiving.
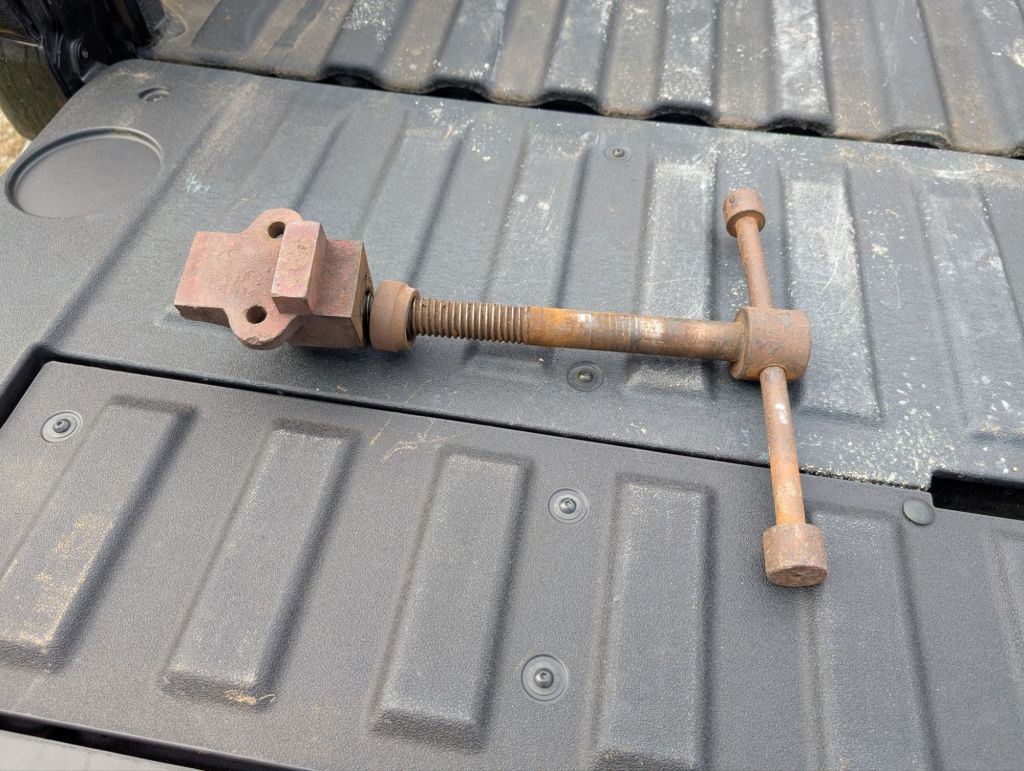
I was up at the Vermont house the other day and made my periodic pilgrimage to The Red Carrot in Rutland. The store is great for things like rustic boxes (more on that some day), but as a woodworker and general DIYer, I prefer the related warehouse down the street. They have most of the interesting tools (at least for me, not needing any more planes or saws). I usually pick up a few odds and ends (like screw taps or T augers). Once in a while, though, the warehouse will hide a real gem.
It will clean up nicely.
The metal screw above came from what I think was a portable leg vise. It had two white oak jaws: insect riddled and good for nothing but throwing in the woods to rot. But the screw is in great shape and the nut is rather beefy. It just needs a de-rusting and to straighten the handle.
Unlike typical woodworking leg vise screws, which mount horizontally (in line with the screw itself), the nut had vertical mounting holes and a flange. This means it’s screwed into the underside of the work surface (like a modern bench vise). It could also be for blacksmithing too.
I don’t have a place for this right now. But for $20, how can you go wrong?
Hope everyone’s 2025 is off to a great start! I am actively ignoring the shitshow that is the United States federal government for the next 2-4 years, so that means more woodworking!
I was recently up north where I have a basic set of hand tools and a pretty good workbench in a shed. My tool kit consists of a few bench planes (No. 5 1/2, No. 4, and scrub plane), saws (a 20 inch hardpoint and a 12″ hardpoint, plus a 12TPI crosscut carcase saw), chisels (1″, 3/4″, and 1/2″), plus a small router plane, a small shoulder plane, a brace and bit, and all the basic marking and measuring tools. This is, in my view, an essential hand tool woodworking kit and I can do most home improvement and general construction tasks that cross the bench. Speaking of which, the workbench is 62″ long and the main benchtop slab is 15″ deep, which is plenty.
I have a dedicated Milkman’s Workbench for when I need vises.
But when I’m up north, when I’m not making spice racks and rebuilding exterior stairs, I like to scour the antique stores for two things: gate leg tables and vintage handtools. Most recently, I found a nice double gateleg table that now sits under a window in my living room. For furniture, I highly recommend The Red Carrot in Rutland, Vermont. Especially when the warehouse down the road is open. They also have a great selection of rustic boxes, most of which seem to have been joiner’s chests at some point. I don’t buy them to use them, but rather to study the techniques.
For tools, though, I find the foofier antique stores and thrift shops tend to be goldmines. While everyone else is looking at the jewelry and lamps and sewing machines up front, I’m digging through the back corner to find Disston and Simmonds hand saws and Stanley bench planes. On this trip, in addition to a nice 9 PPI Simmonds crosscut hand saw (26″ plate length) I extricated from a pile of painted kitsch, I finally bought a transitional jointer plane I’d been eyeing for a few years as it migrated around the store.
Not bad for 150 years old.
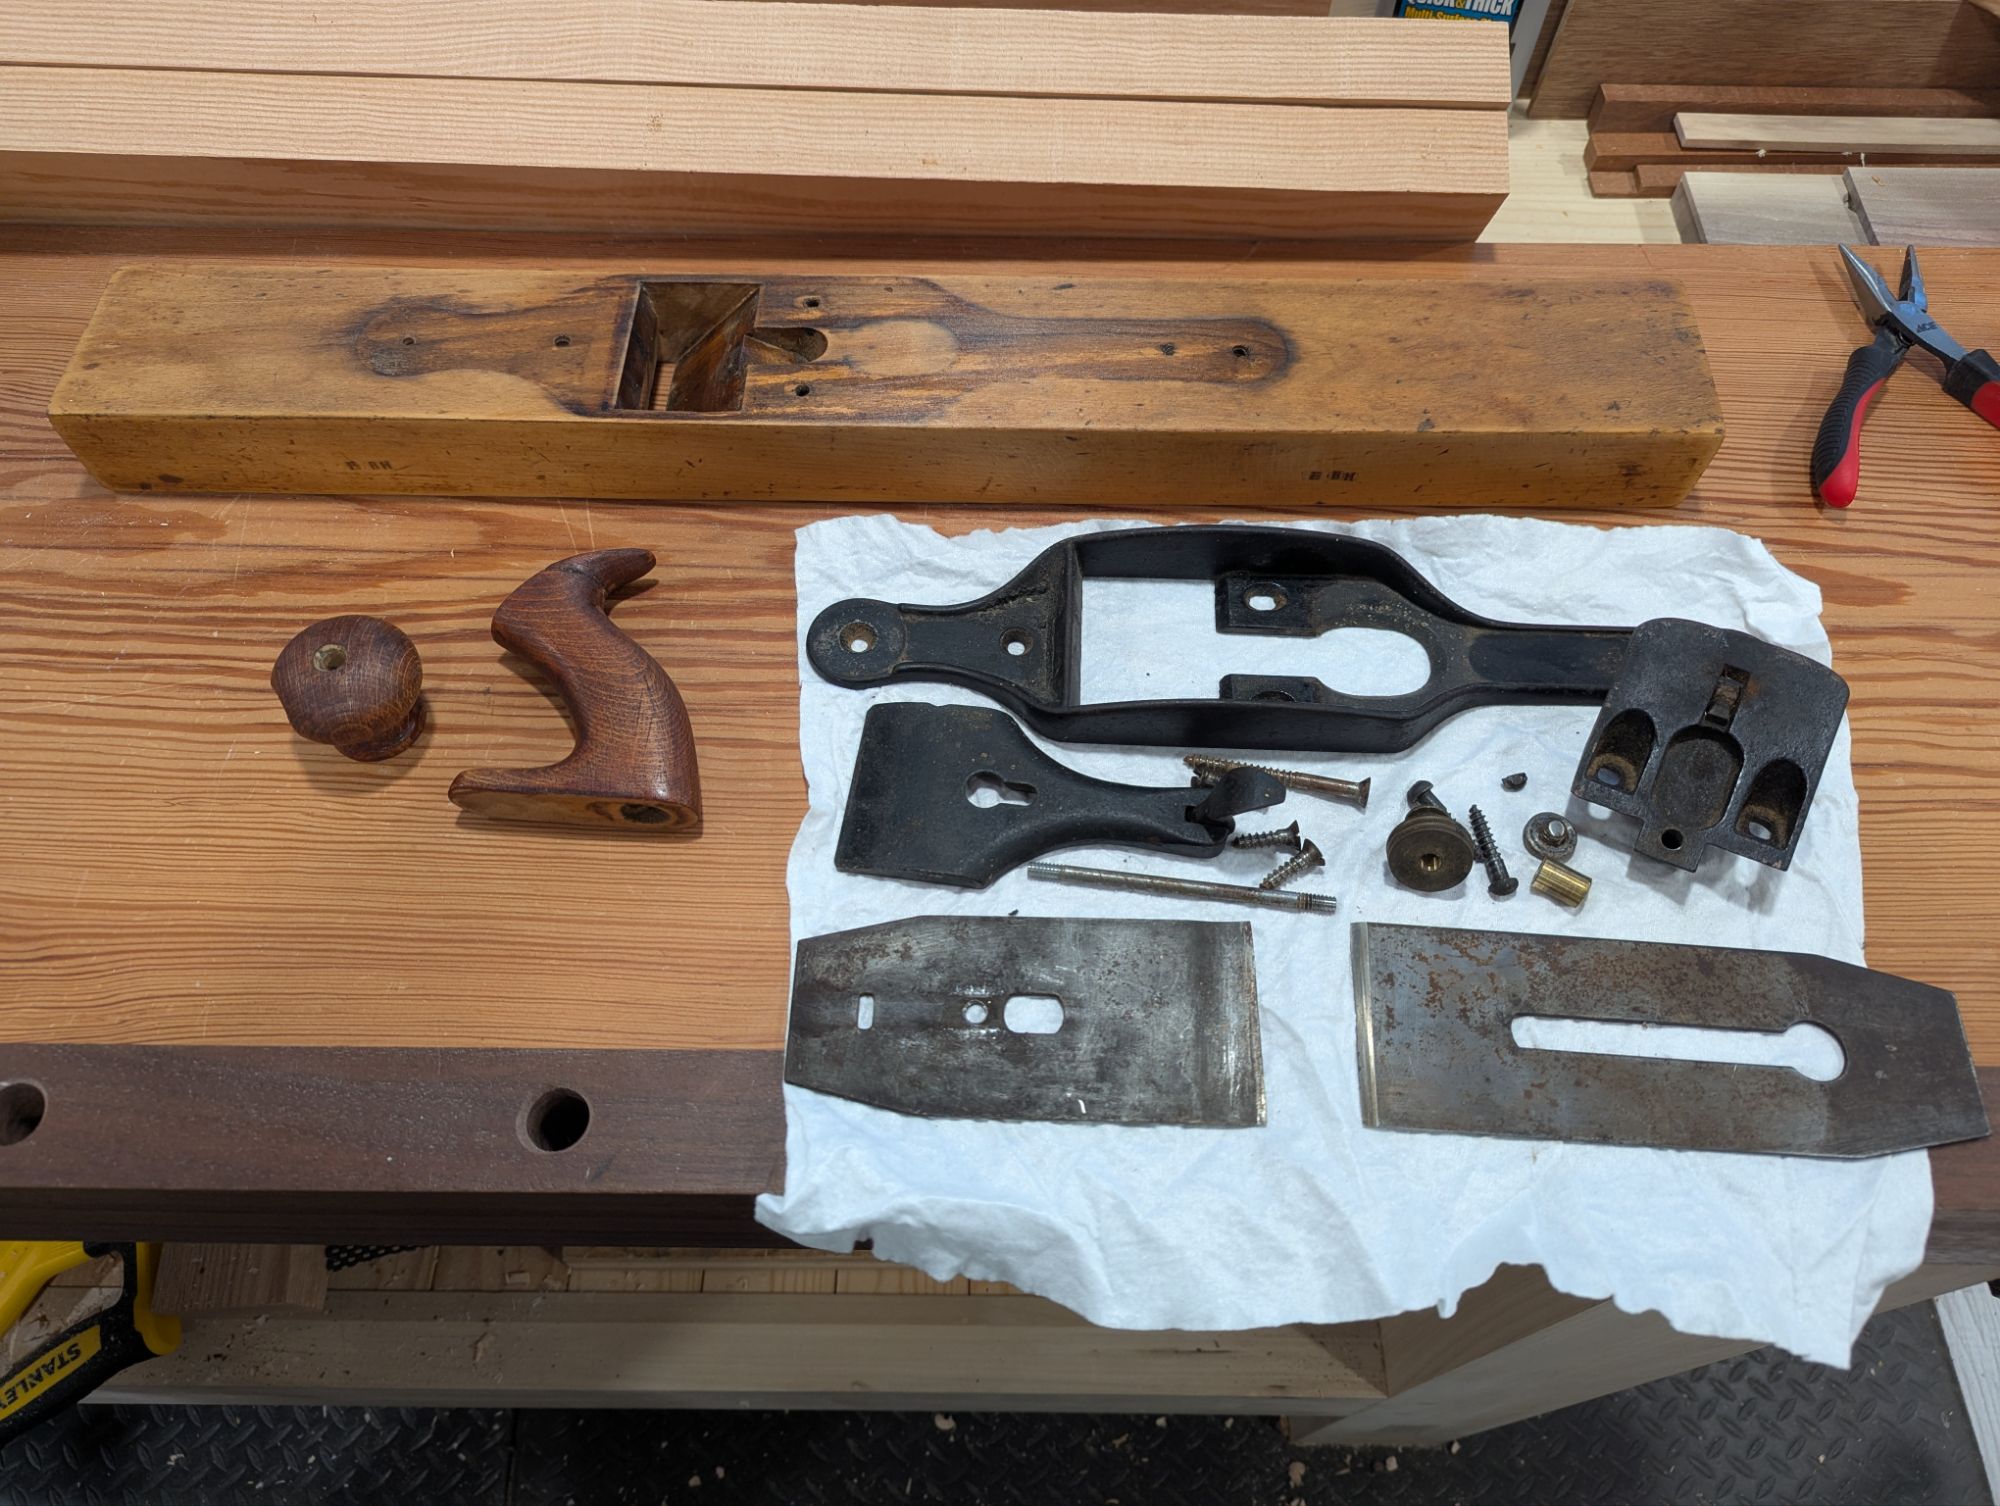
As far as I can tell, it’s a Stanley No. 31 transitional jointer plane, Type 4 (manufactured between 1871 and 1872). No lateral adjustment, right handed threads on the depth adjustment knob. The japanning on the casing is like 95% intact and aside from the horn of the tote being cracked (I’ll make a new tote), and one of the slotted frog screws having split (you can see the half moon fragment next to the frog, and replacement screws are readily available on electronic bay dot com), it’s in amazing shape. The beech sole, while a bit twisted, seems never to have been seriously flattened. The mouth is still crisp and tight and should remain so after truing the sole. The throat has shrunk a bit (again, 150 year old wood), so I might have to grind 1/16″ off the iron width so it adjusts easier. Or just get a modern replacement blade which is a bit narrower. Even the knob is sound (despite a small flake off the side).
Do I need a transitional jointer plane for my toolkit? Definitively no. I have a Type 1 Stanley Bedrock No. 7, and one of the very last Old Street Tool trying planes ever made. Plus I have a No. 6 fore plane that is just as good as a jointer for most of the work that I do. And is my every day plane, as it were.
But this transitional plane was $45 dollars and a piece of history. So I will clean it up and use it as I see fit.
In between my day job as an M&A attorney and my social responsibilities (which are legion), I have been slowly organizing the new workshop. Recently, this has included updating the tool wall that goes with my hanging wall cabinet. The tool wall itself hangs from the same french cleats the main wall cabinet hangs off, and I actually now have enough room for a second tool wall on the other side of the cabinet (that I may or may not ever get around to).
My first goal for the new tool wall was to move a number of tools that used to hang off the sides of the wall cabinet itself (or just lived on or around the workbench) onto the tool wall. I largely kept the previous hangers for the other tools (chisel mallet, rasps, dovetail layout guides, and chisels/marking gauges, etc.), but I did remake the rasp hanger so they would hang a bit more uniformly.
As for new tools on the wall, the plane adjustment hammer (red handle), the sliding bevels, the large dividers, the gimlets and dowel plate, and the wrenches all used to hang on the right side of the main cabinet (above where the combination square is currently). Happily, by moving those to the wall (and shrinking the footprint [wallprint?] of the cabinet itself), I was actually able to widen the tool wall too and fit even more tools on it.
I was even able to fit my discontinued Lee Valley pencil gauge on it. For the record, mine had no “character” to speak of when I unwrapped it. It really does work great, though.
A thinner top shelf also helped fit more boring tools.
The new wall is 14″ wide and 44″ tall (the height matches the cabinet height including the drawer), and is made of 3/4 birch plywood (the 5 ply, veneered home center stuff). There is still some space above the chisels and below the dovetail guides but aside from a bar magnet to hang my marking knifes, I’m not 100% sure what to put there. I really like where the 12″ combination square sits currently. I’m just too used to it to change it (and I’m proud of how well the hanger design works).
There are still a coping saw and my gunsmith pattern screwdrivers on the far side of the wall cabinet, which will go on the opposite tool wall if/when I get to it. I will also hang my Crucible bench square, my drawknives (yes, I have two now!), and a few other things on that opposite wall when the time comes.
It goes without saying, but I buy all my tools with my own money (the ones I didn’t get as a gift from my godfather or inherit from my grandfather).
I’m not sure I could ever go back to a floor chest as my main tool storage. But that’s just a luxury I’ve worked hard to attain.
I went up north for a quick summer weekend and did something I don’t usually do: peruse the antique shops. This was pretty fruitful, honestly. I found a boarded chest made from 12″ x 7/8″ clear pine which will clean up very nicely. It’s about 24x14x14. It was last used as a toy chest (I know from the several Battleship peg pieces inside it) but it has some signs of old tills. More on that another time.
I also found a nice Disston D7 (I think) hand saw, crosscut. The plate is arrow straight with no kinks that I can see. Even the nib is intact. The only defect (aside from a heavy black patina on the blade that comes from being stored in barn-like conditions) is a small chip off the top horn of the tote. Easily fixed (or, honestly, just sanded smooth and left alone). I’ll do a quick restoration post on that one too in the future.
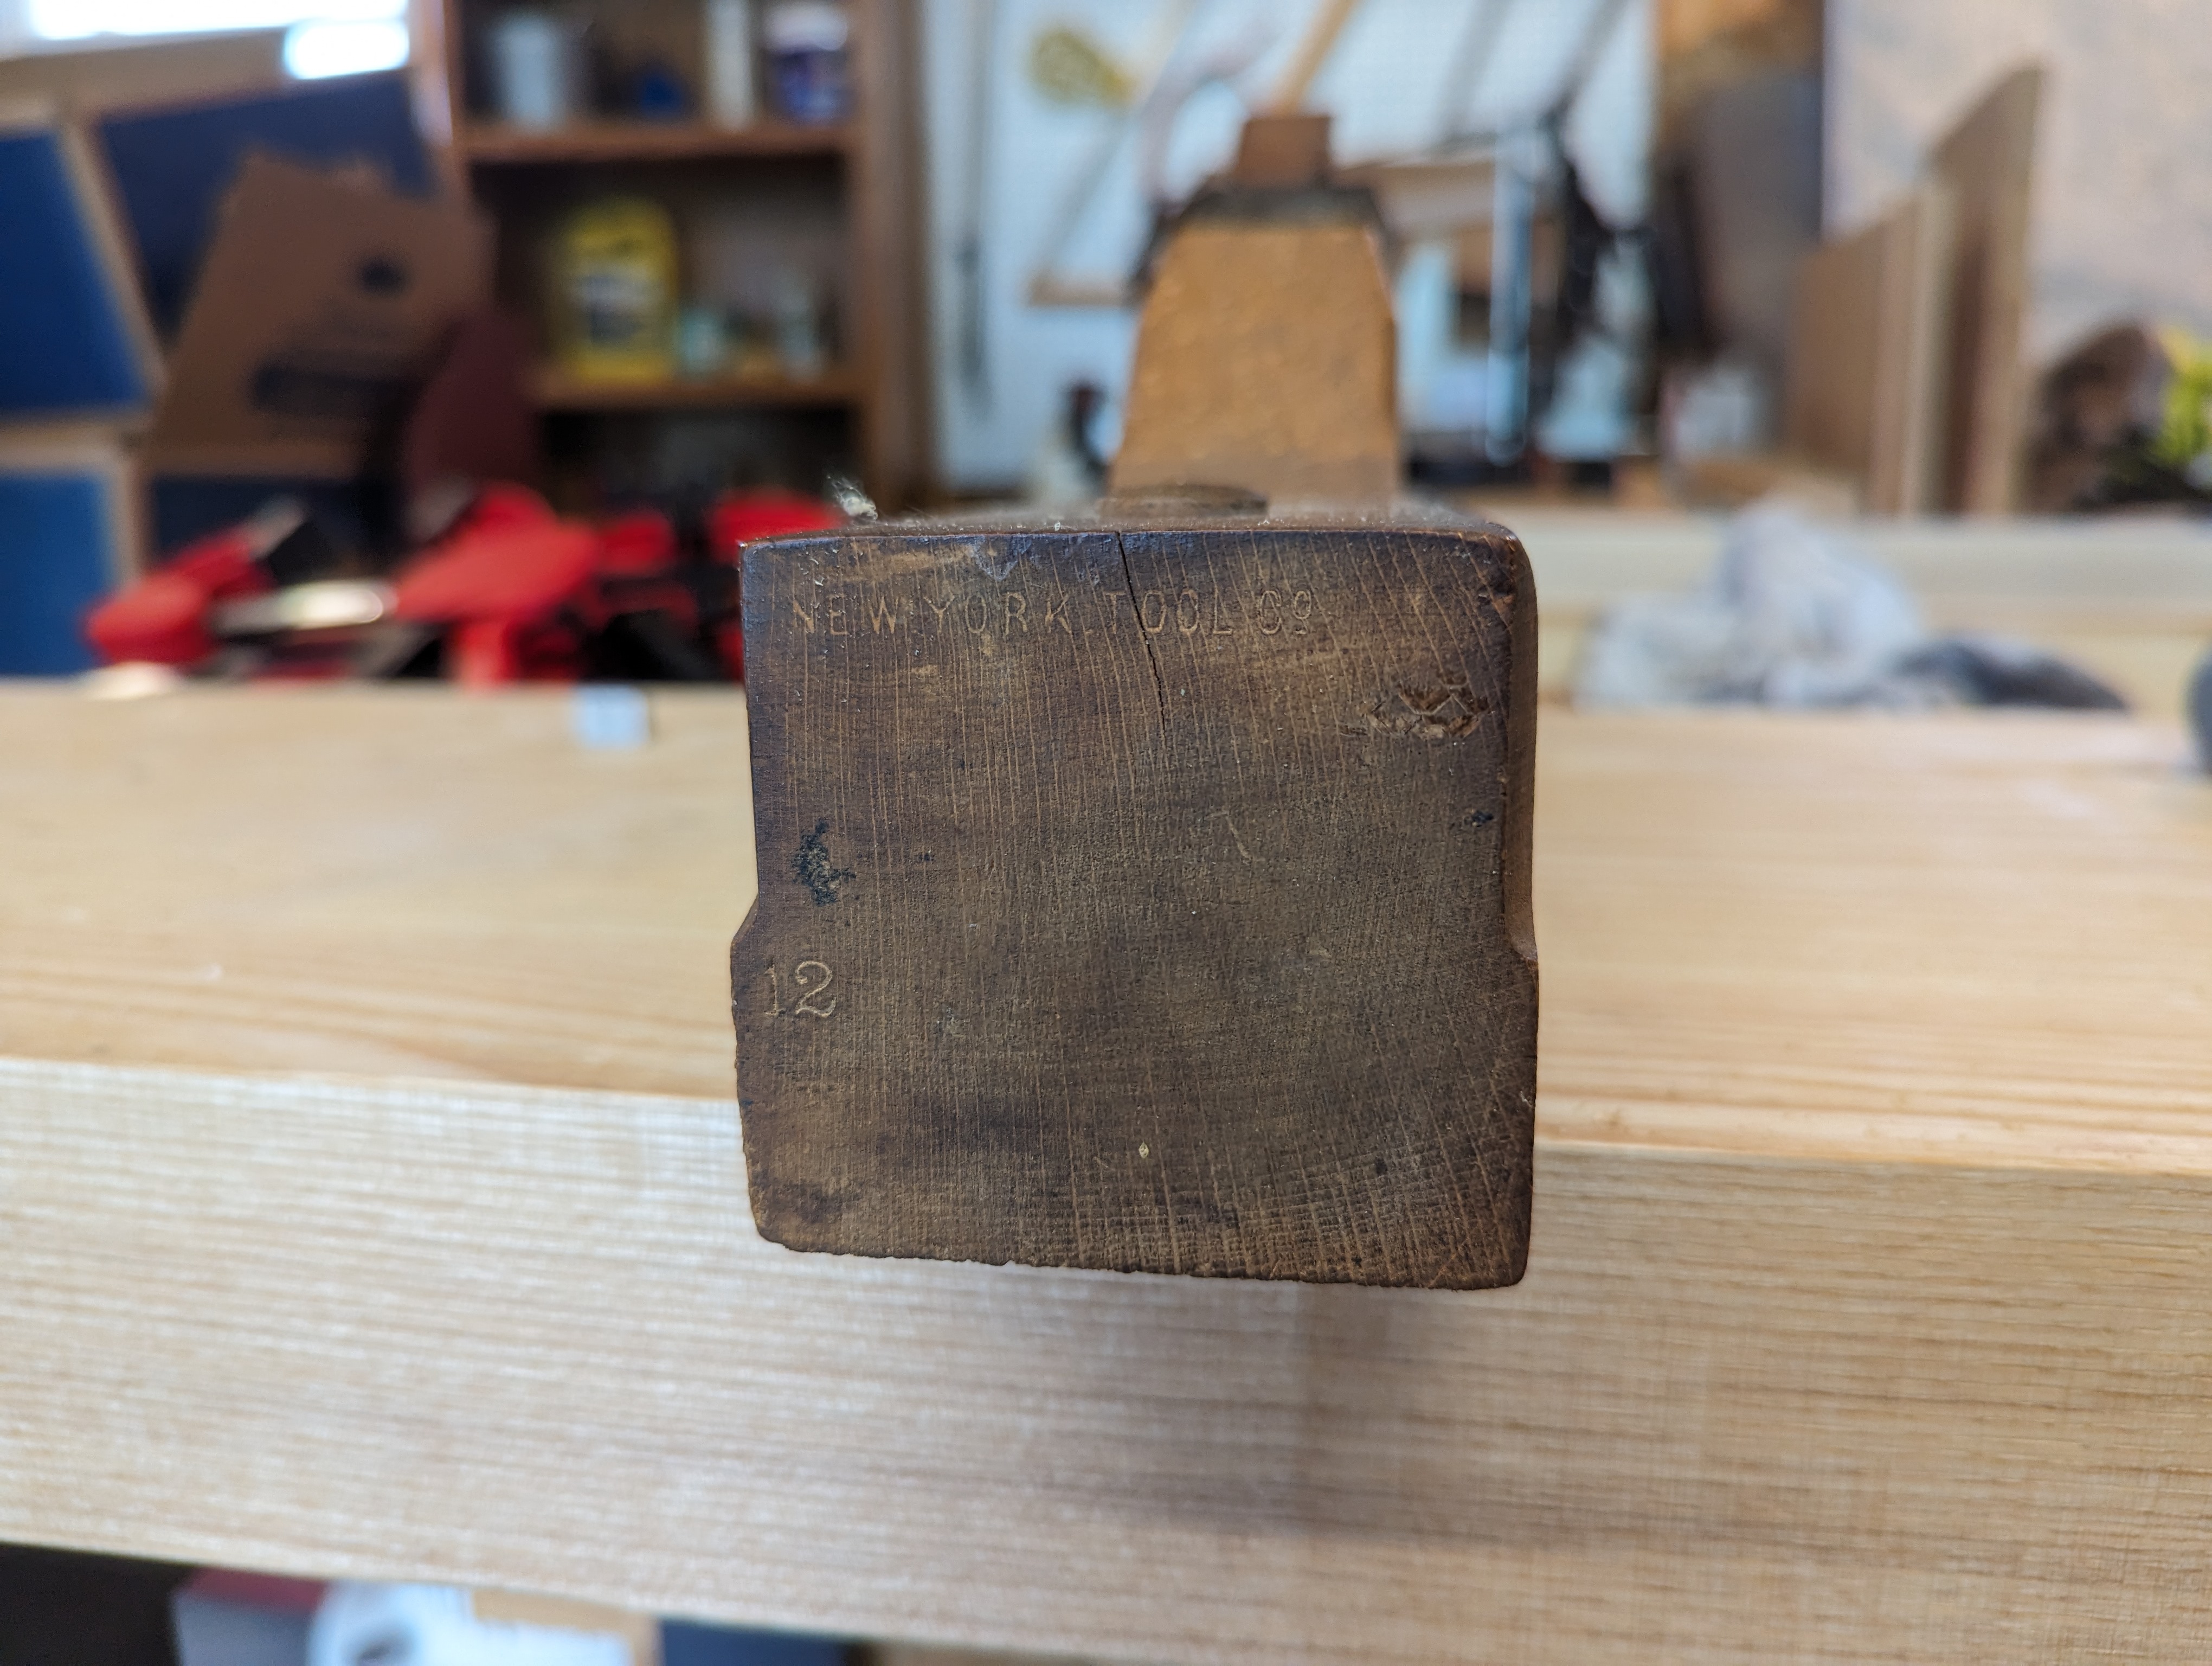
But the best find (in my opinion) was a wooden jack plane in remarkable condition. It’s stamped with “New York Tool Co.” (which my cursory research showed was a brand used by the Auburn Tool Co in the late second half of the 19th century). It’s 16 inches long and seems to be a No. 12. I didn’t even argue with the sticker price at the antique shop (which was $25).
One tiny check on the toe of the plane.
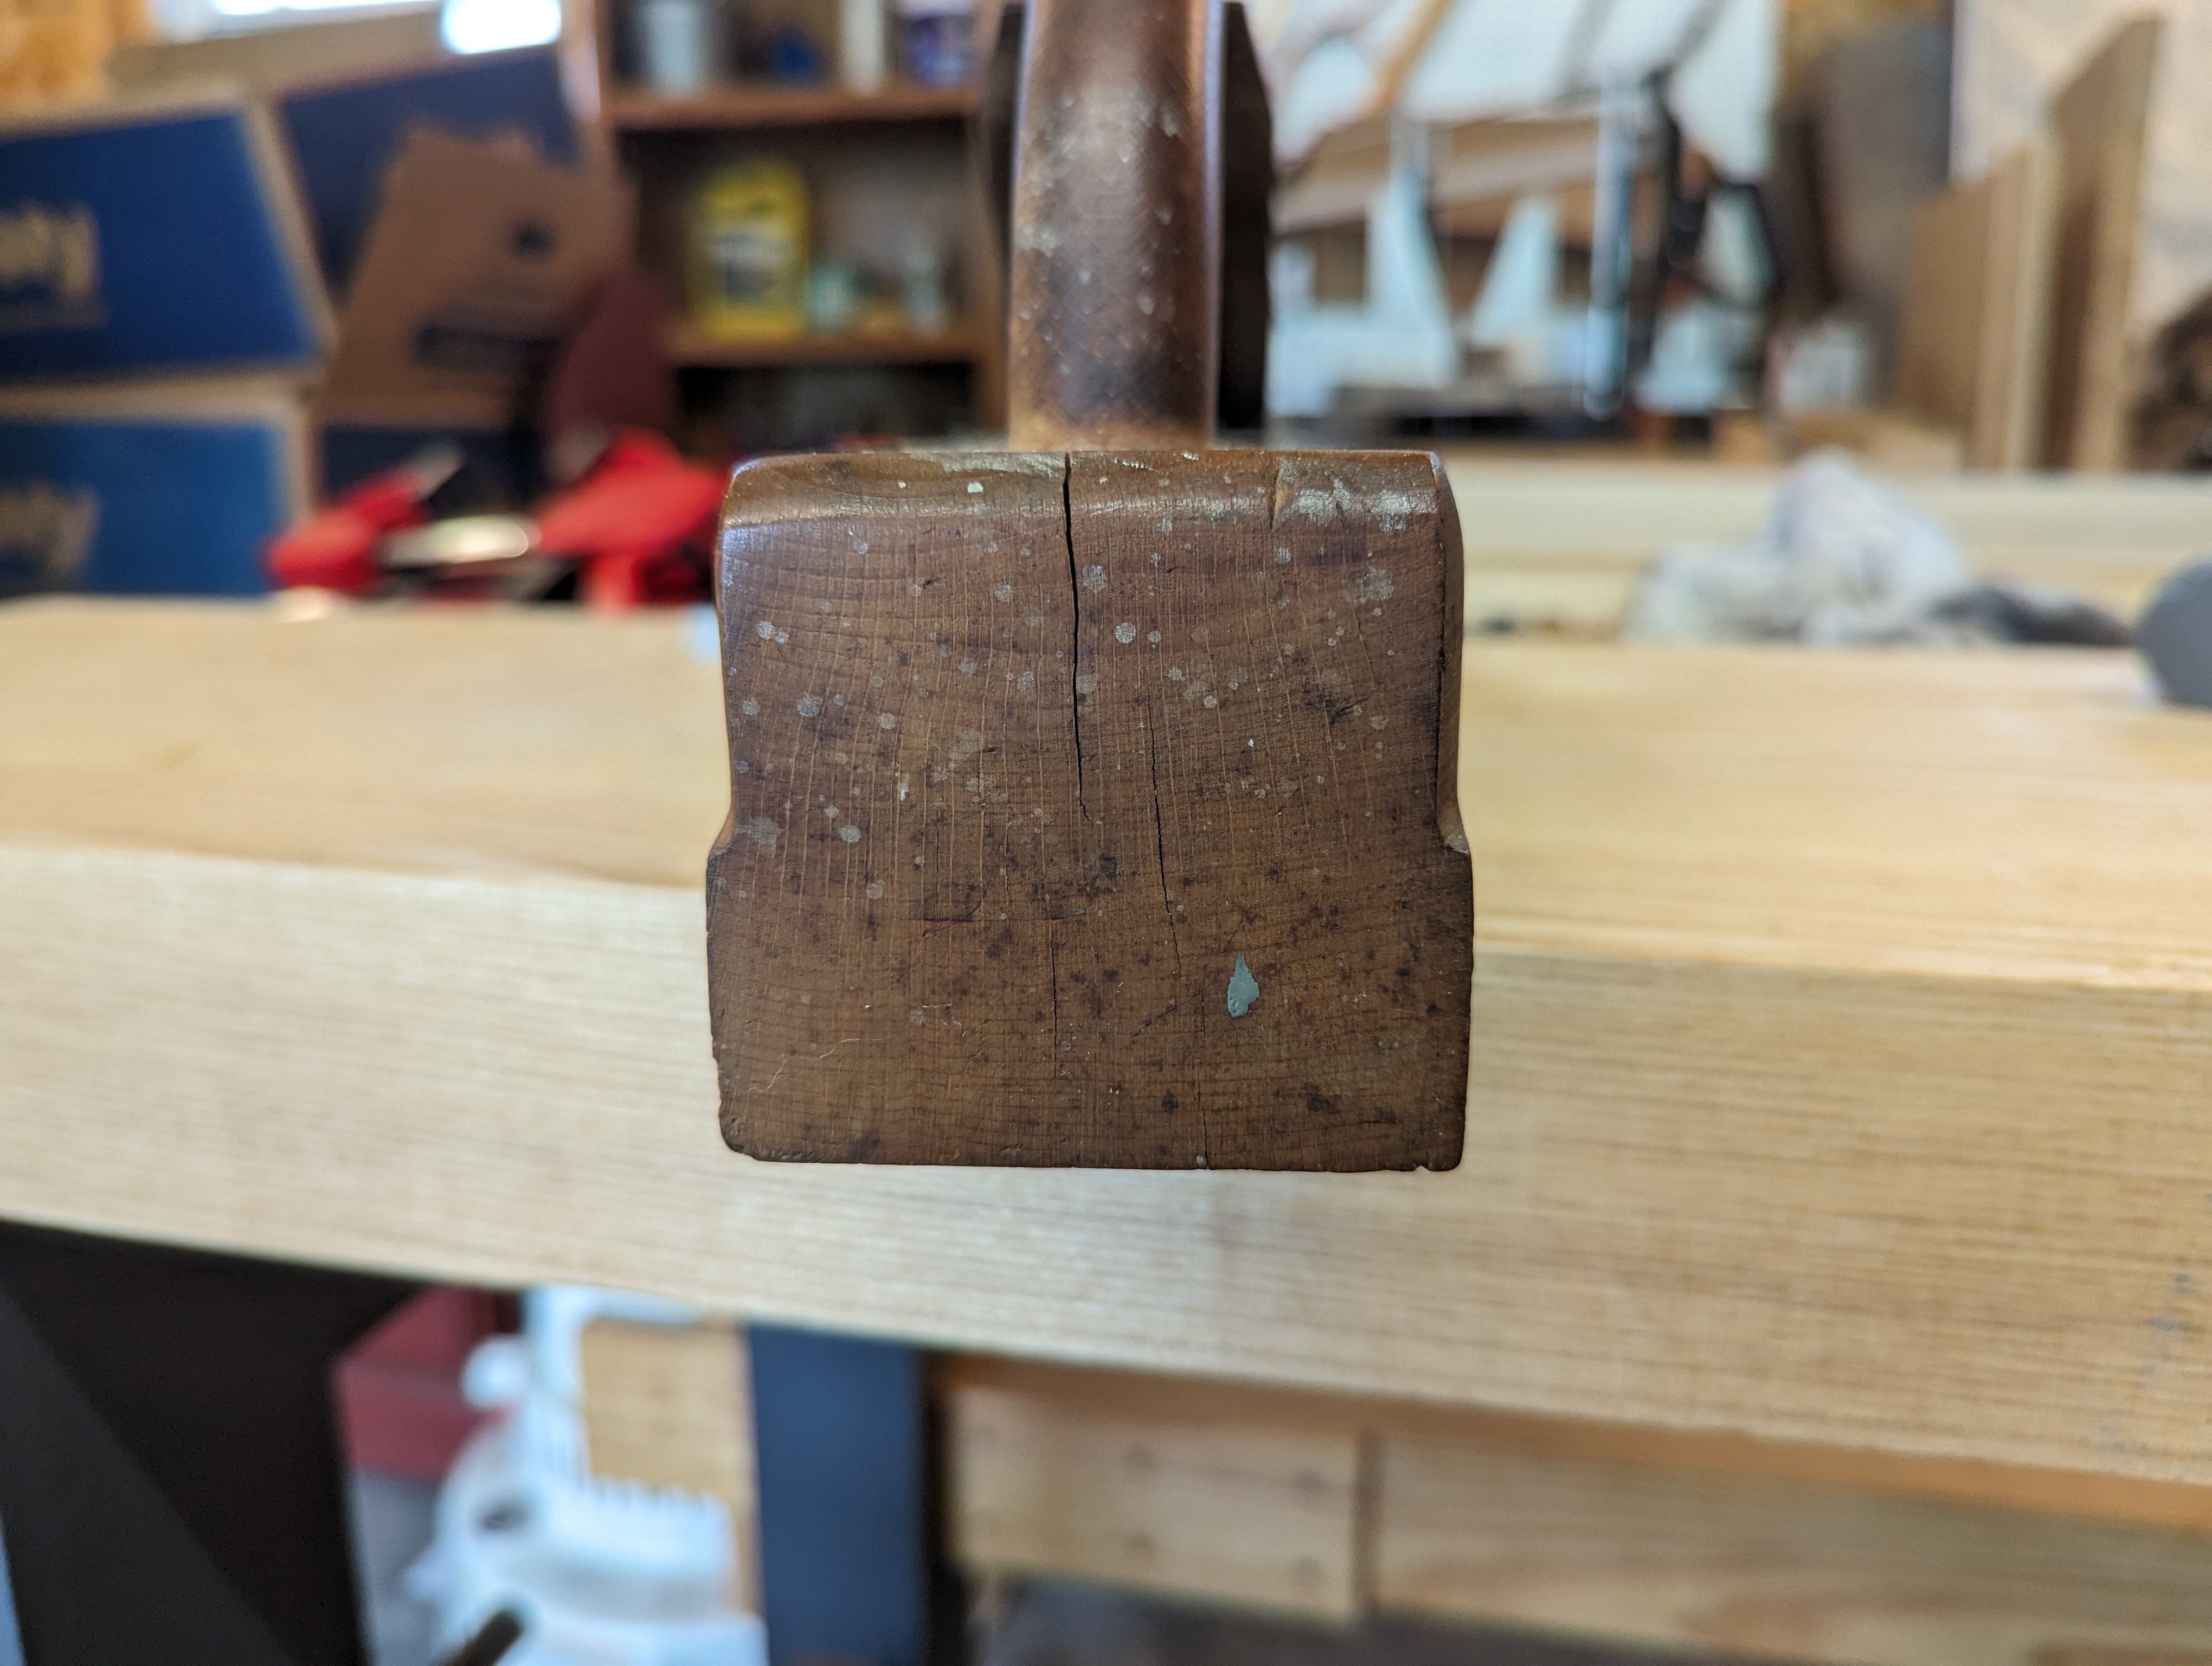
The strike button on the front of the plane is pristine and there is no mushrooming to speak of on the iron (mushrooming happens from consistent use of a metal hammer or mallet to adjust the depth and lateral adjustment of the iron). There are also no mallet dents on the heel of the plane; just a few shallow checks away from the sole.
It’s honestly a bit silly how nice this thing is.
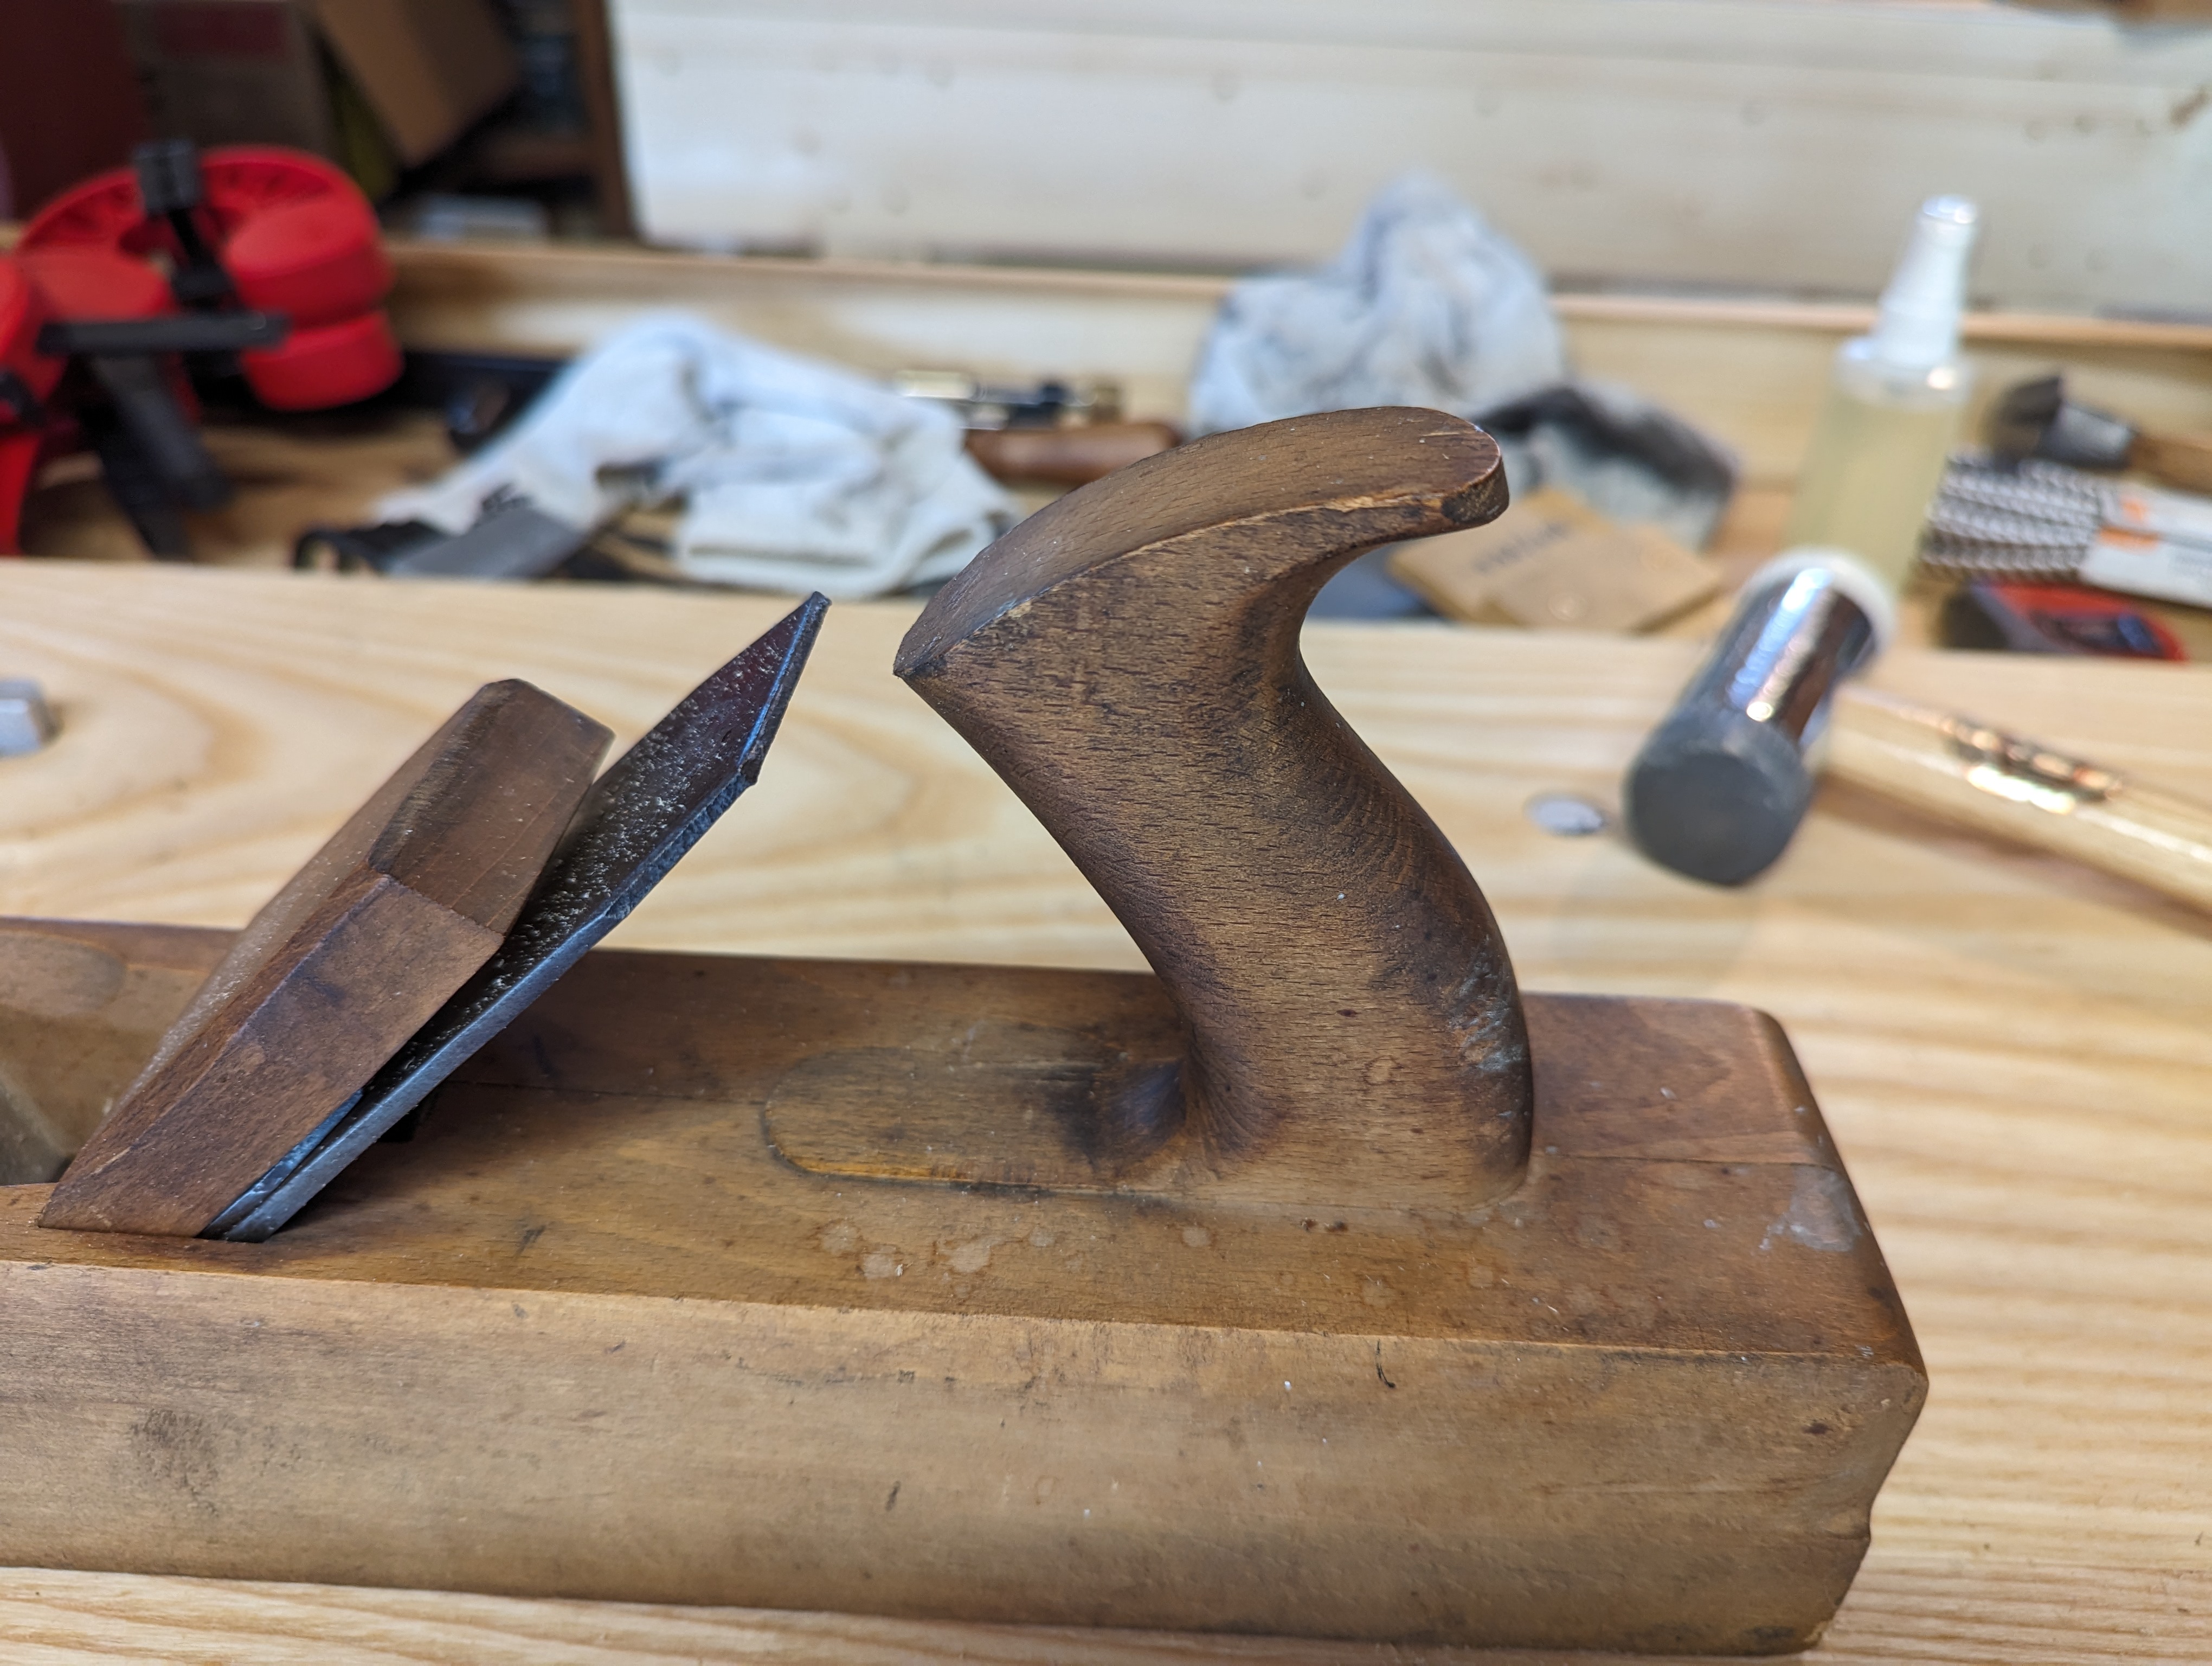
The tote is fully in tact, with just a couple of knicks showing lighter wood below which are probably just from being in a box bumping into other antique store fare (and not from use). The tote itself is a bit wobbly and just need regluing after 130 years. In fact, the only meaningful patina on the entire plane is on the back of the tote (where the palm of the user would be). If I had mineral spirits and denatured alcohol with me on the trip, I probably could have freshened it up to like new.
That could easily just be grime sticking to the exposed end grain and not patina from use.
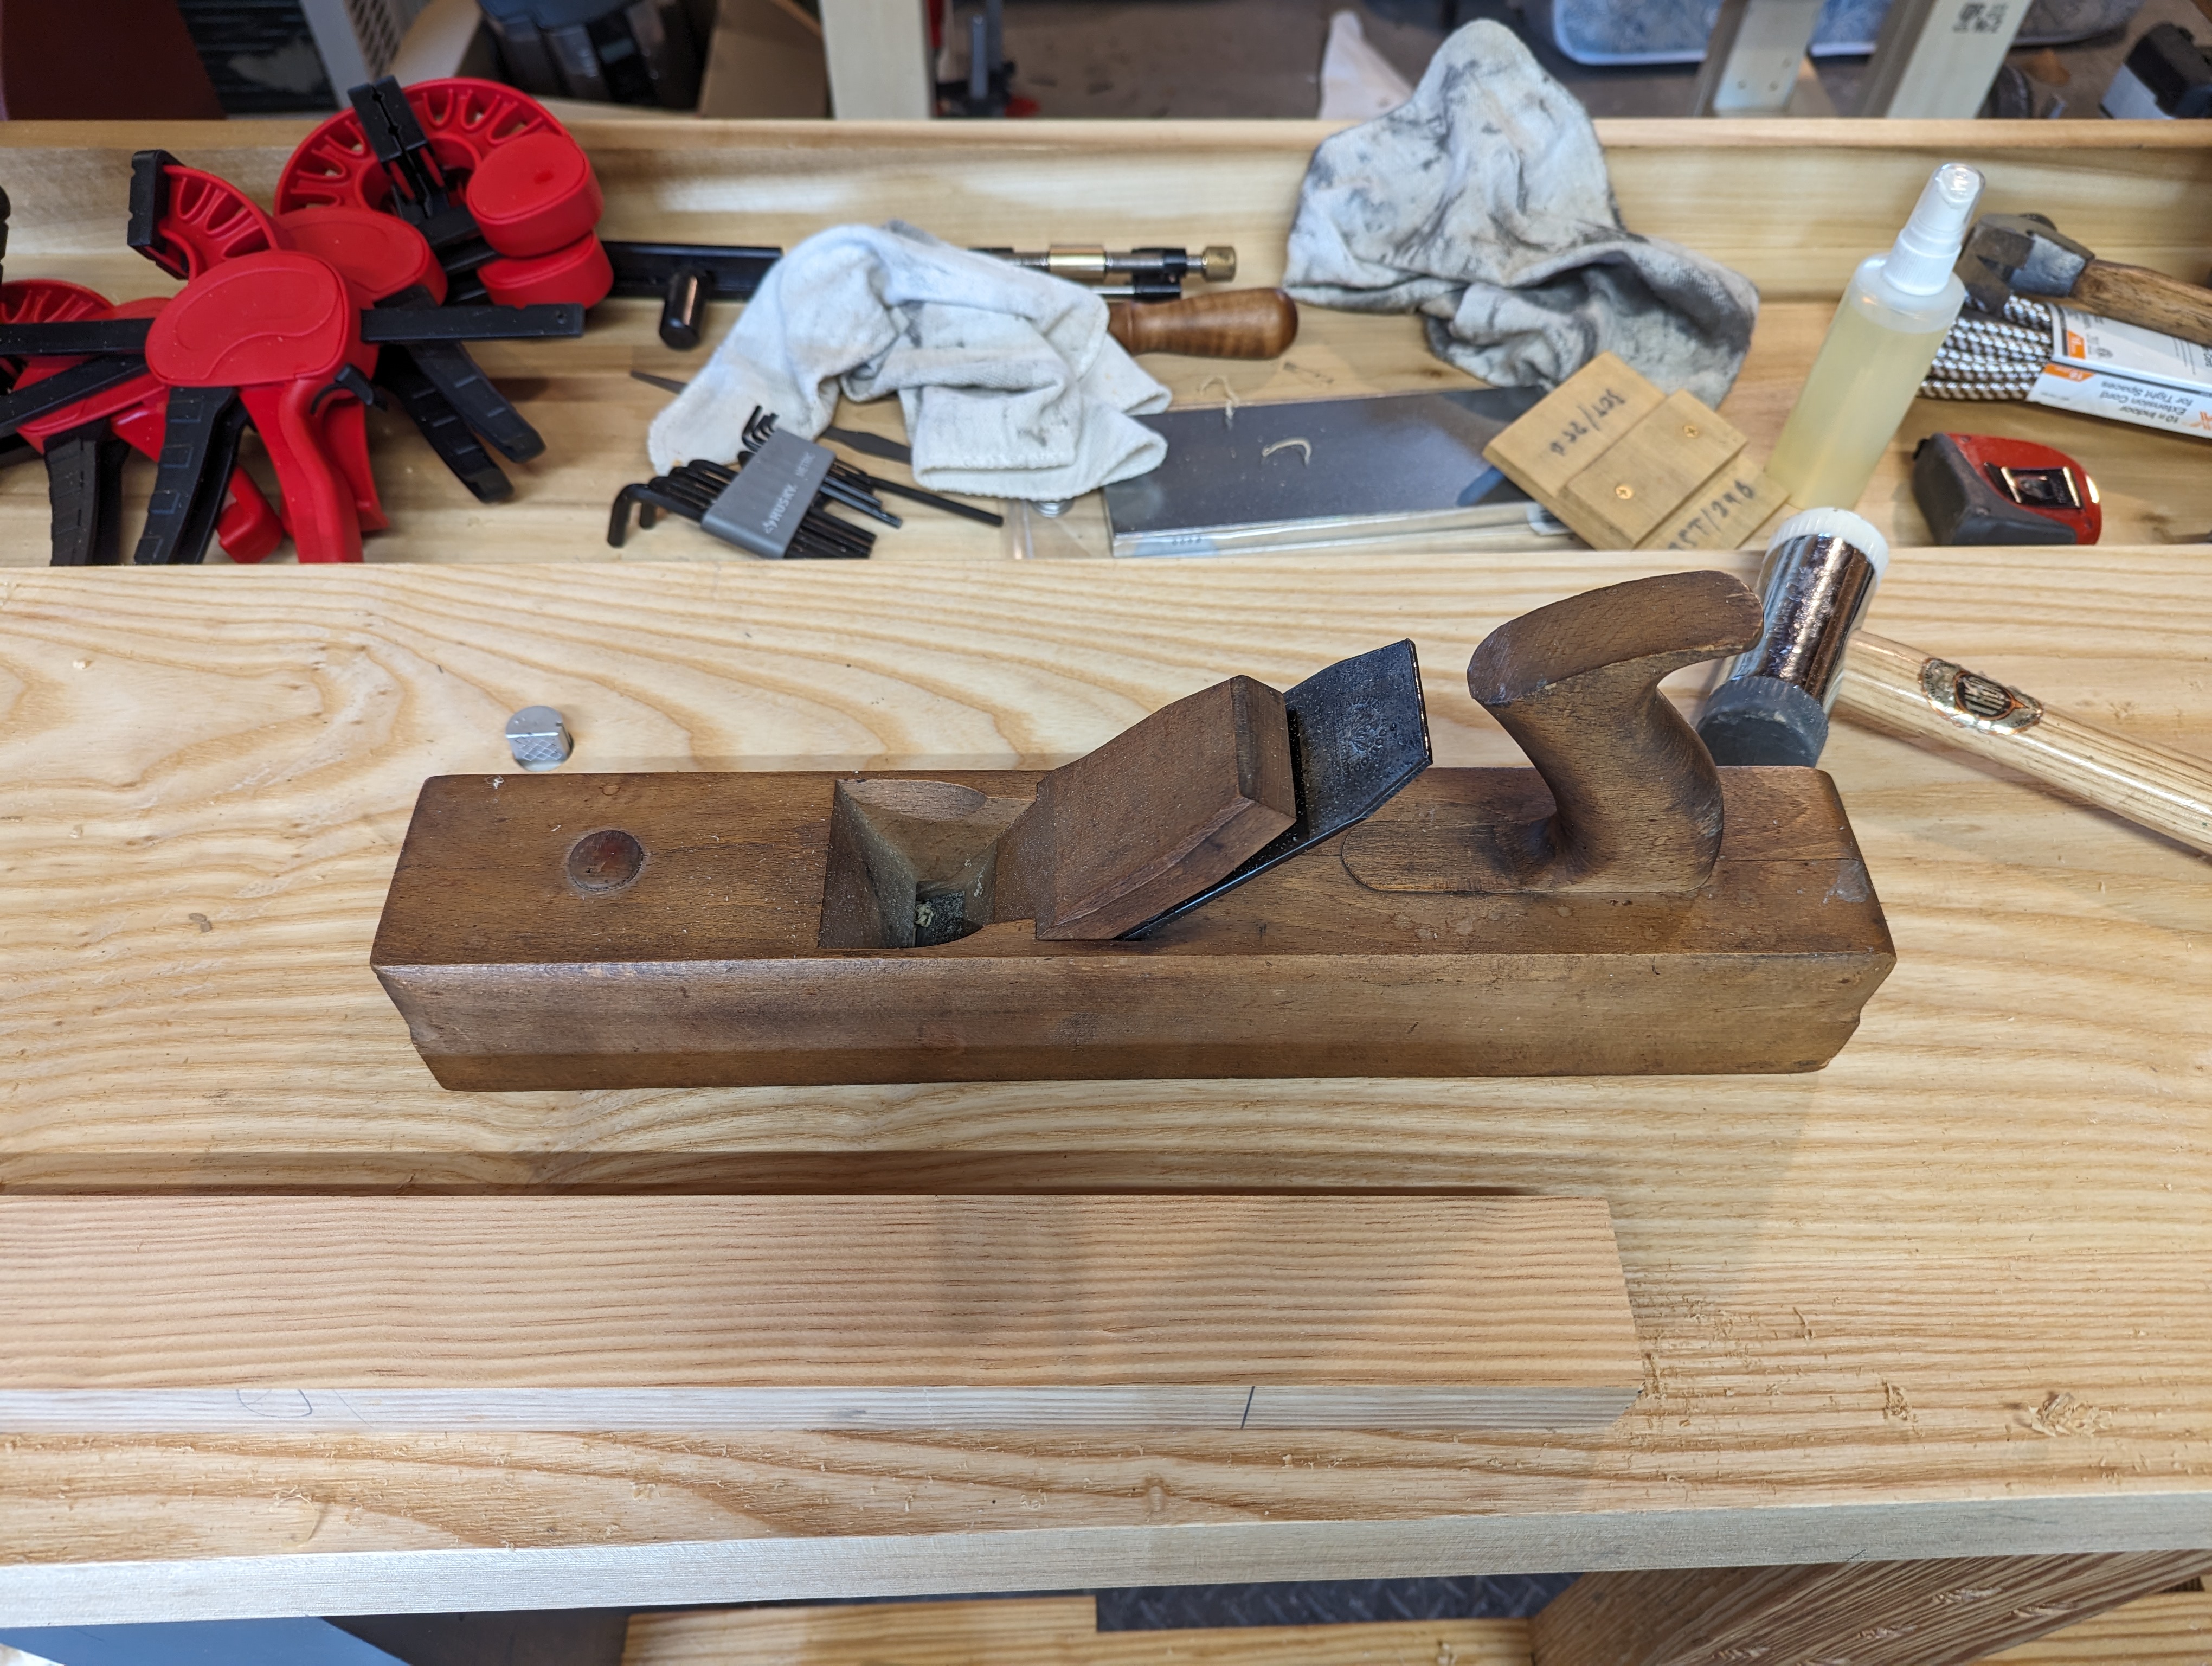
The mouth is still tight. Not tight for a jack plane, mind you; tight for any wooden plane. The front of the mouth is crisp and 90 degrees to the sides of the sole. The back of the mouth (behind the iron) is a little chipped but that seems pretty common on wooden soled planes where the bed comes to such a fragile point. A couple swipes with a fine cut file will clean it right up. I’m not even sure the sole has ever been flattened, but it didn’t take much to true it with a fore plane. And there are no splits on the cheeks around the wedge.
Seriously. Look at that crisp mouth on a 130 year old wooden jack plane.
The iron looks pretty much fresh to me; I don’t think it’s ever been reground. There were no shavings caught between the iron and the chip breaker when I pulled the two apart; just a little flaky orange rust. Other than being sharpened a bit out of square, and some camming on the cap iron screw, you’d be hard pressed to prove this thing ever actually saw any real use. There aren’t even any of the usual paint splatters or other stains from being near a workbench.
Those Victorian era prisoners sure knew how to make ’em!
All in all, I have a hard time believing that someone made even a part time living with this tool. It’s just too pristine. It’s possible there was a hobbyist in the late 19th century, perhaps an attorney or accountant, who took pride in the upkeep of his tools, even though he rarely put them to heavy use. But that seems a bit too romantic and hits a bit too close to home.
In any event, it will have a good home with me. Even with occasional use (I’m not giving up my metal planes any time soon), this beauty will probably see more action with me that it did in its youth.
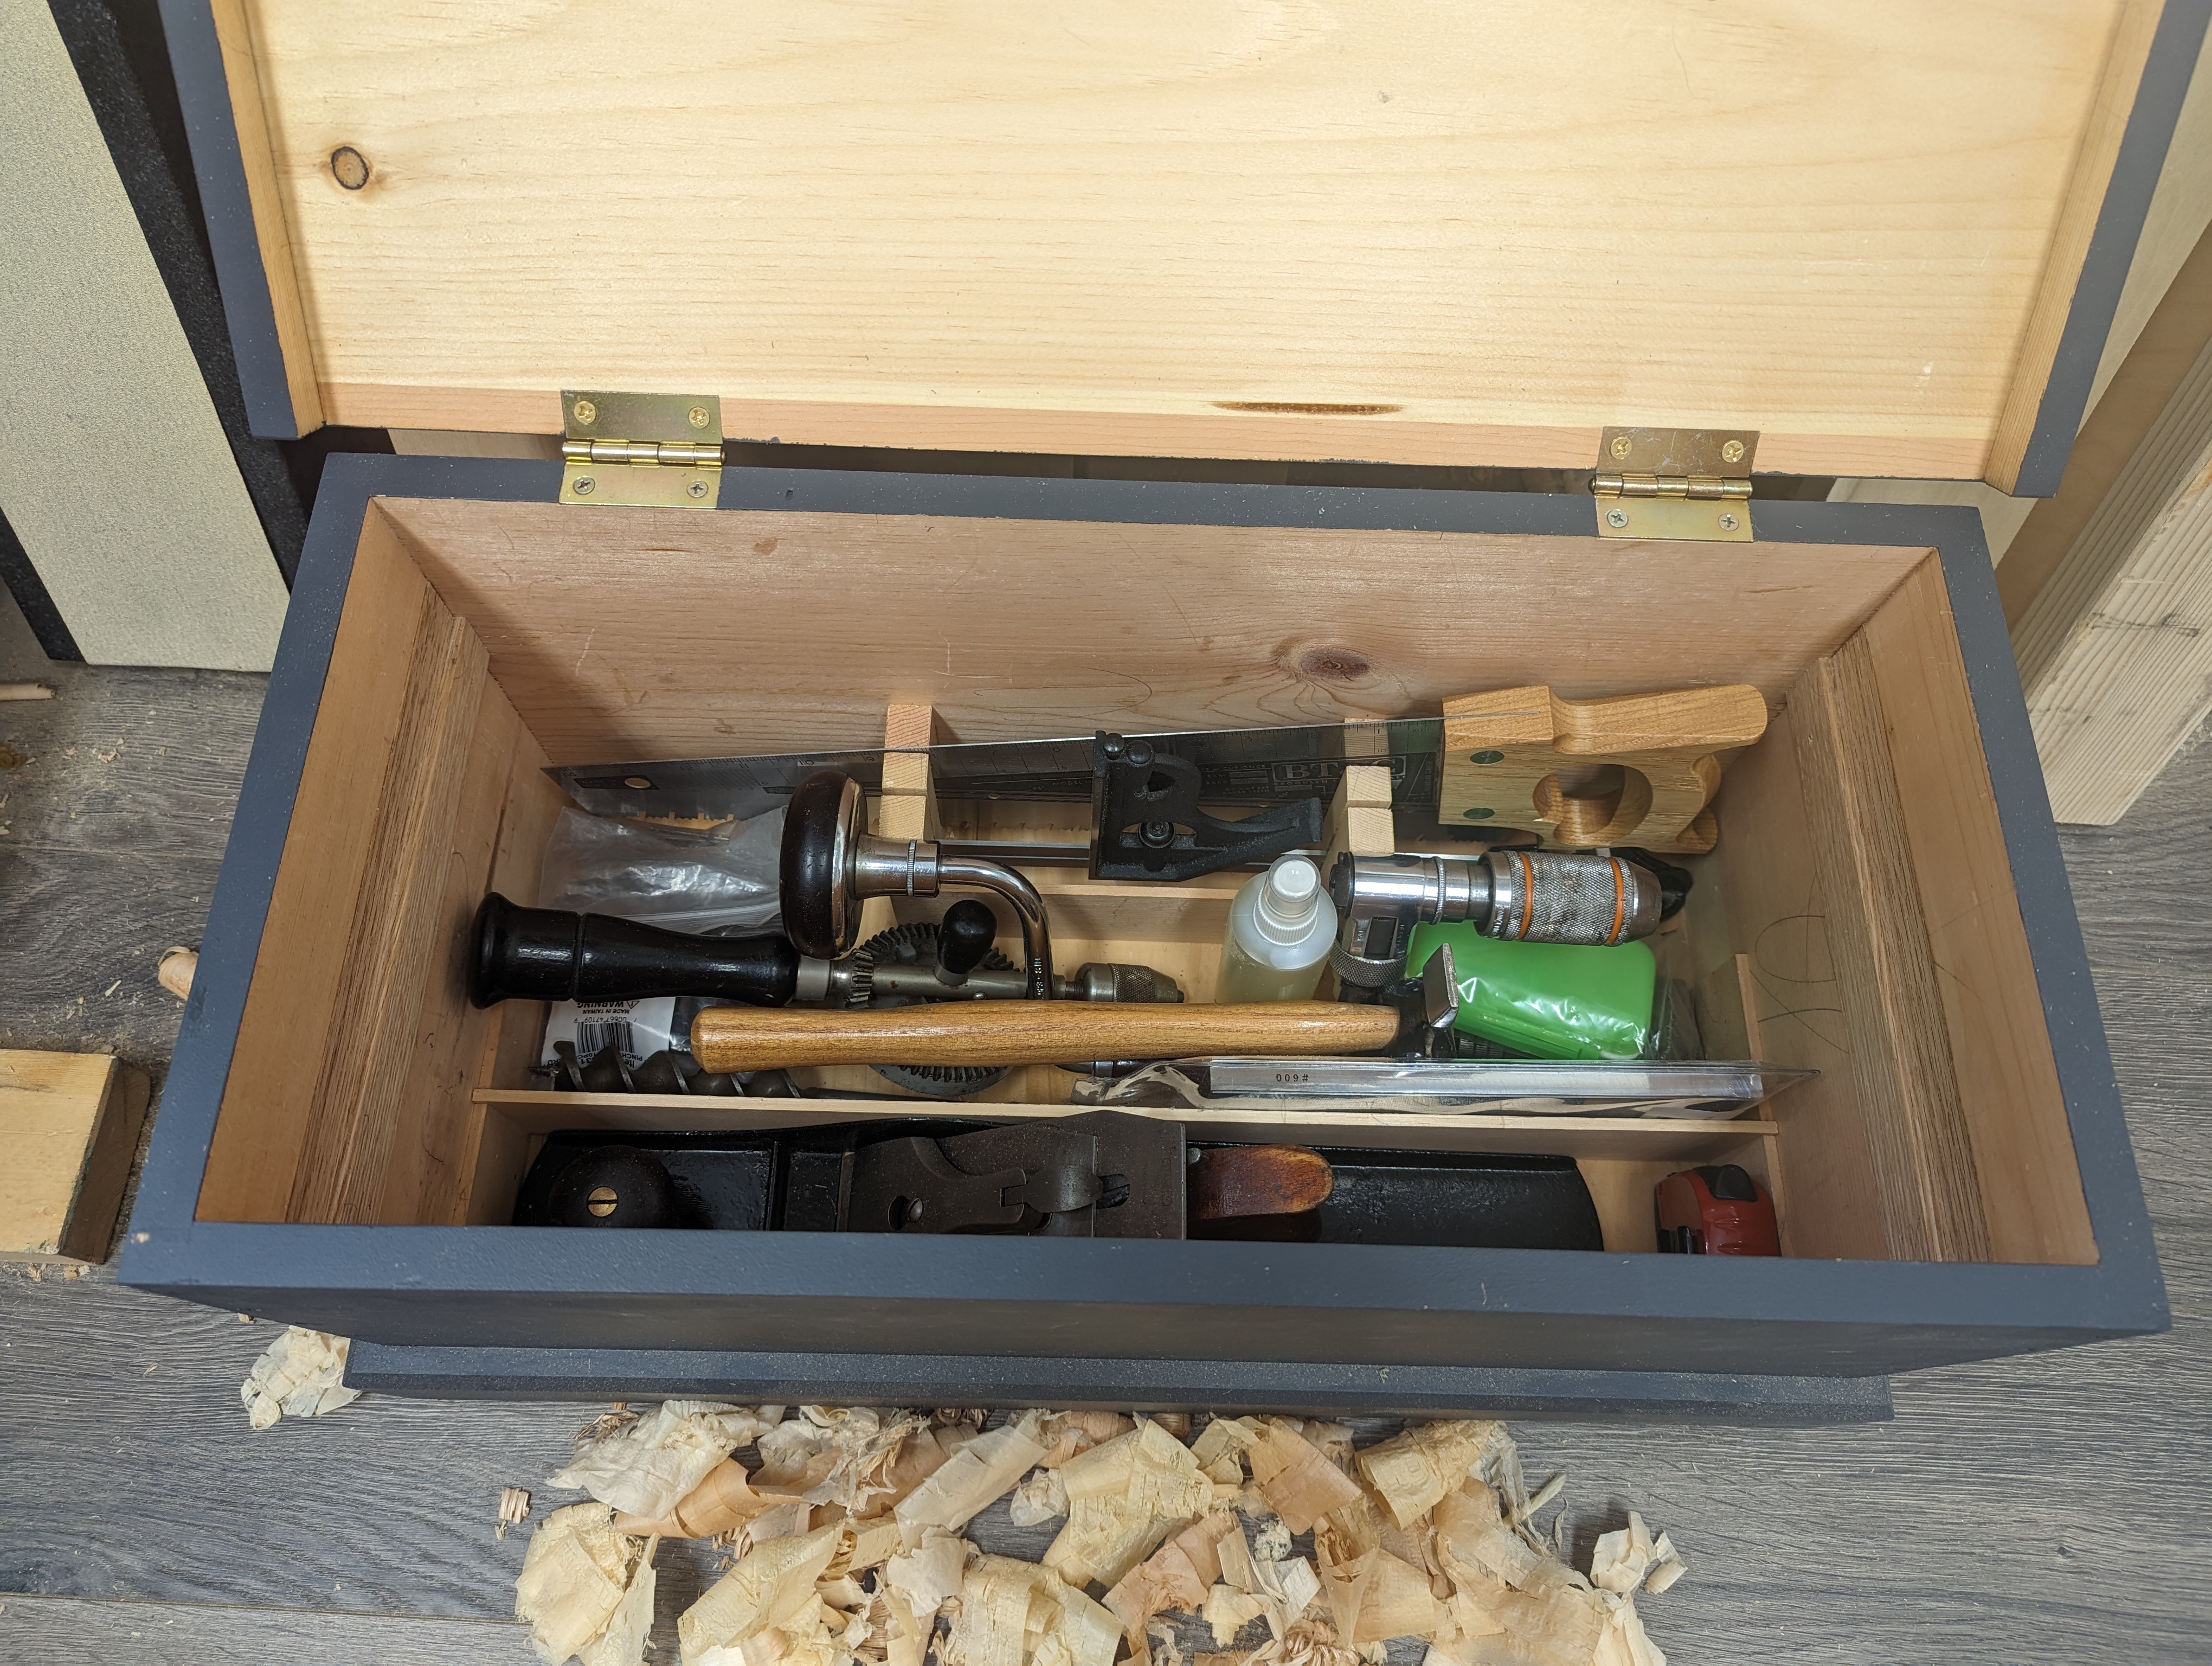
It’s no secret that I like me a sliding tray in a toolbox. See here. Or here. A pull out tray that covers the whole well is well and good if that’s your thing. I have a vintage craftsman metal toolbox that’s built that way. But I find it gets in the way on the bench.
As shown by the links above, I’ve made a few traveling toolboxes in my day. Any tool storage solution should be customized to tools it will hold, of course. Though much trial and error, I’ve settled on the perfect size (using 5/8″ pine for the case) being roughly 22″ long x 11″ wide x 9″ high. This gives plenty of room in the well for a No. 6 Stanley (my preferred “single” plane), a saw till for a small panel saw (the BTC hardware store saw is shown below, but any small hardpoint saw will fit too) and combination square, a short sweep hand brace and bits, and an eggbeater drill, plus a hammer and a sharpening stone. If the chest were taller, I’d probably add a tool rack to the back wall of the well.
And some other odds and ends.
But a No. 6 is only about 5 1/4″ high, and even a panel saw in its till is less than 6″. What do do with the other 3+” of well space? A sliding tray, of course, that slides front to back and holds everything else I’ll need.
3″ is too deep for a single tray of this size. Nothing you’re carrying You’d waste a ton of space. And 3″ of height is probably enough for two tiers of sliding trays (bottom probably being 1 1/2″ deep (so 1 3/4″ with the bottom)). I’ve certainly done that before in the blue toolbox.
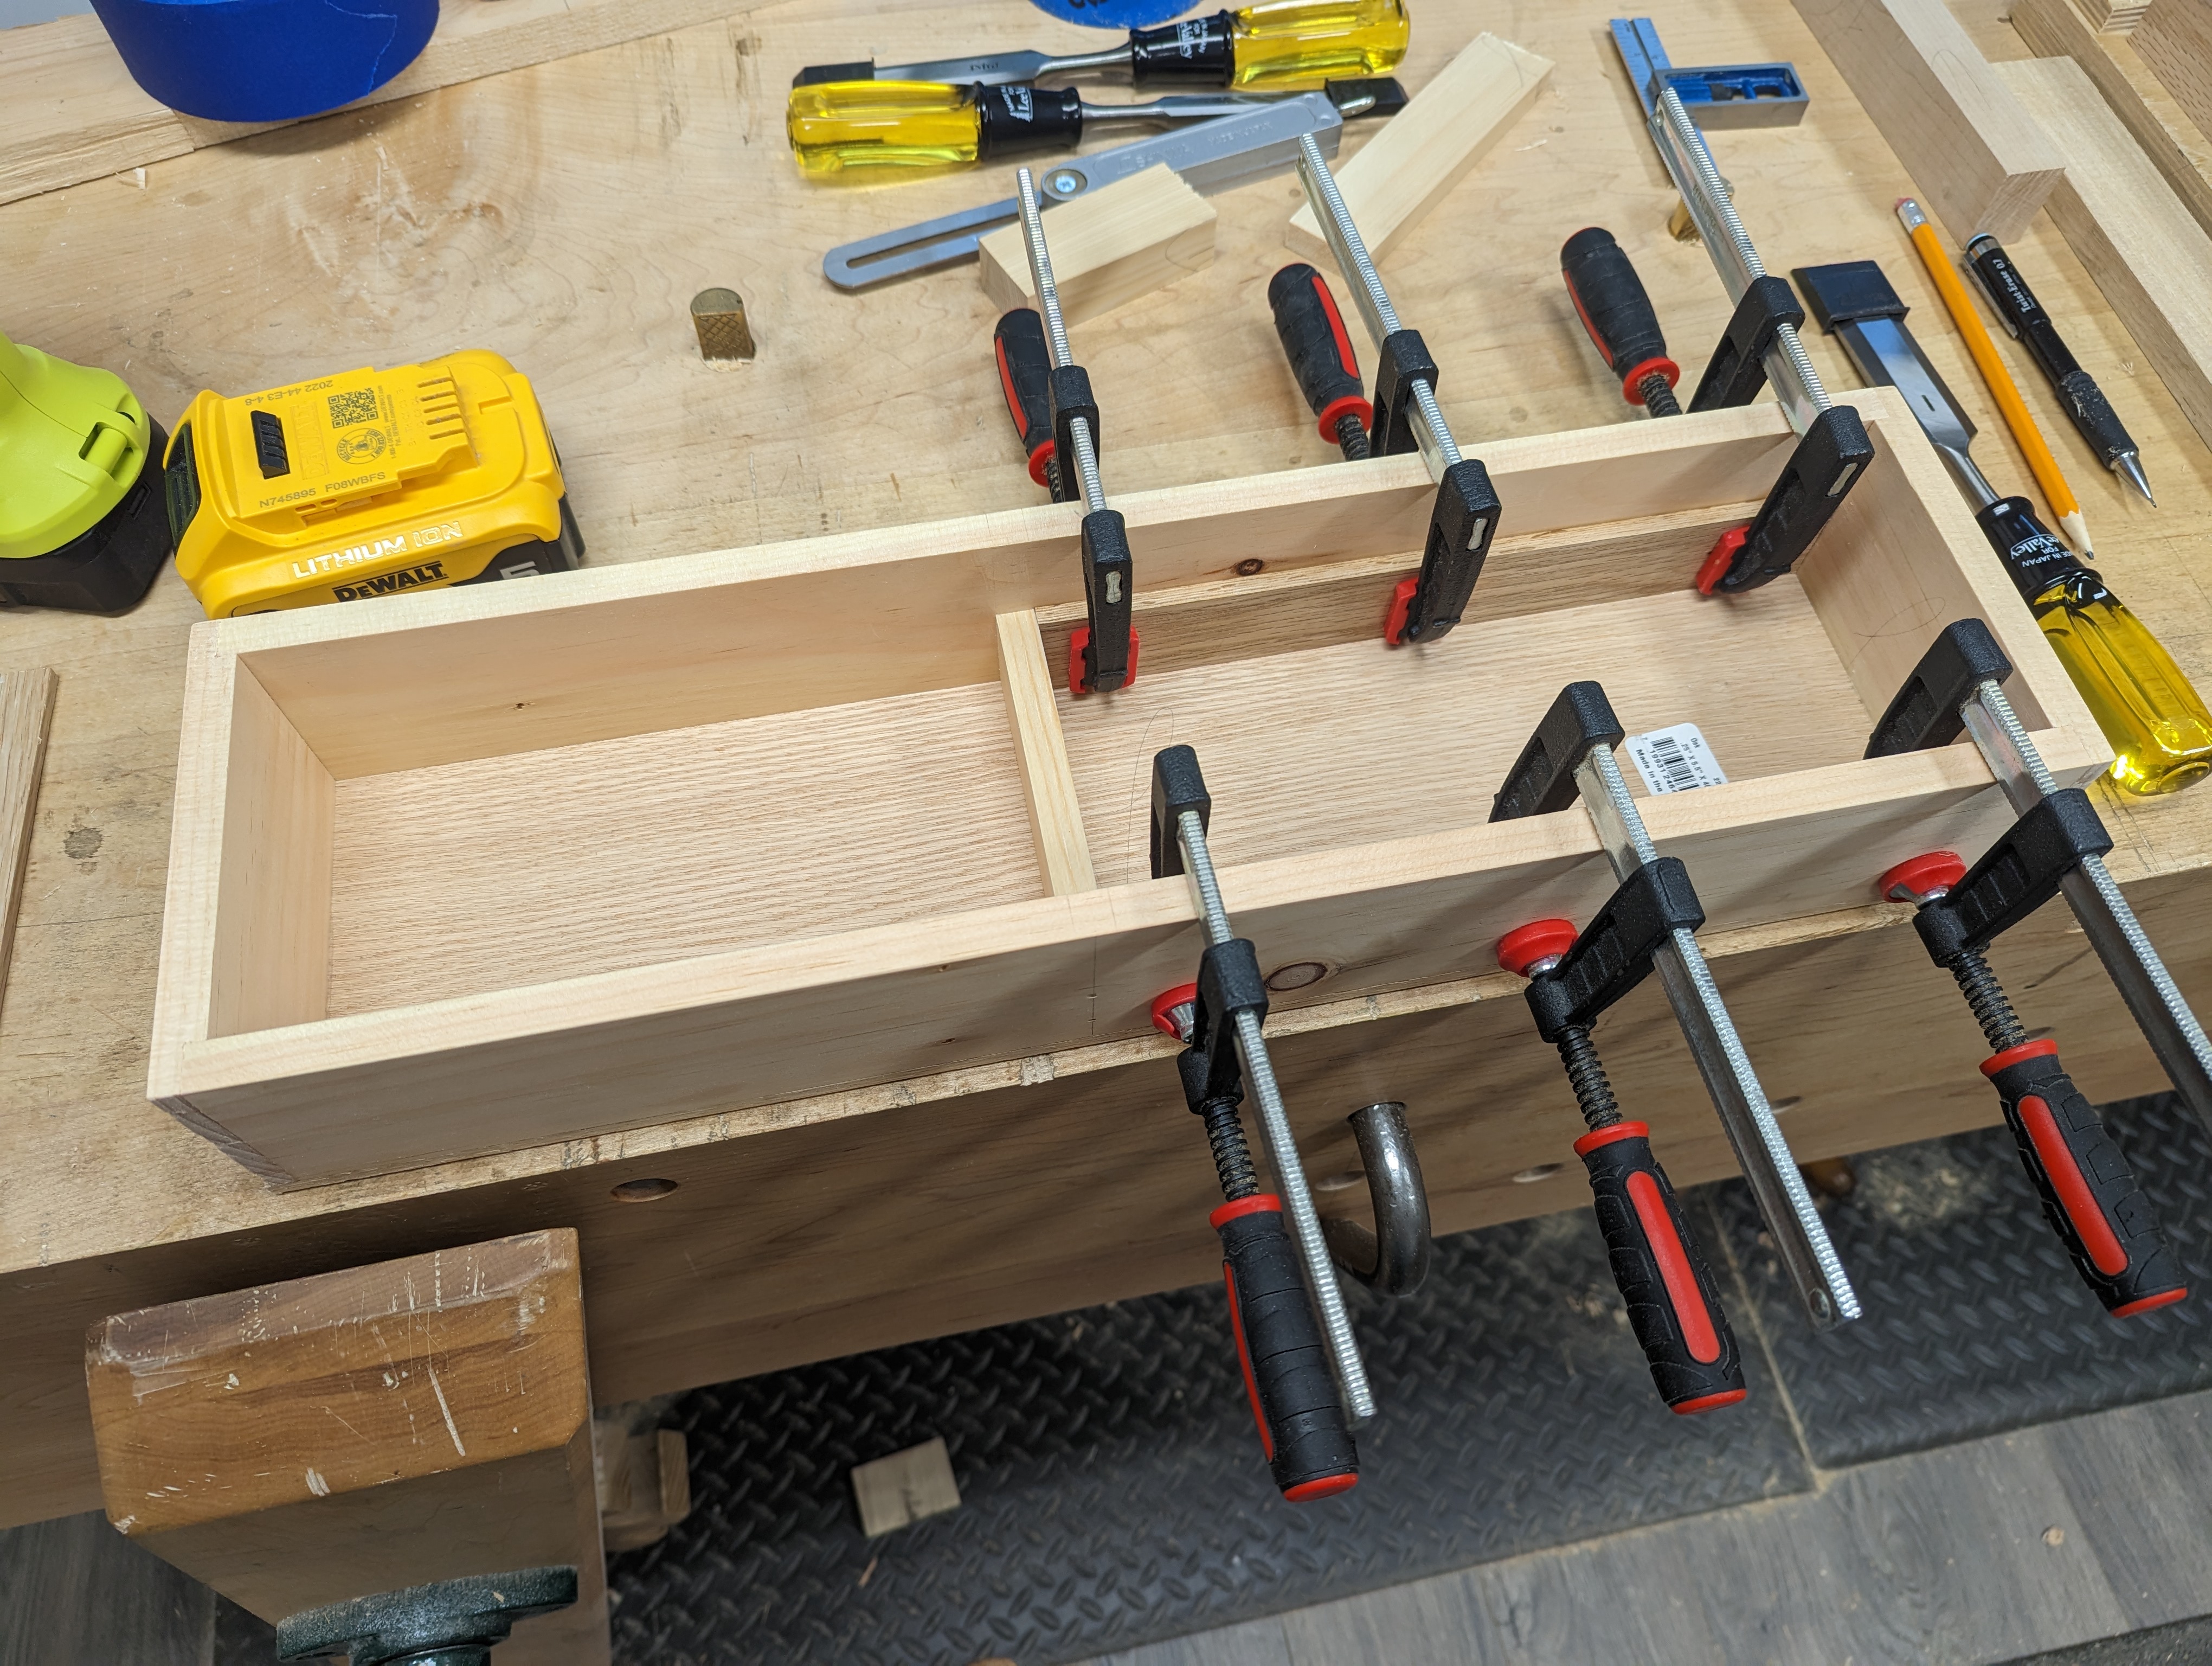
But I thought it would be fun this time to add the second tray inside the first. So I first whipped up a single deep tray with 1/2″ pine in the usual style (1/4″ oak bottom with grain running parallel to the length of the tray, nailed onto the tray) that was about 5″ wide. I also divided off a dedicated chisel compartment, since there will be lots of piling into the rest of the tray.
The divider also let me use up some shorter oak scraps for the inner runners.
To size the inside tray, I found the tallest items that would sit in the bottom of the tray tray (which was either the stock of my marking gauge or my sharpening guide) and sized some thin oak runners to that height, plus 1/8″ (see picture above). Those got glued in to the long sides of the tray. I then knocked together another tray in 3/8″ pine that was pretty much exactly half the length tray and tall enough to fill the remaining depth of the large tray (taking into account the 1/4″ oak tray bottom). The grain of the tray bottom runs perpendicular to the length of the tray this time.
It overlaps the chisel compartment a bit but doesn’t get in the way.
I’ve found the inside tray acts as a bit of a gyroscope when this thing is on the move. The toolbox easily fits in the back seat of the car and I’ve noticed the tray whips around less than if it were a single tray. Perhaps the inner tray shifts a bit on the x axis and takes away some of the y axis momentum (inertia?) of the larger tray. Who knows?
The auger bit seems to have migrated out of the well.
If you need a how-to on making and fitting sliding trays in a tool chest, I highly recommend the Christopher Schwarz 2015 Popular Woodworking article on a Traveling Toolchest (a medium chest that is still big enough for a hobbyist woodworker’s set of tools). Go to the “Interior” section of the article.
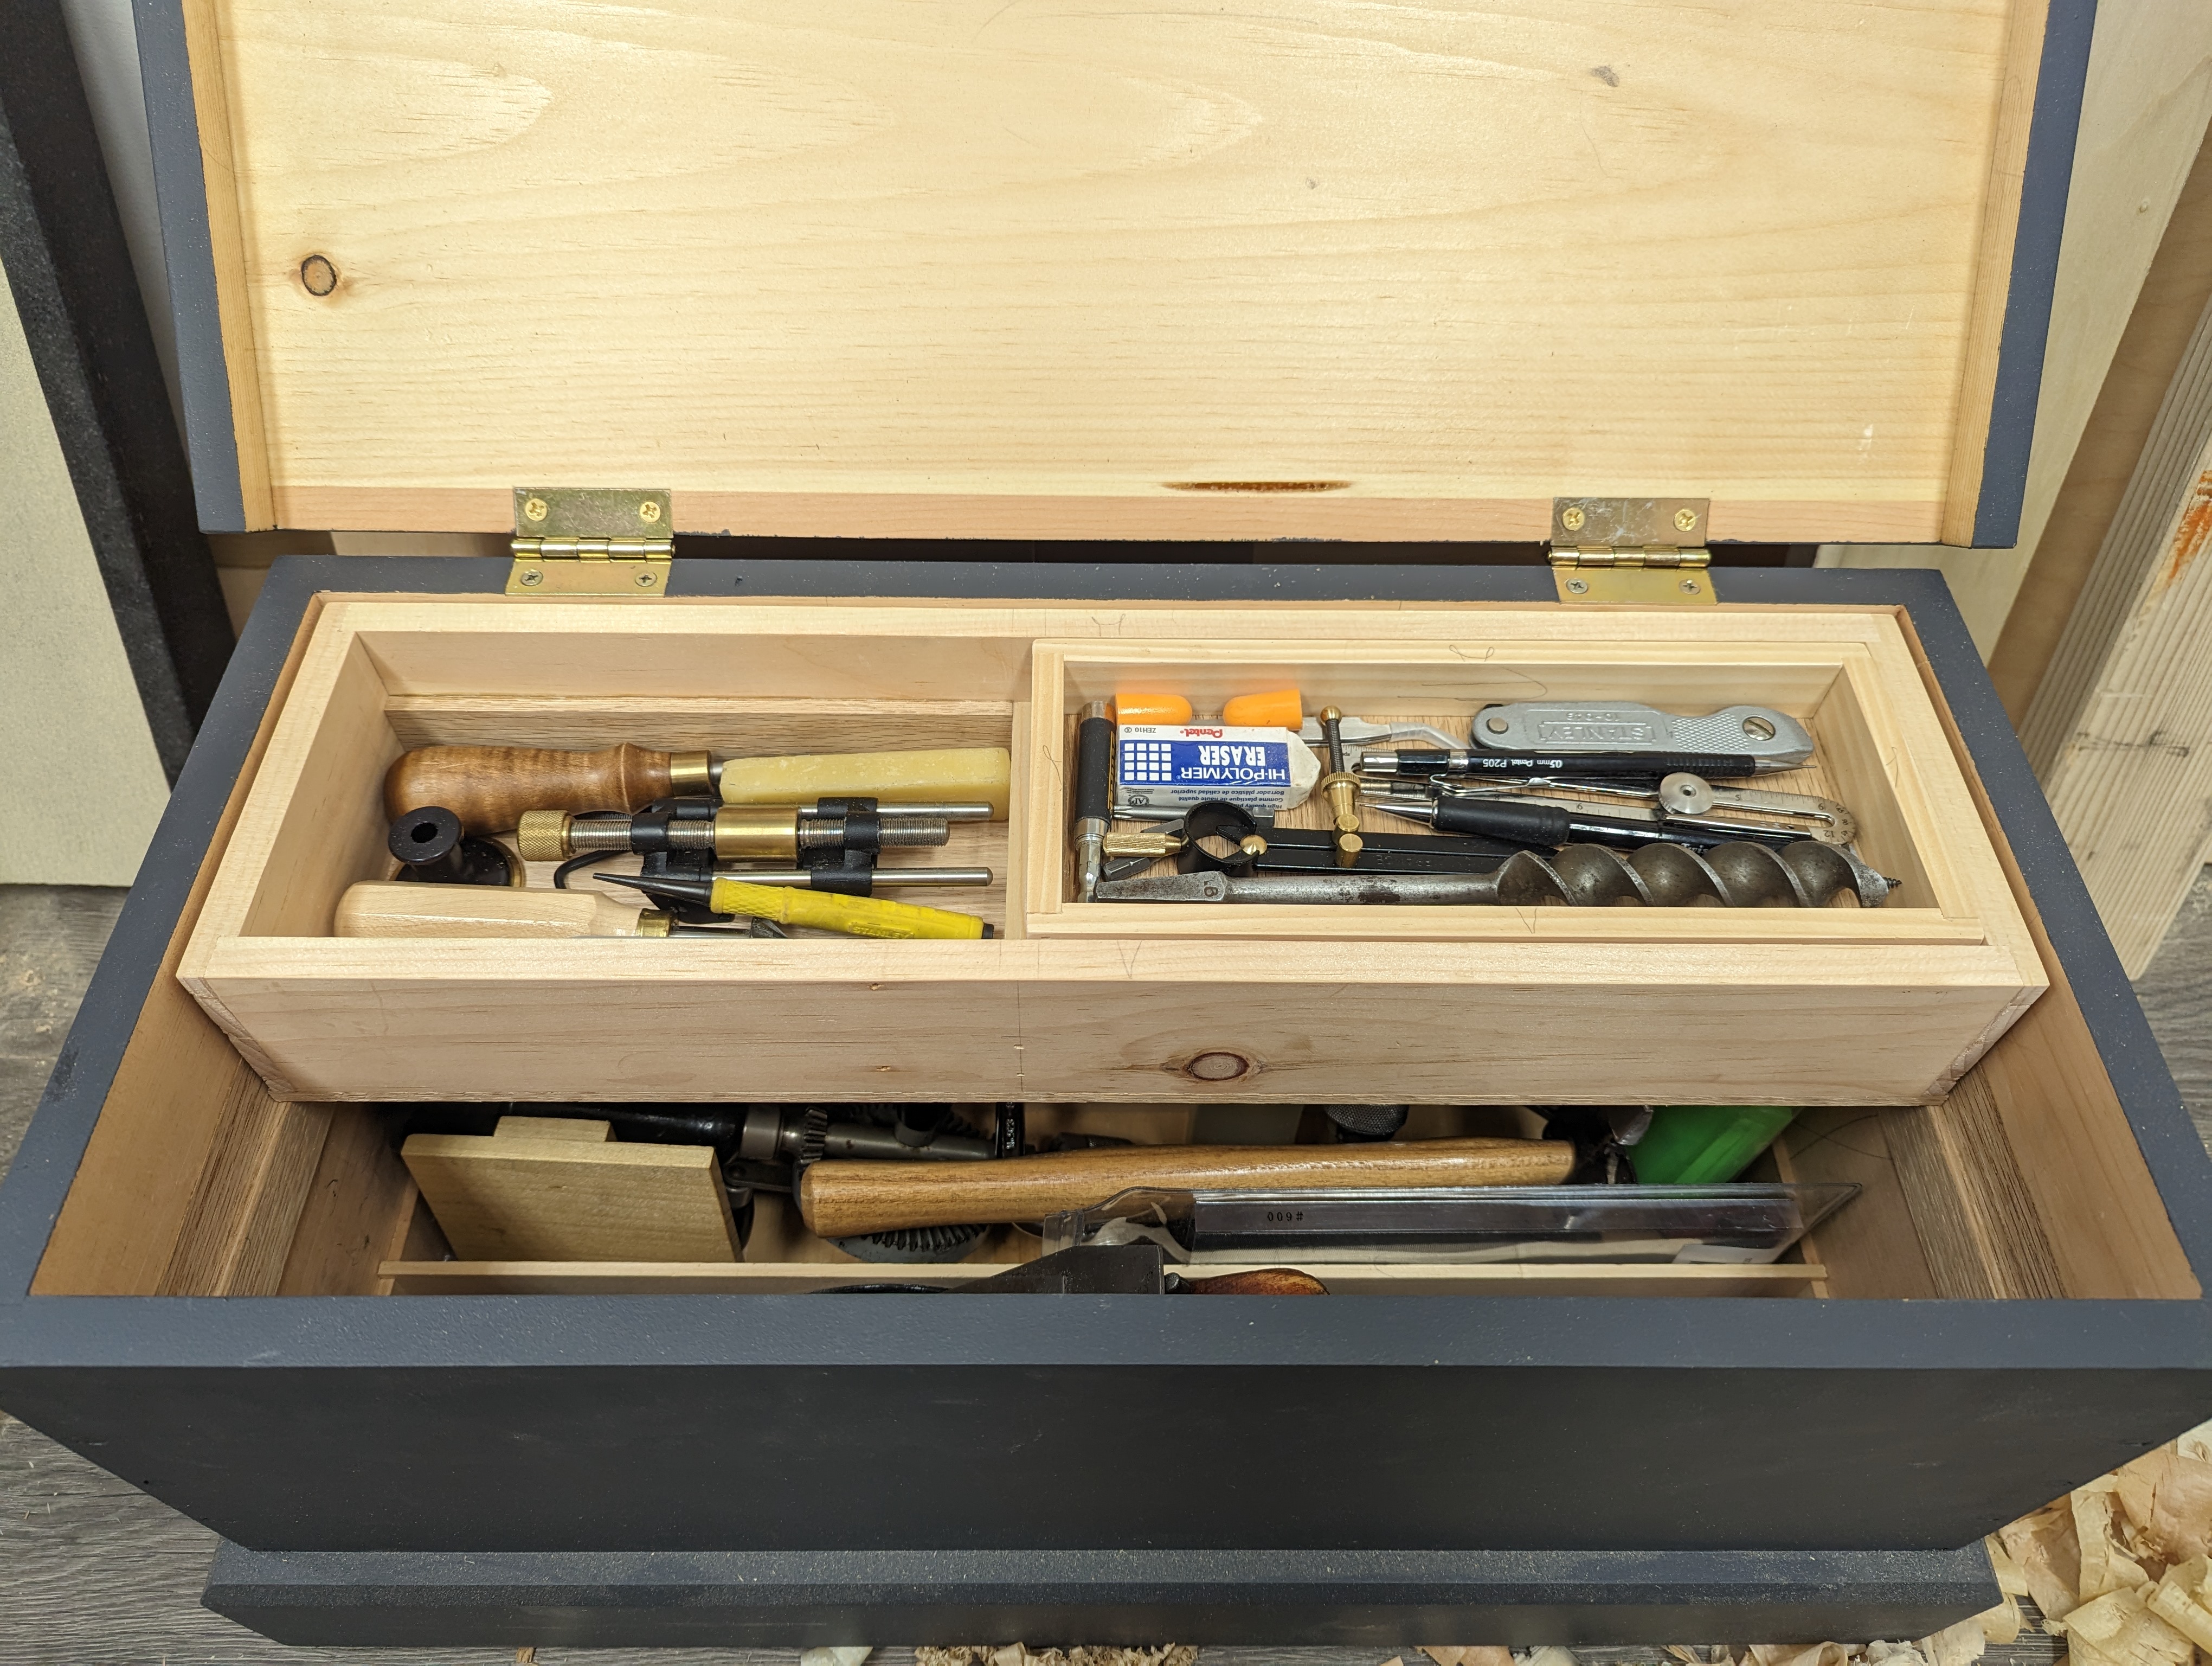
This setup works so well, I also added a sliding inner tray to the drawer on my hanging tool cabinet in the shop. More on that later, but a sneak preview below.
No gyroscopic action needed here.
I hope everyone gets some workshop time on the holiday weekend.
I made a comment on a recent post about how I ever managed to live without an impact driver for almost a decade of woodworking. I’d like to expound on that a bit more.
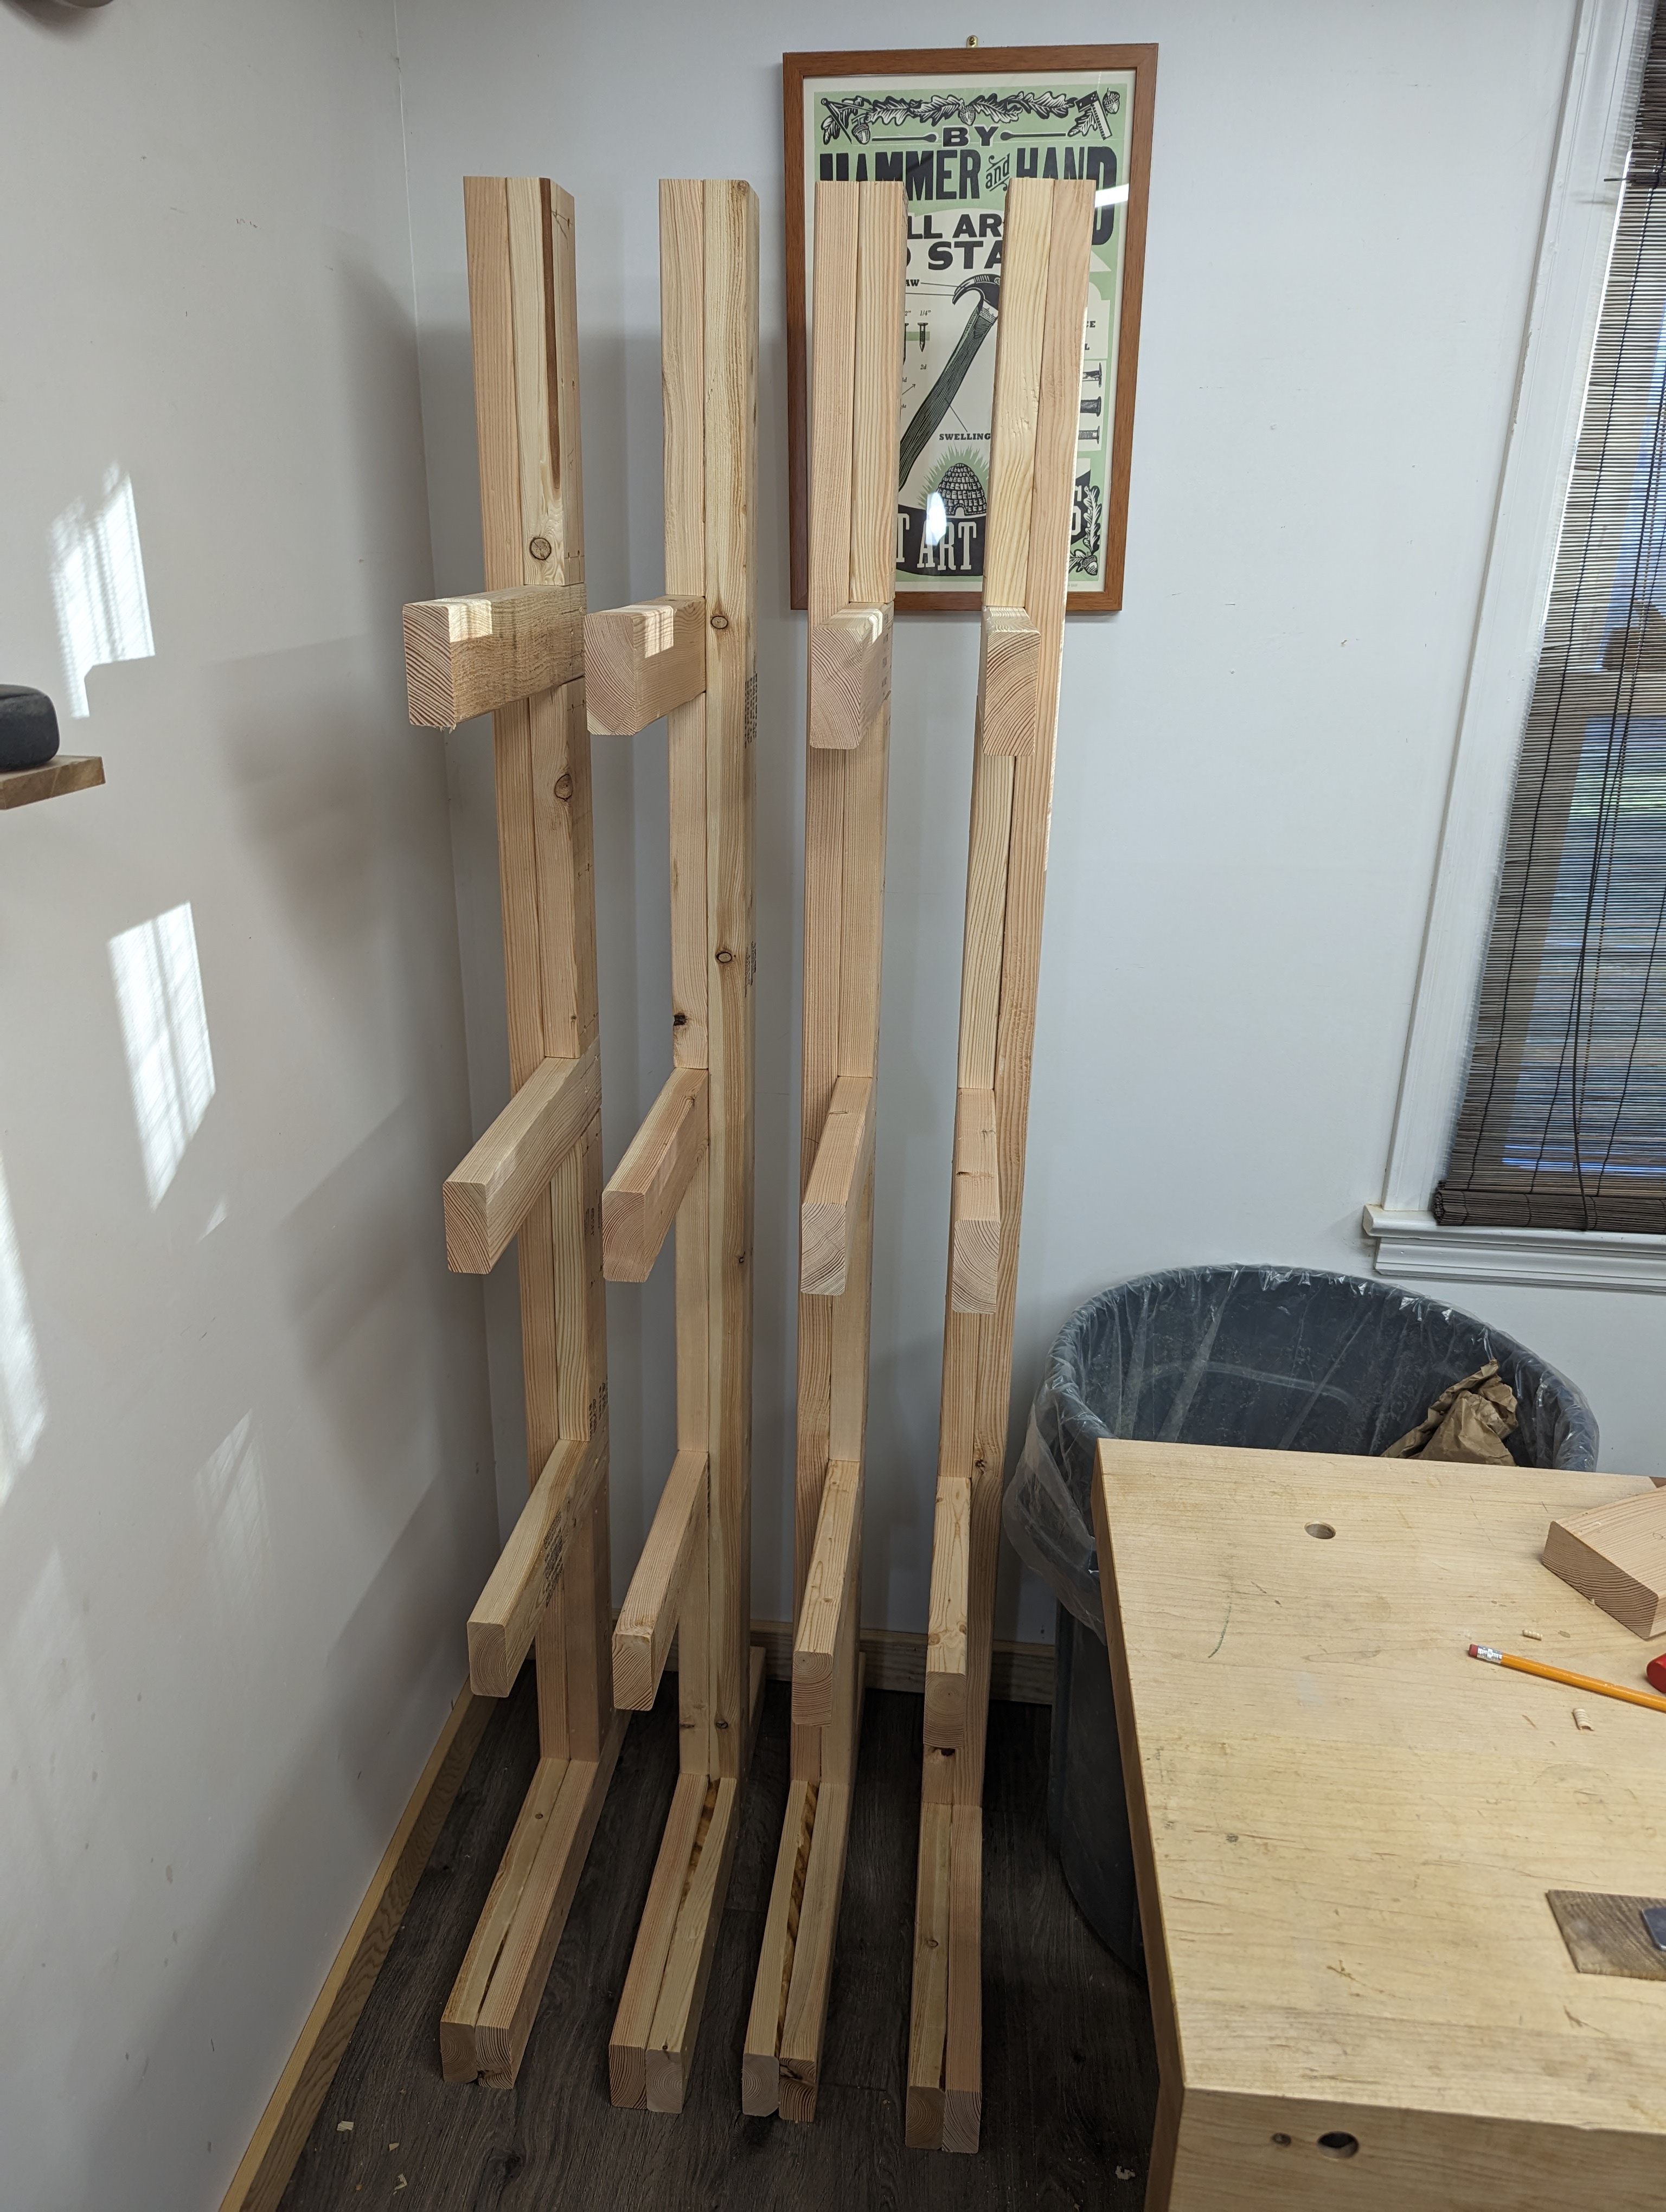
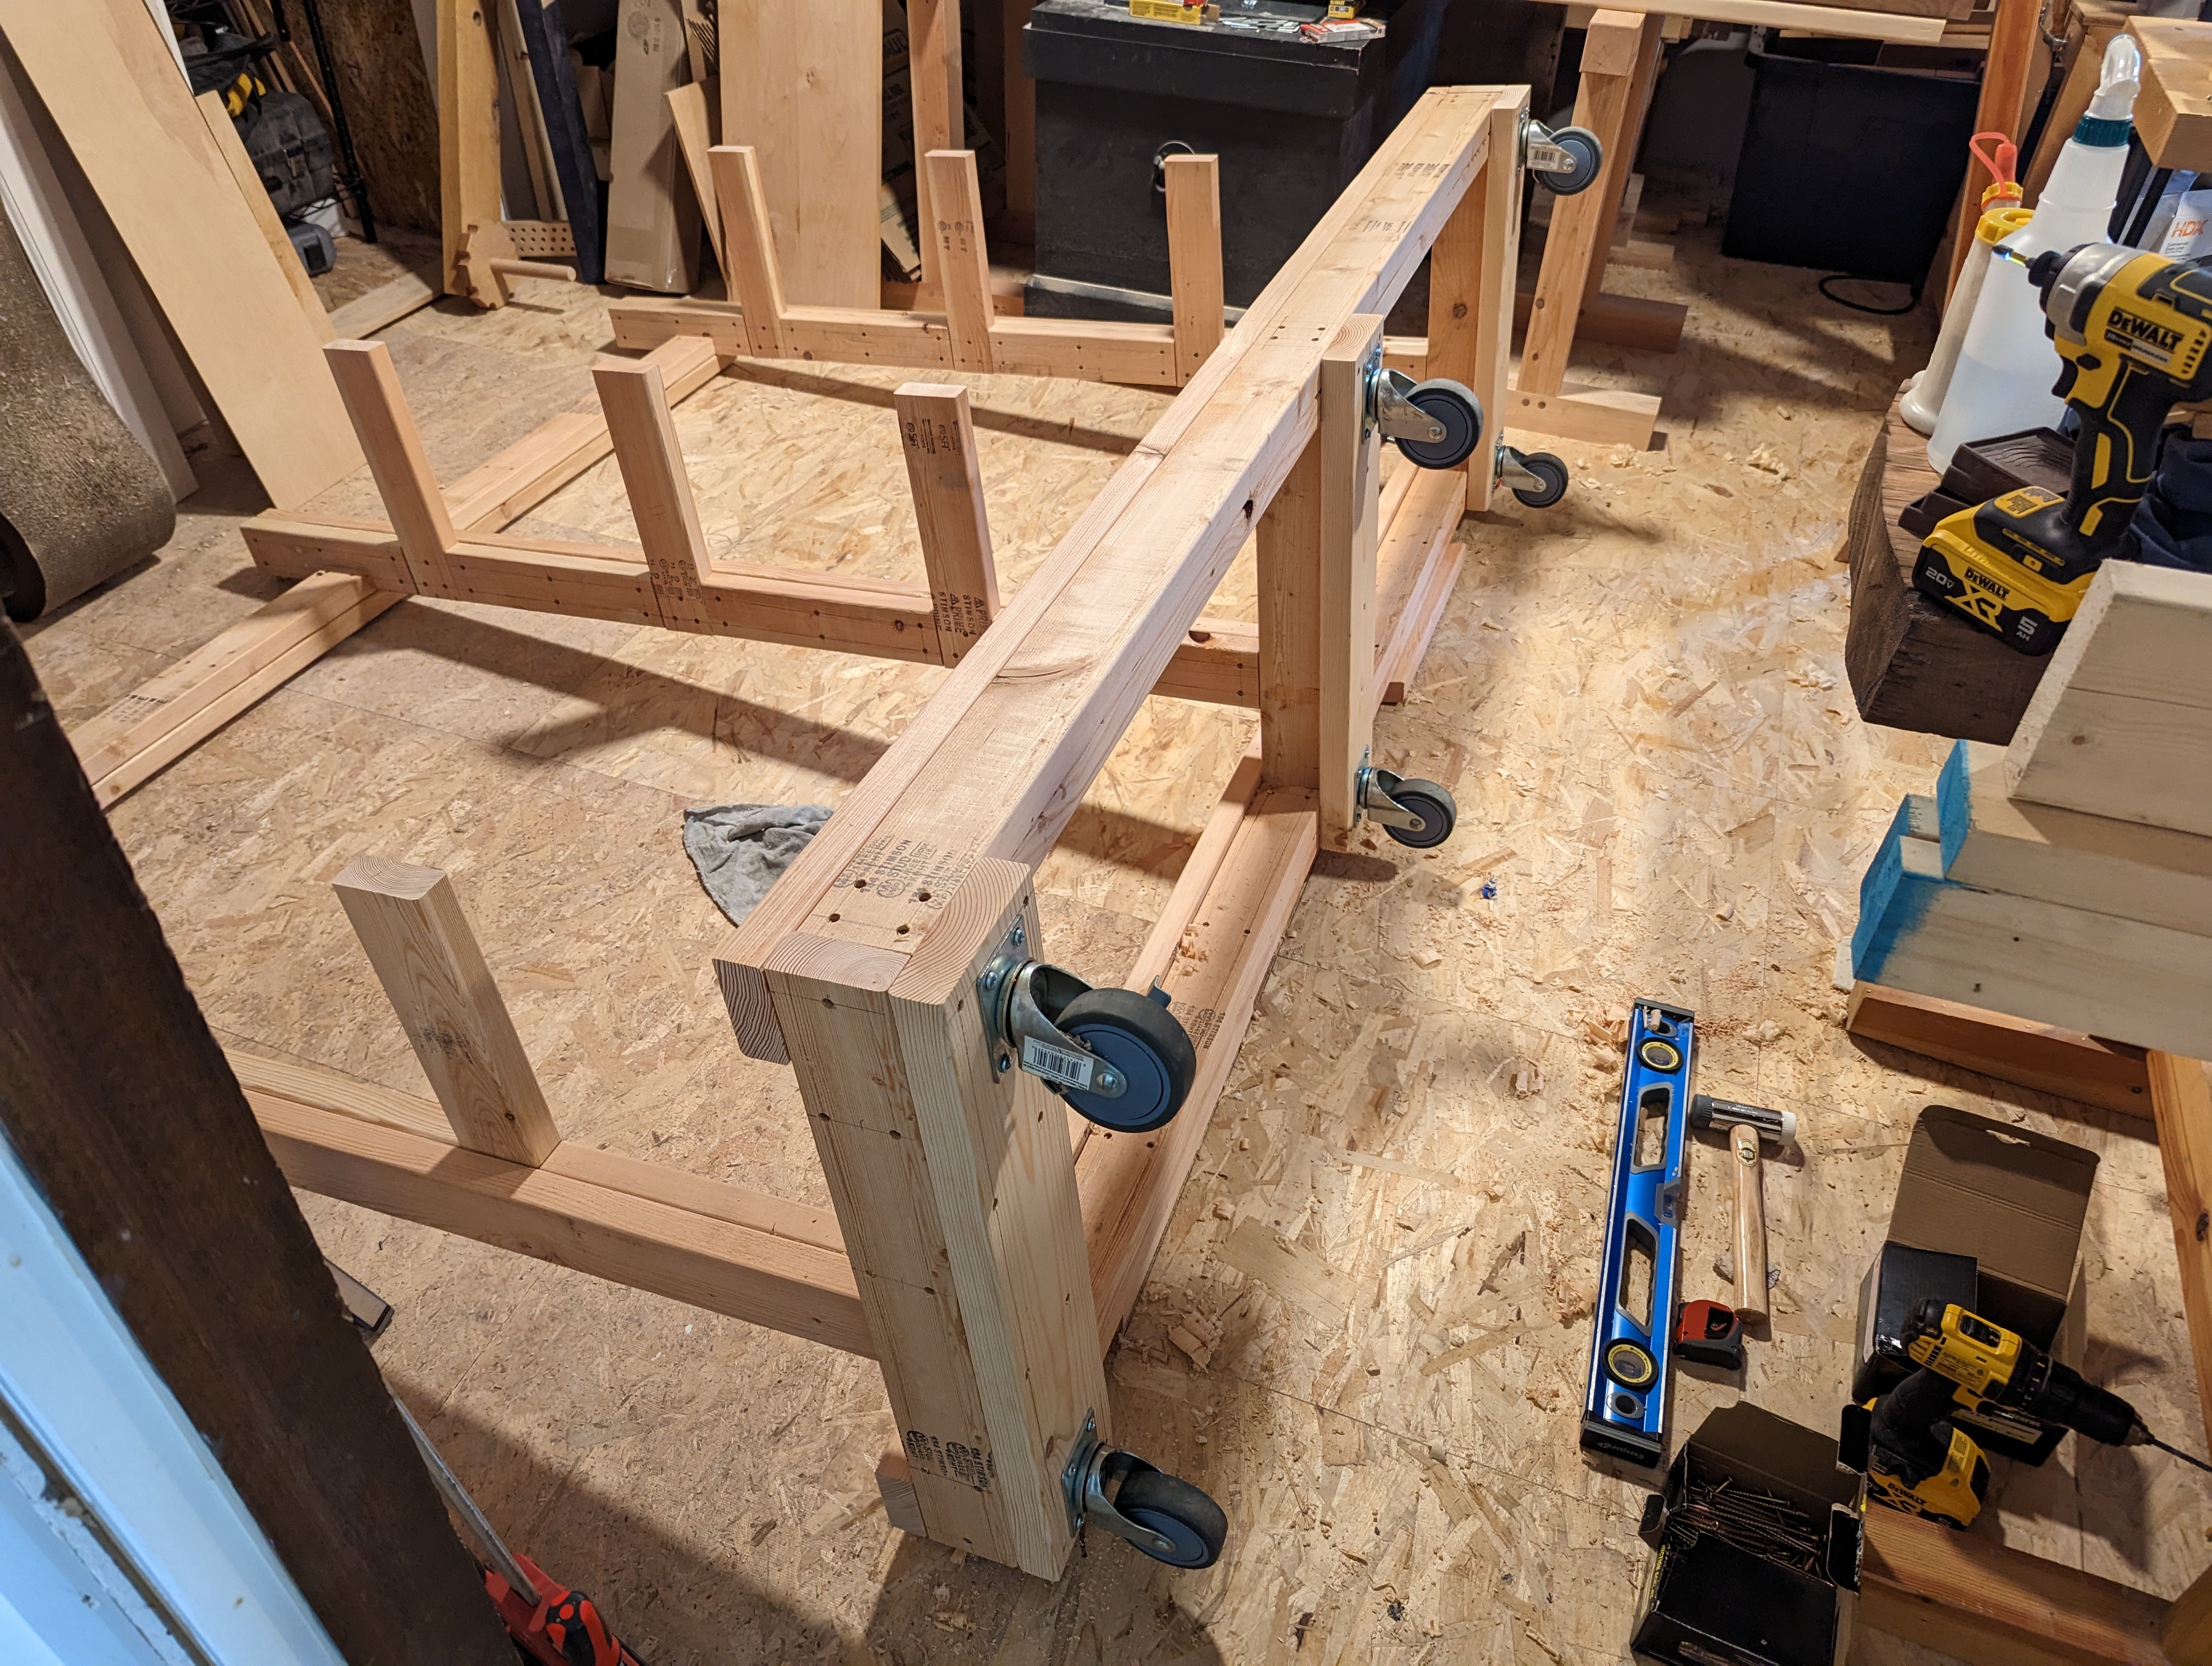
As folks may know, I build a lot of workbenches. I haven’t actually built one for myself in a while. I’ll find a design that seems intellectual stimulating, build it, and then gift it to a friend or family member. So whenever I’m at the lumber yard, if there is a particularly wide and clear slab of 12/4 or 16/4 lumber (typically ash, poplar, douglas fir, or red oak), I can’t usually help myself. The pile of slabs was becoming a problem, so I made a full size lumber rack. Not one of those wall hangers (Bora, you’re great, but I am constantly worried my entire wall is going to tumble down). A proper, free standing, rolling cart.
There are probably 250 star drive construction screws of either 2 1/2″ (65 mm) or 3 1/2″ (90mm) screws in the entire assembly. As much as I’d love to say I drove each with a brace and bit, I in fact used an impact driver. It’s just so useful and effective (if a bit loud; I wear foam earplugs for work like this). To put it in perspective, I wore out not one but two (!) of the included star drive bits in the boxes of screws. I know these aren’t of the highest quality, but still.
I used a lot of what I learned from the television easel project in making this project. That is, the lumber rack is a series of posts set into a foot that is offset from center based on the calculated center of gravity when loaded with lumber. With a 24 inch foot and 13″ or so of shelf, I calculated that the post should be centered at roughly 8″ from the back of the foot.
So each post of the lumber rack was comprised of the following, all 2×4 framing lumber, glued and screwed together (a la Naked Woodworker workbench) after drilling clearance holes for the screws.
One vertical beam at 72″ high (part of this is a tenon that laps into a dado in the foot)
Four shelf spacers of 15″ high (although the top one is cut to length)
Three shelf bars at 16″ long
One foot beam at 24″ long
Two foot spacers, on at 6″ long (back) and one at 14.5″ long (front) [these create the dado around the vertical beam tenon)
I made four posts, but one of them was like 1/2″ off every single shelf height so I scrapped it.
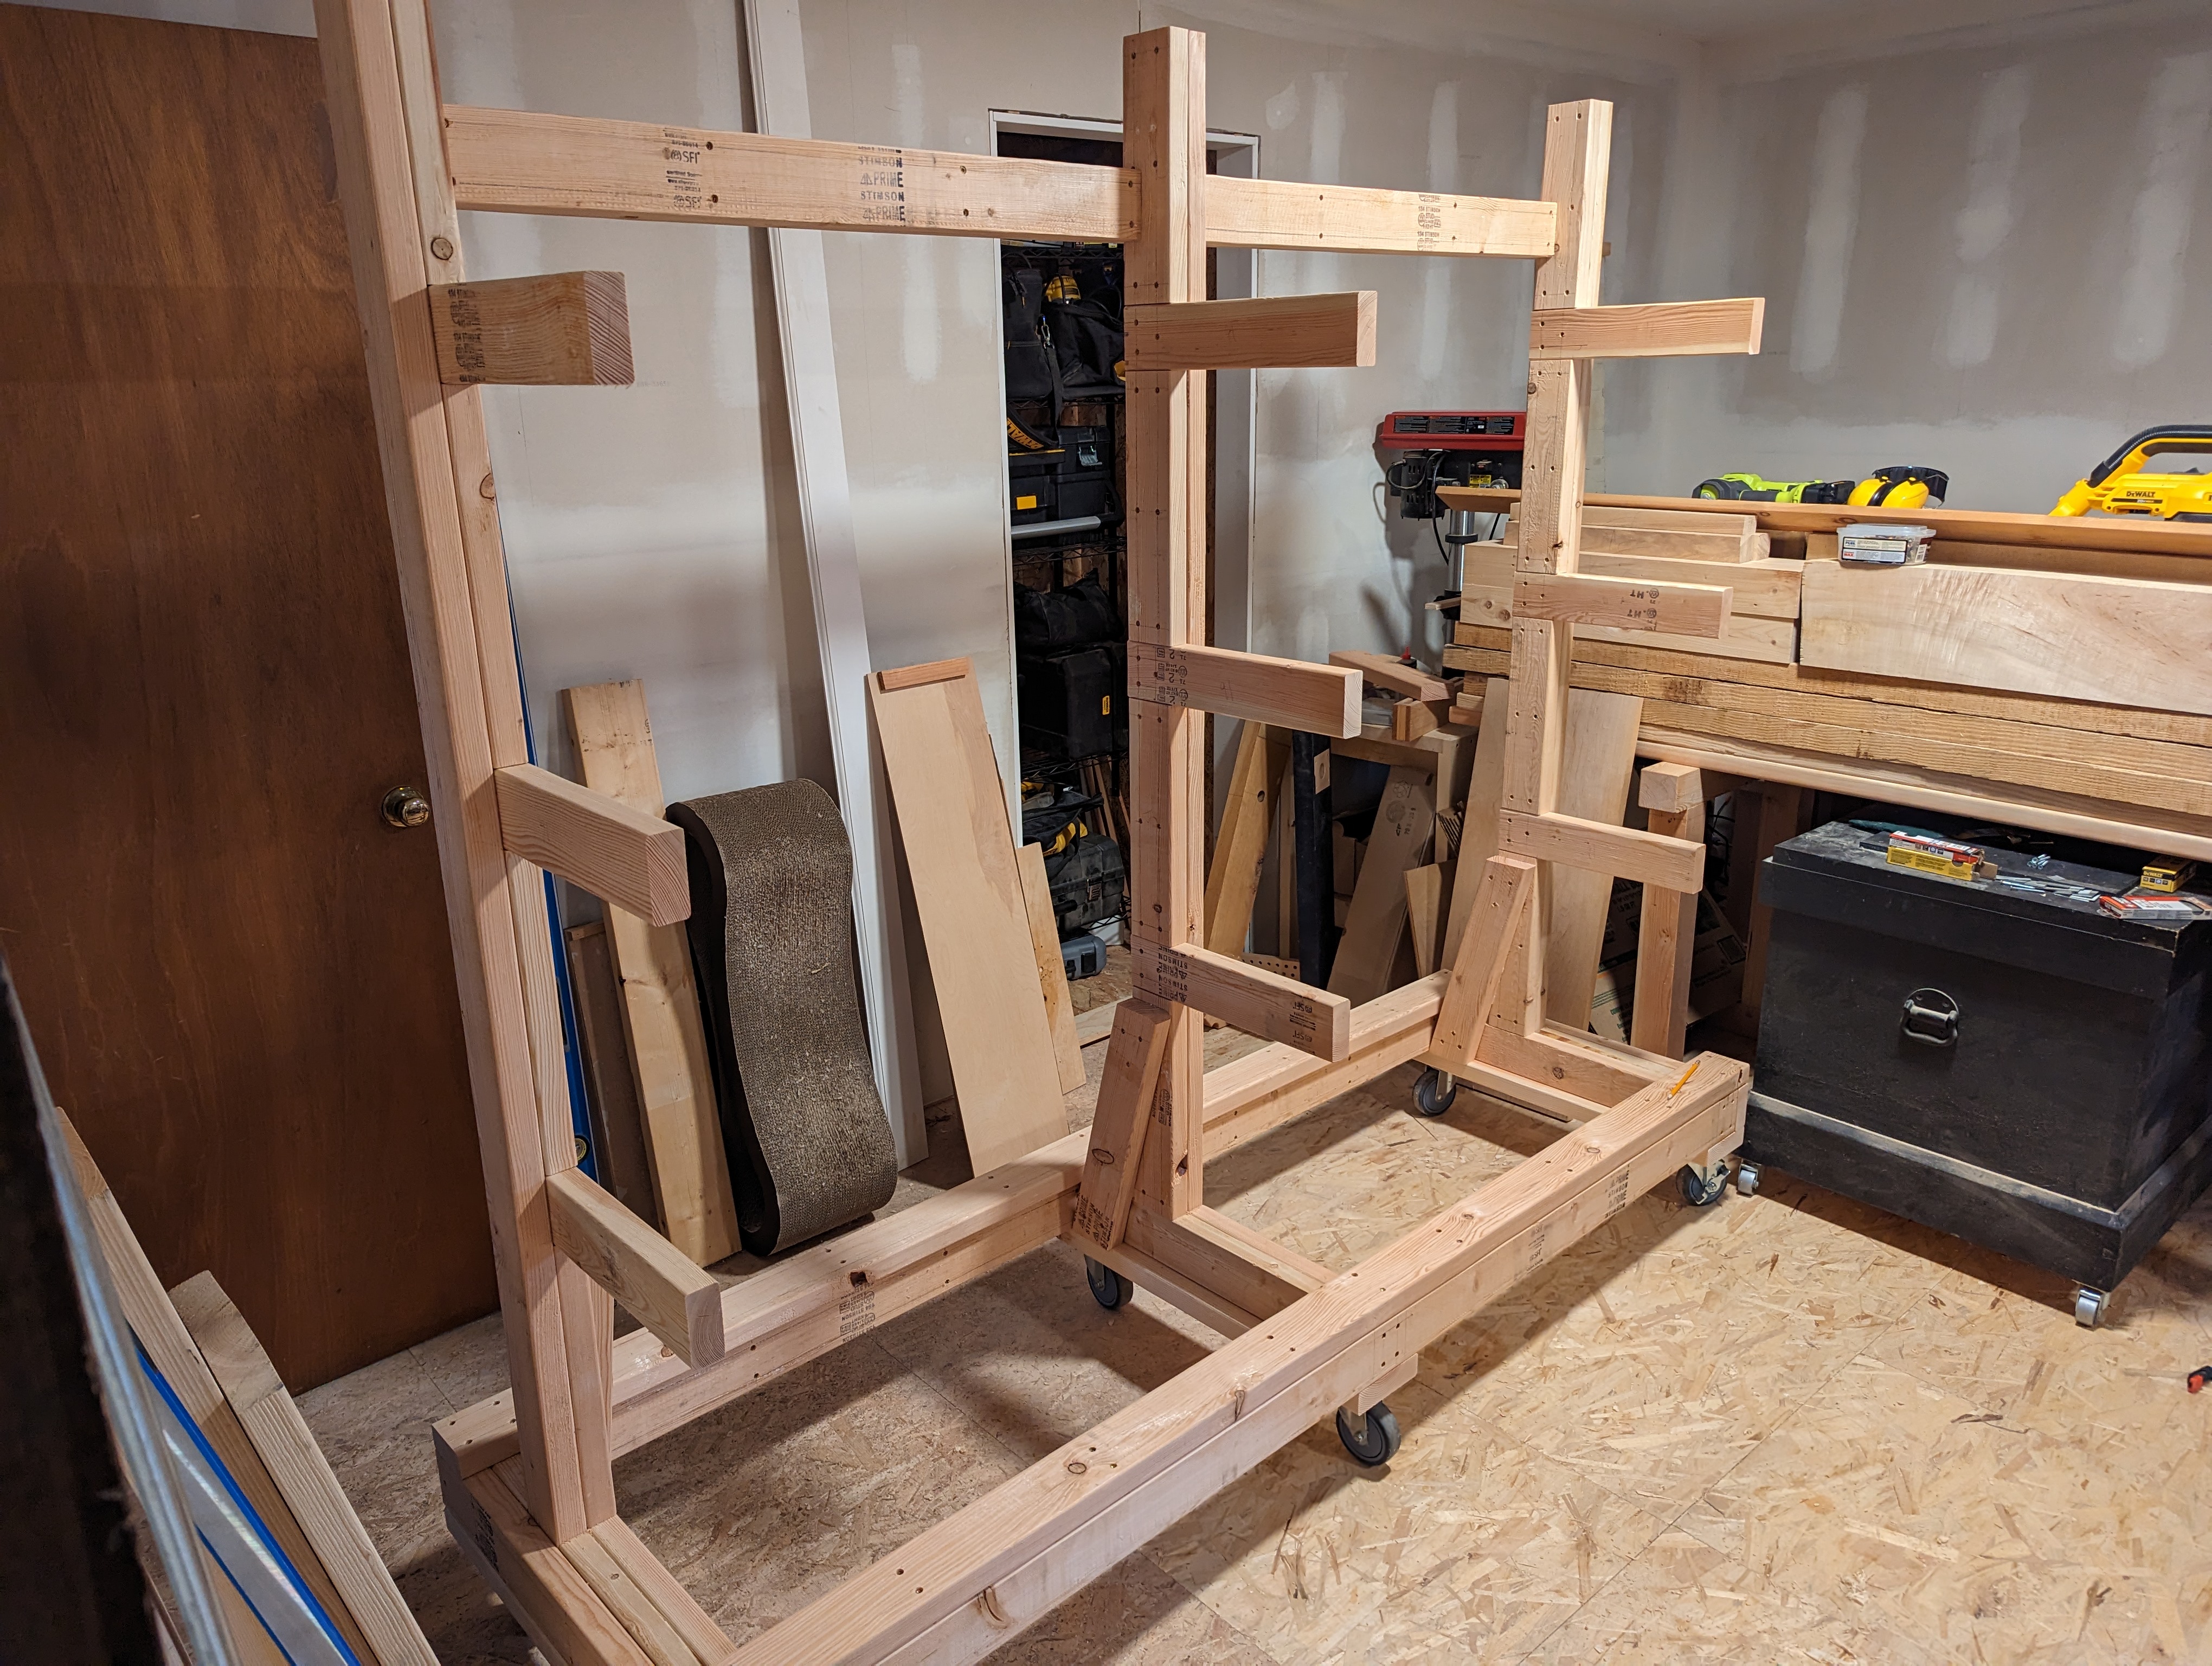
With the posts made, it was time for the base. I started by joining the two end posts with an 84″ long beam, and added a 27″ long end cap on both (creating an enclosed mortise for the tenon on the vertical beam, rather than just a lap joint). Then I added spacers between the ends and the middle post (to form dadoes) and tied everything together with an 87″ long cap beam on top. The back cap beam also created a convenient catch for storing a few things vertically, leaning against the posts.
First cap beam installed as shown above.
After adding a long rail to plumb up and tie together the tops of the posts (with spacers to make more dadoes), it was time to add some bearers beneath the post feet. These, made of 2×6 (instead of 2×4), would both (a) further support and secure the posts and (b) give a wide surface (away from the joinery screws) to attach some heavy duty casters.
Nice detail of the end assemblies here.
The last step (aside from knocking down the rough corners with an orbital sander) was to add a diagonal brace to each post, reinforcing the base of each post. I’m not 100% sure these were needed, as the posts were each secure and restrained by a tenon that lapped into each foot assembly, (x) cap beams front and back on top of the foot, (y) a bearer below where the casters attach, and (z) a shitload of glue and screws on the general base assembly. But they make me feel better and this thing will have about half a ton of lumber at the outset. It was either this or add some rachet straps, which looked ugly(ier) to me.
Diagonal braces seen here.
I am sure (because I checked) there are plans out there for prettier lumber racks. And I absolutely could have spent 10x the time and 2x the money mortising 4×4 posts and drawboring everything. I wish I could say otherwise, but other than a combination square and a marking knife for some more precise cuts, I did not use a single traditional hand tool on this entire project.
But when you need a giant lumber rack, and you’ve got handy a chop saw, an impact driver, some 2×4’s, and a giant box of screws, you do what you have to. I even think I learned a thing or two in the making.
And, most importantly, I can at least walk around in my basement again.
Another year on the Gregorian calendar has passed and I’m back in the workshop. As I always say, “ABCD – Always be Carpen them Diems!” And today, like every other New Year’s Day, is no different.
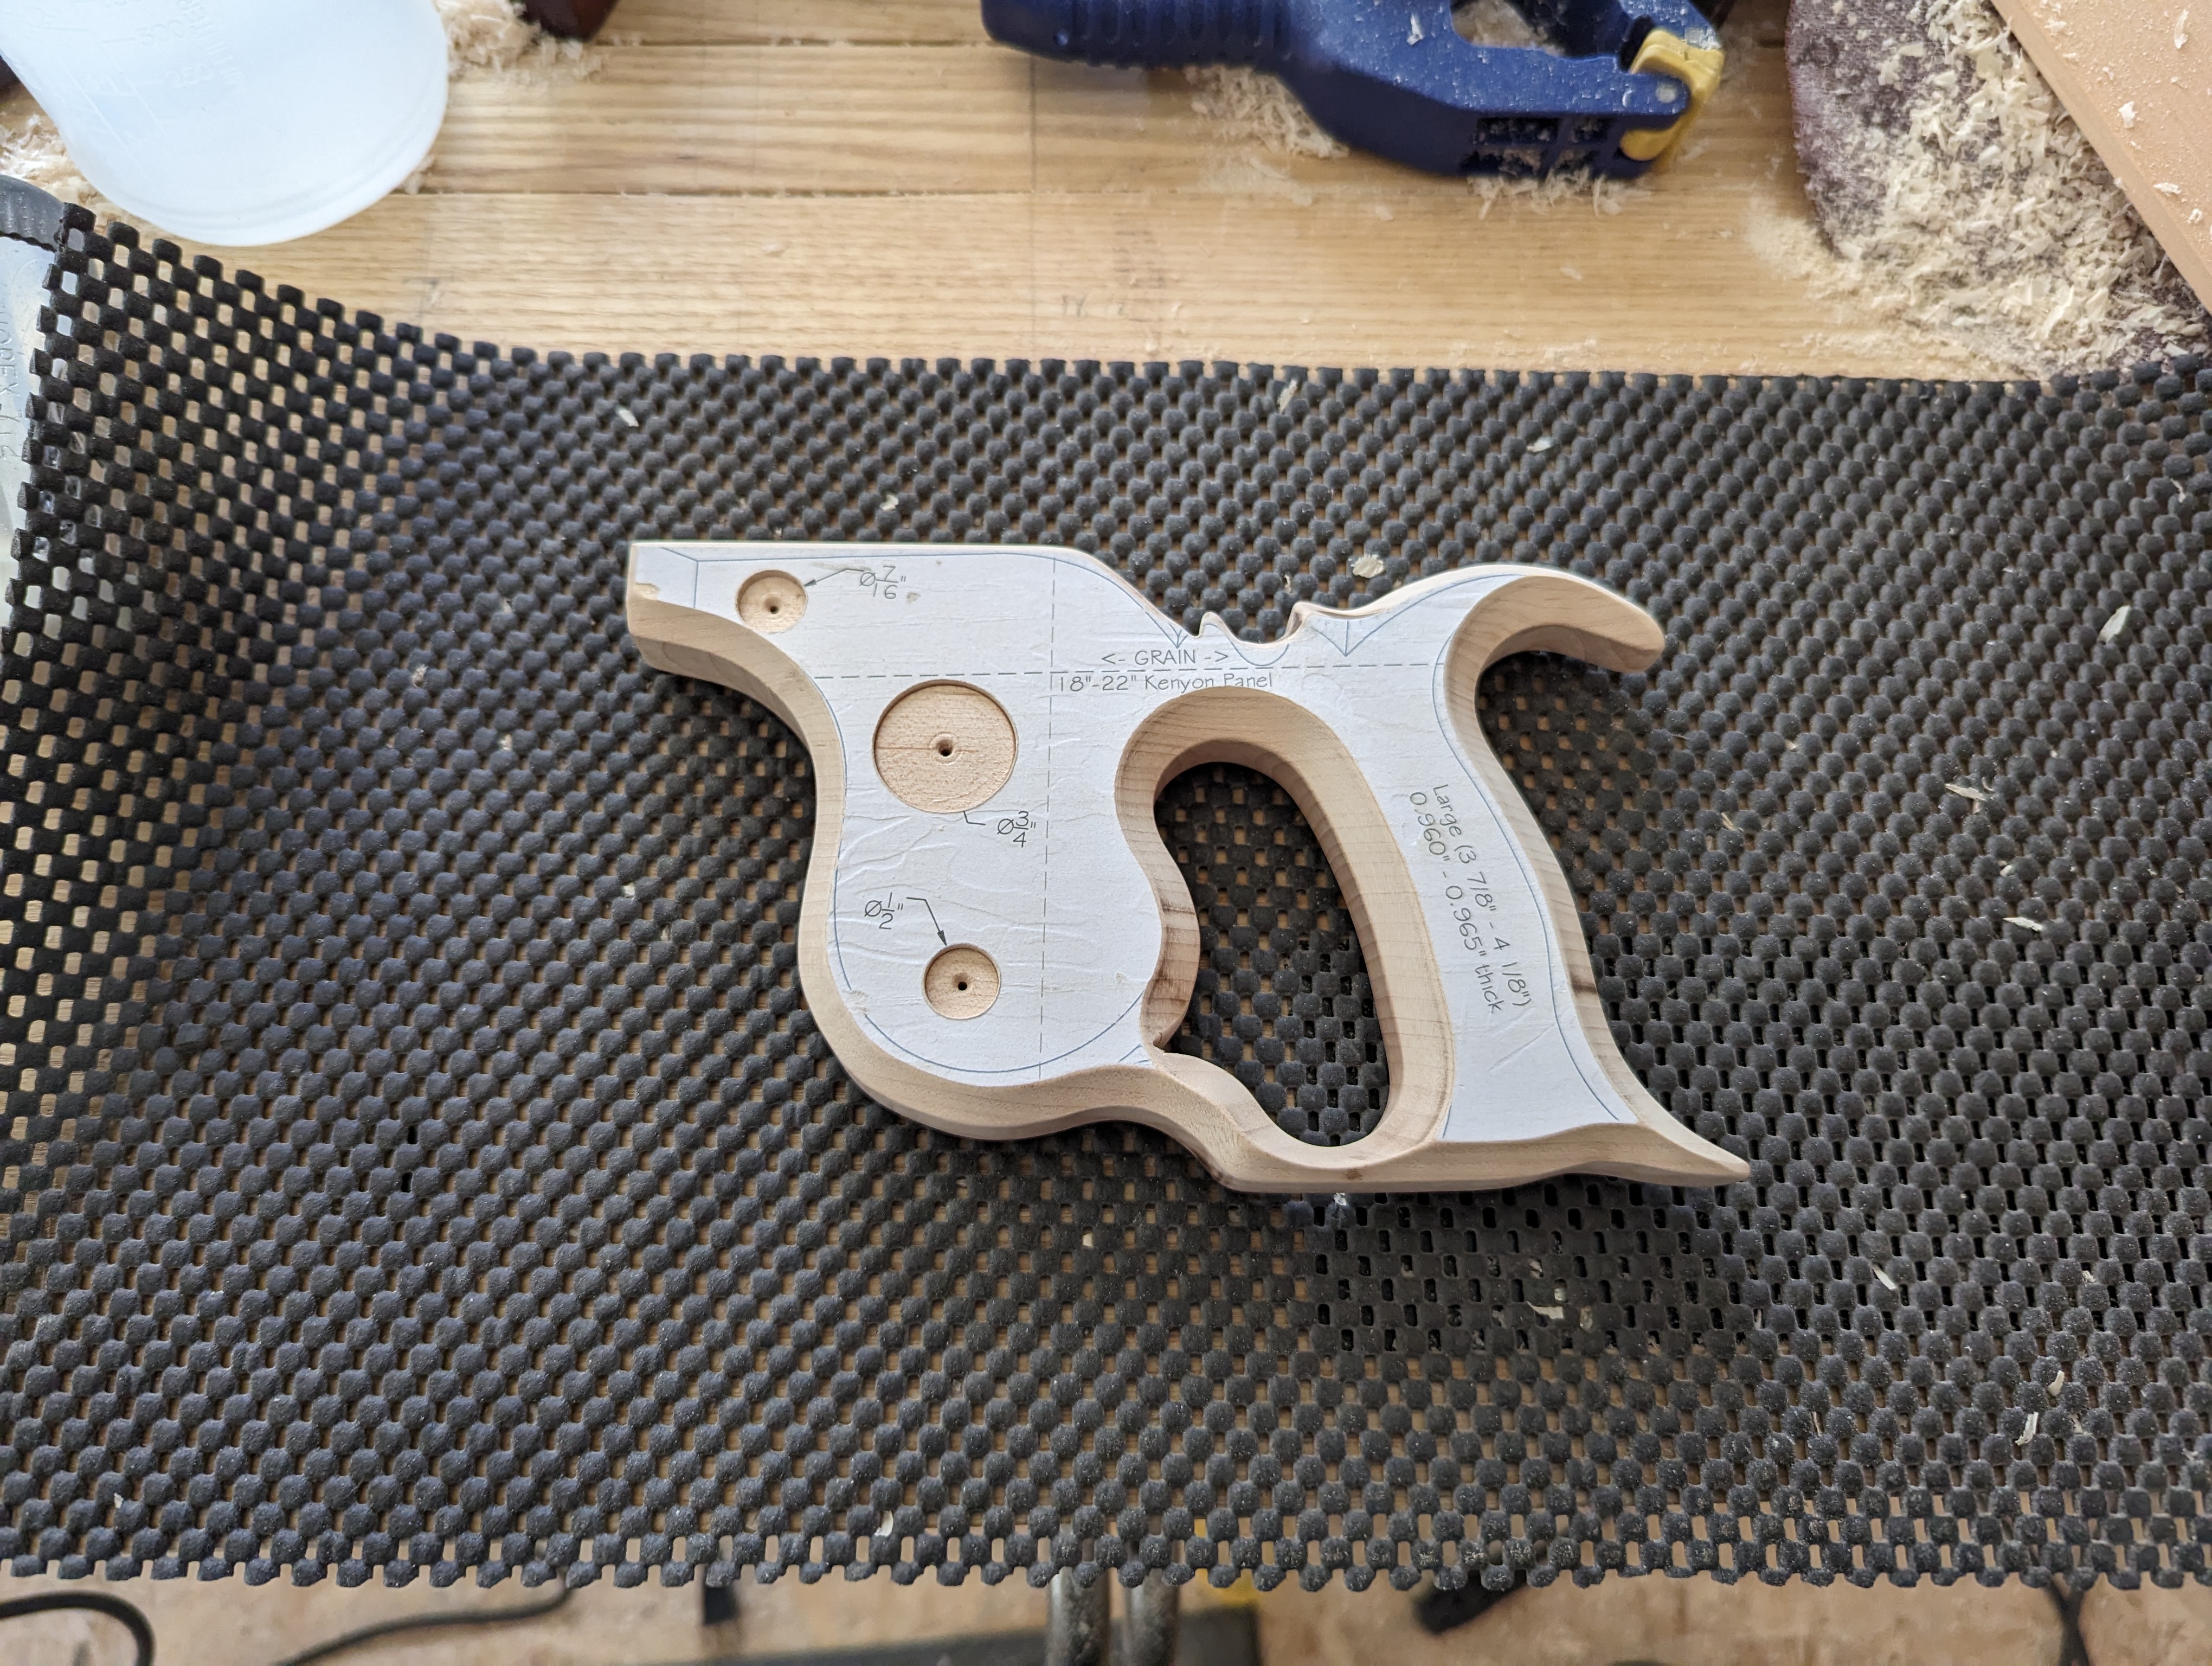
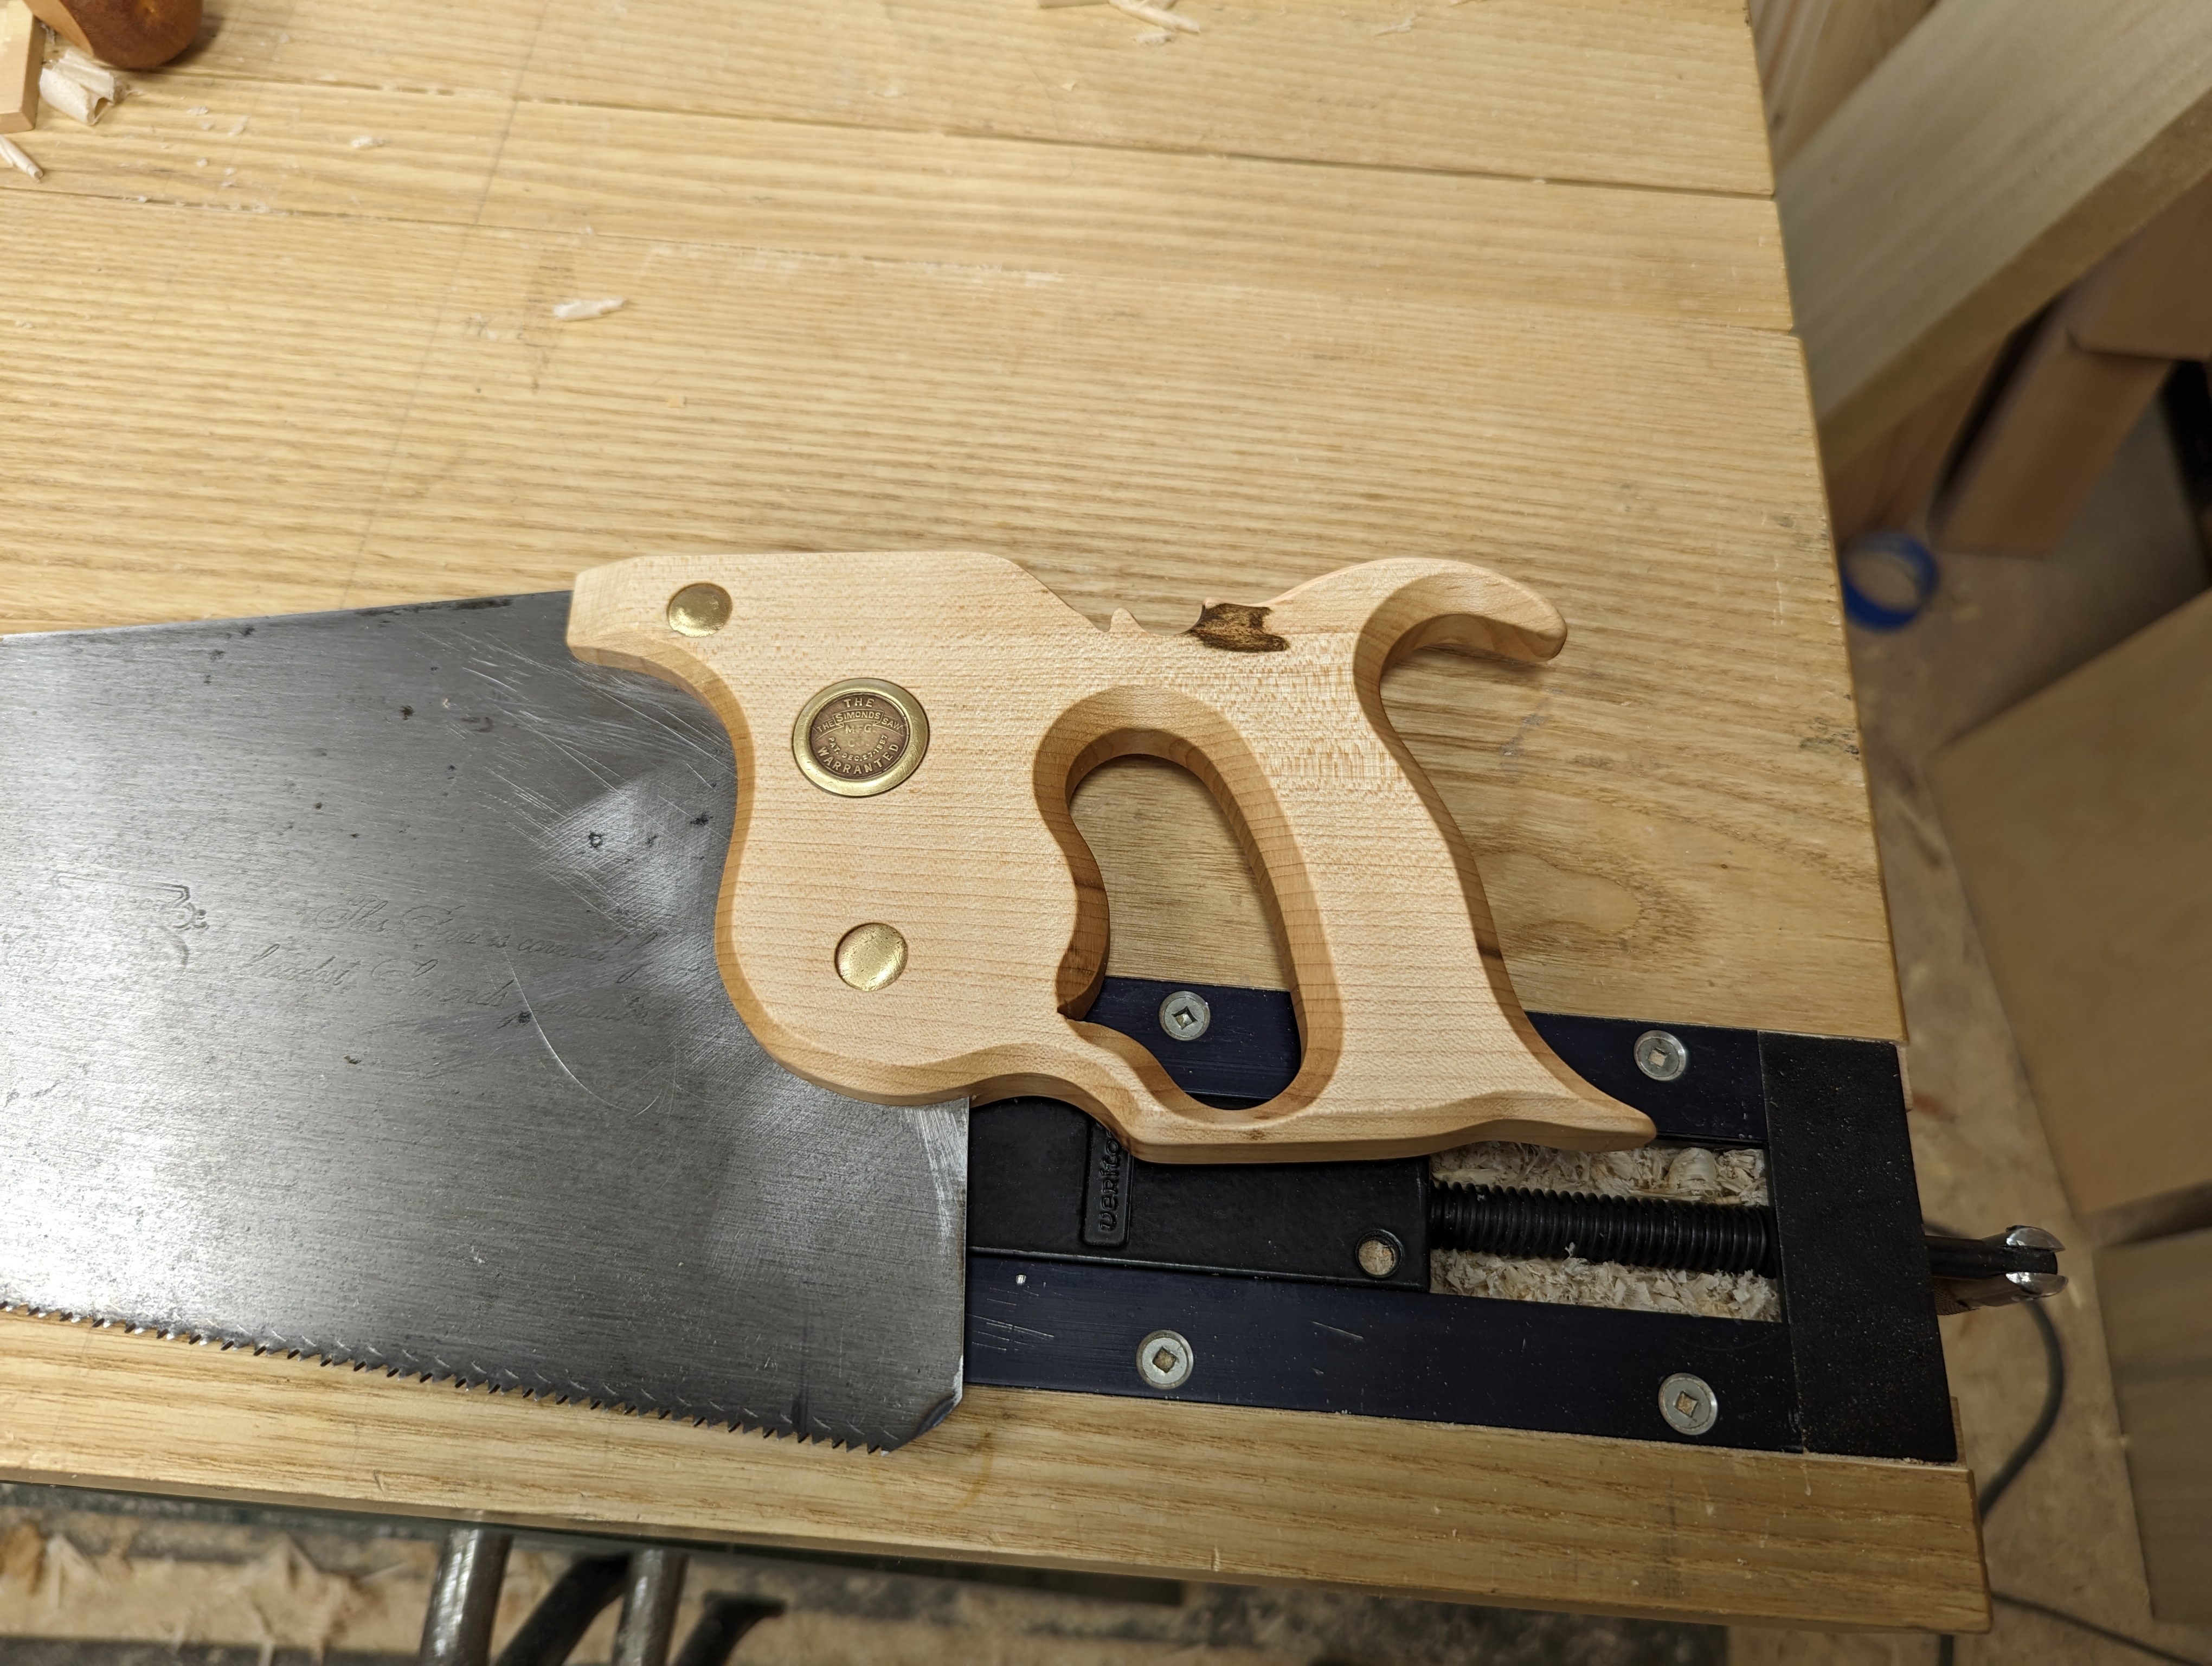
My first project of the year is making a panel saw from “scratch”. Those quotes are doing some pretty heavy lifting, as the plate is taken from a 26″ vintage Simonds 10 TPI crosscut hand saw. I’m not in the mood to cut new teeth today. The plate is in very good shape but the handle was a mess. Clearly an aftermarket job, the slot for the saw plate was at like 10 degrees to the handle and it made for terrible hang.
So first I made a new tote. There are a ton of good tutorials on the yutubs about this, so I’m not going to offer any real pointers here. However, a small oscillating spindle sander (I have the handheld one from Wen, which seems to be a knockoff of the Triton model) makes the job a lot quicker. I don’t have a band saw, so bringing the outline of the tote into flat on the OSS (instead of by hand with rasps and files) is a godsend. Especially on quartersawn hard maple.
Once the outside was shaped, I took my cues from the BTC Hardware Store Saw and busted out the trim router with a chamfer bit. Once the hard arrises are sanded down, it’s just as comfortable as full rounds. Plus, the intersection of the chamfers made a cool lamb’s tongue-like feature at the bottom of the tote, without having to do an actual lamb’s tongue.
When I make the next hand saw tote, if I use this pattern again, I will lighten the chamfer along the front (seen left, where it meets the saw plate). That heavy chamfer, as cool as it looks, nearly overlapped with the top saw nut and left a fragile edge that will probably break off soon.
Next I had to modify the plate to fit the tote. That vertical dotted line on the pattern to the right of the saw nuts shows where the plate seats into the tote. Problem is, the sourced plate did not have a straight line at the heel. That means it’s angle grinder time. I just use a scrap of plywood as a fence (learned that one from Pask Makes) and go to town. I also nibbed off the corner at the heel.
I am aware the guard is off. This operation doesn’t work with the guard on.
The angle grinder leaves the plate rather work hardened at this point. Files still work, but you really have to draw file to get down to fresh steel. I pop it in the saw vise and use the same jig for jointing the teeth. It’s important this be straight and true so it seats nicely in the tote.
You can see the reshaped heel, before a bit of rounding.
I didn’t get pictures of it, but I next cut the slot in the tote for the plate. You can freehand this (like the guy who last owned the saw did), but three is a better way. Just clamp to a flat surface (like a benchtop) another panel saw with a thinner plate and a fine set to the bench with a spacer underneath that centers the cut. Then draw the tote, flat against the bench and cut the slot as deep as you can. You can then finish the cut by hand in the vise, as the portion of the slot you already cut will guide the saw the rest of the way. Lee Valley has an excellent guide on this. If the slot is slightly off center (mine was by about 1/32″), just plane down the thicker side.
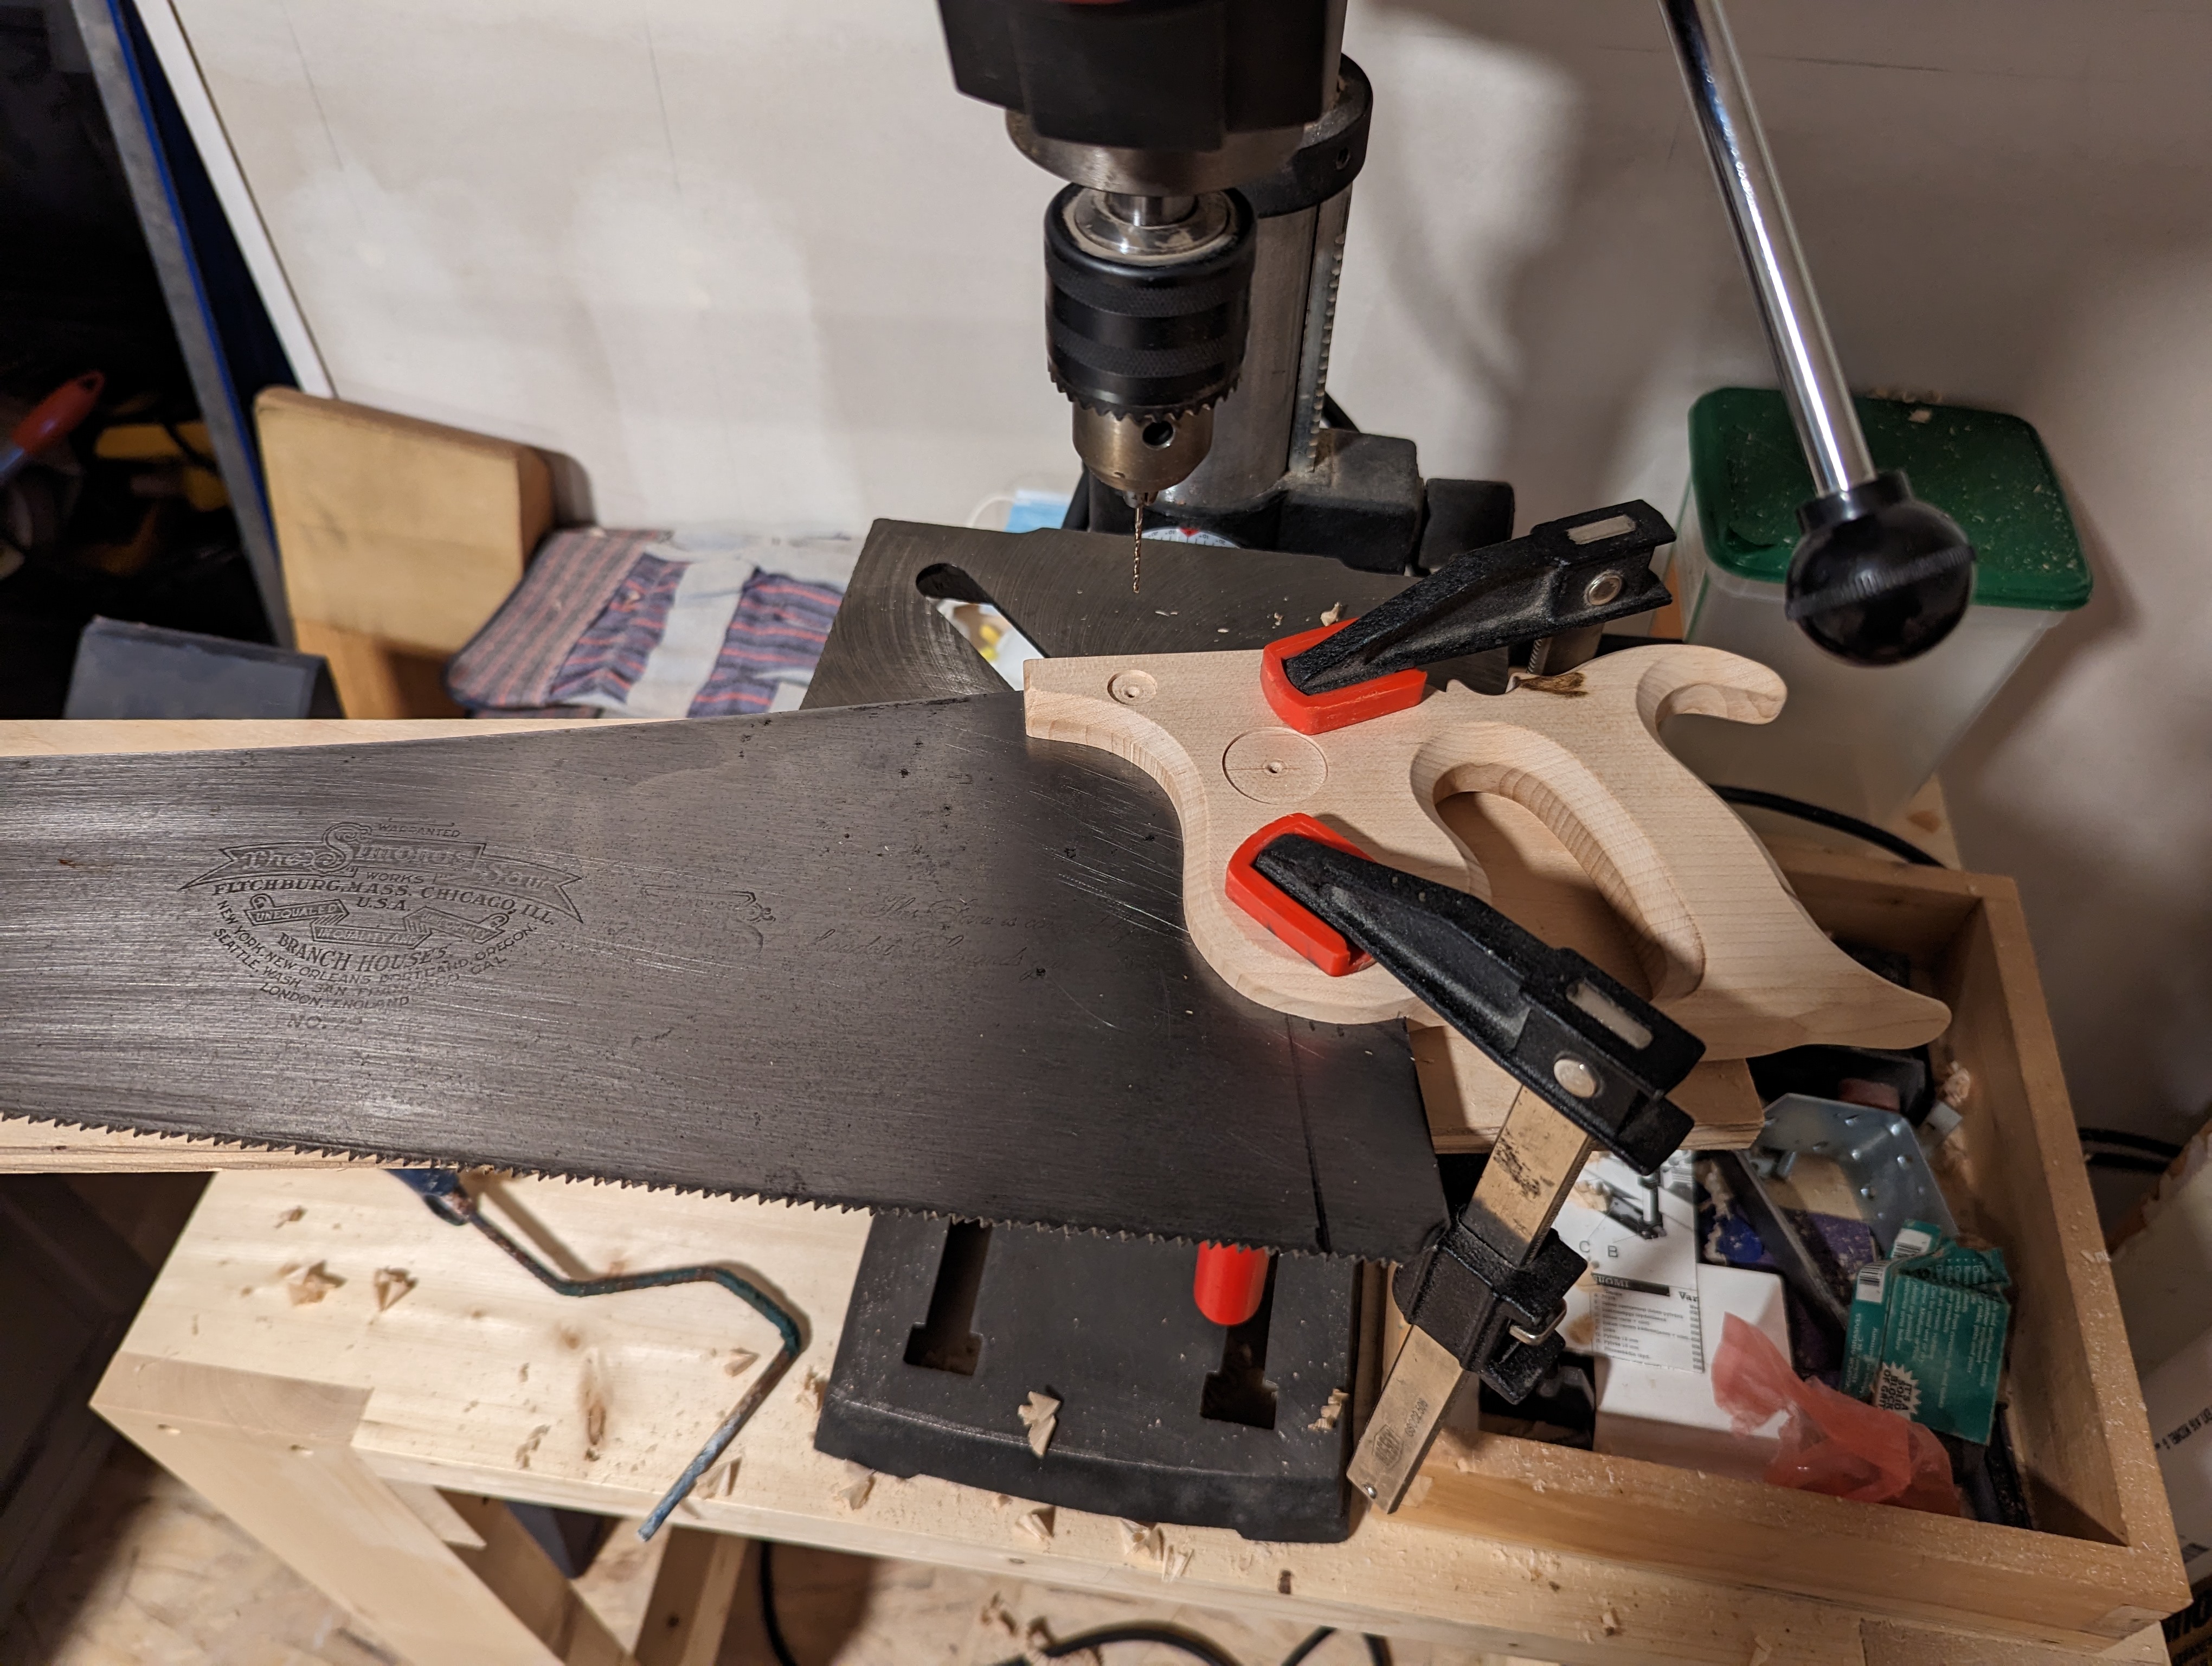
Now it’s time for drilling holes.
Now came the part I was dreading. When re-handling panel saws in the past, I used the existing handle as a pattern and located the saw nuts exact where they had been on the previous tote. For this, I was starting fresh and that meant drilling new holes in the plate. The spring steel plate. With a cheap benchtop drill press.
I had previously drilled 1/16″ pilot holes through the tote and bored the initial recesses for the saw nuts. So I started by clamping assembled saw onto the drill press table and locating the 1/16″ holes, which I then drilled through the plate. I then set the handle aside, recentered the drill press on each pilot hole in the plate, and clamped down the plate to the drill press table. You do not want a spinning hand saw plane. Then I just worked my way up from 1/16″ to 7/32″ incrementally until there were three 7/32″ holes in the plate. In truth, I cooked about four 7/32″ drill bits. It’s just too much for my little drill press to handle. But they were cheap drill bits (scavenged from various box store sets).
All that was left to finish the tote was drilling out the saw nut holes (9/32″ for the slotted nuts and 1/4″ for the medallion and bolts) and tweaking the depth of the recesses. I think I set the recesses in a little deep, but it works. Some boiled linseed oil really makes the quartersawn holographics of the hard maple pop.
Medallion side.Nut side.
I still need to hack off some of the toe to get the plate itself down to about 19″ of tooth line. That, in my experience, makes the plate stiff enough to not need a half back or magnetic guide for basic joinery. Plus it gets rid of that kink that always develops about 5-6″ from the toe of every 26″ hand saw. And, of course, that will allow it to fit in the toolbox.
The hang of the saw is a bit toe heavy, which makes me think it should be a medium rip (8-10 TPI). I find that useful for crosscutting wider, thicker stock on the saw bench and still able to rip efficiently at the vise. A saw like that is a workhorse for my travel toolbox. Once the BLO dries, it’s time to carpe some more diems and reshape the teeth.
But, for now, Happy New Year and I hope you find some time in the shop soon. Thanks for being a reader and stay tuned for some new and exciting things this year.