woodworking

Putting On a Brave Face

It only took me a week to ruin my new workbench.  I’m trying to put on a brave face, but it’s no use.   I can’t even look myself in the mirror, I’m so ashamed.  I drilled the first holdfast hole in the bench, and it’s not plumb.  And it’s the hole farthest to the left.  The one for mortising over the leg.  I’ve got woe.

It’s entirely my fault, too.  Instead of reading the directions for my Crucible Holdfast, I chucked the recommended 1″ WoodOwl augur bit in a modern, three-jawed hand brace.  I was blown away by how easily the WoodOwl powered through the wood.  So much that I lost focus and canted the hole back to front.  I’d be lying if I said it wasn’t over 2° off plumb back to front (although negligibly canted left to right).

The directions recommend a corded drill and jig to keep the bit plumb.  Corded (I think) because (in my experience) the wobble of a brace and bit always results in an overlarge hole as it reams itself with every sweep of the brace.  Jig because it’s difficult to keep a bit that large from going out of plumb, no matter how little wobble you impart.  I utilized neither.

wp-1485572514951.jpg

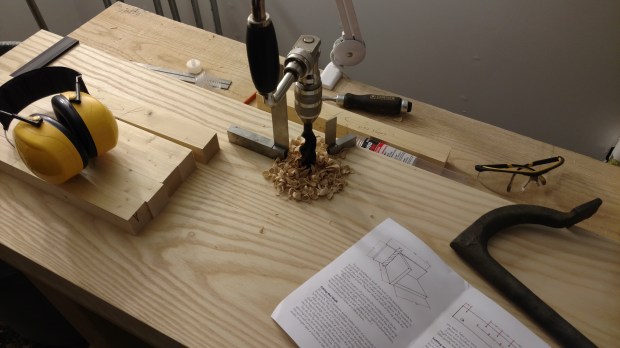
I took a vanity picture during the process and can see the cant in the shot.

The result: the holdfast only holds in a 60° sweep pointed at the front edge of the bench.  It won’t grab at all when oriented lengthwise, either left or right.  It could be worse, but it still makes me sad.

I’m debating plugging the hole with epoxy and a 1″ oak dowel (plus an ash dutchman on the show face).  But that feels like a temper tantrum.  I should probably sleep on it another day.

JPG

Something Old, Something New

The point at which you first install workholding on a workbench is a bit thrilling.  The bench transforms from furniture to functioning tool.  Even if the workholding is just an aluminum planing stop.


wp-1485520332717.jpg

Final flattening of the bench only took about 30 minutes.

I have been enamored with these Lee Valley-Veritas planing stops for some time.  I tried a toothed planing stop on my previous workbench, but I never really liked it.  Unless I needed the extra 6 inches or so of benchtop, I always went back to these aluminum stops. They are low profile and easy to install (requiring only two 3/4″ dog holes).  And they can be cut to perfect length.

This time, I even remembered to space the holes so they’d line up with a row of tail vise dog holes, if I ever install a metal front vise as a tail vise.  I mean to, eventually, but I only have 12″ from the end of the benchtop to the top stretchers, so I’d need a pretty compact front vise.  Before I do, though, I’m going to try working with just holdfasts and does’ feet.  I hear it works pretty well.

My first project on the new workbench will be that plant stand I was making last year, which is very similar to a previous prototype.  I’ve said it before and I’ll say it again: working home center spruce is such a joy.

JPG

Ain’t She a Beaute?

So I have a new workbench. It’s really pretty, if I do say so myself.  With any luck, it will be the last workbench I ever make.

Soft focus like a Barbara Walters interview.

Made of air-dried ash, it’s a monster, even without the shelf and the benchtop extension (both to come soon). The slab is 92″ x 15″ x 4″, the legs and top stretchers are 3″ x 4″, and the lower stretchers are 1.5″ x 4″. Why only 1.5″ thick?  Because the lower shelf will be supported by some 1″ x full-length brackets glued and screwed to the inside faces of the stretchers. And it’s all I had leftover on the pile.

It’s important to me to show how the slab and the frame are held together. There are two blind mortises on the underside of the slab, to match two stub tenons on the front legs.  The top stretchers form the inside shoulder of the tenon and support the slab (which, when put into place, went “thunk” and has stayed put). Much like the subconscious inspiration.

I did use a door shim to wedge the right-hand tenon.

I would be remiss not to note that the tenons for the long stretchers are only about 1.5″ long, but they are both glued and drawbored. I feel confident that is sufficient for the heaviest planing strain.

The last tenon, cut at my Stent Panel Workbench.

I’m very pleased with how the bench came out, but I will admit one complaint: how the long stretcher shoulders look. I rounded over the corners of the legs, and the long stretchers are in plane with that. You can see the problem. I will probably get over it. Probably.

wp-1485041563085.jpg

There are a few crimes to hide, but this isn’t supposed to be fine furniture.

I haven’t decided on what type of planing stop to use, but I’m leaning toward a Veritas aluminum stop like I use on my current bench. It will span the entire width of the slab and doesn’t mar the work like a toothed stop would. But it uses a different-sized hole than my Crucible holdfast.

More in a few days when I square the ends of the benchtop and attach the bottom shelf.

JPG

Silent World

In case you didn’t know, every episode of MacGyver is available on Netflix.  And I’ve been watching the hell out of it.  I recently saw an episode, Season 2; Episode 9, called “Silent World“, where Mac [30-year old spoiler alert!] stops a plot to steal a guided missile with the help of a friend, who is a teacher at a school for the hearing-impaired.

In the episode, the teacher (who is the best-acted character in the episode) has a recurring nightmare that helps identify the perpetrators.  The nightmare seems at first like a prophecy, but is decoded as the episode progresses and in fact turns out to be based on her recent experiences.  It’s amazing how the human brain works, using dreams to process and catalog the myriad sensory information we receive every day.

So what does this have to do with woodworking?  I had been thinking about the design of my new workbench build, which I’d characterize as part Roubo, part Moravian.  A bespoke, if not novel, design to utilize the available materials in the most effective way possible.

wp-1484318898288.jpg

The “Slab to Frame” ratio is about 2:3.

It turns out, however, that my design is a complete knockoff, being positively Follansbeean.  I was reading his blog’s archives and came across the post where he set up his bench in his new workshop (under a tarpaulin).  A post published long before I started building my new workbench.

Although my bench won’t have wedged through-tenons on the long stretchers (I’ll drawbore all the stretchers), mine otherwise matches Peter’s pretty closely, right down down to the spacers on which a thinner shelf will sit to extend the benchtop.  My design is born out of only having 15″ x 92″ of 16/4 ash for the main slab top, and I would be willing to bet Peter was solving the same problem.

wp-1484318223542.jpg

Two stub tenons on the front legs go into the benchtop and keep the slab in place.

Funny how the brain catalogs these things for later use.  But now at least I can give the design proper attribution.

JPG

I Guess It Works

If you follow me on Twitter, you know that I made a box.  A simple thing, really.  Four sides, with through dovetails at the corners and a bottom that is glued on.  All out of leftover, bone dry EWP from the home center.  For me, none of that is out of the ordinary.  What is, however, is that it has a lid.  And what a glorious lid!

wp-1483568063606.jpg

Okay, maybe not so glorious from the outside.

Both the bottom and the lid are single boards, rounded over on all four sides on both faces.  The lid, however, is not attached by hinges.  Instead, a batten and some buttons on the underside of the lid it keep it from sliding around.  Each is rounded over at the edges to help the lid slide into place.  It seems to work pretty well.

wp-1483568060448.jpg

All leftover Douglas Fir, which I hear is harder and more rigid than EWP.

I am certain that someone will tell me I did this all wrong, and it’s not a sound way affix a lid.  I’m willing to bet I won’t care, especially if I end up nailing on the buttons.

JPG

I Think I Figured It Out (Thank You!)

Thanks to everyone who gave me suggestions about why a leg wasn’t seated squarely in its joint.  After quadruple checking my combination square for squareness (it is), it turns out the culprit was human error.

First, the shoulder isn’t perfectly seated after all.  The mortise canted ever so slightly inward, but the toothed underside of the benchtop hid the minute gap between the slab and the shoulder of the mortise.  I corrected  this (with a bit of paring inside the mortise) and the joint still (thankfully) fits very snugly.  The canted mortise was about 75% of the problem.

Second, there is a very slight hollow where I was resting my square.  It must be left over from traversing the underside of the benchtop.  It runs down a couple thou toward the mortise, which doesn’t really show with a long straightedge across the whole width.  But with a small machinist’s square, it’s plain as day.  Not worth fussing over, I think.

Oh well.  At least I got blog two posts out of it.

JPG


End Grain Problems

Monday’s post was apparently number 200 here at The Apartment Woodworker.  I feel like 200 posts in a little over two years isn’t so bad.  Here’s to the next 200 or so.  Still with me?  Good.

Call me crazy, but I left the workbench slab in the clamps for almost 48 hours.  There was a tiny bit of twist (maybe 1/64″) in the mating surfaces between the two timbers and I didn’t take any chance the PVA glue (Titebond II) would fail simply for insufficient curing time.  This isn’t 3/4″ pine here.  But I’m starting to think the twist might have had something to do with this nasty check at the end of one board.

wp-1481044744087.jpg

Masked for when it gets stabilized.

I’ve talked about it in the past, but I like to stabilize end grain checks with thin viscosity cyanoacrylate glue (i.e., super glue).  It dies hard and clear and penetrates deep into the check.  This particular check goes almost 3/4 of the way through the thickness, but seems to angle upward, so I might not need the whole bottle of CA glue.  But if I do, so be it.

wp-1481044749855.jpg

That ridge in the middle of the tape is the gap.

The good news is the check is on the underside of the main slab, and at the back right corner (to hide the bit of wain).  As long as the check gets sealed up, that should be the end of the problem.

Should be.

JPG

That Still Only Counts as One

I’ve been building an even better workbench of late, and today was a major milestone in the build: laminating the top. Unlike my current workbench, the main slab of this benchtop is just two boards. And they both came from the same length of wood, so in my book, that still counts as only one board. 

Gimli would be proud.

The lamination is 91 inches long, 15.5 inches wide, and a shade under 4 inches thick. I would like the benchtop to be about 22 inches of total depth, but I dont have any more 12/4 ash and I don’t want to laminate smaller boards onto the main slab.  So I have a decision to make: add a tool well or make a torsion box out of 5/4 ash to form the final third of the benchtop. Can it be both?

That hollow will come out during final dressing.

I keep thinking about that stretcherless Shaker Workbench and how that back board was held on with pegs in the main slab. But I’d like the option to use the tool well when I don’t need a full-depth bench. 

Has anyone ever made a reversible tool well?

JPG

Slippery Slope

I’ve been watching a ton of New Yankee Workshop lately. Norm Abram is the Bob Ross of woodworking; and Christopher Schwarz is right: Norm is hilarious. Roman Ogee, not Roman Orgy. Lolz. 

It’s gotten me thinking though: what if I had Norm’s signature tool, a radial arm saw?  It goes against everything I believe in (not really).  But I do have a double bevel compound miter saw, so would halflaps on that be any slower or worse than doing it by hand?  Probably not, and as long as I cut the shoulder by hand (so I knew it was perfectly square), wouldn’t hogging out the waste by power tool be okay?  I already use a thickness planer on boards I made S2S by hand. 

This will need paring with both a chisel and a router plane.

I’ll give it a try and see how slippery the slope really is. 

JPG

Lock and Load

I’ve been rapid fire finishing smaller projects, in the hope of clearing out some space in the shop. 

First, I finished (literally and figuratively) my travel-size tool chest. It’s not a coffin. 

But I would be okay being buried in it.

Then, I completed the first of two Japanese saw horses. The second one is in process, and I will probably make two more in short order. 

I will skip the bevel on the feet next time.

Next, the rolling cart for my new Craftsman tool chest went together rather easily. It’s solid, if unspectacular.

I plan to add a saw till under the lid with rare earth magnets.

Finally, a hanging corner shelf for my bedroom was an exercise in directional planing. After some espresso stain, it may become an upcoming Basic Project.

I’ve never had studs to screw into before.

There are a few other things to clear out as well, but nothing woodworking related.  The shop feels less cluttered, at least. 

JPG