Getting Started in Woodworking

Exciting Times

Hello, everyone! It’s July 2024 and things are weird, generally. The Mets, despite being a pretty shaky team, are in the playoff hunt. The world is on literal and figurative fire. And I have a new workshop.

Complete with shop cat!

More on that soon.

But today I’d like to revisit something I’ve talked about previously: rectangular tenons on low benches. It’s no secret that I’m a fan of the traditional Chinese workbench. And in the past I’ve showed off several versions of a sawbench or sitting bench that use angled, rectangular tenons. But today, I’d like to do a deeper dive on how I lay out the angled mortises. Because if you lay them out correctly, it’s tough (but not impossible) to screw things up.

By definition, for any angled mortise, the mortise hole on the top of the slab is in a different position than the mortise hole on the bottom of the slab. Unless you want a super tippy bench, the top of the mortise hole should closer to the center line than the bottom of the mortise hole. And if it’s a compound angle, the mortise hole on the top of the slab will be closer to the midpoint of the slab than the bottom of the mortise hold (which will be closer to the end of the slab). This means that since the mortise (and the corresponding tenon) is a three dimensional object, there will be a portion of the entire mortise is completely vertical. Making angled tenons is, essentially, just strategically relieving the wood around that vertical mortise.

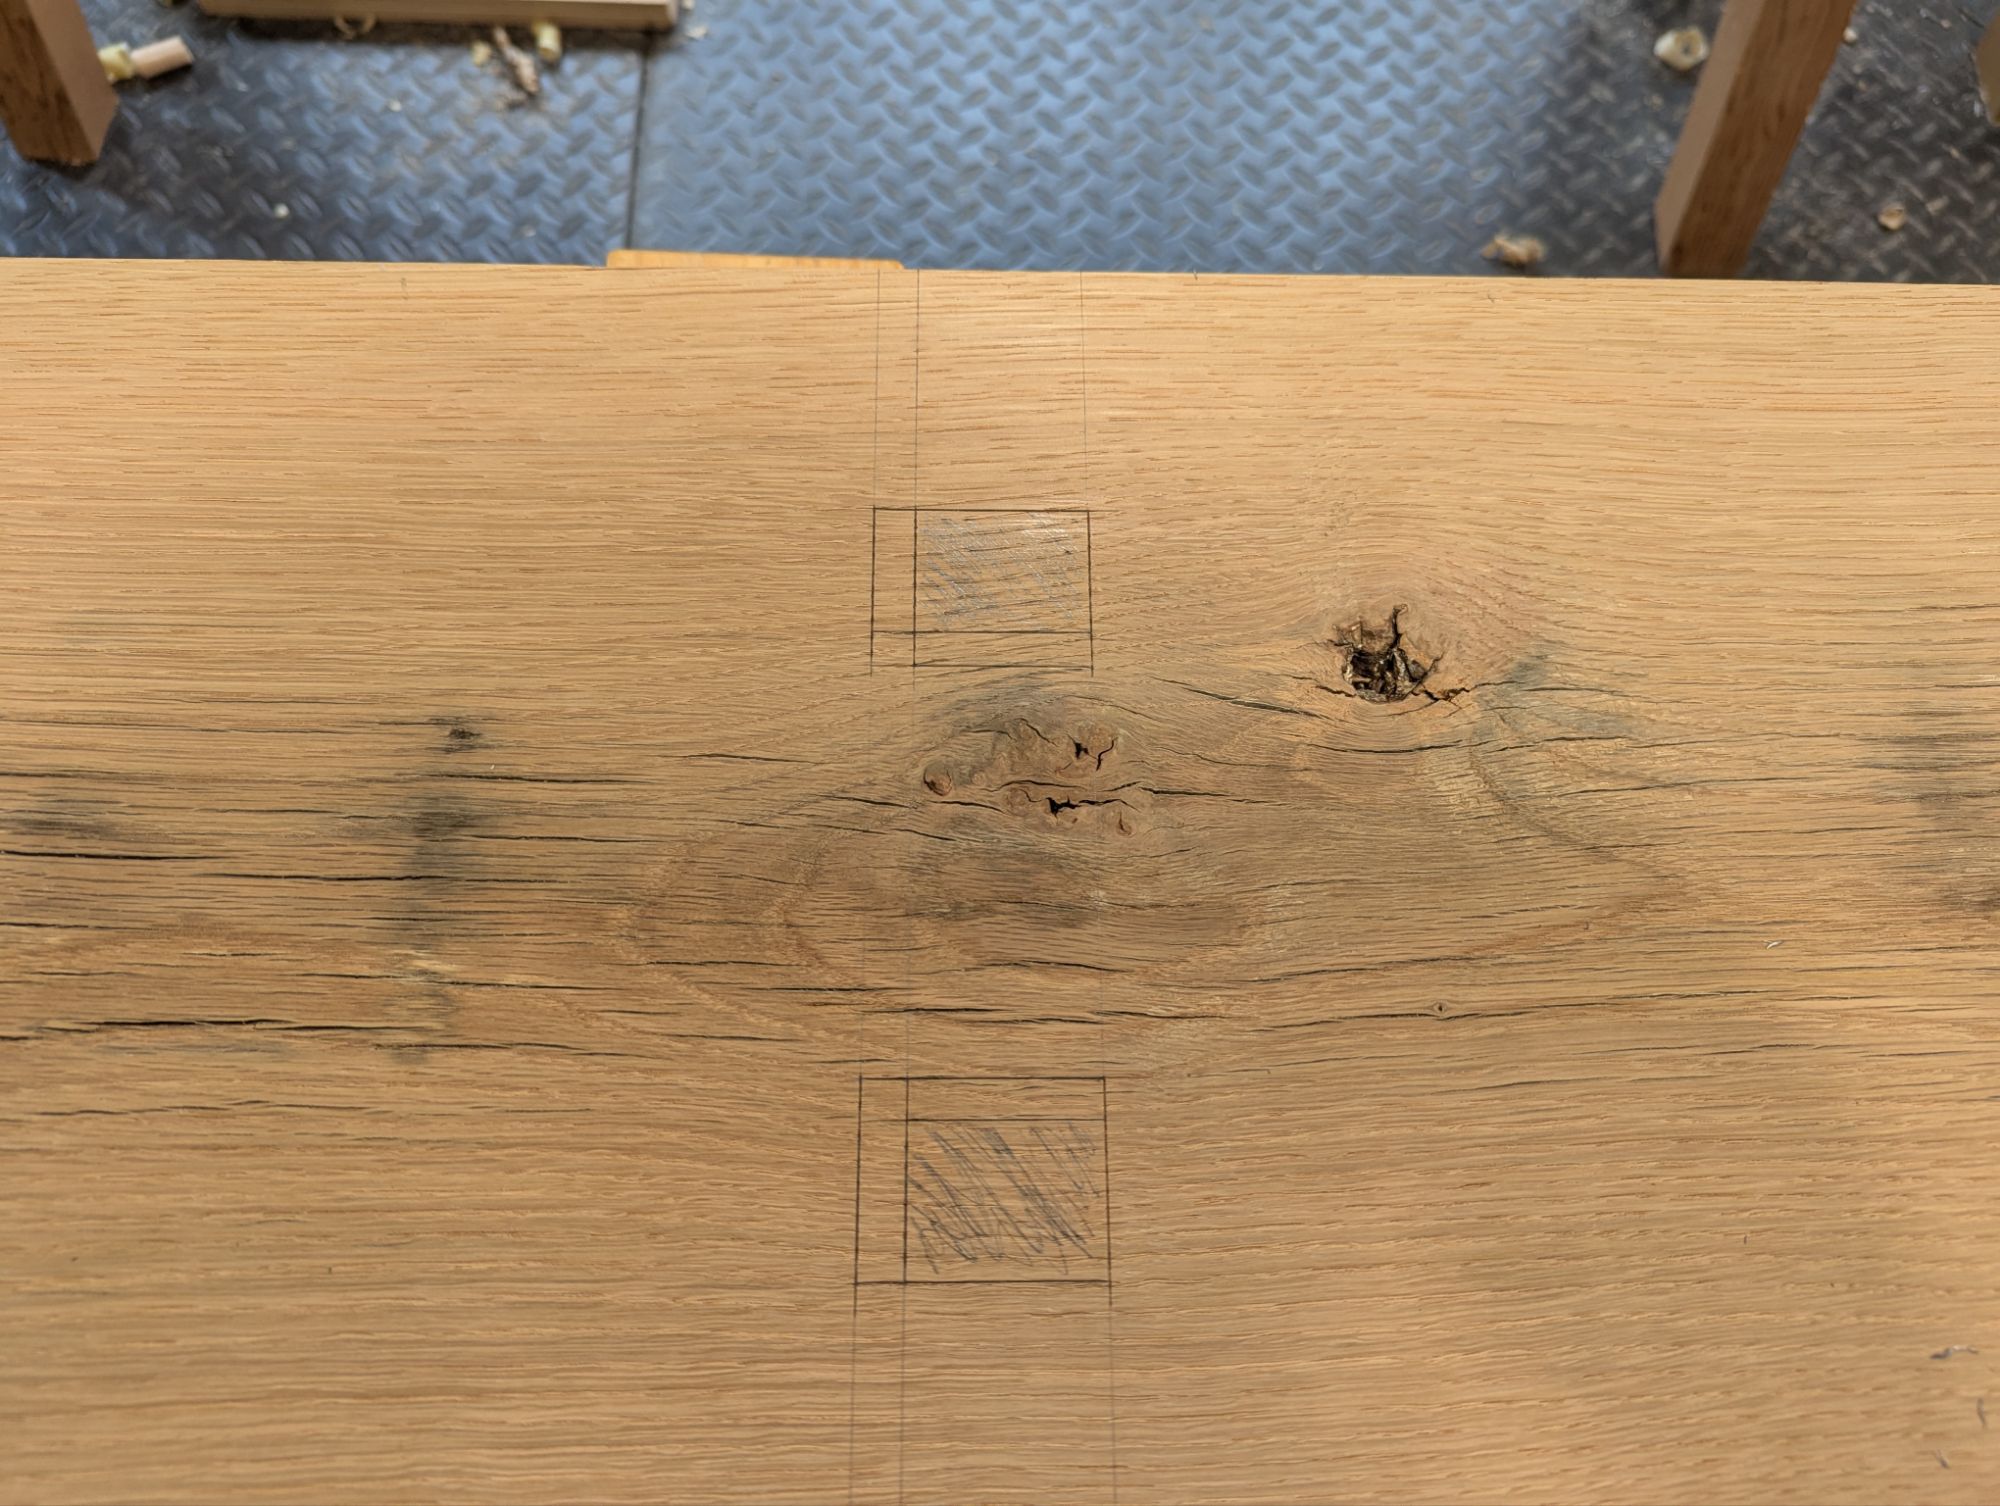
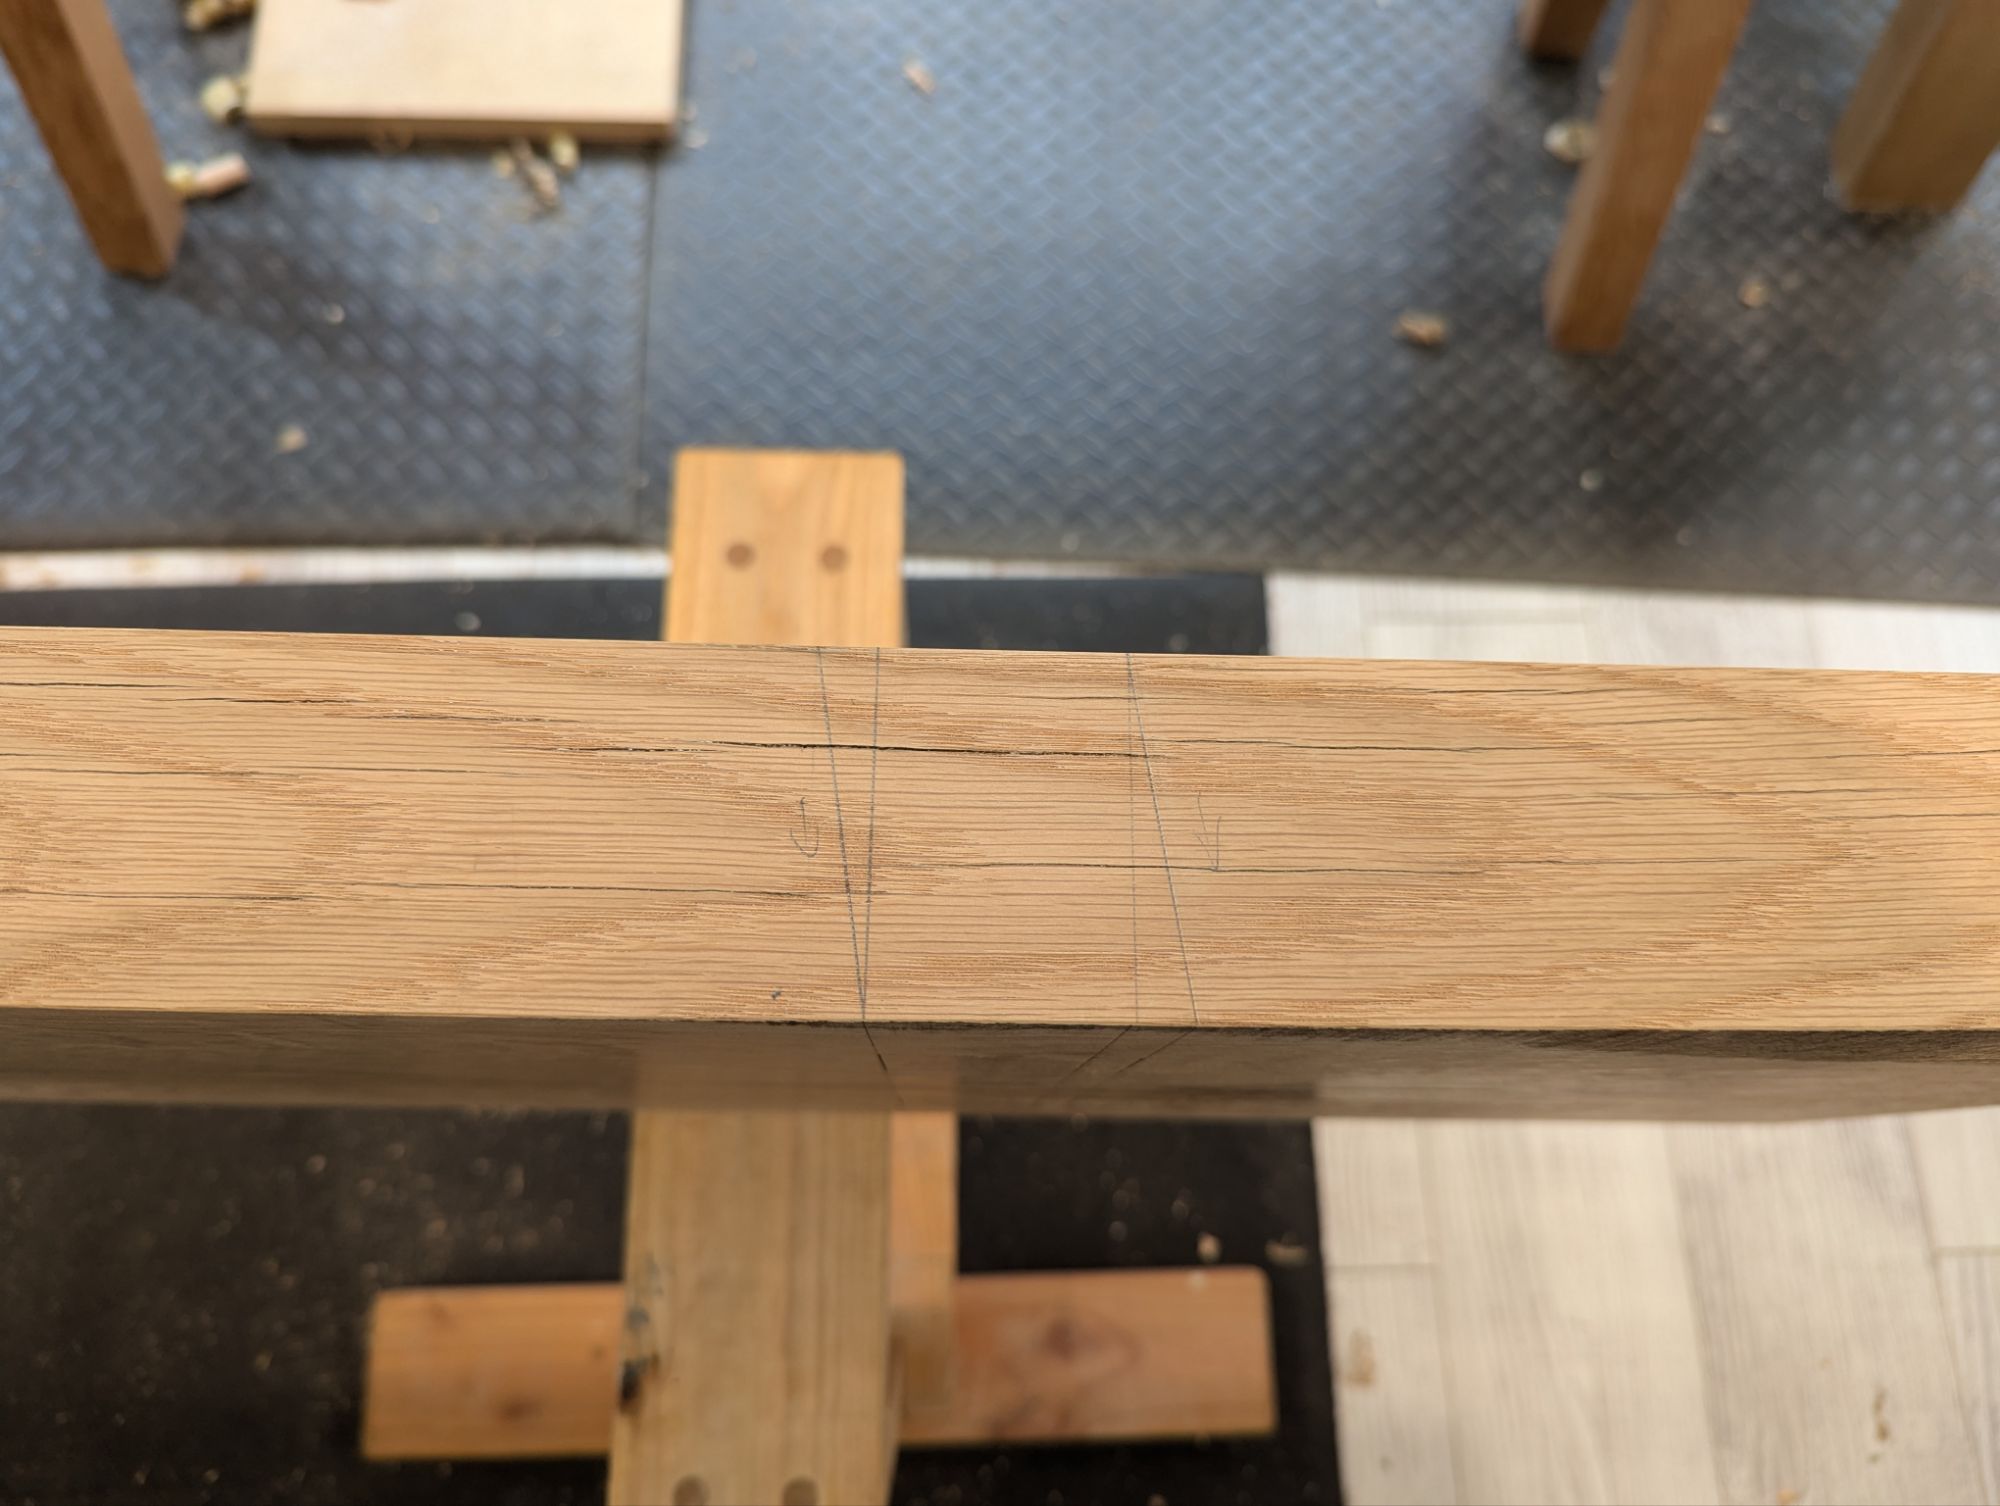
Take a look at the below image, which shows the layout for the mortise on the top of the slab. The greyed out area is the entirely vertical part of the mortise. The unshaded boxes between the other knife lines are the extants of the angled mortise. You’ll see that on the top of the slab, the mortise angles inward. In this case, because of the compound angle, it’s both inward toward the center line and inward toward the mid point of the slab.

The end of the slab is to the right.

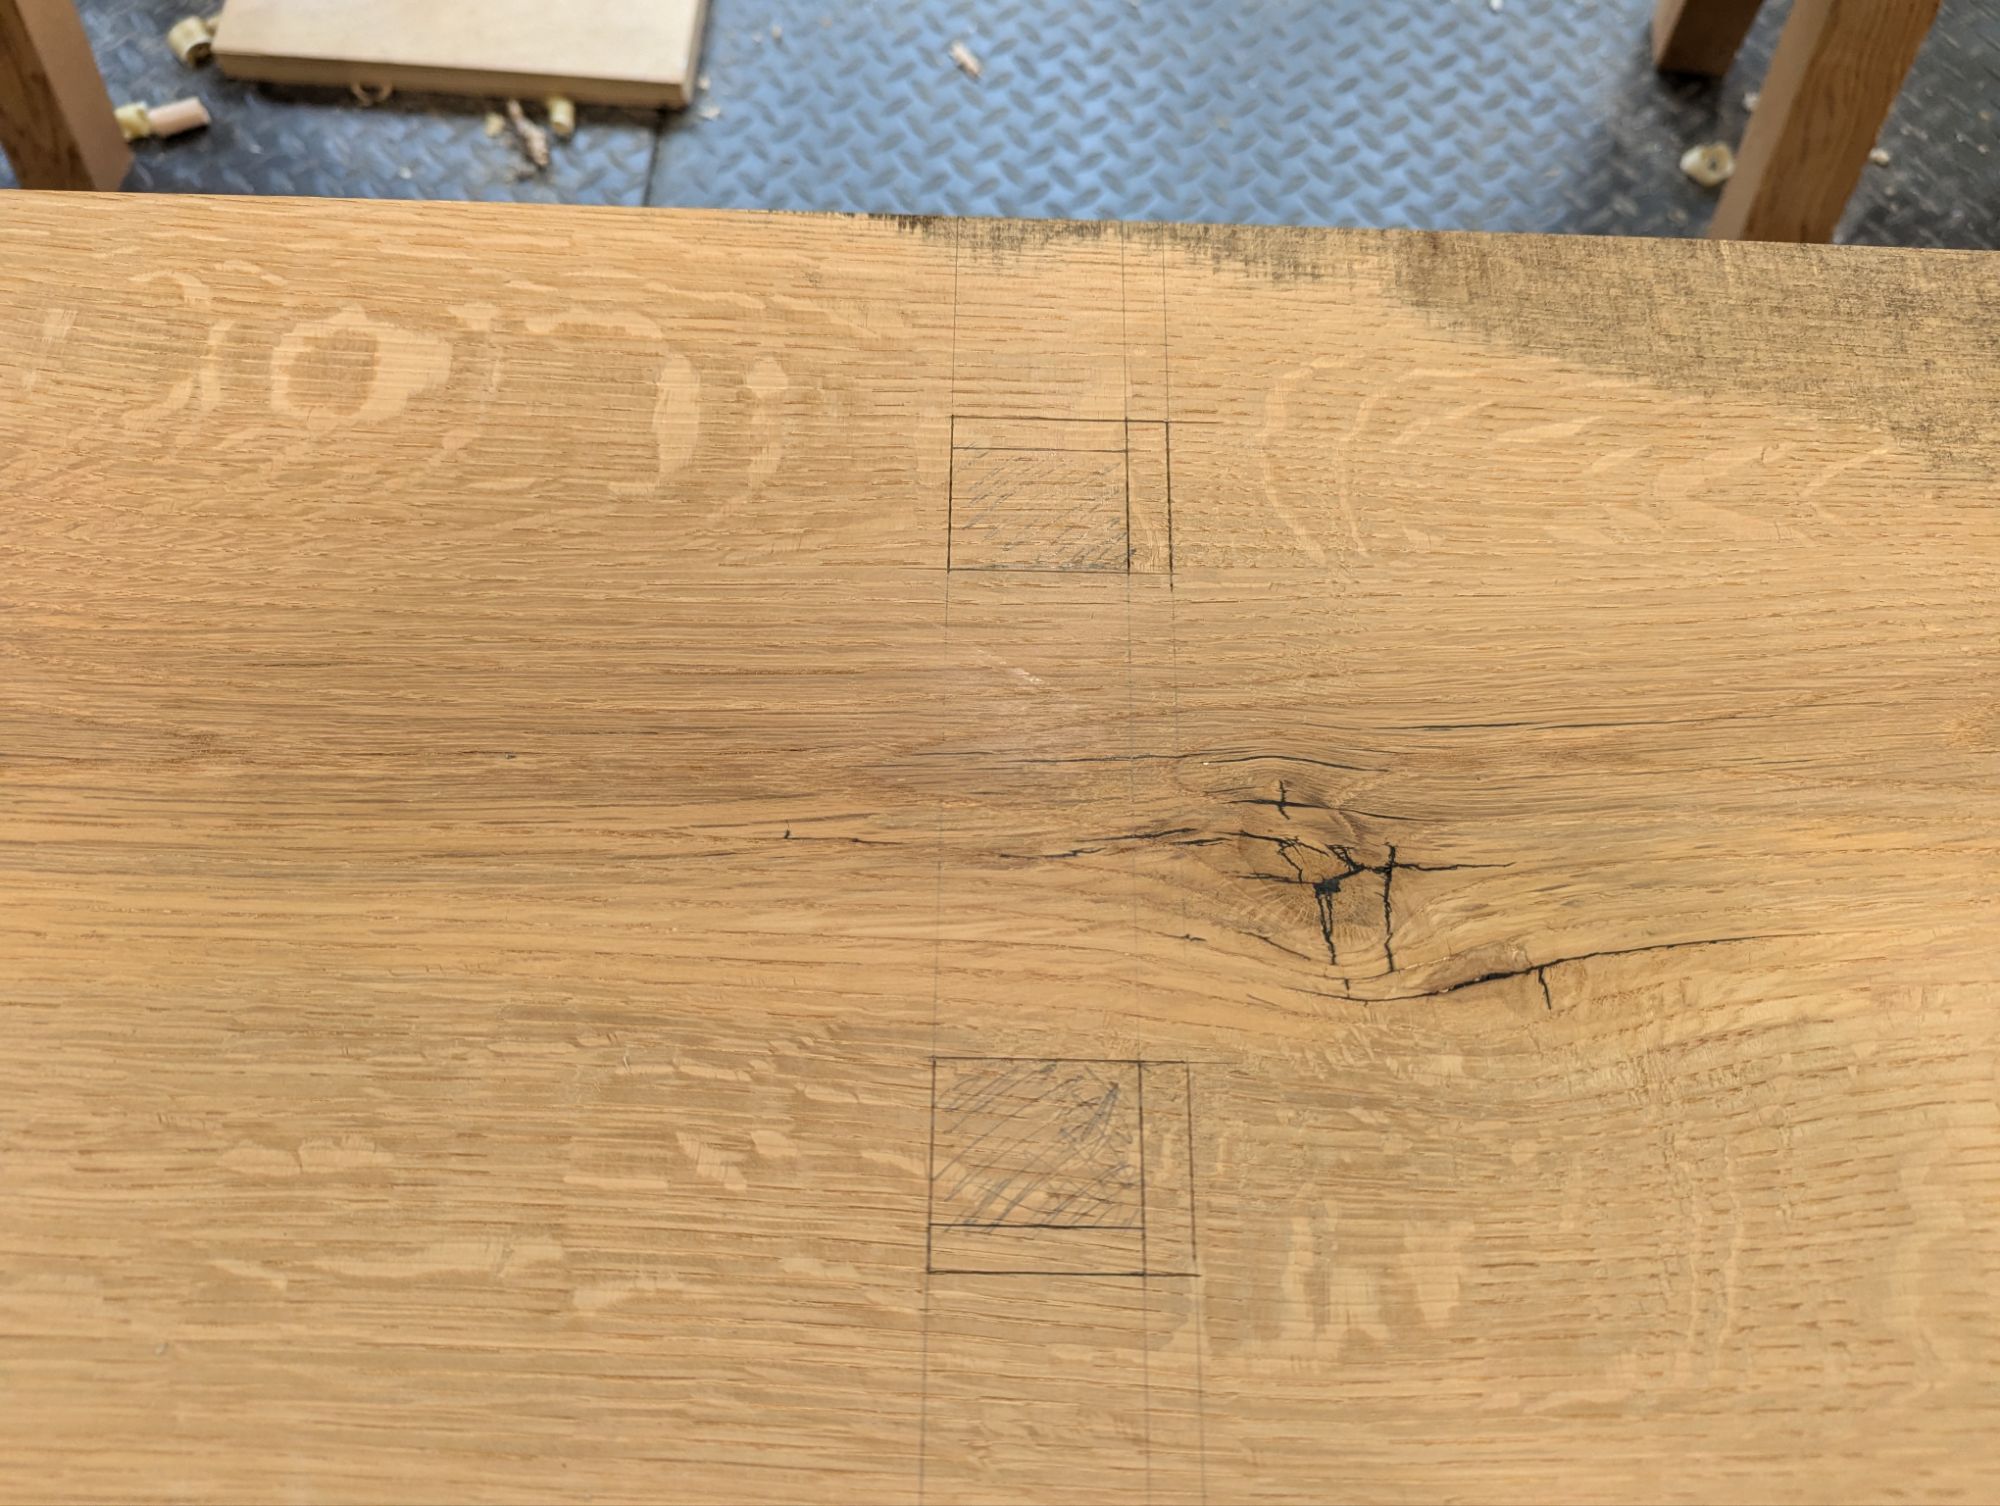
Compare that to the underside of the slab (shown below). The vertical part of the mortise is greyed out again. Because the legs are angled both forward and out, the mortise angles outward (both outward from the center line of the slab [and toward the edges of the slab] and outward from the mid point of the slab [toward the end]).

End of the slab also to the right.

One more note: when laying out, I find it helps to carry your lines down the sides of the slab. This also can show the vertical parts of the mortise more clearly and make sure that is accurately carried around the edge.

I also use a trigonometry calculator to figure where to start the mortise on the top of the slab so the legs don’t stick out too much beyond the plan of the slab itself. For most slabs in the 10-12″ range, the mortise on the top side of the slab should be centered around 2.5″ away from the center line.

This just lays out the forward rake.

So what is my preferred method for cutting these angled mortises?

First, I would bore out the vertical part of the mortise with a brace and bit and then pare roughly to the lines. Second, set up a bevel gauge and chop down the angles until I get pretty close. Finally, use a block of wood as a paring guide to refine the mortise until the angle is perfect. Then cut the tenon to fit each mortise, as there will likely be some slight variance in mortise width (and the wedge will take care of any variance in mortise length).

What are some other viable techniques? If you go the chisel only route (i.e., no boring it out first, which is the traditional method), I would still recommend chopping the vertical mortise first. Then you can pare it down to the lines as described above, with or without the guide block. I do not recommend freehanding the angled mortise right off the chisel. At least not for furniture grade pieces. For a workbench, it’s probably fine.

Once you have the vertical mortise, you could use a floats, rasps, or files to shape in the angles. These tools are also helpful to refine the angles and make everything as uniform as possible.

The nice thing about rectangular mortises is that you really don’t need any of the above special tools. You could do the entire thing with a chisel and mallet no problem (and I’ve heard that the lack of boring tools in China is how the form came to be). Although, although a bevel gauge and a rasp or coarse file will definitely help.

Next time, we’ll talk about cutting the tenons. Including how to cope the shoulder so it mates perfectly with the underside of the bench.

JPG

Apartment Woodworking: Year 10 Retrospective (Part 1)

I recently celebrated my 10th woodworking anniversary. About this time in 2012, I got sick of paying for furniture that didn’t quite match my sensibilities and took matters into my own hands. I’ve probably covered this before, but growing up, we were a New Yankee Workshop household (not a Woodwright’s Shop) household. So when I decided to get back into woodworking as an adult, I went first for some power tools. A home center run with my father resulted in 12″ chop saw, a plunge router kit, a cordless handheld tool bundle, and a boatload of wood screws (plus one hard point saw and one chisel). Those tools alone got me through a bed (that was reclaimed into the base frame for my bar), a desk (that was reclaimed into the base frame for my regular outdoor workbench), and a console table (reclaimed into god knows what).

But I quickly gravitated toward working primarily without power. Not just because it’s loud and dusty using a plunge router in your foyer, no matter how great your shop vac. But also because it’s meditative to me. Now I am sure there are some folks who Zen out with the random orbit sander. But not I. My happy place is a No. 6 or No. 7 hand plane and a stack of rough sawn lumber to S4S.

My other happy place.

Sure, I still have that same chop saw and cordless circular saw. And I regularly use them, along with a hollow chisel mortiser and a thickness planer. I even bought an impact driver a couple months back and can’t believe how I’ve lived without one for all these years. But the fact is, nowadays my power tools support my hand work; not the other way around.

Although I joke that I am an artist, I will never make anything that ends up in a museum. I’m not a savant at anything woodworking related (although I consider myself well above average at hand cut dovetails). I have a day job, that keeps me very busy. And in these 10 years, I’ve devoted enough time to the craft to have picked up a thing or two. And I’d like to share that collected wisdom with the world.

This will be a multi-part series. I’m not sure how many installments there will be, and I certainly expect I won’t make it straight through without deviating to regular posts. I have literally no sponsors.

Getting Started in Woodworking

If you’re here, it may be because you’ve searched “Woodworking in an Apartment” or “Small Space Woodworking” and took a flyer. If so, welcome. I’m James and I have very strong opinions on literally everything.

If you think you might want to get into hand tool woodworking with a limited tool kit and limited space, there are better resources than me. You should go to YouTube and check out Paul Sellers and Richard Maguire. Paul and Richard are giants to me. Paul’s 10 part workbench video came out a few months before I started woodworking (although I didn’t discover Paul until 2014, after 2 years of fapping about with power tools). Paul is like a combination of Mr. Rogers and Bob Ross.

Richard started posting a year into my woodworking career. Paul’s website, Common Woodworking, didn’t exist when I needed it most. Richard’s site, The English Woodworker, has long form content (both paid an unpaid) that cannot be beat. Richard is at the same time exceedingly practical and esoteric. Trust me; you’ll see.

So check their stuff out and maybe come back here if you want more of those very strong opinions of mine. If you’re open to using more substantial power tools, the Woodworkers’ Guild of America and the Wood Whisperers Guild are both good resources.

Beginner Woodworker Hand Tools

People have written entire books on this question. I have my own thoughts, sure. My only piece of real input is to buy a few tools of good quality, rather than a bunch of tools of crappy quality. But if you want my 10 year retrospective take on the absolute core tool kit, here it is.

  • Hardpoint panel saw from the home center (Home Depot has DeWalt; Lowes has Craftsman; I have used both)
  • 1/2″ (and maybe 1″ too) Lee Valley bevel edge chisel (the ones with the clear handle; they work both for fine work and mortising)
  • No. 5 Stanley Bailey pattern Hand Plane (Patrick Leach at http://www.supertool.com/ can get you a good worker that won’t take much to restore; sign up for his monthly tool list so you can build your kit with good vintage stuff if you want to go forward)
  • Stanley 10-049 folding utility knife (Paul Sellers swears by this knife and so do I; get it from Amazon)
  • Thorex double face mallet (both Paul Sellers and Richard Maguire use one and so do I; get it from Amazon)
  • 12′ tape measure (the Starrett “exact” one is pretty great, and cheap, from Amazon)
  • 12″ combination square (I use a Starrett, but Lee Valley sells a 12″ in a set with a 6″; they are pretty accurate for the price)
  • Taytools double sided diamond plate sharpening stone (these are pretty good for the price, Amazon available, but also get a sharpening stone holder from powertec or peachtree and some 3 in 1 oil)
  • Vise type honing guide for plane and chisel sharpening (I like the eclipse-style one you can get from Lee Valley, but make sure to make a stop block system for repeatable angles)
  • Cordless drill driver (let’s face it, you probably have one already)

And that’s it. Don’t forget the glue and the mechanical pencil.

You can probably get away with a speed square from the home center instead of a combination square.

Workbenches

I currently work on a Moravian-style knock down workbench based on Will Myers’ excellent video series. And Christopher Schwarz of Lost Art Press is the modern authority on workbenches of all styles. His Ingenious Mechanicks book changed my life.

But for my money, I would check out either The Naked Woodworker workbench, which can be built with just dimensional framing lumber from the home center and the tool kit described above. Or check out Rex Krueger on YouTube and his “Joiners Workbench“, which is similar but arguably easier to build with the same kit.

Or just find a thick plank and make that Grandpa Amu low workbench, which I love.

I’ve built a few of those Chinese-style low benches, two of which are shown in this one picture.

I’m going to stop it there for now. I could otherwise go on forever.

Btw, I’m not on twitter anymore. I have a strict “no social media owned by delusional man child” policy (I’ve been off facebook for several years for the same reason and never had an instagram).

JPG