big projects

It’s Easier to Remove More

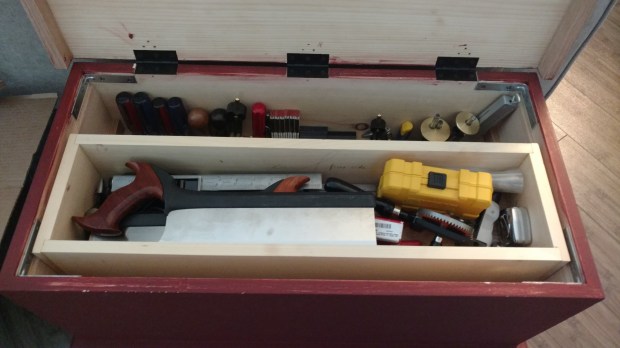
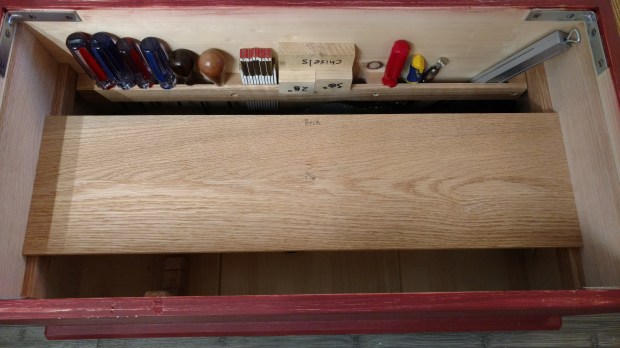
I’m sick of projects.  I want to spend the next month just sharpening and sorting.  Figuring out what I have, giving away what I don’t need, and planning a permanent tool storage solution around that result.  I’d also like to beef up my DIY moxon vise with an extra board on the back jaw for balance.

wp-1463090713357.jpg

The shop is becoming cluttered again.

But all of that depends on actually finishing one project: my Stent Panel workbench.  I’m very close: four more boards to laminate onto the remaining legs, one short stretcher to fit and a show face to attach to the benchtop.  But then comes the final problem: piston-fitting the leg tenons.  Since abandoning long stretchers, friction-fit joinery has become a must.  And for portability, I also won’t be gluing or drawboring the legs in place (at least not at first).

So far, sizing tenons has been a trial and error process.  I flatten a tenon board, square an edge, and then send it through the thicknesser to just over the correct thickness and width.  In at least two cases, the tenons ended up too thin (by 1/64 or so) for the mortises.

My first thought was to CA glue plastic shims to the tenon cheeks.  This worked fine.  But the correct thickness plastic shims are either hot pink or white, neither of which are a great color matches to the rest of the bench.

My second option is wood veneer.  In fact, Rockler makes a 2/83″ pine veneer sold in 3 sq ft batches for under $9.00 (it was $12.98 including shipping).  I figure a film of PVA glue brings the patch up to 1/32; I can shoulder plane down the reverse side to friction fit. And the face grain to face grain glue surface should make the veneer a permanent addition to the tenons.

The leftover veneer can be used to fill any remaining gaps once the bench is assembled and flipped over.  Measure twice and cut once, indeed.

JPG

Over and out

The traveling tool tote is done.  With the sliding tray finished, the chest is loaded up with everything I’ll need on site to finish my Stent Panel workbench a couple weekends from now.

wp-1462654776526.jpg

With room to spare, no less!

I will do a full retrospective after a few weeks of use, but I’m overall pleased with the outcome.  Portability is not an issue: it’s neither too heavy nor out of balance.  The sliding tray does wonders to balance out the heavy bench planes at the back of the well.

wp-1462654780955.jpg

I’d save some space if my sharpening jig wasn’t made of 2×3…

I’m still on the fence regarding casters.  There isn’t much glue surface holding the lower skirt on: barely 3/4″ (plus a few headless brads).  That small glue surface would support most of the casters’ bearing surface.  Is that enough?  Probably.  Will this prototype be in woodworking use for long enough to justify casters?  Unknown.

JPG

Tearing it all down

I’m displeased with the “no mortise” hinges on the traveling tool tote (the same that were used on the medium tool chest).  And not just because they still require hinge mortises (on one side, at least).

wp-1462393265422.jpg

This is what the fully-loaded well looks like, FYI.

No matter how hard I tried, I couldn’t get the “no mortise” hinges on straight.  In a fit of rage, I bought some home center middle hinges (in oil-rubbed bronze) and switched them in.  Between the comically deep mortises and the unsightly holes in the underside of the lid, this will remind me forever not to give into the hype.

image

A constant reminder of my shortcomings.

I am also displeased with the first set of rot strips.  Too narrow and too tall.  On the next iteration of the tool chest, they will be replaced with something a bit more squat and stable.

It’s tough being my own biggest critic.

JPG

Retail Therapy

I splurged a bit the other day, on several hundred Dictum nails and additional accoutrements. Not sure if I ever talked about my gouges, but I finally bought a tool roll for them. I also picked up a Japanese nail set, a drawbore pin and a mortise float, all of which are being put to immediate use (no spoilers!).

image

The traveling tool tote is basically finished now, other than the tray (which is the last and final step).  I really like the look of those Dictum nails and plan to use them assembling the tray also (the carcass used Tremont cut nails).  Tapered drill bits would have been invaluable, though, as there was some end-grain splitting in the pine lid when attaching the oak battens (the battens themselves held up fine).

wp-1462210734972.jpg

The lid also doesn’t close as tightly as I’d like, but worse things have happened.

Some cyanoacrylate shored up the splits and the whole thing got slathered in more red paint.  After a few weeks of use, I’ll do a full retrospective on the project.  I’m already thinking about ways to improve the design for the next go-around.  Not the least of which will be painting the lid before attaching the oak battens.

wp-1462211168412.jpg

There is always another go-around.

Sorry for the sporadic posts lately.  Things have been too busy for much writing.

JPG

The “Right” Way

I made a ton of progress this weekend on both the new workbench (which will henceforth be known as the Stent Panel Workbench) and the traveling tool tote.  And I did it all through cut corners, quick fixes and general expedience.

First, I laminated another leg for the workbench.  But this time, I did it all at once.  The tenon board fit so tightly, it made sense just to build the leg around the fitted joint.  Even though the tenon board itself is slightly out of square with the underside of the table top, I can flush it to shoulder boards (which I know are square) and everything will be fine.

wp-1461452179862.jpg

The back legs are only three laminations.

While the glue was drying, I added a rack to the back of the tool tote.  A small scrap of cherry was almost perfectly sized to make spacers for the oak strip, so the rack is two-toned.  And I don’t care one bit.

wp-1461452185485.jpg

Jointer plane, smoothing plane and router plane, if you were wondering.

I also added a simple panel saw till to the front of the chest.  It’s best practice to screw in the till (one through the tongue and one from under the floorboard), but that was really annoying last time.  So instead, I skipped the screws and glued it in place (with hide glue).  I worked really hard to make the carcass square and plumb, and my reward is less fussing with slotted screws in tight spaces.

wp-1461452189555.jpg

I’m not even adding a backsaw till.  They can live in the sliding tray.

Finally, I fit the bottom for the sliding tray.  After shooting to length, I noticed a very slight twist overall. Rather than play about, I sent it through the thickness planer for an extra pass and will rely on the tray carcass (made from 5/8″ quartersawn pine) to bring it perfectly in wind.

wp-1461452195700.jpg

I did not cut corners when shooting to length, though; it’s absolutely perfect.

Even without the organizers, the tool tote really shined today.  It’s manageable when fully loaded, but would benefit from some rubber casters.

All in all, not bad for a single day in the shop.

JPG

Who Needs ‘Em?

If you haven’t seen it yet, you should check out the Lost Art Press teaser on Roman Workbenches.  There is something about the bench depicted in the plate that makes sense to me.  At the height of a normal workbench, I bet it would be fantastic for a small-space woodworker and pull excellent double duty as workbench and stout kitchen table.  To that end, I have decided to forego the long stretchers and shelf on my Roubo-style workbench.

wp-1461248639725.jpg

It’s been at this stage for a while, actually.

Here is my thinking: the benchtop is just over 4″ thick,  and the tenons are at least 4″ wide and 1 1/4″ thick, so the joinery is plenty beefy.  Instead of long stretchers and a shelf, I will build a low, rolling cart to keep under the bench.  When in use, I can wheel out the rolling cart (for access to my tool chest and other essentials), and when I’m done, it tucks away neatly.  This will free up the corner where my tool chest currently resides and, eventually, I can revisit the floor chest idea.

The bench will still have short stretchers, although I might use lapped joinery temporarily (rather than mortise and tenon) until I determine if the bench can live without long stretchers.

Make sense?  Or am I just being lazy?

JPG

Everything is ruined forever!

No, not really.  But the chamfer on the lower skirt isn’t as deep as I wanted.  And “Tuscan Red” milk paint is drabber than I expected.

wp-1461086300627.jpg

First coat, slathered on.

I should have carefully masked the insides, but whatever, it’s a tool box.  Also, the reinforcing corner brackets seem to be growing…

wp-1461086225275.jpg

Second coat, much more uniform.

Third coat should be the charm.  Then I’ll worry about the tray and the lid.

JPG

Of Course I Did

In a classic case of “trying to do way too much all at the same time”, I dropped the traveling tool tote on Sunday and fractured front right joint.  Id est, the most visible joint. I was trying to attach the rot strips while the clamps were still on the tray runners and it lost balance on the saw benches.

wp-1460324087106.jpg

Everything was going so well, at the time.

Whatever stress imparted upon impact, the top nail no longer held the joint solidly and I feared for long term stability.  My choice was clear: add a dovetailed skirt and dust seal to the project, or cram the joint full of some more hide glue and reinforce everything with some ugly Home Center corner brackets.


wp-1460323574450.jpg

Seriously, guys, what did you think I’d go with?

Repeat after me: this is a working tool, not a museum piece.  At least the handles look nice (or will, once I blacken the screws).

JPG

A Familiar Sight

With the floorboards now flushed to the case on the traveling tool tote, I’m at a critical juncture.  Should I finish the dovetailed skirt, or do I fit the tray runners?  Obviously, the runners, but not for the reason you’d think.

The walls of the carcass are only 11/16″ thick.  But the cast iron chest handles I’ve selected take 1″, No. 12 screws.  The case is becoming unwieldy, so in order to attach the handles I need the extra thickness from the runners.  After the handles are attached, I can apply the skirt, add the rot strips and paint the carcass (Tuscan Red this time).    Then I’ll turn to the sliding tray, wall rack and battened lid.

But in the meantime, I only have two wooden clamps and the hide glue needs to dry.

JPG

Nailed It!

A quick update on the traveling tool tote: it has a bottom now.

First, each floorboard is tacked in position with a headless brad.  I’m still a relative novice at driving nails and I want the alignment to be correct when I drive the heavy nails.

wp-1459775389546.jpg

With a business card’s worth of space in between.

Next, I pre-drill and drive the aforementioned heavy nails (CT6, to be exact) at 5″ intervals, which I marked using my new 8″ dividers.  I also trim the overhang with a panel saw.

wp-1459775395289.jpg

The half-driven nails are a story unto themselves, for another time.

Then, I plane down the remaining overhang to be flush with the case and admire just how well cut nails cinch the work together.

wp-1459775418419.jpg

Quite remarkable, really.

Finally, I spend a few days agonizing over whether I drilled the pilot holes too deep and resolve to drive a few brads through the lower skirt into the floorboards, just in case.

Because nothing can ever just be nice.

JPG