Shop Equipment

Saying Goodbye (For Now) to Old Friends

Yesterday, I said farewell to some of my oldest and most trusted tools: my full size router set, cordless jigsaw and cordless circular saw. They now live in storage in my brother’s basement.

These are some of my original tools, from the before times when everything I knew about woodworking came from Norm Abram.  Back before I knew I wanted to do hand tool woodworking almost exclusively.  I consider many of my early tool purchases impulsive wastes of money, but not these.  If (when?) I have the space again, these tools will be back in the shop.

Godspeed, gentlemen.  We shall meet again!

Godspeed, gentlemen. We shall meet again!

My quest to simplify my woodworking existence continues.  I hadn’t touched any of these tools since well before I moved into my apartment over 4 months ago.   My finishing supplies bin takes their place under the worktable.

That brings total power tools remaining in my apartment woodworking shop to: compact router, cordless drill, random orbit sander and Dremel rotary tool.  Not sure there is anything left to cut at this point.  I have thought about giving up my WorkSharp 3000 sharpening station as well, but I never know if I’ll need to grind an edge back to life.

Goodbye for now, old friends!

JPG

Sometimes, Careful Planning is Not Enough

Just about three months ago, I wrote an entry on the “dining” table I built to be the foundation of my apartment woodworking shop (post linked: here).  During its construction, I had envisaged the table (which, by the way, was reverse-engineered from a Restoration Hardware design) as a furniture-quality, rock-solid clamping surface with some much-needed storage space on the shelf below.

And it has not disappointed.

And, thus far, it has not disappointed.

I believe I executed pretty well on that concept.  There is no hint of wobble or bench-based chatter when I am hand planing, and I have (just barely) enough storage below for the powered odds and ends I thought I would use when I switched back to apartment-based woodworking (more on that another time).

During the design phase, I did my best to determine the perfect dimensions for what I’d need to do meaningful woodworking, but there was no way to solve for (or even predict) everything. I’m not saying I would necessarily change any of these dimensions, but, for example:

  • The height (at 31″) is just right for planing, with the top of the Milkman’s Workbench sitting at a very comfortable 33″ (I’m a little over 5’10” and all my planes are iron-soled, FYI), but I still need to craft a moxon-style vise to raise the workholding to a comfortable level for joinery.
  • The top is wide enough (at 50″) to accommodate both the Milkman’s Workbench and a shooting board/miter box at the same time, but not nearly wide enough for planing longer, thinner boards (hence the need for a 72″ planing slab (seen above on the right, planed to final dimensions but still lacking dog holes and inset vise)).
  • The top is deep enough (at 34″) to splay out the tools needed for any particular project, but is sadly too deep for the reach of the boom on my LED task light (solved by locating the clamp-on base to the side, which now gets in the way of some cross-grain planing).
  • The overhang of the top in relation to the frame is wide enough (at 4″) for ease of clamping a variety of benchtop accessories on all four sides (e.g., Milkman’s Workbench, miter box, saw vise, task lamp base, soon-to-be planing slab), but anything less than a co-planar top eliminates the usefulness of the legs themselves as a clamping surface.

The point is, no matter how well you plan, no matter how much thought goes into the design or care goes into the execution, it is only a matter of time before the shortcomings and mistakes become apparent.  In making the best of a less-than-ideal situation, any solution to an existing problem could also be the genesis of a new, unforeseen issue.

And that, more than anything, is the essence of small-space woodworking.

JPG

Because sometimes what we really mean is “unplugged”

Hand tool woodworking is great.  It’s relatively quiet, can be done with minimal shop space, and the results are often better than anything produced solely or mostly by machine.  I consider myself a hand tool woodworker, although I admit sometimes I reach for a plunge router, cordless drill or an orbital sander.  I also own, and frequently use, a thickness planer to surface the remaining two faces of a board that I’ve hand straightened and squared.

Net net, if I’m deviating from my basic set of saws, chisels and planes, there are meaningful efficiencies at work.

That having been said, I have a new addition to the shop. The Nobex Champion 180 miter box, with Ikeda blade.

Perpetually on backorder at  www.leevalley.com for a reason.

Perpetually on back-order at http://www.leevalley.com for a reason.

I know it’s technically not a power tool, but it is also not an essential tool for hand tool woodworking.  I can mark a knifewall and saw/shoot down to the line. I get it.

I wanted the convenience and the speed of a precision miter box.  Accurate saw cuts mean less time at the shooting board, so I can get back to the fun part, cutting joints.  Plus, I miss my 14″ double bevel compound miter saw and this should be a pretty solid replacement.

I have only cut a few pieces of wood so far, but I have some initial reactions.  First, the unit was much easier to assemble than expected (although there were a few extra pieces [two random hex nuts], which is distressing).  Second, the unit feels sturdy and the Ikeda blade is super sharp (already cut myself).  Third, the blade should definitely be lubricated prior to use.

My brother and sister-in-law requested that I make some footstools for their new house (they left the last footstool, which matched a vanity sink I also made, at their old house), so I will have an opportunity to further the miter box.  I have also been thinking about making some picture frames; not out of necessity, but as practice for cutting mitered halflap joints by hand (which is a favorite design element in exposed joinery).

Edit: After a couple days of use, I am very happy with the saw. I still have to shoot the ends of each board (the blade is ever so slightly canted to the left, which is probably user error), but it is always a slight cleanup, not a major straightening.

JPG

Let There Be Light!

“See the line; cut the line.”  It’s the basic premise of hand tool woodworking.  It seems like everyone is so focused on the latter (cutting the line) and no one cares about the former (seeing the line).  I would like to change that, because no one should struggle through the literal and metaphorical darkness.

In my experience, an ample source of clean and bright light is just as important to quality and safety in woodworking as sharp tools, solid workholding and proper technique.  With a little bit of planning, you too can drive away the dark and see what you’ve been missing.

wpid-20141122_175003.jpg

You can’t cut what you can’t see, and quality shop lighting goes a long way in improving your woodworking, even in an apartment.

Up front, I want to say that you do have choices when it comes to shop lighting.  I use LED lighting because when it comes to efficiency, durability, simplicity and safety, LED in my mind is head and shoulders above incandescent or fluorescent equivalents.  If you’re looking to illuminate a workbench tucked away in a corner, without having to change bulbs or wire permanent fixtures, then hanging LED bar lights are the way to go.  If you are looking for tips on lighting your 1500 square foot production workshop, you are clearly on the wrong website.

Okay, now that’s over, let’s talk about goals.  My shop lighting goal is (and has always been) to have bright, white light shining directly on my work surface(s) without shadows or obstructions.  Ideally, I’d have a north facing window and a high ceiling with plenty of clearance and wooden studs directly above my workbench.  That way, I could hang two Lithonia 120V LED light bars over the workbench and be done with it.  I had this setup in Vermont (plus an LED task light for joinery and sharpening tasks) and it worked great.

In my current apartment, though, my windows face east (which is a nightmare in the mornings) and, although I have 12 foot ceilings, everything is concrete and drywall with nary a wooden stud to be found.  I only need to hang one bar light given my smaller work space, but I am just not comfortable using drywall anchors or drilling into the concrete [i.e., losing my security deposit].  The LED task light alone was not cutting it and I needed to get creative.  The solution turned out to be easier than I could have hoped.  I built an arbor.

wpid-wp-1416699117890.jpg

Sometimes the best ideas are born of lazy necessity.

Take some leftover 6/4 ash (ripped and planed into two approximately 60″ x 3.25″ x 1″ pieces), add in couple of angle irons (left over from the Milkman’s Workbench supplies) and a pair of threaded screw hooks (hardware store specials), clamp to opposite sides of the table and hang a bar light.  Done and done.  No finish, no flair: just bright, clean light directly on the work surface.  I might one day scrap the screw hooks and make a cross bar that fits in bridle joints on the supports, but for now, good enough is good enough for me.

wpid-20141122_183002.jpg

It’s that simple.

The best part is, because they’re just clamped to the table, I can move the supports around if I need the clearance or want to focus the light on a particular part of the work surface.  Plus, the whole thing is portable, relatively speaking.

wpid-wp-1416699141096.jpg

Nothing permanent here.

With very little effort, I now have a well-illuminated work surface.  My task lamp can be tucked out of the way until needed for close up work and the whole project took about 2 hours (not including the drive to my parents’ house and back to use my thickness planer).

Quality shop lighting makes tasks like reading grain direction and inspecting the camber on a freshly-sharpened plane iron a snap.  You’re also less likely to miss a spot when planing or applying finish or wander over a layout line if the work is brightly lit.

So before you cut the line, spend some time making sure you can see the line.  Drive away the dark in your workshop and see what you’ve been missing.

JPG

The Bare Essentials (Part 2, Handplane Edition)

Welcome back to The Apartment Woodworker!

This week, I will be rounding out the workshop tour with an in-depth look at the set of hand planes that I’ve come to know and love.  Just like always, I won’t be using brand names in any description.  After all, only one of my planes is a premium brand (the large router plane; thanks, Mom!) and everything else is at best a mid-budget brand.  If you are here looking for hand tool porn, you are still in the wrong place.

wpid-20141029_185518.jpg

From left to right: No. 5 1/2, No. 4 1/2, No. 4, low angle block, large router, small router, small chisel, small shoulder, trimming.

Every woodworker loves planes, even woodworkers who don’t use hand tools, and for good reason: planes are the most beautiful and complicated (and expensive) hand tools in the woodworker’s arsenal.  From straightening and squaring rough stock to refining the fit of a joint to preparing the final piece for finishing, hand planes are essential at every step of furniture building.  Even the most die-hard power tool enthusiast still needs at least a block plane.

Ownership of a hand plane is sort of endothermic.  Only through consistent use and maintenance will a plane (and the woodworker using the tool) reach full potential.  Be it a premium modern plane or a rehabilitated antique-store find, “up and running” is just the first step in the lifelong maturity and growth of tool and user alike.  Once the sole is flat and the iron is sharp, the real fun begins.  Plus, S4S’ing a piece of 12/4 ash is excellent exercise.

20140704_105330

This is reclaimed pine, but it’s still super way better than going to the gym.

In my hand-tool woodworking, I quickly developed a preference for two particular planes: the #5 1/2 jack plane and the #4 bench plane.  The #5 1/2 is plenty long enough for jointing, the #4 is plenty short enough for smoothing, and those two planes will touch every single piece of wood in every single project.  I definitely use my other planes (for instance, I’m very fond of my large router plane, and the # 4 1/2 is “super tuned” for smoothing), but the #5 1/2 and the #4 form the foundation of my tool chest. It’s true that sometimes I struggle when edge jointing thin stock, because the #5 1/2 is rather too heavy and tippy and the #4, though thinner and lighter, is probably too short.  Other times, flattening very long boards is a chore because even the #5 1/2 is too short.   Generally, though, these two planes (and a block plane) give me everything I need to prepare all six faces of a board (faces, sides and ends) for joinery and finishing.

wpid-wp-1414623745997.jpg

I rarely reach for anything else.

As an aside, I know quality hand planes are expensive and I’m not advocating that any beginner woodworker go out and spend a fortune on premium versions of the planes shown above.  Truth be told, each plane has its limitations and I have made compromises for lack of space.  As always, stick to your budget and figure out what works for you.  If you are dying for a recommendation, though, first go out and buy a regular home center block plane.  Learn how to sharpen it and adjust it.  Then, make your second hand plane a decent quality #5, which I guarantee will get the job done. After that, get a small router plane and hand cut a housing joint. It will change your life.

So, that’s it for the “this is my apartment workshop and these are my tools” portion of The Apartment Woodworker.  I purposely didn’t bore you with my straightedges and other miscellany and I hope you have enjoyed the tour.  Next time, I hope to share with you a silly little personal project that was a little bit about necessity and a lot about testing the capabilities of the Milkman’s Workbench.

The Milkman's Workbench

This thing

By the way, Happy Halloween to everyone!  Do yourself a favor and treat your Saturday hangover to a Netflix binge on Supernatural.  It’s still an amazingly entertaining show, even though it jumped the shark like a billion years ago.

JPG

The Bare Essentials (Full Version, Part 1)

When I first decided to take up woodworking in May 2012, I lived in a two bedroom apartment in Lower Fairfield County, Connecticut and had exactly zero clue on how to proceed.  So I did what I think anyone would do in that situation: go to the home center, grab a WorkMate portable workbench, some hand saws, chisels, marking tools, clamps and a block plane off the rack and get to work.

Tools in hand (and having not yet discovered Paul Sellers and his Woodworking Masters Classes or Chris Schwarz and his Lost Art Press), I then did what anyone in this internet age would do: browse some basic instructions on the interwebs and do my best.  I took on projects well beyond my skill level (including a seven foot parsons dining table for my parents and a vanity sink for my brother’s remodeled bathroom) which, surprisingly, came out okay.  Today, I cringe at the tool marks and gaps in those early pieces (and I have since reclaimed the wood from most of my other early projects), but I was making things and I was hooked.

[Picture Not Found (Thankfully)]

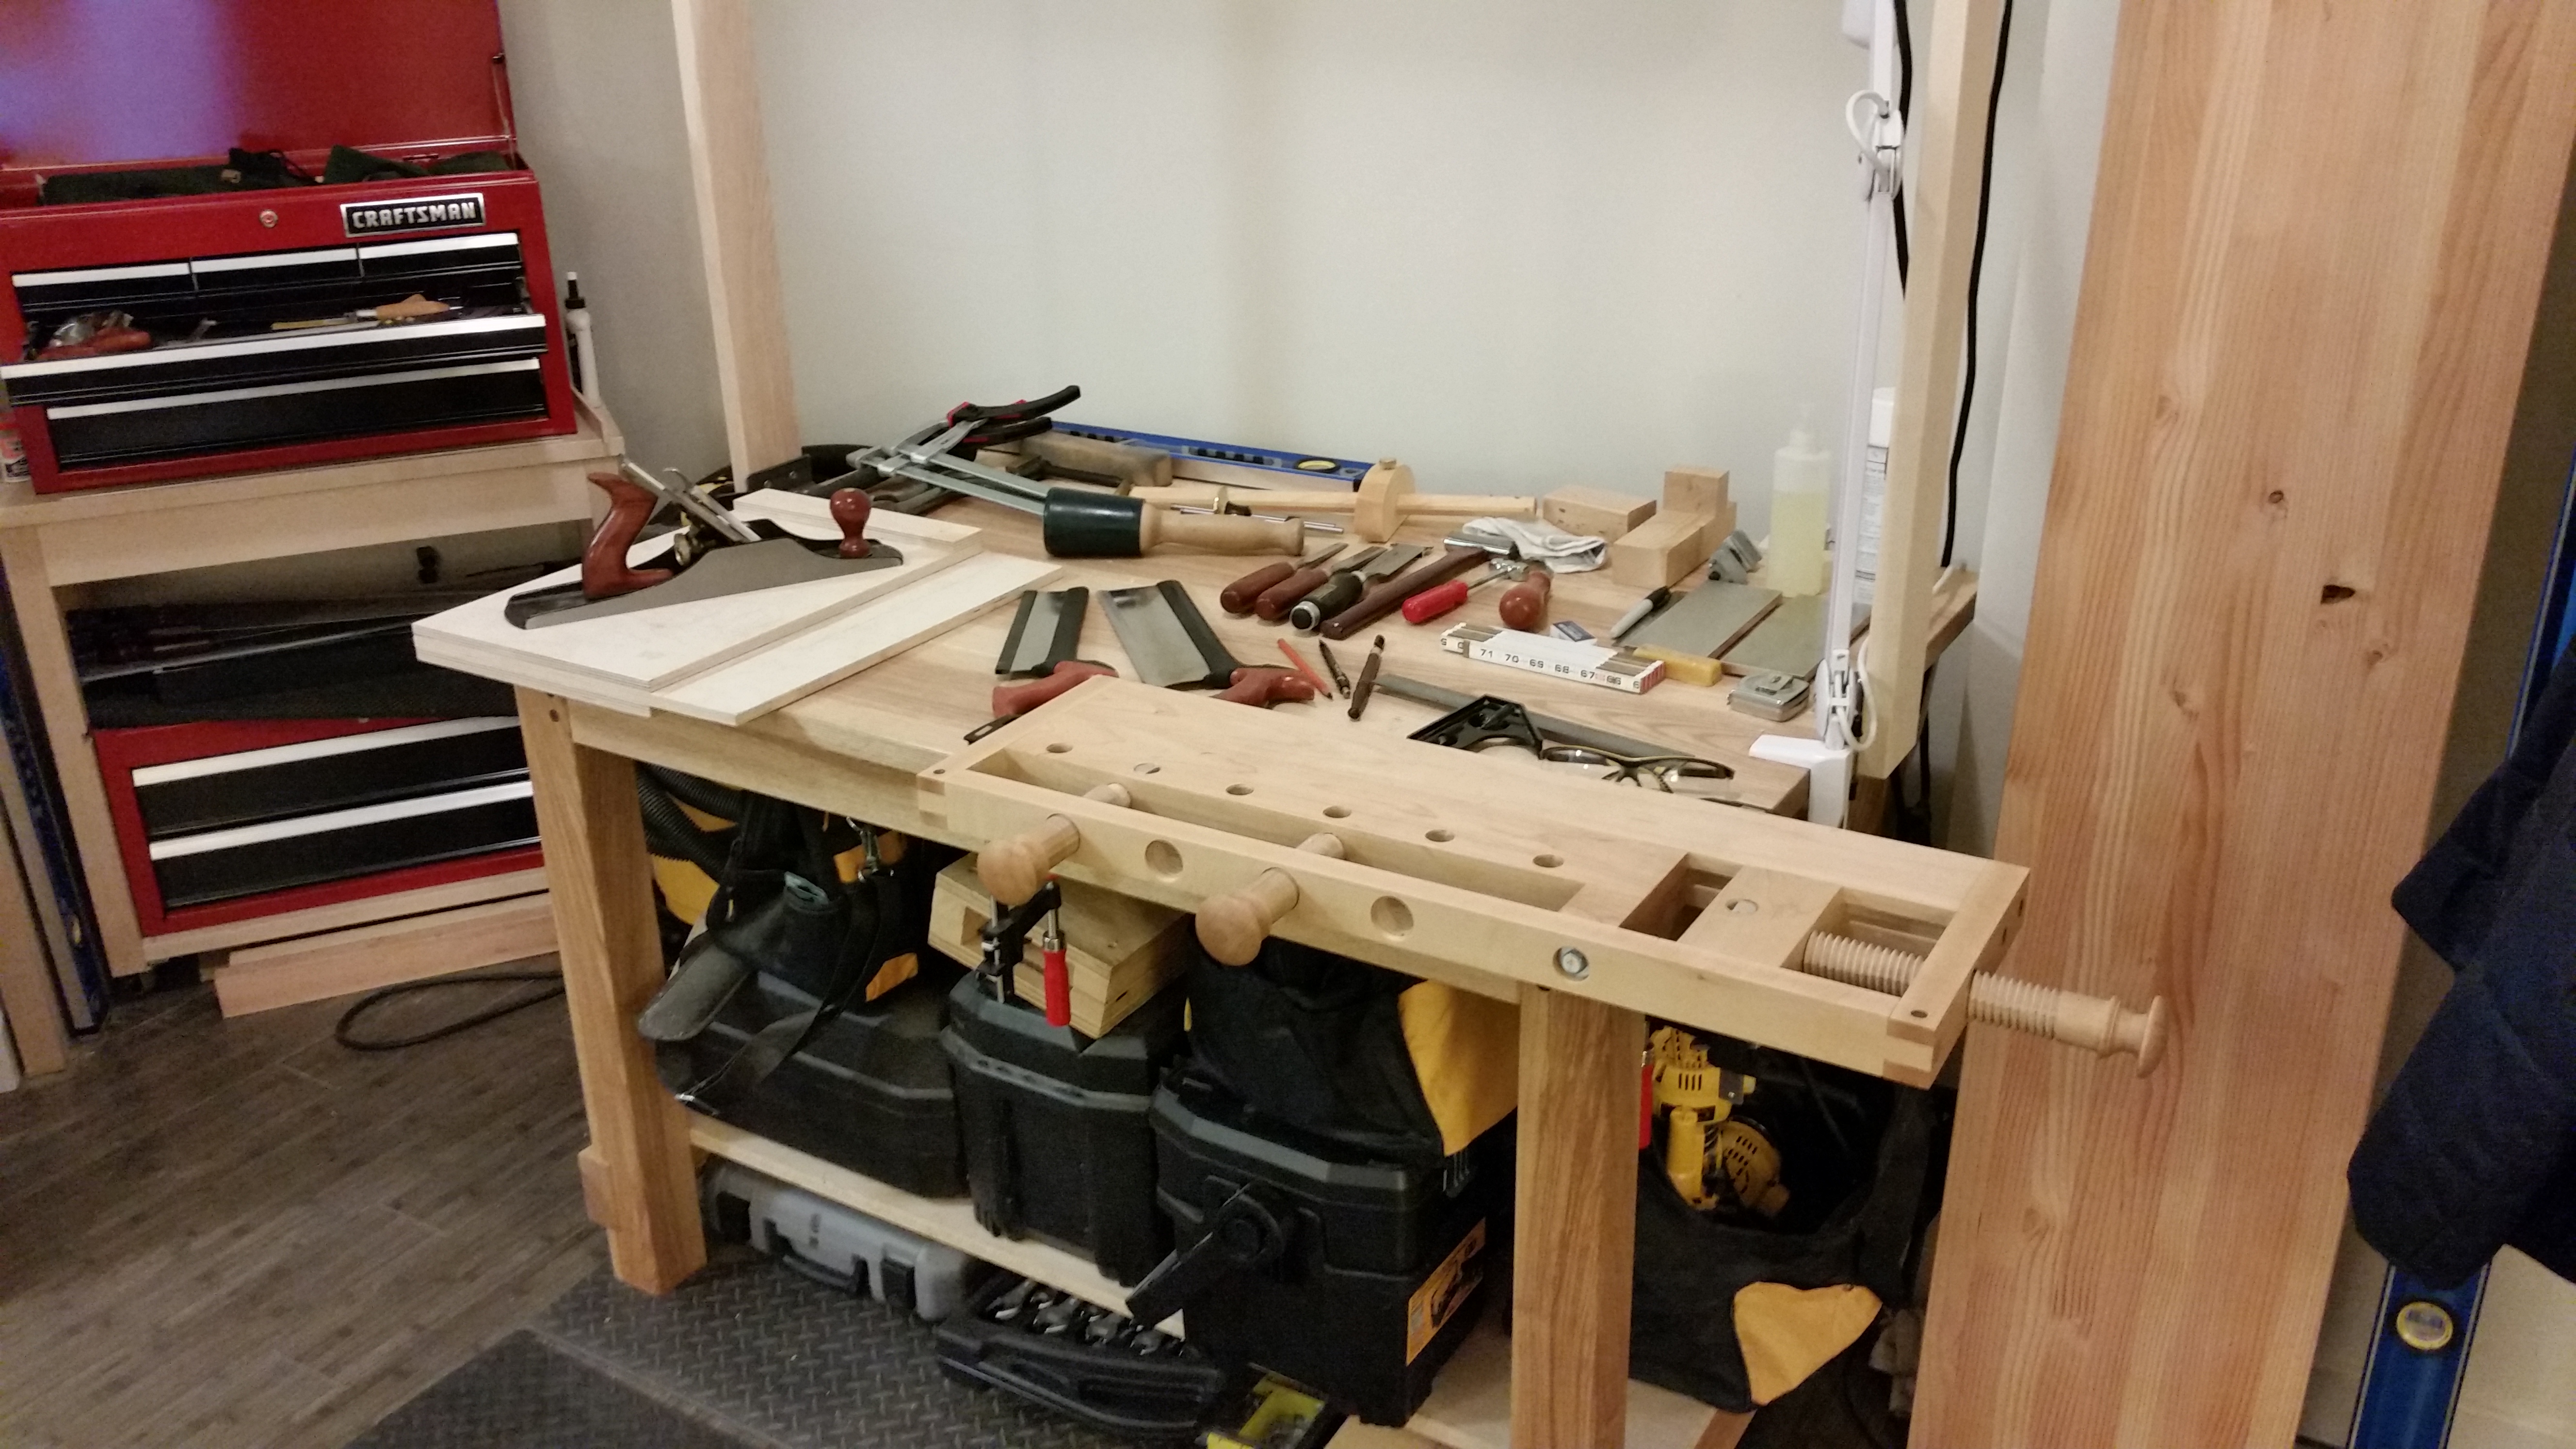
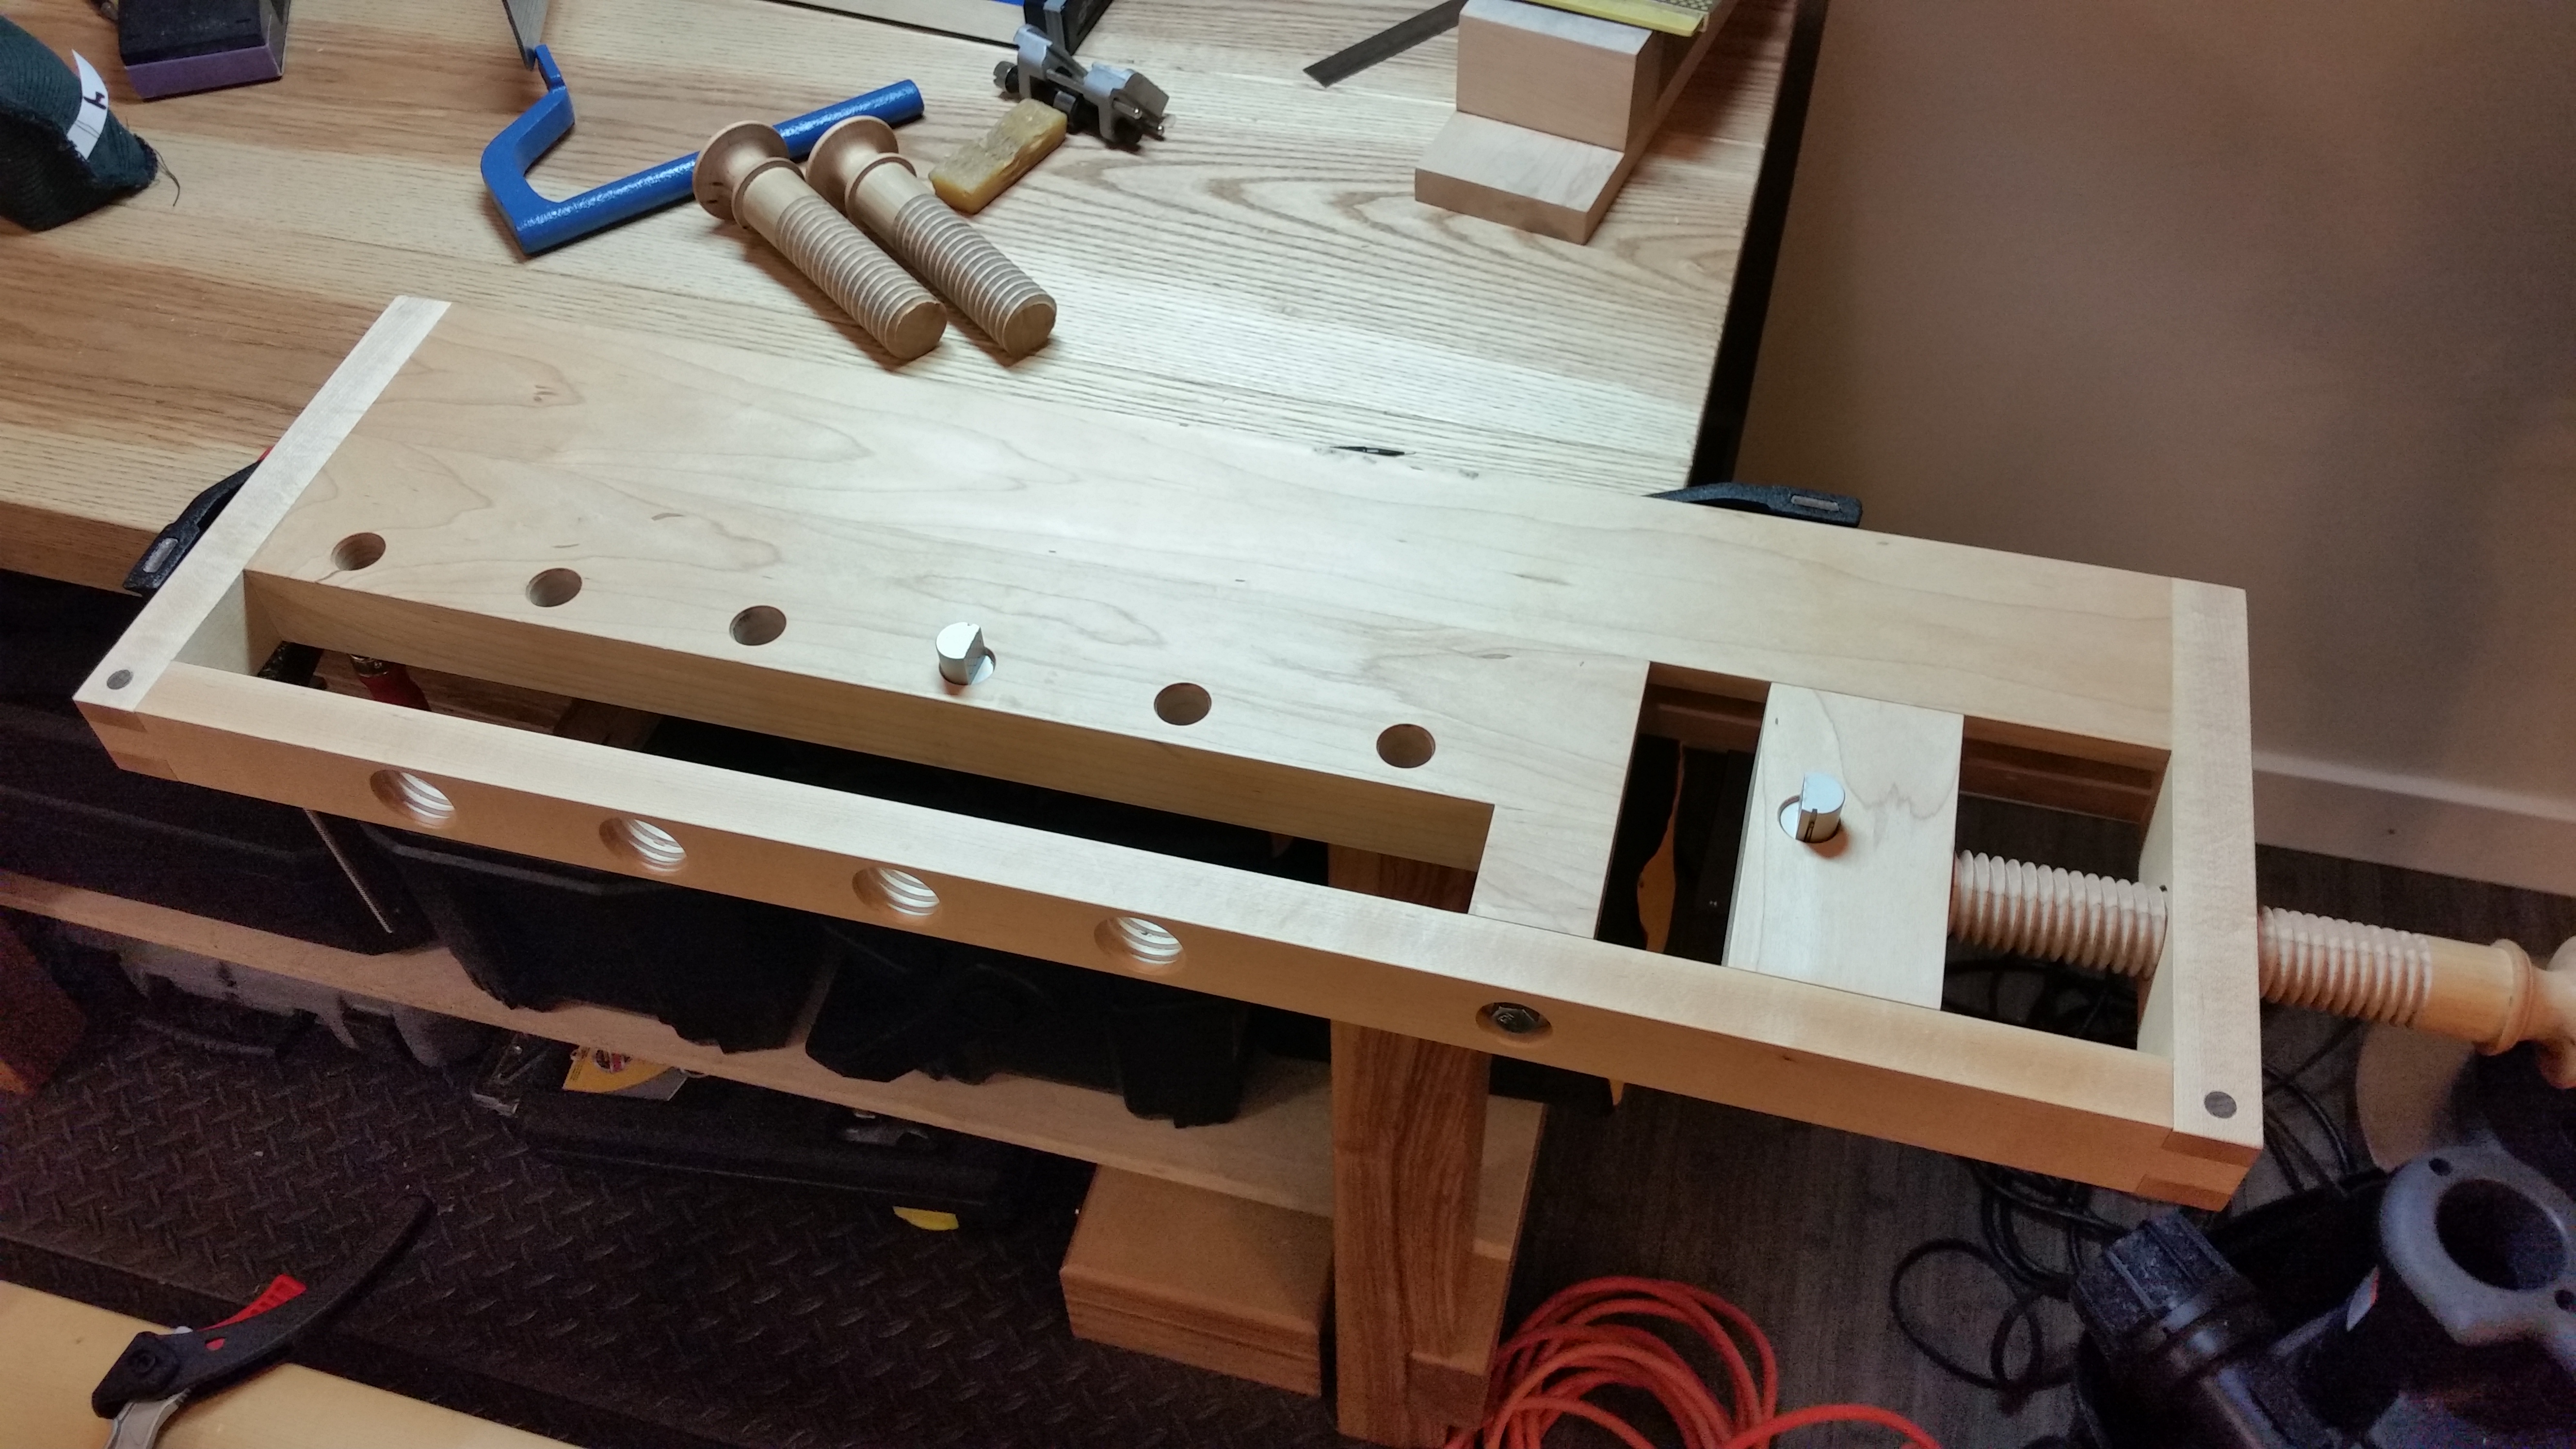
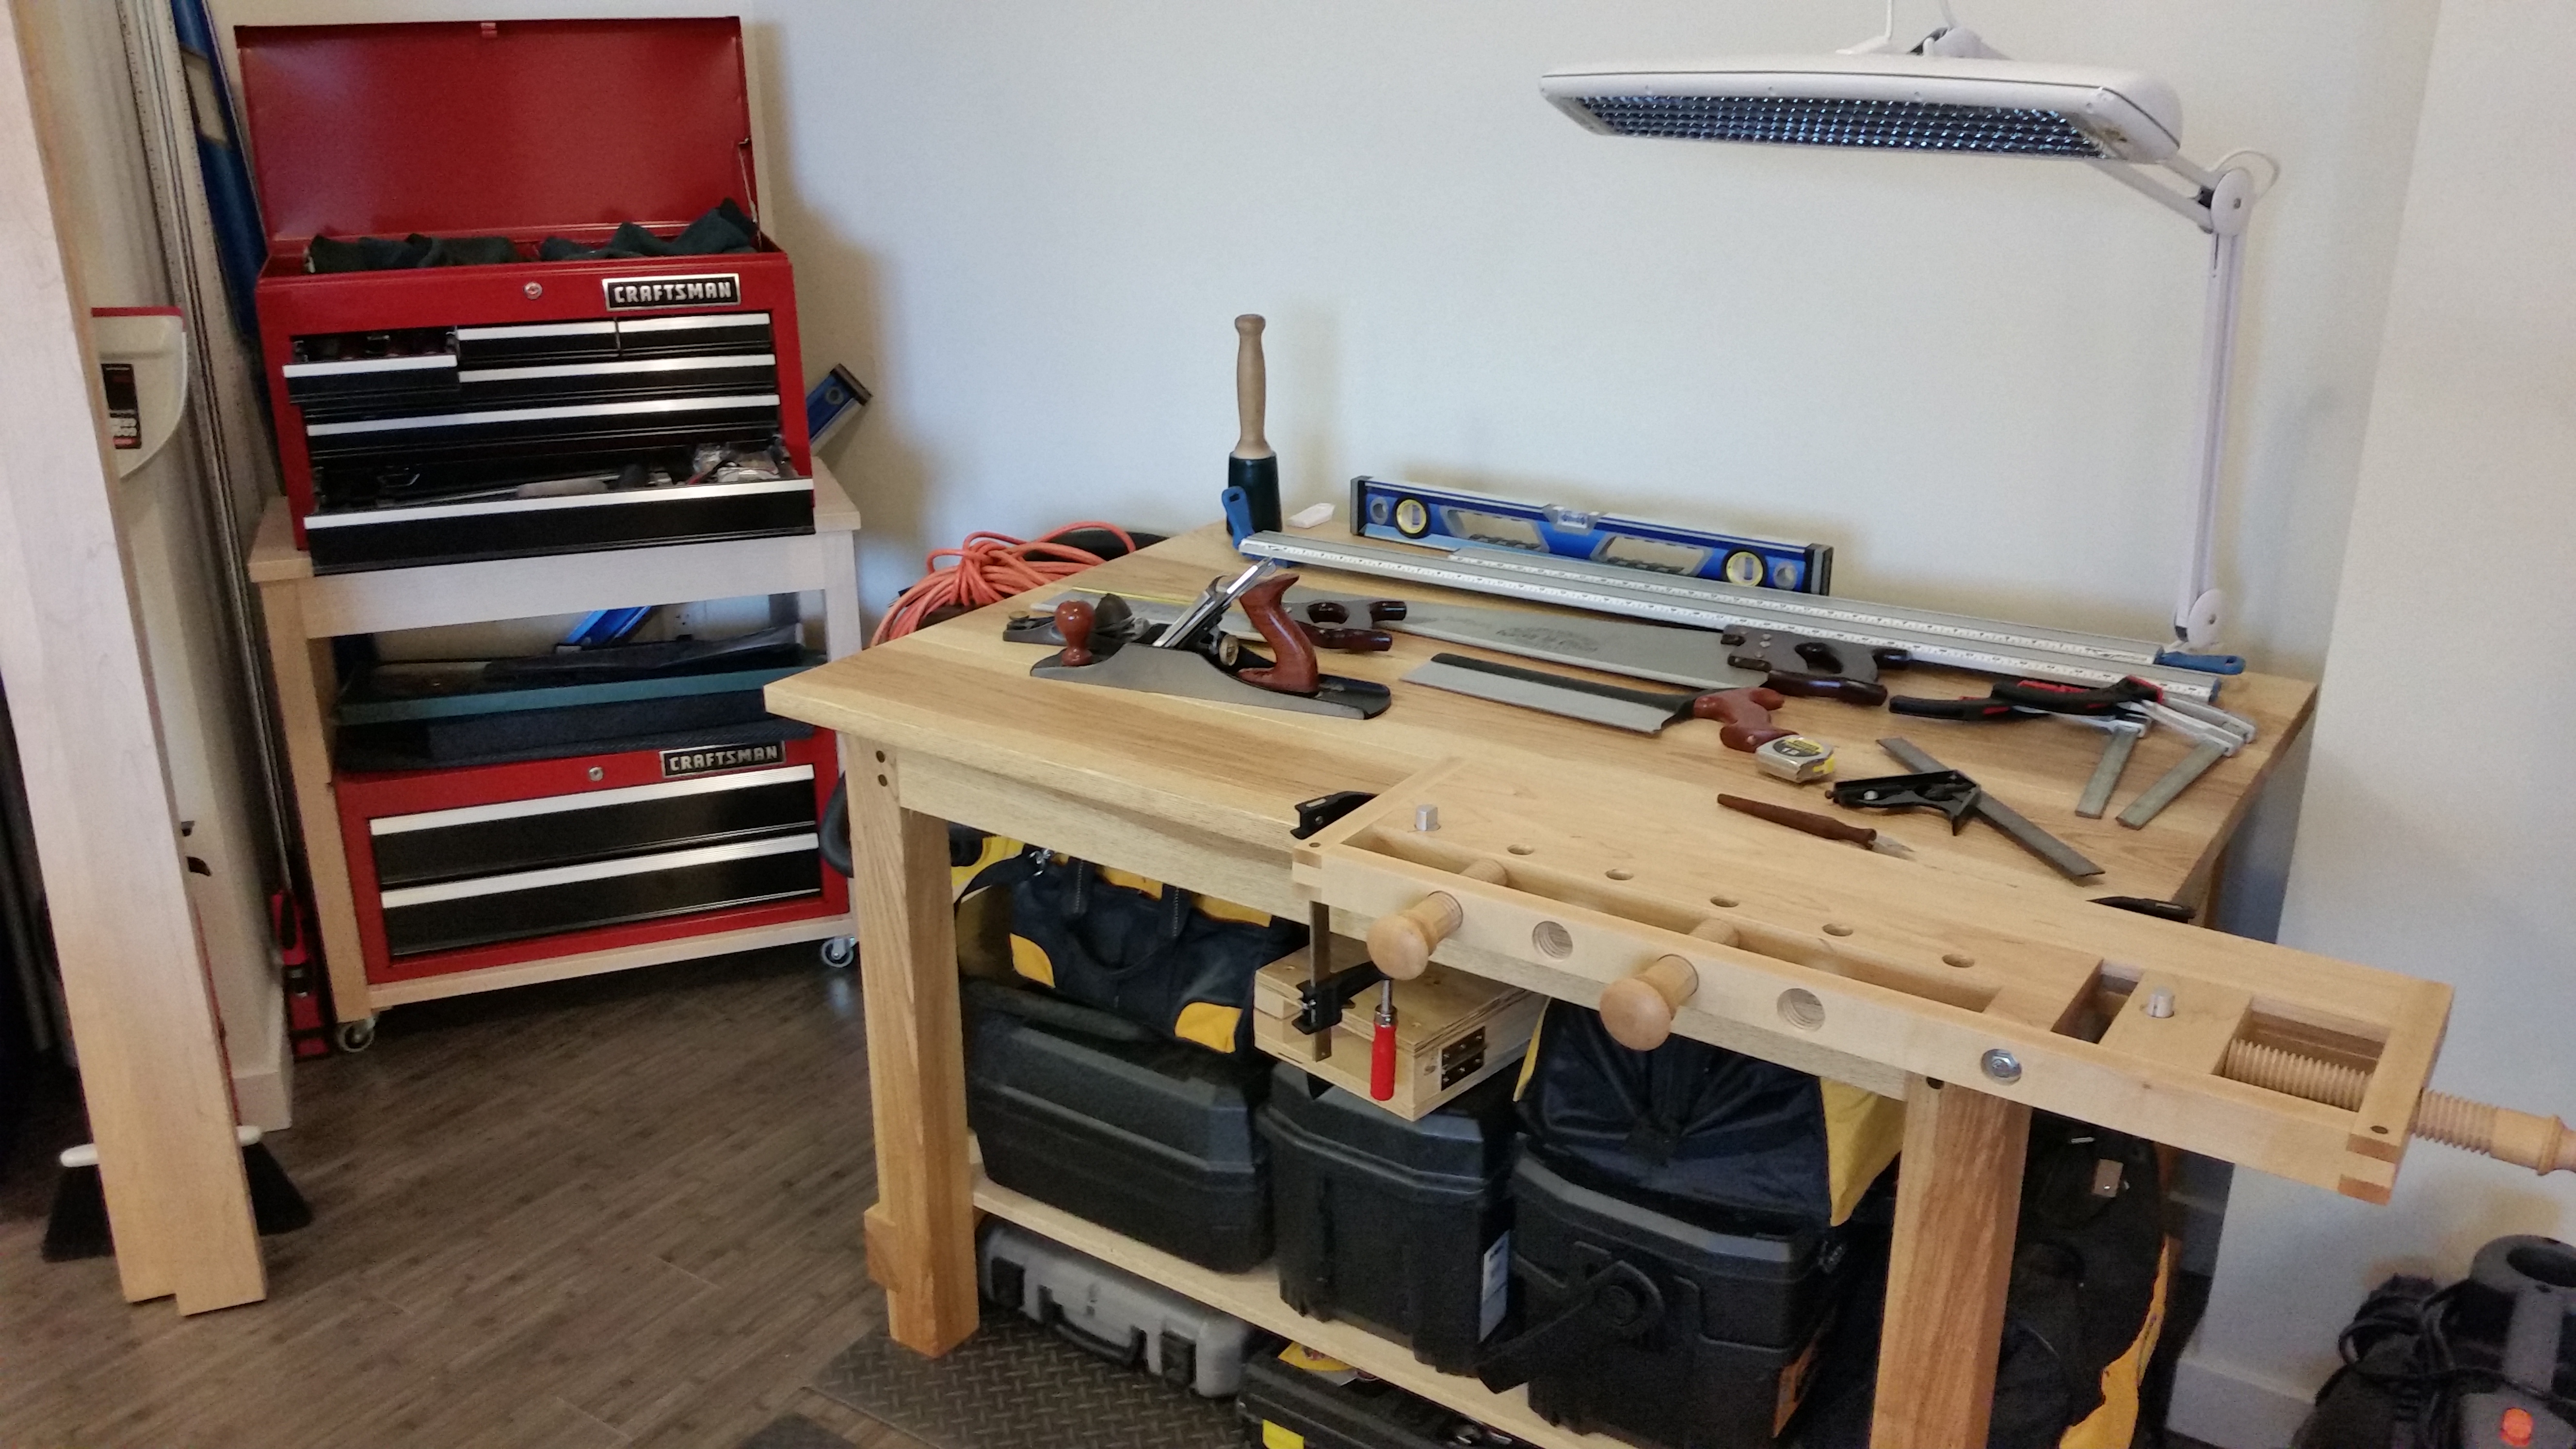
Fast forward two and a half years and I am back pretty much where I started: in apartment in Lower Fairfield County, Connecticut, working wood in the evenings and weekends with a limited set of hand tools.  What lives on my workbench now (a Milkman’s Workbench clamped to a sturdy dining table I built for such a purpose) is very surprisingly not much different than what lived on and around my workbench then (a WorkMate 425): some hand saws, chisels, marking tools, clamps and hand planes.  My current tools are nicer, sharper, better tuned and of slightly larger quantity, it’s true, but in retrospect I wasn’t THAT far off when I stumbled into the home center a fresh faced newbie.

I have found a setup that works for me and I hope to be a resource for other new woodworkers wandering in the “what tools to buy” wilderness. I made some very bad tool purchases when I didn’t know any better and if I can steer just one person away from the same mistakes, I will be proud. I am intentionally avoiding brand-name-dropping, so if you are looking for hand tool porn, you are probably in the wrong place.  And remember: all of this is just my opinion based on my personal preference, experience and budget.  Figure out what works for you based on your goals and your resources.

So, here we go.  Please, feel free to judge.

Chisels:

20141023_063208

Marking knives and small planes, as well.

Nothing special here. A set of six bench chisels from 1/4 inch to 1 inch in 1/8 increments (which took forever to flatten but hold an edge quite nicely), plus two other chisels: a 1/2 inch sash mortiser (which I also use for paring) and a 3/8 inch corner chisel.  I use an 18 oz poly-wrapped chisel mallet that I bought off Amazon. That’s it, and it gets the job done. I would love to add a real paring chisel and maybe a wider bench chisel, but I am not quite sure where to fit them in the chest.

Chris Schwarz recommends that beginning woodworkers start with 1/2 inch and 3/4 inch chisels, and I would add to that a 1/4 inch (for cleaning out waste). At that point, though, a low cost but quality set of bench chisels starts to make sense (it seems they are always on sale, anyway).  Be sure to read up on flattening and honing, though, so you don’t completely ruin your first set like I did.

Hand Saws:

20141023_063240

Not pictured: three panel saws.

Pictured are seven joinery saws: an 11 inch crosscut carcass saw, two ripcut tenon saws (12 inches and 16 inches, respectively), two dovetail saws (14TPI and 20TPI), an old Disston coping saw that was my grandfather’s and a box store flush cut dowel pullsaw.  I know that is too many for a beginning woodworker; you really only need three, I think.

In my mind, the essential joinery saw set consists of crosscut carcass, ripcut tenon and dovetail. I know could do without the super fine dovetail saw (at 20tpi, I never use it because I don’t think I can even sharpen it) and the smaller tenon saw (if I had to, though it’s my favorite saw).  Also, there is nothing a flush trim saw can do that a dovetail saw and a chisel can’t in slightly more time.  Furthermore, not everyone hogs out dovetail waste with a coping saw (and mine requires vintage blades). If you use the knifewall marking method (which you absolutely should), you could even skip the crosscut carcass saw, but I have found the decreased resistance when crosscutting shoulders and housing joints helps in developing good sawing technique and habits.

My panel saws include two 26 inch ripcut (4.5 and 8 TPI) and a 22 inch, 10 TPI crosscut, although I got along just fine with only the 8 TPI ripcut panel saw for an extended period.  8 TPI in a ripcut pattern is easy to sharpen and works in a both directions for a variety of woods and thicknesses.

Measuring and Marking:

20141023_063533

Yes, that is a folding rule, and I use it all the time.

Now we are starting to cross into the more “miscellaneous” part of woodworking.  Other than a 12 inch combination square (the best you can afford), a decent tape measure, a marking gauge of some sort, a marking knife and some pencils (mechanical, black charcoal and white charcoal), the rest is personal preference.  I use a folding rule every time I woodwork and I couldn’t live without my brass setup gauges (which I use for testing tenon shoulders depth just as often as setting router depth).  The long white box in the front is a set of aluminum winding sticks, which are absolutely essential for hand-preparing rough stock and work well as straight edges.  The other try squares and the aluminum dovetail marker are luxuries I could live without (but would prefer not to).  And, of course, that Pocket Ref (4th Ed.) is just for show.

Two double bevel marking knives (both gifts), a scratch awl and a Shinto rasp live in the middle top drawer with the sash mortiser and corner chisel (see above).

Miscellaneous:

20141023_063549

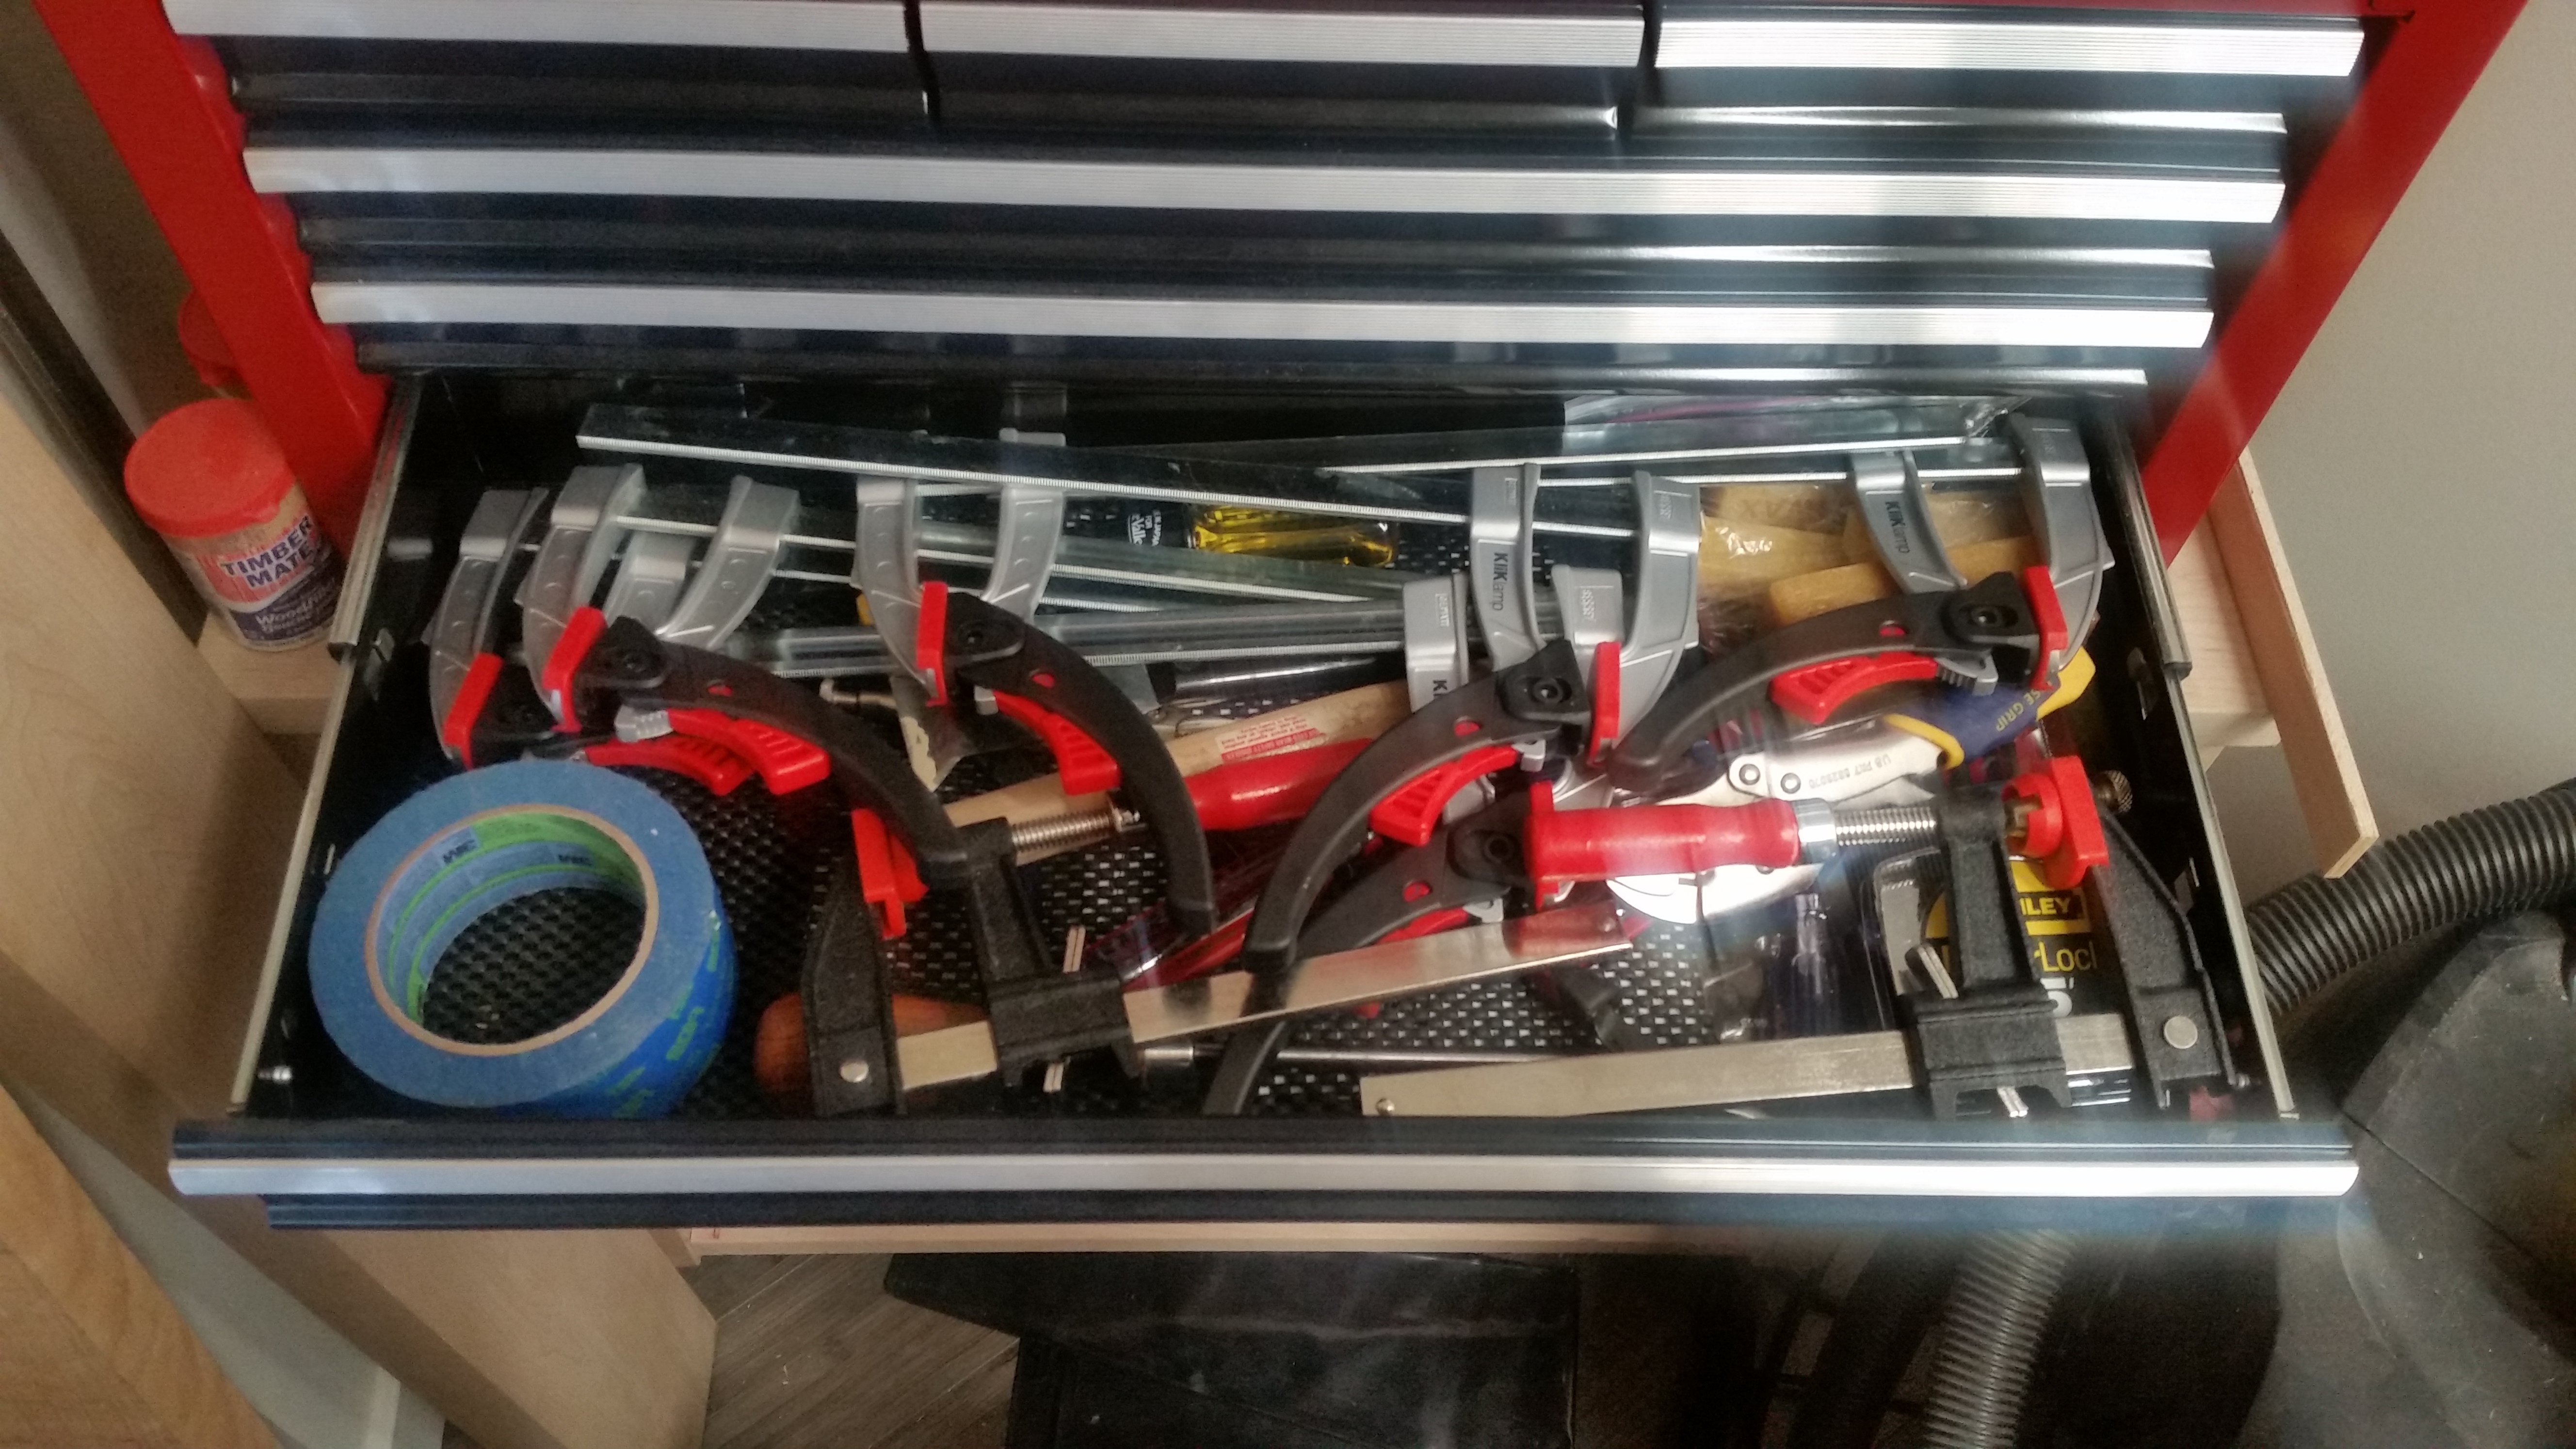
There is never enough space for never enough clamps.

We are officially at essential odds and ends.  Some clamps; Blue Tape (you gotta have Blue Tape); screwdrivers; pliers; crepe blocks (if you don’t have one, get one); painters tools; a deadblow mallet; sharp scissors (essential for sand paper); and who knows what else.  I think those are needle files under the beeswax and a magnet at the front right.

And there you have it.  A place for (almost) everything, and everything in its place.  I am satisfied with the current state of my tool collection, although there are still a few, non-critical gaps I will address in due course.

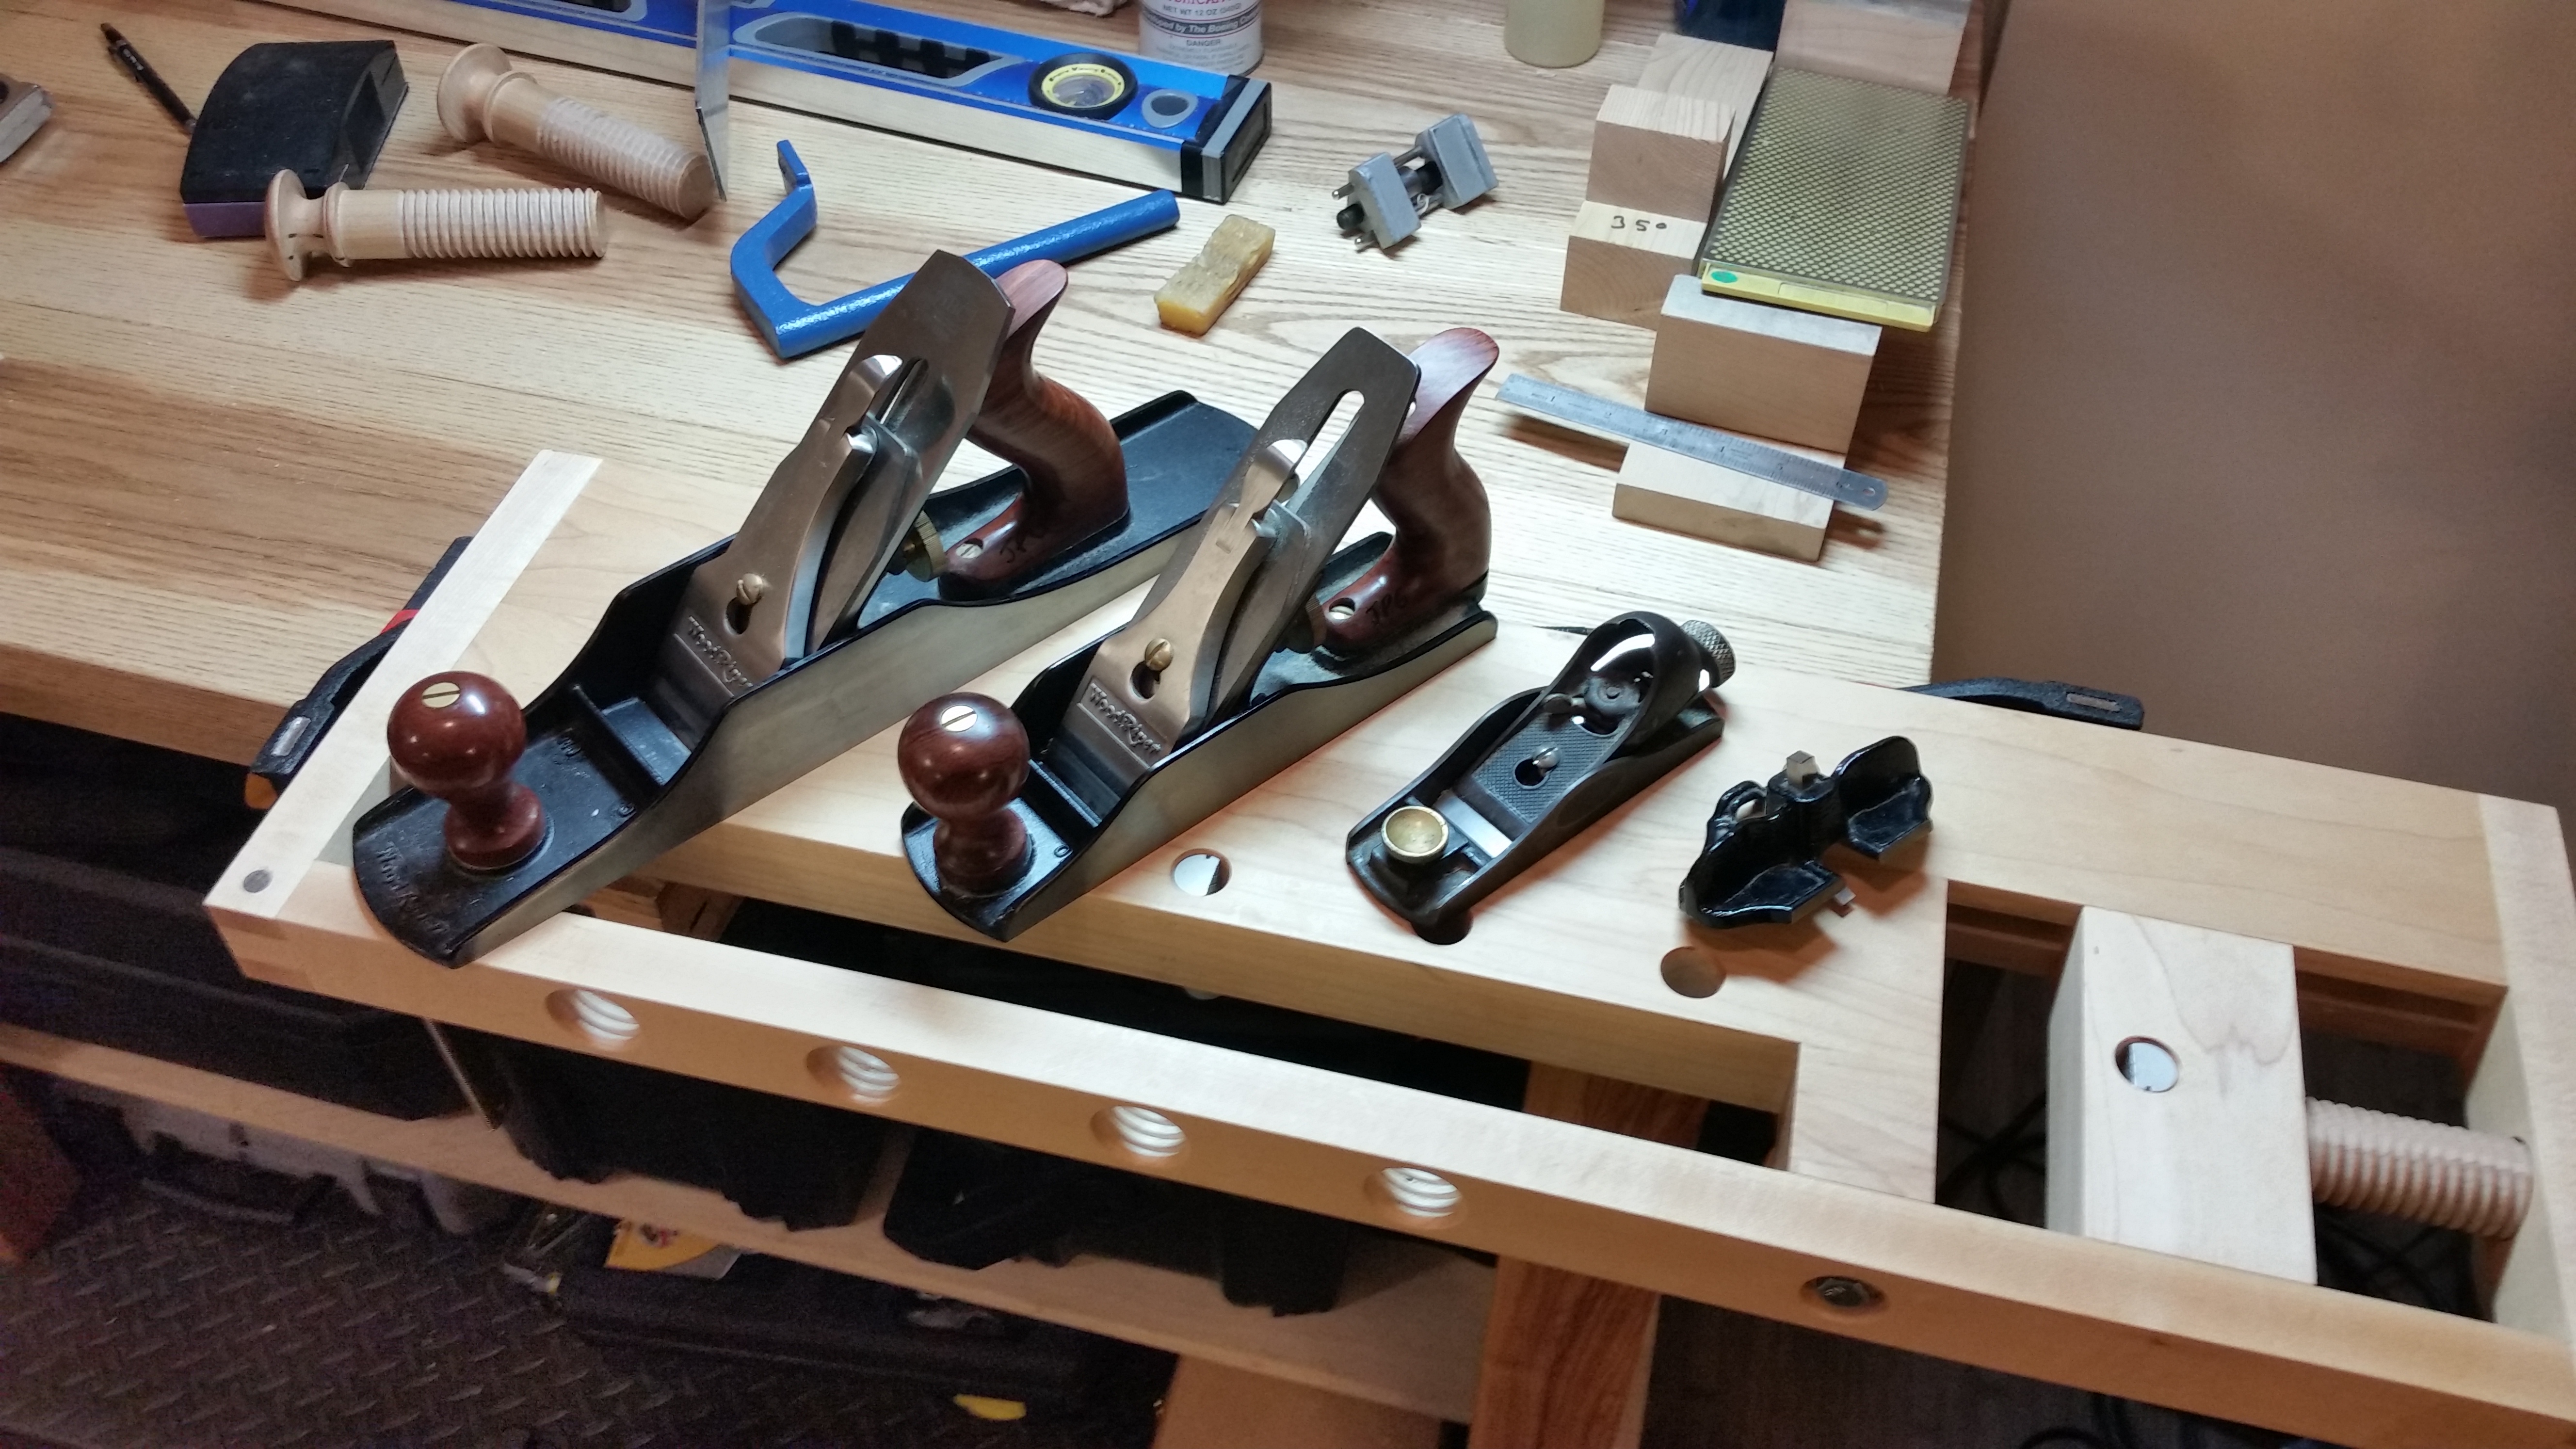
You may be wondering, “where are the big hand planes?!?”  Well, I will treat them in a bit more depth in a second full post that should go live next week (the alluded-to “Full Version, Part 2”).  For now, here they are in their resting state, mere soldiers in this endless, bitter war against corrosion.

wpid-20141023_075128.jpg

In my defense, my chisel plane, small router plane and shoulder plane were in the “Chisels” picture.

That’s all for this week.  I have to prepare for an early Friday conference call.

JPG

The Bare Essentials (Short, Text-Only Version)

Welcome back to The Apartment Woodworker! In this week’s installment, I will share (in two parts) the contents of my recently-condensed workshop and why certain tools made the cut and others did not.

Monday is my first day back at the office, so in the spirit of brevity, this is the relatively TL;DR version. Later this week, the full version (with all the pretty pictures) should go live.

Although markedly less organized in practice, the process of downsizing my workshop was in three steps.

Step One was easiest. I asked myself, “What large items will I simply not have space for in the new apartment?” Seven foot workbench? Out. Miter saw? Out. Thickness planer? Out. All three were no-brainers. Also falling into this category was my rolling tool cabinet, although I briefly entertained the idea of keeping it, as the compact cabinet I made isn’t MUCH smaller. It’s not like I own a table saw or a jointer in the first place.

Step Two was also relatively straightforward. I thought, “What tools are essential for me to prepare and join two pieces of wood together?” In other words, “What are the basics of my more traditional style of woodworking?” Hand planes, hand saws, chisels, marking tools, sharpening implements, a few essential clamps, glues and finishes. Add in a solid work surface (Milkman’s Workbench clamped to a rock solid table) and a shop vacuum for cleanup and I have the essentials to keep making furniture. Period. Full Stop. From here on, nothing was included without justification.

Step Three was the most difficult and (potentially) dangerous. “What else, other than the above, do I need in practicality and can I find space for?” I definitely need my power drill for the household, although I do have a brace. And some screw drivers/socket wrenches also for the household. Sandpaper too. Okay, but what else? I do all my roundovers and chamfers by compact router, so I guess that’s in. So is my random orbit sander, which serves so many purposes. Now I need my dust extractor because I’m inside. Why not jig saw and circular saw, too? After all, they take the same batteries as the power drill and I have a few inches of shelf space left over. Then, just as I was running out of room, I struggled to justify any other big items. I just filled up the corners with some odds and ends (READ: other mallets and adhesive tape), some straight edges and essential safety equipment.

I don’t think I went overboard and it all fits.

Making due with less. Or, rather, making due with just enough. What a brave new world.

Down-sizing (and, perhaps, right-sizing)

Sometimes, smaller is better.  Let me explain.

While at my parents’ house in Rutland County, Vermont on and off during my six-month leave of absence, my woodworking shop occupied two bays in a three-car garage.  It was I think the right amount of space for a shop that consisted mainly of a seven foot workbench, compound double-bevel miter saw, thickness planer, Craftsman rolling cabinet and dedicated sharpening station, as well as a largish lumber rack.  I had room to spread out and I never felt cramped (except when an assembled, drying project was messing up my Feng shui).

Somewhere, Norm Abrams is chuckling.

Which, let’s face it, happened pretty often.

But, as they do, all good things end and I have since returned to my life as a Manhattan-based M&A attorney.  My workbench, miter saw, thickness planer and rolling cabinet are all now living in disuse at my parents’ house in New Haven County, CT.  The closest thing I have to a dedicated sharpening station in my new apartment is a machinists granite slab and a WorkSharp 3000 with its own plastic toolbox.

WorkSharp 3000 does a bevel good

Zero exaggeration

Out of necessity, I am now making due with less.  So let us explore the brass tacks of the new, apartment-based woodworking shop:

Fits conveniently in the dining nook!

The full workshop, again!

At a macro level, my apartment workshop now consists of what you see in the picture:

1.)  “Dining” table with storage below (for more info on the table itself, please see last week’s post, “A Proper Foundation for Woodworking”)

2.)  Rolling cart with Craftsman 26″ Top Chest and matching Intermediate Chest for hand tool storage (more on that next week!)

3.)  30″ Milkman’s Workbench (shout out to Chris Schwarz for all the astounding work he does for the craft, especially at the Chris Schwarz blog and at lostartpress.com) firmly clamped to the “dining” table

4.)  Saw bench (the excellent 2008 Lost Art Press version; again credit Chris Schwarz) [not shown]

5.)  Two(!) shop vacuums: my trusty Dewalt D27904 Dust Extractor and a brand new Ridgid four gallon portable shop vac (very pleased so far with the purchase)

6.)  A condensed array of Dewalt handheld power tools, including compact router kit and random orbit sander, as well as 20V cordless versions of a drill, jig saw and circular saw

7.)  Other miscellany includes my excellent LED task lamp, a Lie-Nielsen-style saw vise, a shooting board/bench hook (once again, a Chris Schwarz design), various straight edges and squares and other random items.

20141008_083128

I should probably also mention the clear plastic bin of glues and finishes and the general purpose tool bag

I am confident everything possible is packed into the limited space, but I don’t feel like I went overboard.  I have everything I need to continue meaningful woodworking in the limited space of my apartment (and it’s not like I was overly reliant on power tools in the first place, having always been sans table saw and sans jointer).

I know myself well enough to say that I will make regular sojourns to visit my thickness planer (it’s much easier to hand plane two sides straight and square and let the machine do the rest), but I am rather looking forward to breaking my miter saw dependence.

One final note: I couldn’t for the life of me figure out what to use as a planing stop on the new “dining” table for stock that is too long to pinch between dogs on the Milkman’s Workbench.  I am certainly not going to bore dog holes and, just as I was about to concoct some plywood monstrosity to clamp to end of the table, I stumbled upon a most simple, elegant solution:

20141011_154021

It’s a straight edge clamp!  Duh!

That’s all for today.  I promise that next time I will dissect my tool chests.  I also have a silly little project in process (mostly for testing the capabilities of the Milkman’s Workbench), which I hope to unveil soon.

JPG

A Proper Foundation for Woodworking

Welcome to The Apartment Woodworker (.com)!  After much delay, I have finally finished organizing my new apartment workshop.

Fits conveniently in the dining nook!

The full workshop

Today, I present my new “dining” table, which forms the [literal] basis of the workshop.  Hand-crafted (by me) of solid ash (purchased rough-sawn from Exclusively Vermont in Bristol, VT), the table measures 50″ long, 34″ deep and 31″ high and has a 48″ long and 24″ deep lower shelf.  The entire piece is finished in two coats of Watco Danish Oil (Medium Walnut).

All joints are hand cut, other than the mortises in the rails (hogged out by router for expedience)

The foundation of any workshop is a rock-solid work-surface

Each leg is a single piece of solid ash nearly 3″ square.  The top rails (3.5″ x 1.75″ of solid ash) are joined to the legs with draw-bored mortise and tenon joints.  The bottom rails (also 3.5″ x 1.75″ solid ash) are joined to the legs with 1″ deep housing joints and the bottom stretcher (3.25″ x 1.5″ solid red oak, purchased rough-sawn from Gagnon Lumber in Pittsford, VT) is mortise and tenoned to the lower rails.

All joints are also glued

Detail on the draw-bores and reveal

The tabletop consists of four 1.125″ solid ash boards, edge jointed with a slight round-over at the seams. After much debate, I decided to glue the tabletop to the frame and reinforce the glue joint with four angle irons (custom made at Mac Steel in Rutland, VT) secured with 1″ #10 wood screws.  The goal was rigidity and, although not elegant, it did the trick.

These are the same angle irons that I use on my milkman's workbench

Metal fasteners do have a place in my work, after all

There will also eventually be a lower shelf of solid ash, as soon as I can get back up to Vermont and retrieve the remaining ash lumber.  For now, though, a sheet of .75″ birch plywood works just fine.  I am also waiting for delivery of the carpet which will live under the table permanently.

All-in-all, I am very pleased with the result.  Even though the table is clearly intended as a clamping surface for a milkman’s workbench (which will be covered in the next post), the table is very much furniture quality and one day will take its rightful place as a dining table that will far outlast me.  On its own (even without the bottom shelf), the table weighs over 100 lbs and, with the plywood bottom shelf fully-loaded, the table is nearly impossible to move.  I doubt I will need to worry about bench-wobble causing handplane chatter.

Thanks for coming by!  Please let me know what you think and stay tuned for my next post, which will cover my condensed tool chest and other workshop accoutrements.

JPG