Author: The Apartment Woodworker

The Apartment Woodworker is a weekly blog with insights, projects and tips for making the most of woodworking with hand tools in confined spaces.

So Many Things Change

My weekend was somewhat productive.

On Saturday, I set up the temporary workshop at my parents’ house.  I even solved the biggest problem with my old workbench: stability.  I did so in two ways.  First, I screwed the top down to the frame with some 3″ No. 12 screws (no longer just relying just on the friction-fit 3/4″ stub tenons for lateral support).  Second, I loaded up the underside of the frame with additional ballast in the form of five-to-six foot lengths of lumber.  The net result is a workbench that now weighs about 300 lbs (better known as approximately what a workbench should weigh).

wp-1456092500977.jpg

From L to R:  8/4 red oak, 6/4 maple, 8/4 maple, 2×6 Douglas Fir and 2×10 Douglas Fir.

On Sunday, I got right to ripping down almost all of the Douglas Fir 2×10’s that will become the new workbench.  Approximately 60 feet of 2×10’s became the following:

  • 2 x 4.5 x 72 (times 12, for most of the laminated benchtop)
  • 2 x 4.5 x 62 (times 4, for most of the laminated legs once crosscut)
  • 2 x 4.5 x 82 (times 2, for the tenons on the laminated legs once crosscut)

The final 82″ of 2×10 (seen below the bench) is the prettiest lumber of all (even with a knot or two) and will become the faces of the front legs and the benchtop.  Some of the off-cuts from the 82″ lengths will also go to the strips of the benchtop that form the mortises (more on that below).

wp-1456092509414.jpg

To be left out, for a week, to further acclimate.

Four things became apparent during the stock breakdown process.

  1. really miss my miter saw.  For this build, waste is anathema, and a clean, straight, crosscut is key to ensuring full length.  And it’s so much quicker than by hand.  my miter saw used to live in my old apartment.  I had no idea how much I missed it.
  2. Even quarter- and rift-sawn lumber has internal stresses.  One of the 12 foot lengths of 2×10 (in fact, the clearest and straightest-grain of the batch) split lengthwise along the grain while I was crosscutting it on the miter saw.  There was so much energy bound up in the piece that upon splitting a shard of wood shot off the main board and hit me in the eye protection.  After cutting around those stresses, the remainder of the piece will become one of the strips that form the mortises on the benchtop.
  3. I don’t have enough lumber for the entire bench.  The plan was for the lumber seen above to be the entire bench, but I don’t think that will work.  This should nonetheless get me a 4 x 20 x 72 benchtop and four 4 x 4 legs, and probably the short stretchers.  I think another 16 feet of Douglas Fir 2×6 will be plenty for the long stretchers.
  4. Battery-powered circular saws have limitations.  Just ripping the lumber shown above used four full charges of double 20V batteries and three full charges of single 20V batteries.  I either need another charger or a corded circular saw.

More than anything, this post has helped me think through exactly how to use the available materials in the most efficient way practicable. I may need one or two more boards, but for about $100, I will have most of a proper workbench.

JPG

Out of Retirement

As I begin the new workbench build this weekend, I won’t be in my apartment woodworking shop.  For starters, there is just not enough room.  And the entire operation relies on proximity to my thickness planer.  So I am pulling my old workbench out of retirement.

20140702_191541

My, how far I’ve come.


At 84″ long and 24″ deep, my old workbench (which has been collecting dust in storage my parents’ house) is the perfect work surface for laminating the new benchtop.  The old workbench needs to be moved inside, though, and will reside in their basement for the foreseeable future.

I’m also pulling a few power tools into the mix for this build in particular.  The top will be laminated from 72″ lengths of Douglas Fir 2×10’s ripped down the middle and a circular saw will rip much squarer (and quicker) than I can by hand.  The end result should be a thicker overall bench top.  In fact, I am hopeful the slab will be over 4″ thick after flattening, so my 12-inch double bevel sliding compound miter saw will be indispensable as well.

I’m doing 72″ for two reasons.  One, it should still be transportable (in pieces).  Two, the use of a quick-release tail vise will add extra length as required (and I can always make an insert).

More details to come, but suffice to say, I’m heavily influenced by Roubo’s Plate 11 in this build.  There will be a crochet, but I do plan to skip the sliding dovetails.

JPG

Some [Non-]Mechanical Assistance

I’m not always kind to my Work Sharp 3000 sharpening system.  It’s a temperamental machine, in my experience. But seeing as I somehow let some of my chisels get a bit out of shape, the Work Sharp has spent a fair time on my bench lately.

P1000307

In all its glory.

For those unfamiliar with the product, the Work Sharp spins a tempered glass disc covered with adhesive-backed abrasive paper on each face (see above).  With the disc spinning, the top face is typically used for flattening, while an adjustable tool rest permits bevel-grinding and sharpening on the underside (up to 2″ wide).  Though great for bevels, I’ve found it nearly impossible to evenly flatten on the top face while the disc is spinning.  But the discs are very flat, which is what I’d like to talk about today.

For flattening, I typically use a machinist’s granite slab with adhesive-backed sandpaper.  The setup is admittedly much better for planes than for chisels and the granite slab can be cumbersome in use.  For example, I can only adhere a few different grits at a time (which range only from 80 to 320).  Also, changing sandpaper often leaves adhesive residue that needs to be scraped away (or worse, removed with mineral spirits).  So instead, I’ve been using the Work Sharp discs for re-flattening my chisels, but off the machine.

To begin with, there are more grits available than with adhesive-backed sandpaper (WS goes from 80 grit to 3000 and above) and each of grit is available at all times because I own 5 glass discs.  Plus each disc is naturally non-skid on the benchtop, having abrasive paper on both sides.  In addition, because each disc is barely over a chisel-length in diameter, I can work the chisel from all angles use every square inch of abrasive on the discs (unlike my granite slab, where large swathes of fresh grit are wasted).  Finally, the abrasive on the WS discs lasts much longer than ordinary sandpaper and can be easily cleaned with a crepe block while spinning on the machine.

And the results have been more than satisfactory, especially for my purposes.

P1000308

Polished to 1000 grit only.  I already own enough mirrors and my chisels are for chopping.

I’m not recommending anyone go out and buy a Work Sharp 3000 (and certainly don’t blow $100 on extra glass discs just because they are nice surfaces for flattening).  But small-space woodworking is about finding the right tool for the job from what’s available.  And in this case, something I had on hand works better than anything else.

JPG

Engage the Forward Stabilizers

I’ve been a bit under the weather, so not much has gotten done in the workshop.  That’s not all bad, though.  It gave a Douglas Fir post, which I bought to be the top rails on the Japanese-style Saw Horses, more time to acclimate.  A good thing, too: it was sopping wet when purchased, as though left out in the rain for a day or two before the pallet was brought to the rack.

Over the last couple of weeks of drying, the two 36″ lengths that will become the top rails stayed quite straight.  There was barely any twist either.  What did happen, though, was some severe checking on the ends and on one face.  It makes me think the wood was greener than it should have been (or was left out in the rain for a very long time).

wp-1455278836786.jpg

This is what happens when wood dries too fast.

None of the checks were structural, nor very deep.  Not even the long check down the face grain seen in the above picture.  That does not mean, however, that they shouldn’t be stabilized.  There will after all be mortises within a couple inches of each end.

My strong preference for stabilizing end grain checking (and knots, for that matter) has always been thin viscosity cyanoacrylate glue.  Like the Ents at Isengard, I just keep pouring CA glue into the checks until the gaps are filled and the bubbling stops.  Then I give it about five minutes to set before I seal it up with spray activator.

wp-1455278833024.jpg

It looks gross, but it works.

I will let those sit for a day or two to fully harden inside, then I’ll square up the ends with a chop saw.  The end result should be pristine end grain and clean glue lines in the stabilized checks.

JPG


Nothing Too Extreme

While I wait for the Douglas Fir posts to dry out and become the top rails for my new sawhorses, I’ve doing a little bit of shaping around the edges. Literally.

One design element I’ve noticed in most saw horses of this style are the beveled feet.  Although the rake varies, very rarely are the feet left four square.  So I went with the crowd.

P1000306

Subtle on its own, but noticeable in comparison.

Each bevel is about 3/8″ deep and 7.5″ long, but the measurements are not exact.  I am sans band saw, so all work was done with a No. 4 set as heavy as I could.

The most surprising part was the ability to work in both grain directions.  My No. 4 is by no means supertuned for smoothing, but it was sharp and I was able to work in both grain directions with only slight tear out.  And a couple final passes with my No. 4 1/2 in the correct direction cleared all of that up.

It’s nice when something actually works right the first time.  I’m pleased enough with the shape of this first foot that it will become the pattern for the other three feet.

JPG

Where We Last Left Off

Things went better than expected with the laminated feet for the prototype Japanese-style sawhorse prototype.

wp-1454183697242.jpg

About as well as could be hoped, judging by the facial expression.

Before I hit the thickness planer this weekend, I did in fact cut the dadoes that will end up being the mortise in each laminated foot.  When cutting wide dadoes, I like to leave a bridge section in the middle on which to register the sole of the router plane.  I don’t know why, but this time before thicknessing I left the bridges in one foot and removed the bridges in the other.  There was no difference in the thicknessing result, FYI.

In any event, the bridge is easily chiseled away after the majority of the dado is proper depth.

wp-1454183704492.jpg

Like so.

I also tried something new, which I will call “gang-thicknessing”.  Having taken the time to square up each edge to the reference face, I clamped the foot assembly together before sending it through the thicknesser.  It goes without saying that you should ensure the metal clamps are clear of both the cutter head and the sides of the machine before doing this.  But if done right, it will ensure assembled foot is parallel (and each foot is exactly the same height).

wp-1454183693176.jpg

Again: CLAMPS CLEAR OF THE CUTTER HEAD AND THE SIDES!

The sides and top of each foot still need dressing to remove any plane tracks, but I am very pleased with how it all came together.  I have also dimensioned the rest of the prototype parts (legs, stretcher, top rail) and hope to finish the joinery in the next couple days.  Meanwhile, the feet are glued up and drying.

wp-1454185115417.jpg

Other than the knots, it kind of looks like LVL, doesn’t it?

JPG

I Had Almost Forgotten

It’s been a struggle putting together a design for a workbench.  Not because I don’t know what I want to make, but because I need to figure out the best way to make it by hand from construction lumber.  I have about 60 linear feet of Douglas Fir 2×10’s that will become the frame, and I plan to laminate over a dozen Douglas Fir 2×4’s for the top, but creating a step-by-step plan has been elusive.

And for me, that means taking a step back from the theoretical and diving into some practical research.  And what could be a better practice run than those Japanese-style Saw Horses I’ve always wanted?  And what better place to start than the feet, which are a perfect scale analogue for the laminated workbench legs?

Each foot is approximately 24″ long and consists of two boards.  I don’t have any 2×4’s, but I do have some 2×8’s and a panel saw, so here we go!

Step one: rip a 48″ 2×8 into two lengths of 2×4, then crosscut to 24″ each and reassemble in sequence.

P1000303

Hand sawing gets the blood pumping.

Step two: carefully mark where the boards meet, and stack each right board on top of the corresponding left board without changing orientation.

P1000305

This ensures consistent grain direction, just like a single board.

Step three:  surface plane the two faces where the boards will meet, then square up one edge to each reference face.

IMG_20160128_204049456[1]

And mark carefully.

Step four: thickness plane each board to S4S and prepare for glue up.

[Picture not found…yet.]

Before I actually glue up the feet, though, I should create the mortises for the legs by cutting dadoes in the reference faces.  The bottoms are already square to those reference faces, so there is no reason I can’t cut those joints in advance of thicknessing.

The legs, btw, will be made from approximately 30″ of Douglas Fir 2×6.  But that, along with the top and bottom cross rails, is for another day.

JPG

Some Scattered Thoughts

Sometimes, I regret spending the first year or so of my woodworking life using primarily power tools. I ponder how much further along I’d be in my hand work and sigh.  Sunk costs, I guess.  But more than that, I wonder how awesome it would have been to learn on a proper workbench.  I started on a Black & Decker Workmate 425, so it could have been worse.

But then what is the right type of workbench for a new apartment woodworker?  While I love my Milkman’s Workbench, and am glad to have made it, it’s not my go-to workbench anymore.  And I certainly did not have the skill to make one just starting out (not to mention the PWW article had not even been written yet).  So what would I do?  I’d buy another Black & Decker Workmate 425, of course, and start on my basic set of tools.

But then, I would buy four, eight foot long Douglas Fir 2x4s and laminate a 48″ x 12″ slab.  Which I could then dress by hand, drill some dog holes for a planing stop and clamp to a sturdy table with angle iron.  Then I’d use that surface to make a DIY moxon vise from veneer press screws and some red oak or maple 2×4’s and have all the workholding I could need for a while.  Then I would use the moxon vise to make a shooting board.

I’m not just spitballing here.  I woodwork almost exclusively on a 48″ x 9″ x 1.5″ maple slab, a shop-made moxon vise with 24″ between the screws, and a plywood shooting board.  And it works for me.

JPG

A Rare How-To

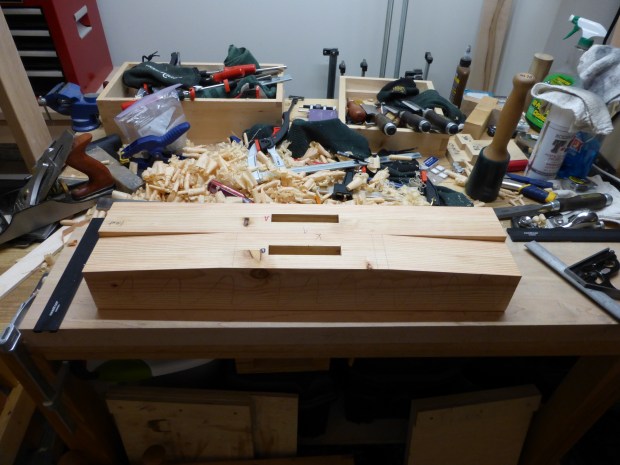
If you follow me on Twitter, you may know that I spent most of #blizzard2016 hand-cutting mitered half lap joints for a cherry side table.  The finished piece will have eight such joints, and although I’m only about halfway through the first of two frames, I’d like to reflect a bit on the process.

wp-1453653657899.jpg

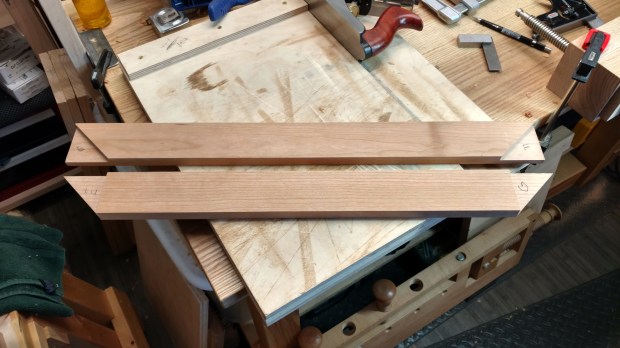
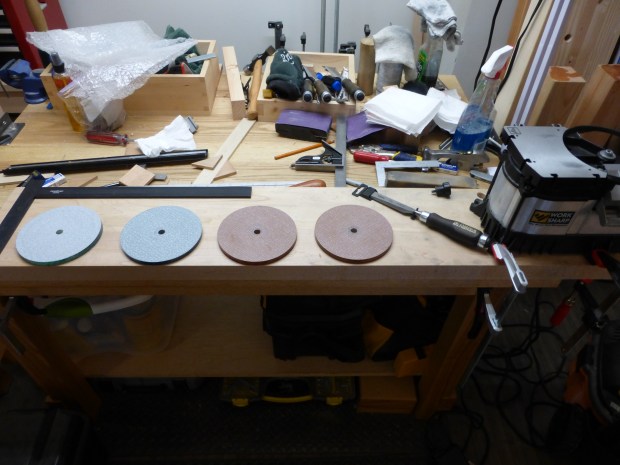
The goal is to have four each of these.

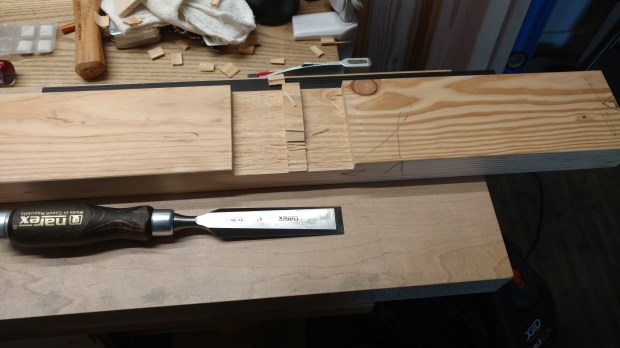
First off, some defined terms.  For the duration of this post, I will refer to the lower piece in the picture above (the E-G piece) as the “Angled Piece”.  The upper piece in the picture (the E-F piece) will henceforth be known as the “Recessed Piece”.  I’m sure they have proper names that have no relevance to what I’m about to say.

On each Angled Piece, there are three cuts to make.  The first two apply to all lap joints: a shoulder crosscut and a cheek rip cut.  The third is unique to the mitered half lap: a 45° miter cut across the face. My preferred order is (i) cheek, (ii) shoulder, (iii) miter, but whatever you do, always make the cheek rip BEFORE you cut the miter.   Otherwise, you will lose your guiding kerf on the rest of the rip as you get to full depth.

P1000295

Don’t be a hero.  Start with the easy cut.

Once all three cuts are made, and after the cheek is flat and parallel to the face (whether off the saw or by router plane), it’s time to square the shoulder to the reference edge by paring down to the knife line.  Then is the most critical step: true the miter to 45° using the same reference edge to which the shoulder was squared.

When I cut the first joint, I thought to just straighten the miter, transfer the mark to the Recessed Piece and leave well enough alone.  After all, it doesn’t have to be perfect; it just has to be consistent.  Since my shoulder was square, this would have worked fine, assuming I sawed perfectly and my full knife line was intact.  But alas, the saw jumped out of the kerf and took part of my knife line with it.  So fitting the joint became trial and error angle finding with a shoulder plane.

If you instead true the miter to 45°, go ahead and still use the Angled Piece to transfer the mark to the Recessed Piece (it’s easier than using a combination square).  But if you saw less than perfectly, you can always fall back on just truing the mitered recess to 45°.  With a straight edge on the Recessed Piece and a square shoulder on the Angled Piece, everything will come together perfectly either way.

P1000302

Like this, but without half an hour of shoulder planing.

One more thing: depending on how much material you remove from the miter on the Angled Piece getting it to 45°, you may need a couple passes on the shoulder to bring it back in plane with the end of the miter.  Otherwise, your inside corners won’t meet right at the miter.

JPG

Finding the Hole(s)

It’s pretty snowy out, all of a sudden.  And I’m using the quiet time to get some things done in the shop.  Sharpening and plane making in the early am, then onto other tasks.

On my list for a while was drilling a few more dog holes in the maple planing bench.  Not actually for bench dogs, but for aluminum planing stops.  Extremely low-profile, they come in several lengths (and can be hacksawed to exact measurements).  I’m sure I’ve talked about them before, but I could not live without them in my apartment woodworking shop.

wp-1453569811248.jpg

Not sure if others sell them, but all mine are from Lee Valley/Veritas.

The pegs (which come in 3/4″ or 20mm) slide in a track on the underside of the stop, so they fit in a variety of dog hole configurations.  And the pegs are shallow (less than 1 1/2″): perfect for a clamp-on workbench made of 8/4 maple.

In addition to their utility for surface planing (seen above), I have found these planing stops to be quite useful as bench hooks. Two more holes to the right side of the bench now make a crosscutting bench hook (see below).  And because my plywood shooting board/bench hook is too deep for this particular bench, I no longer have to unclamp the whole bench every time I want to cut a tenon shoulder.

wp-1453569834524.jpg

And it saves me from always digging out the saw benches.

There are actually three more holes to drill.  One centered in the far right for a holdfast.  And two more along the back edge on the left side of the bench to form a perpendicular for traversing and general bracing.  Everything is measured and marked; I’m just taking it slowly today.

Hope all my east coast readers are staying off the roads.  It’s not too bad out here, but pretty blustery.  I can only imagine what it’s like further north.

JPG