The final throes of once-mighty trees. Form and style strangely alike, yet wholly unexpected. Juxtaposed by convenience.
How the mighty fall and turn to dust.
A poem, by The Apartment Woodworker.
The final throes of once-mighty trees. Form and style strangely alike, yet wholly unexpected. Juxtaposed by convenience.
How the mighty fall and turn to dust.
A poem, by The Apartment Woodworker.
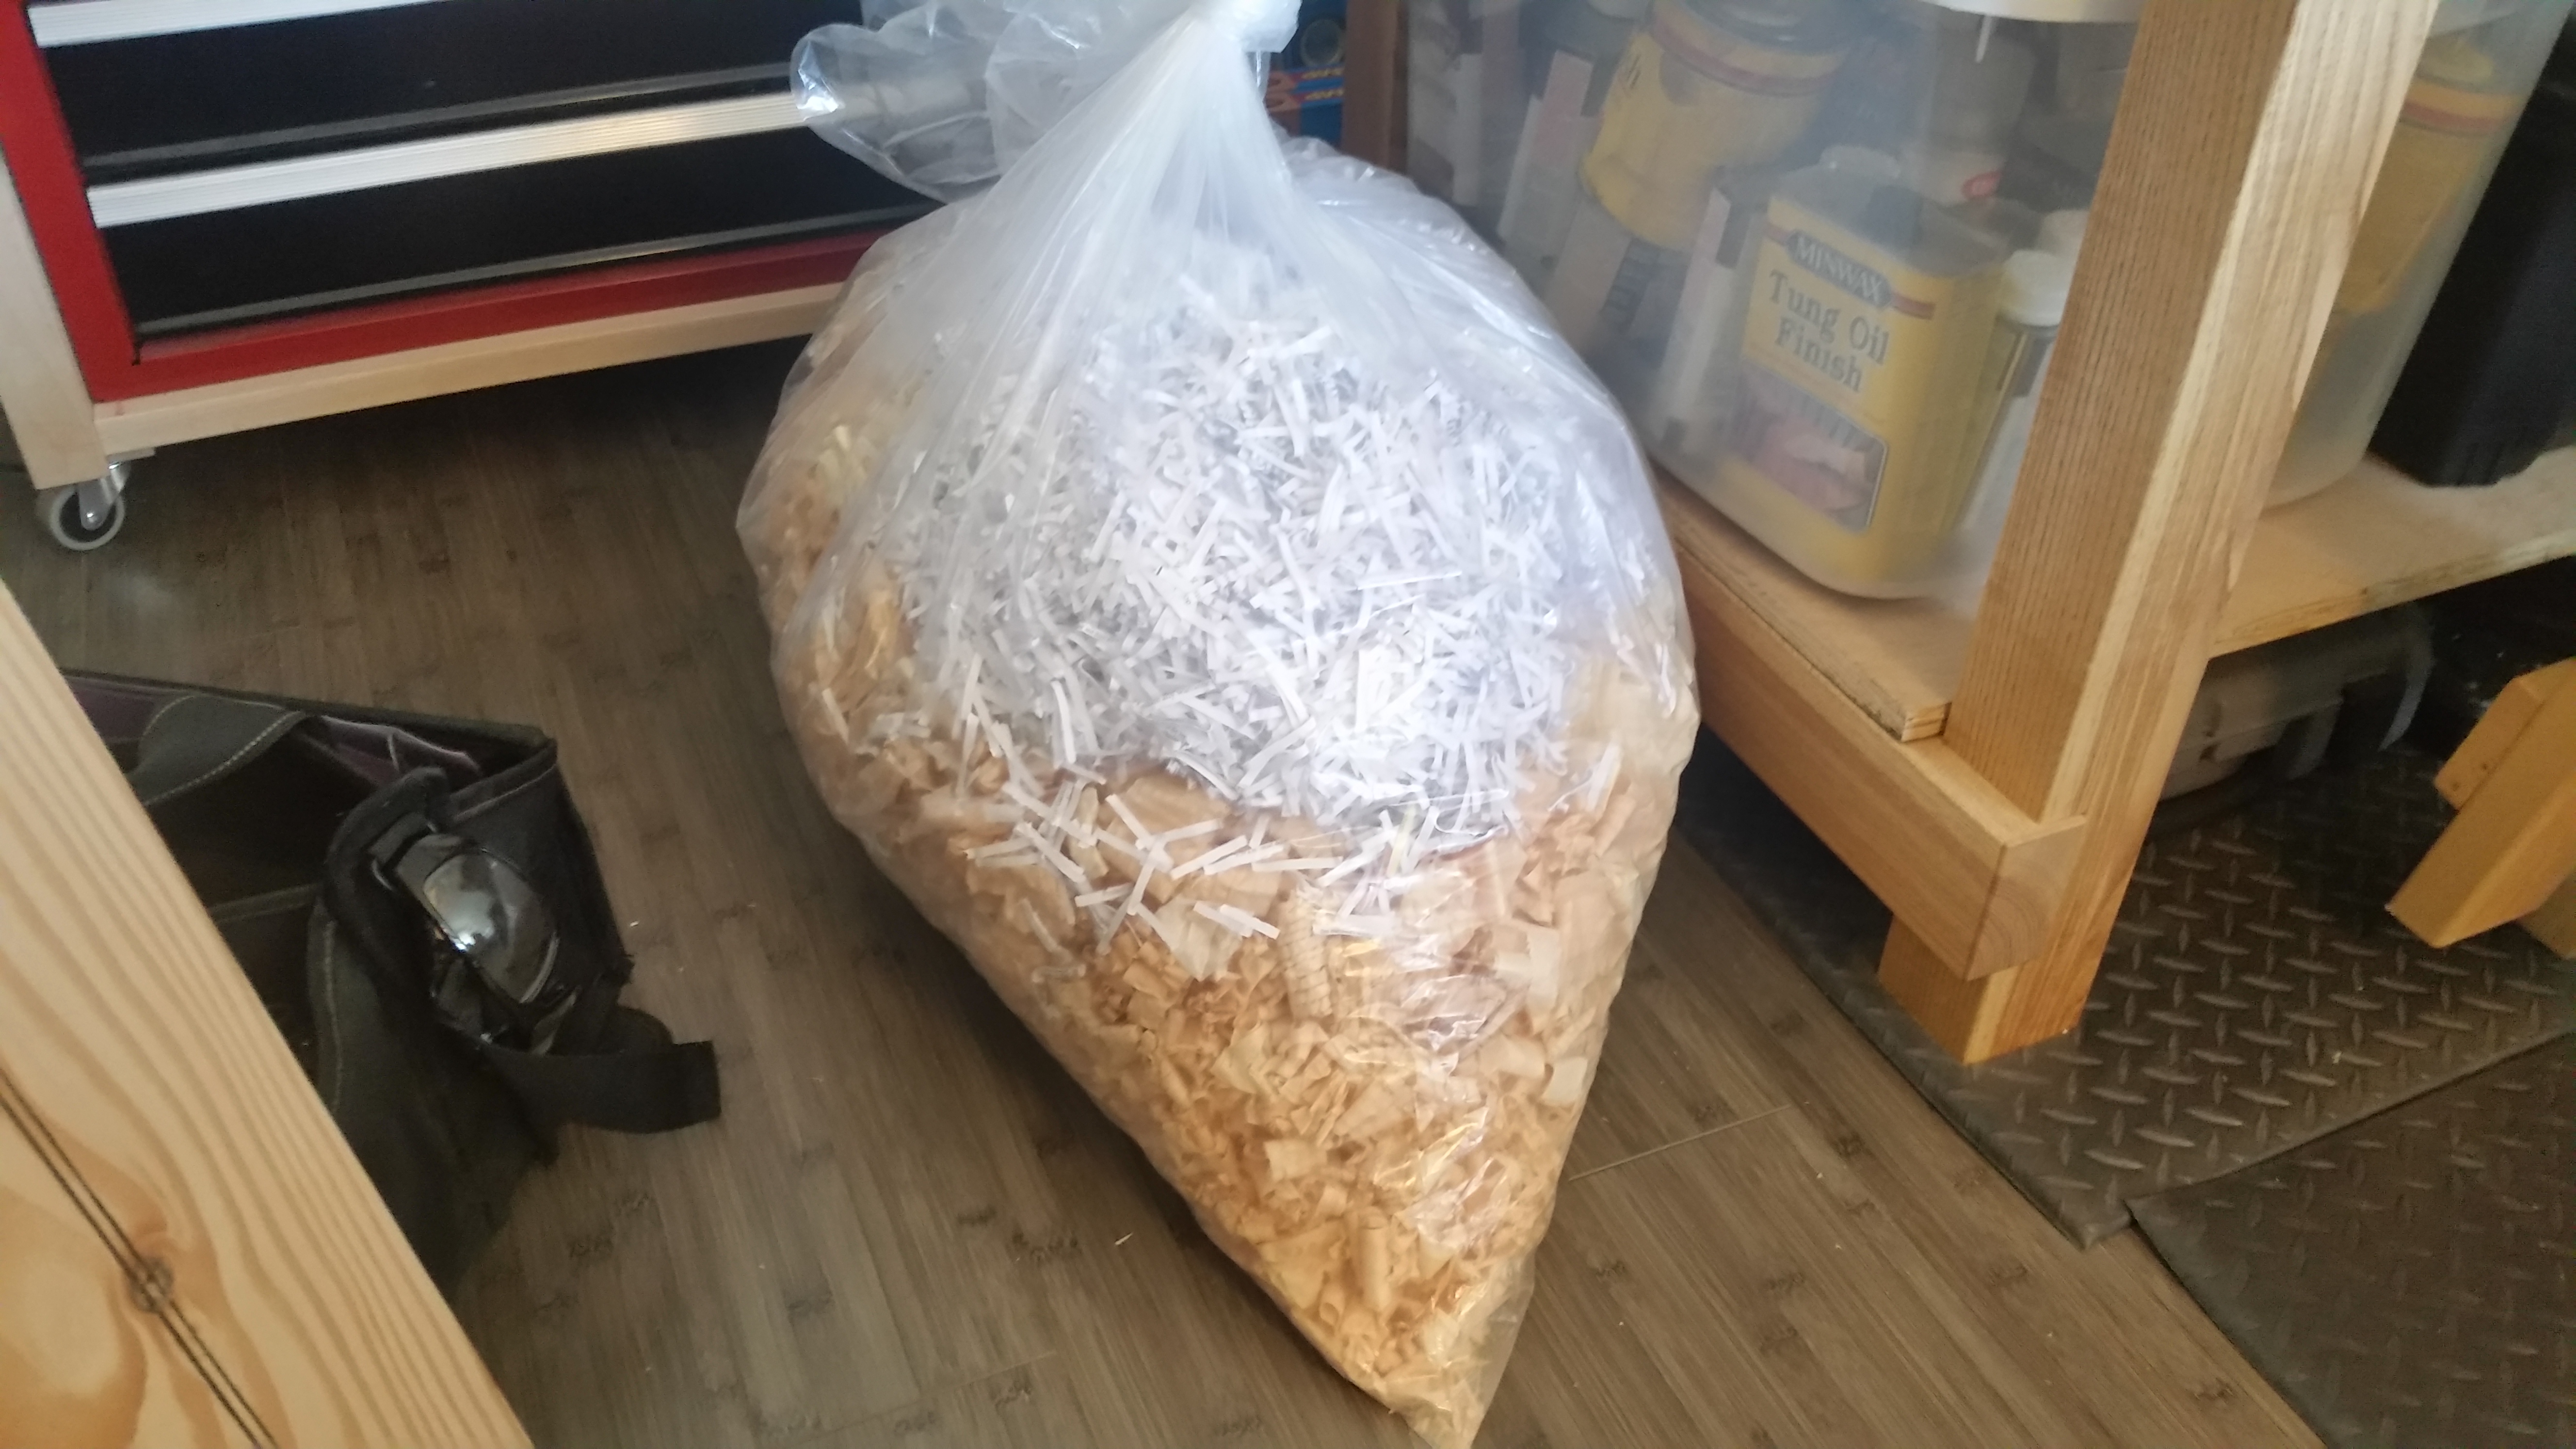
It’s increasingly apparent that my little apartment woodworking experiment has hit a major snag. No, not sheer lack of time because of my hectic work schedule (I find the time). Not even lack of effective work holding (I’ve got that covered). My biggest problem right now is lack of space. Specifically, lack of tool storage space. I’ve pared away everything I can. There is simply nothing more to cull from my on hand tool collection and I’m still short on space.

Filled beyond capacity! Like a trendy nightclub!
I know I’ve been lamenting the space constraints in previous posts, but I’ve finally decided to do something about it. No, not build a TARDiS. Beginning this weekend, I am doing the next best thing: a major workshop layout redesign. The hope is to find enough floor space for a standing cabinet that can store larger, less frequently used tools and free up workbench and tool chest space for more commonly used items. All without cluttering (further) the travel lanes in my apartment.
I haven’t decided yet about the type of standing tool cabinet (store-bought or custom made [by me]). Given my stance on casework, and the need of an immediate solution, I will probably go with store-bought. Seems to be my new theme.
Wish me luck!
JPG
It’s true that I don’t woodwork on a full-size woodworking bench. I am not, however, immune from some of the more mundane workbench maintenance tasks. Specifically, I took some time this weekend to re-flatten and re-seal my Milkman’s Workbench.
I’ve been working with thinner stock lately (some pine siding off-cuts for little dovetailed boxes) and have noticed that the as-planed pieces kept developing a slight twist. Turns out, the bench had a couple small high spots (in the middle of the main bench), as well one large high spot around the last two dog holes. Nothing terrible, but enough to affect stock that isn’t thin enough to self-support while planing.

You can see the slightly lighter areas in the above picture.
The flattening didn’t take long (other than the drying time on the Danish Oil), but I took a pretty sizable tear-out chunk from some swirling grain near the wagon vise. Clearly nothing fatal to the function of the Milkman’s Workbench, but you all know my feeling on aesthetics.

It will eat my brain forever.
On an unrelated note, I’ve been watching a lot of Paul Sellers’ videos and am thinking about making one of his shooting boards. We’ll see.
JPG
I know it’s tautological, but the most problematic aspect of small-space woodworking is just that: lack of space. I am fortunate enough to have a large common area that I can temporarily annex into the workshop, but that really only helps me for assembly or short term lumber storage.
With a rather full tool chest already, any time a new tool comes in, something else has to go (or, at least, to be stored). Normally, it’s a phantom problem, because I’m not really buying new tools. I have almost everything I need. But I can’t just leave random tools laying around to trip over.

Although, I admit most days the shop is not exactly the model of order…
As I plan out a lighting rig to go with the new camera, though, I am faced with a dilemma. I don’t want to reassemble a special lighting stand every time I need to snap a new picture. But I also don’t want my apartment to be cluttered with yet another free standing obstruction.
I think the third option, if it exists, is to build a rig that will work both as photography lighting and as workshop lighting. My current front lighting setup for joinery (an LED task lamp) isn’t working that well because of the depth of my workbench. Not to mention that it’s also very directional and the head gets in the way when photographing. On the other hand, a traditional front lighting rig with a diffuser may not shine brightly and clearly enough for use during joinery work.
I just don’t know yet how to solve for both issues, while simultaneously not creating something else for me to trip over. Any thoughts would be appreciated.
JPG
Usually on The Apartment Woodworker, I try to come up with clever titles for posts. Today, no such luck.
It’s been almost 6 months since I started The Apartment Woodworker, and it’s been pretty clear to me from the beginning that I needed a real camera. The internal camera on my Samsung smartphone is pretty good, but like all smartphone cameras, any bit of zoom immediately grained out the picture. I had been putting it off until I was sure The Apartment Woodworker was something I’d enjoy. It’s been a blast, so I took the plunge and bought a proper point and shoot. It even shoots video, so maybe there is some of that in store.
I have tapped a buddy of mine to teach me how to use the thing. I’m hoping that with a bit of training, and some better lighting (which I will unveil later this week), The Apartment Woodworker will reach new heights of artsy foofiness. The updated banner (full image below) was shot using the new camera.
Very little staging required!
JPG
I know it’s only an hour, but I truly despise Daylight Savings Time. Most of my clocks adjust automatically, but that’s not the point. For the third year in a row, I didn’t realize the clocks rolled forward and I started woodworking before quiet hours ended. I’m an early riser, so this morning, I was woodworking audibly while everyone was still sleeping it off. I didn’t get a noise complaint this time, but that’s also not the point. I’ll say it: Daylight Savings Time is stupid in 21st Century society.

On a side note, I am finally using the last of the home center Douglas Fir for an upcoming project that is totes adorbs.
I would like to point out that it was the Germans and Austrians during World War I who first implemented Daylight Savings Time as a way to conserve coal during wartime. And that it was OPEC who forced America to permanently implement Daylight Savings Time during the 1970’s.
Not exact a positive pedigree for a concept.
JPG
This one is text only.
Here at The Apartment Woodworker, I am always looking for new and exciting ways to bring the strange world of small-space woodworking to life. In a total reversal from my usual course, I would like to talk for a moment about the virtues of power tools and apologize to anyone at whom I ever scoffed for using a table saw in rough stock preparation.
If you haven’t angrily closed your browser yet, let me explain. I make no secret of my reliance on a thickness planer, nor do I deny I often turn to my orbital sander for quick finishing-prep. I also love a good roundover or chamfer by router and I sharpen the forstner bits for my power drill with a rotary tool. I even own a sweet miter saw that lives at my parents’ house. But I rationalize this because each one of those power tools complements my hand-tool-first approach to small-space woodworking. Every single board first gets at least ripped and planed S2S by hand before a power tool even touches it.
For the first time ever, though, I wish I owned a table saw. I have been hand-ripping rough-sawn, close-grained hard maple for the plant stand project and Praise Alvis is “hard” an understatement.
I’d be cutting joints by now if I had a table saw. My 4.5 tpi and 6.5 tpi rip panel saws are way too coarse and my 9tpi rip panel saw is way too fine. And each now has a kink in the plate that I need to hammer out. It’s true I don’t have the room for a table saw in my apartment and I could just grab my circular saw from my brother’s house, but that’s not the point. I merely see the point now of power stock preparation.
Up until this point, I considered myself to be a handtool snob who would never, ever use, let alone buy, a table saw. But now I think that when I again have a full-sized shop, I just might just buy myself a SawStop and learn to use it safely. Or at least a bandsaw. Those aren’t so bad.
For stock preparation only: not for joinery. I’m no powertool sissy.
JPG
I am officially over making footstools.
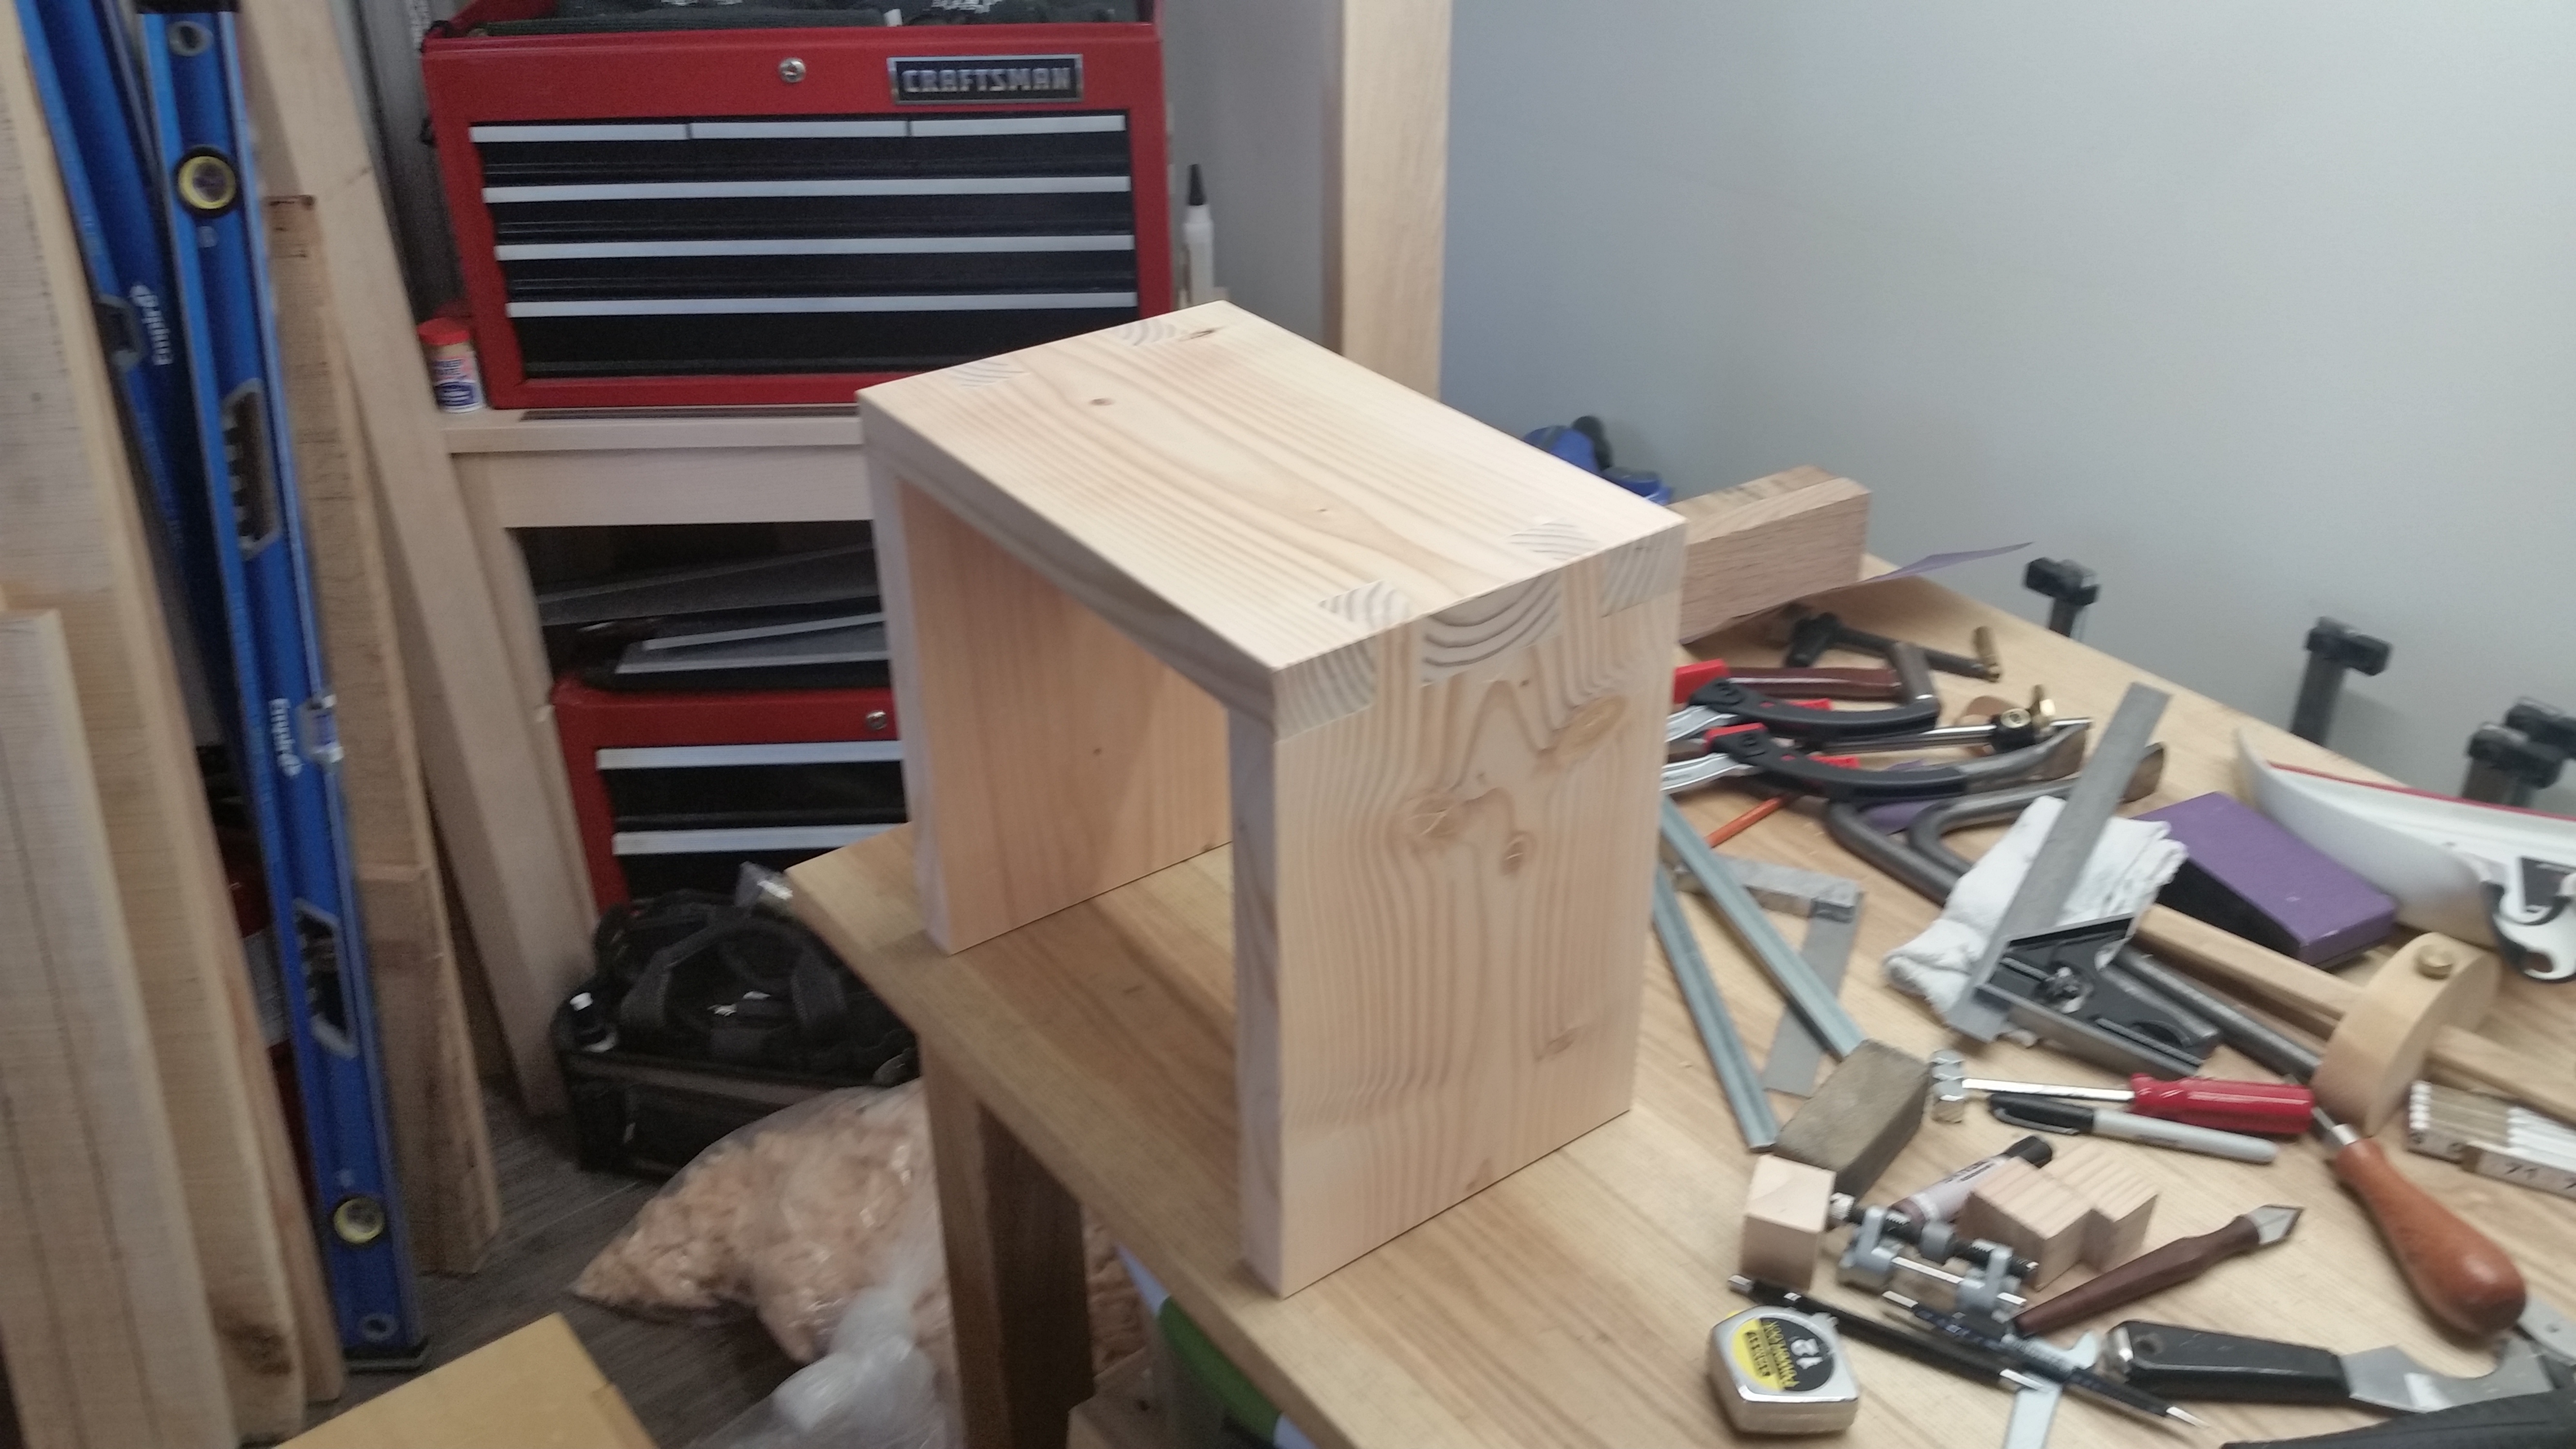
This is the last one, I swear to Glob.
I finally got around to making the third of three footstools for my brother’s new house. The first two footstools were for my niece and nephew. This third one is for use in the kitchen.
This is very clearly a utility piece. Made from home center Douglas Fir 2×10 (leftover from the Planing Slab project), I opted to be super lazy and left the stock pretty close to original thickness and width (after some rough flattening, straightening and squaring). I just realized that I forgot to mark the pieces to ensure continuous grain in the three main boards, but I imagine it will get a couple of coats of paint regardless.
I think that in hardwood, I would have been comfortable with just the two sides and the top. But in something as soft as Douglas Fir, I opted for an additional cross-support, which connects to the sides via mortise and tenon. I did not glue or otherwise attach the cross-support to the underside of the top to allow a tiny bit of flex.
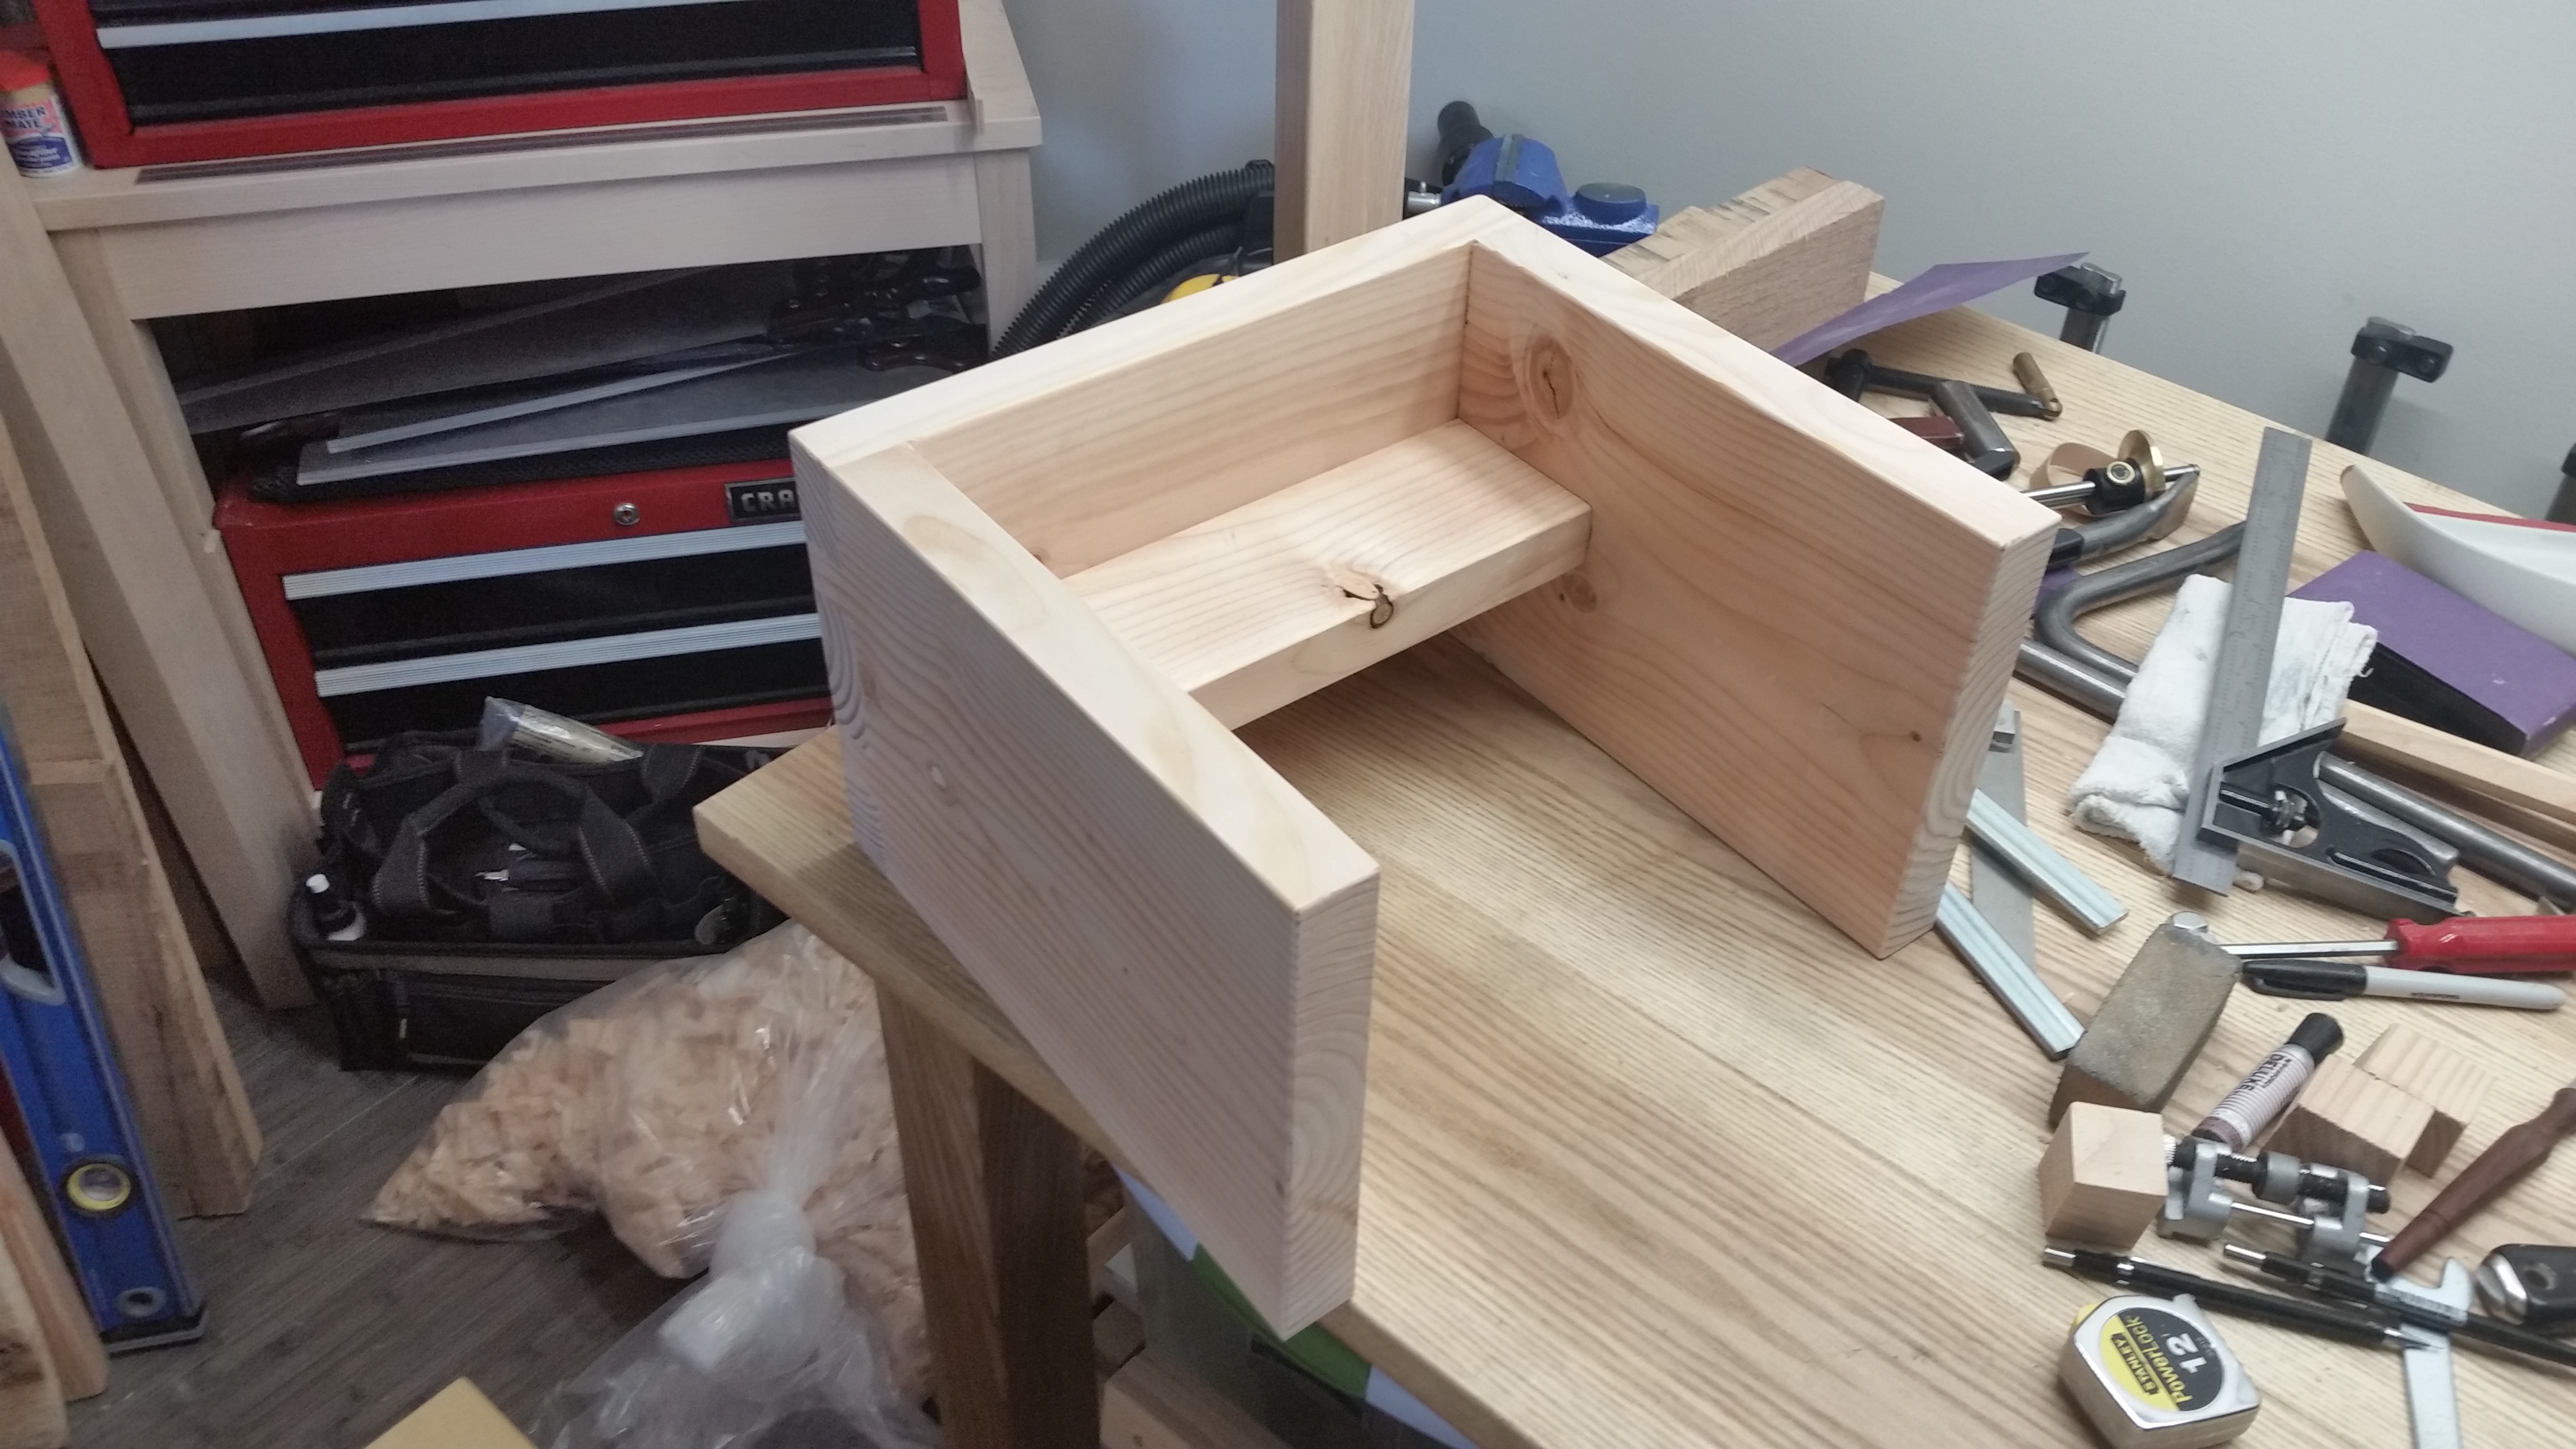
Solid as a rock in softwood.
Speaking of flex, one nice byproduct of using such a soft wood is that the entire piece has a bit of give throughout. This means that any bit of twist or wobble the piece might have (due to an uneven floor or what have you) vanishes when the weight of a person is applied.
With this done, I am now done with footstools, forever. Probably not forever, but certainly for a while.
JPG
I have been pouring over potential plant stand designs for several weeks and I finally settled on what I think will work. The final height of the pot should end up roughly the same as the temporary fix (see below), which has been a useful guide. I haven’t nearly finished the build yet, but some of the stock (scrap hard maple) is at least surfaced and ready for final dimensioning and joinery.
In my continued quest to not turn The Apartment Woodworker into a “look at this awesome thing that I made with my awesome tools” kind of website, I would like merely to share the design specs and explain some of the choices. I am certain the design will be refined further through the build process, but for now, I am satisfied with the aesthetic baseline.

Careful readers will note the ratio of each leg above and below the cross-member is almost exactly that of a lightsaber (or, if you’re boring, a katana).
First, the piece only has three legs. While there has been much going on lately in the world of three-legged furniture, I really just wanted some practice cutting angled tenons and chopping angled mortises. Much of what I design and build is square and true, which can get pretty boring. Plus, the splay and the angle of the legs will keep it stable and the tops of the legs will secure the pot laterally.
Second, the hub design was born from how to get the correct splay angle on the legs. I initially gravitated toward a lapped t-shape (seen top right), which would have reduced the number of individual pieces but required a compound angle on each tenon. Unfortunately, the piece will be weight-bearing, and that compound angle would not place the load on the legs parallel with the mortise and tenon. The hub design, though, allows for the in-line load distribution. I can drawbore each leg assembly to the hub for an eternal joint, even with the additional complexity.
Finally, although the drawing doesn’t show it, I will probably shape the legs a bit as an excuse to put my new spokeshave (a very old Stanley with a very new blade) through it’s paces.
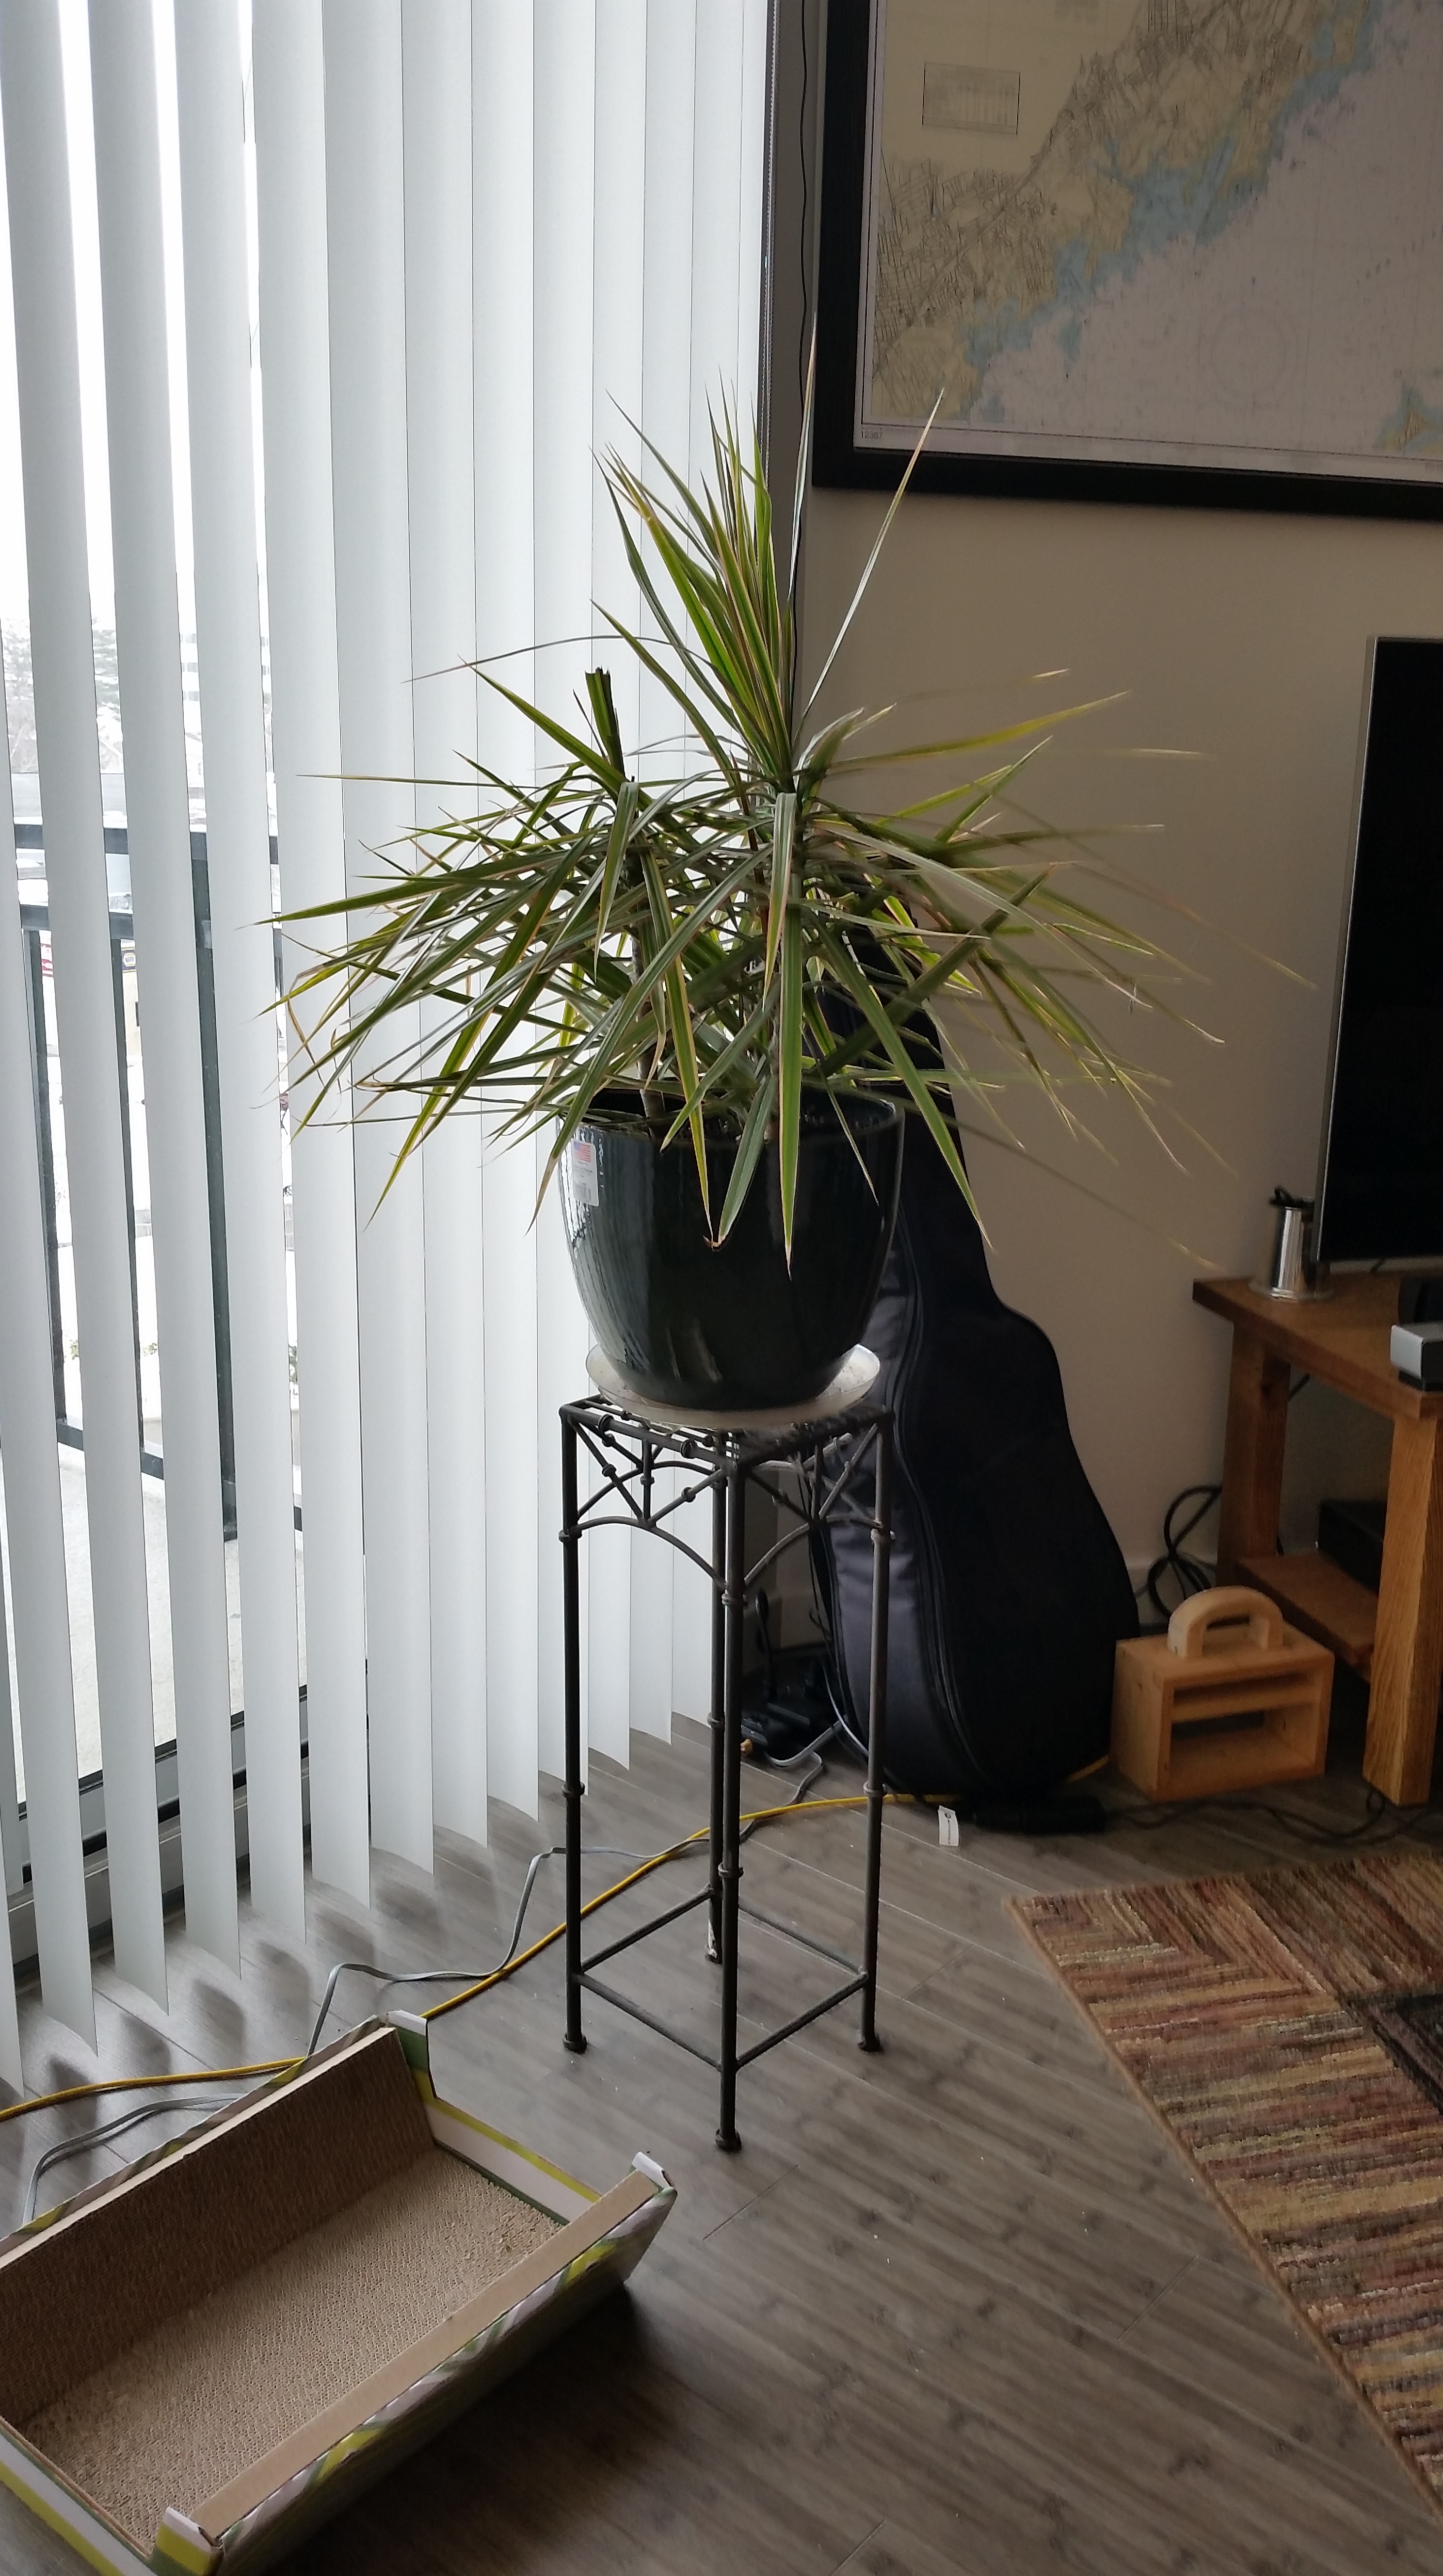
In case you are wondering, this is my current, temporary solution. River ate the crown off the left stem, which was the impetus for this particular project.
Now I just have to build the thing. I’ll post pictures when it’s finished.
JPG
It’s been a long time coming, but I think I’m ready. I’ve progressed sufficiently in my woodworking that it’s finally time to revisit my red oak desk. I still love the design (mitered half lap joints continue to be a personal favorite) and I’m quite satisfied with the overall size and shape (which is why the revisit hasn’t been a high priority), even the joints were cut almost entirely with a plunge router. I don’t even think I owned a tenon saw at that point.
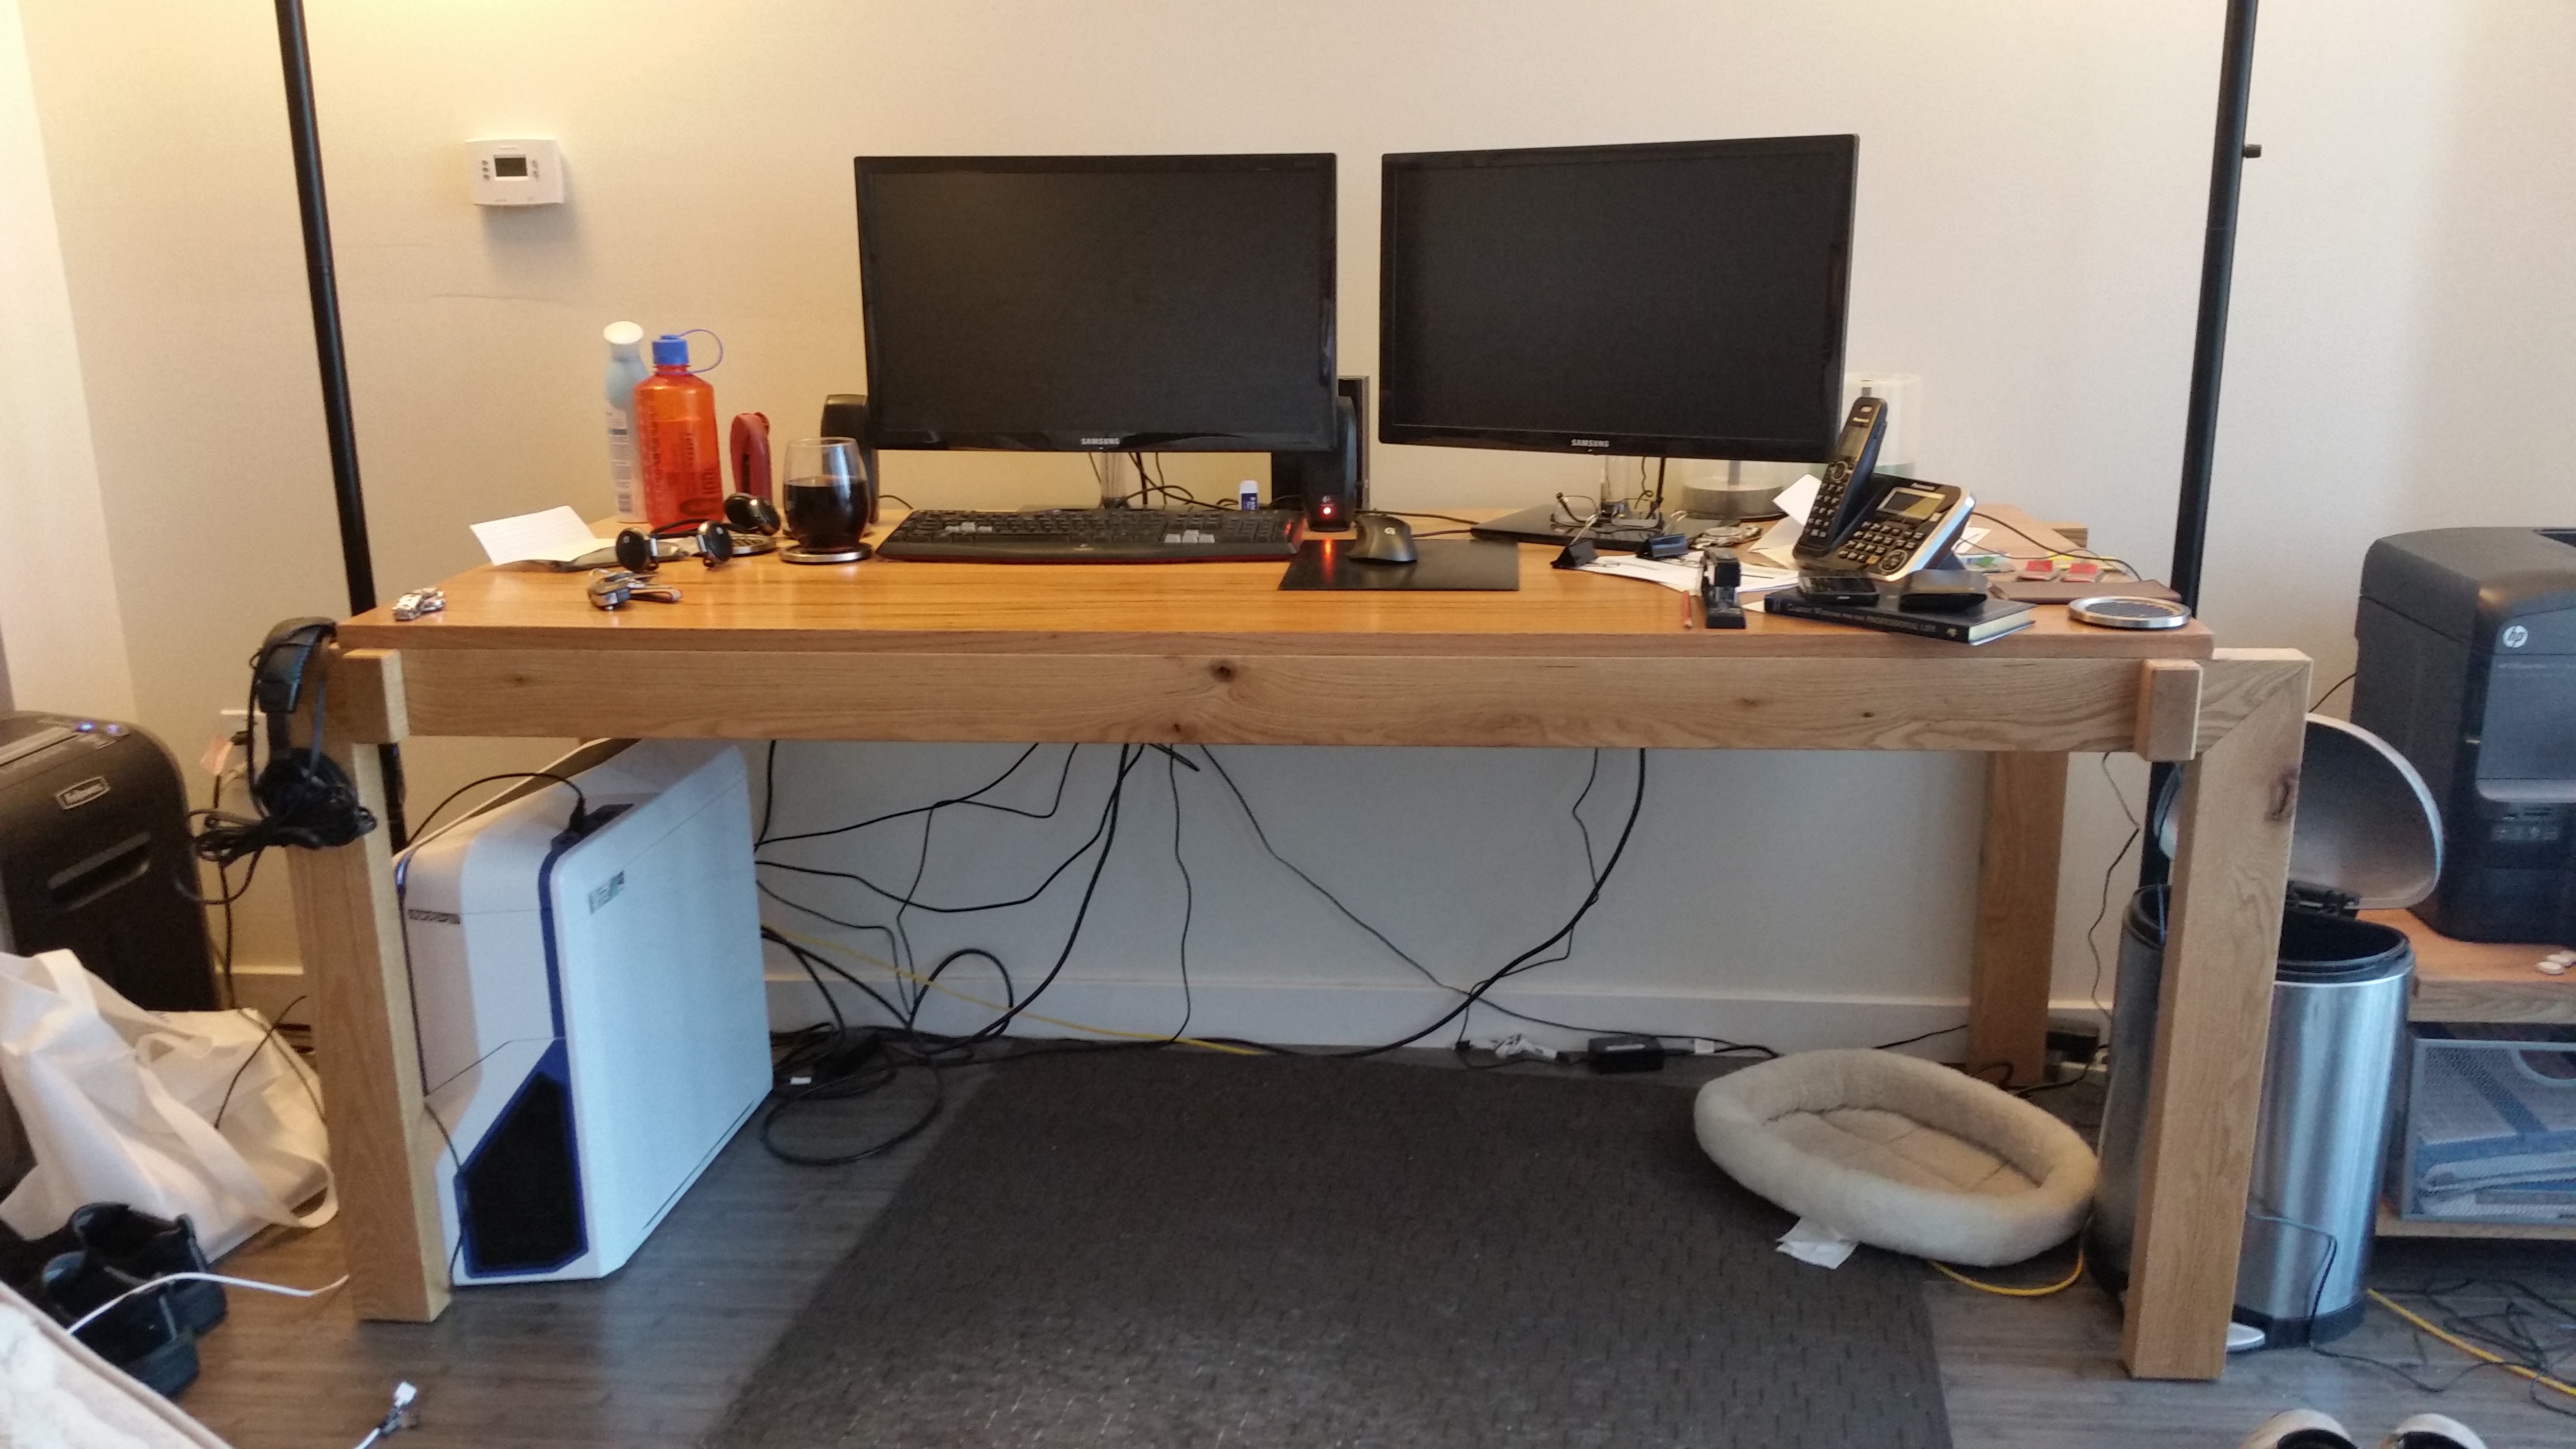
I’m very proud of the piece, despite being made entirely with power tools.
There is no real need to revisit the piece. I just think I can do it so much better now, almost two years later. And I’d love another crack at some of the design elements.
The biggest design change I think will be to thin out the frame pieces a bit, which are currently full-width red oak 2x4s. 3/4″ or so off the width will create a slightly more delicate feel (without any real compromise to strength). I’d also like to tweak the shape and increase the size of the exposed ends of the cross-rails. I’ve had to reinforce them once already and, although they are holding well, I worry that one day they’ll snap off again. There are some execution-related flaws as well, but they are pretty well hidden from day to day view.
I apparently used to not know a ton about grain matching.
The tabletop (which is quartersawn and well-jointed) is not permanently affixed and is in fine shape, so I’ll just reuse it as is. Also, I have quite a bit of air-dried, rough-sawn red oak stock available, so I won’t need to salvage anything from the existing desk (meaning I can build the new frame at my leisure). Plus, it will give me a chance to use the new planing slab.
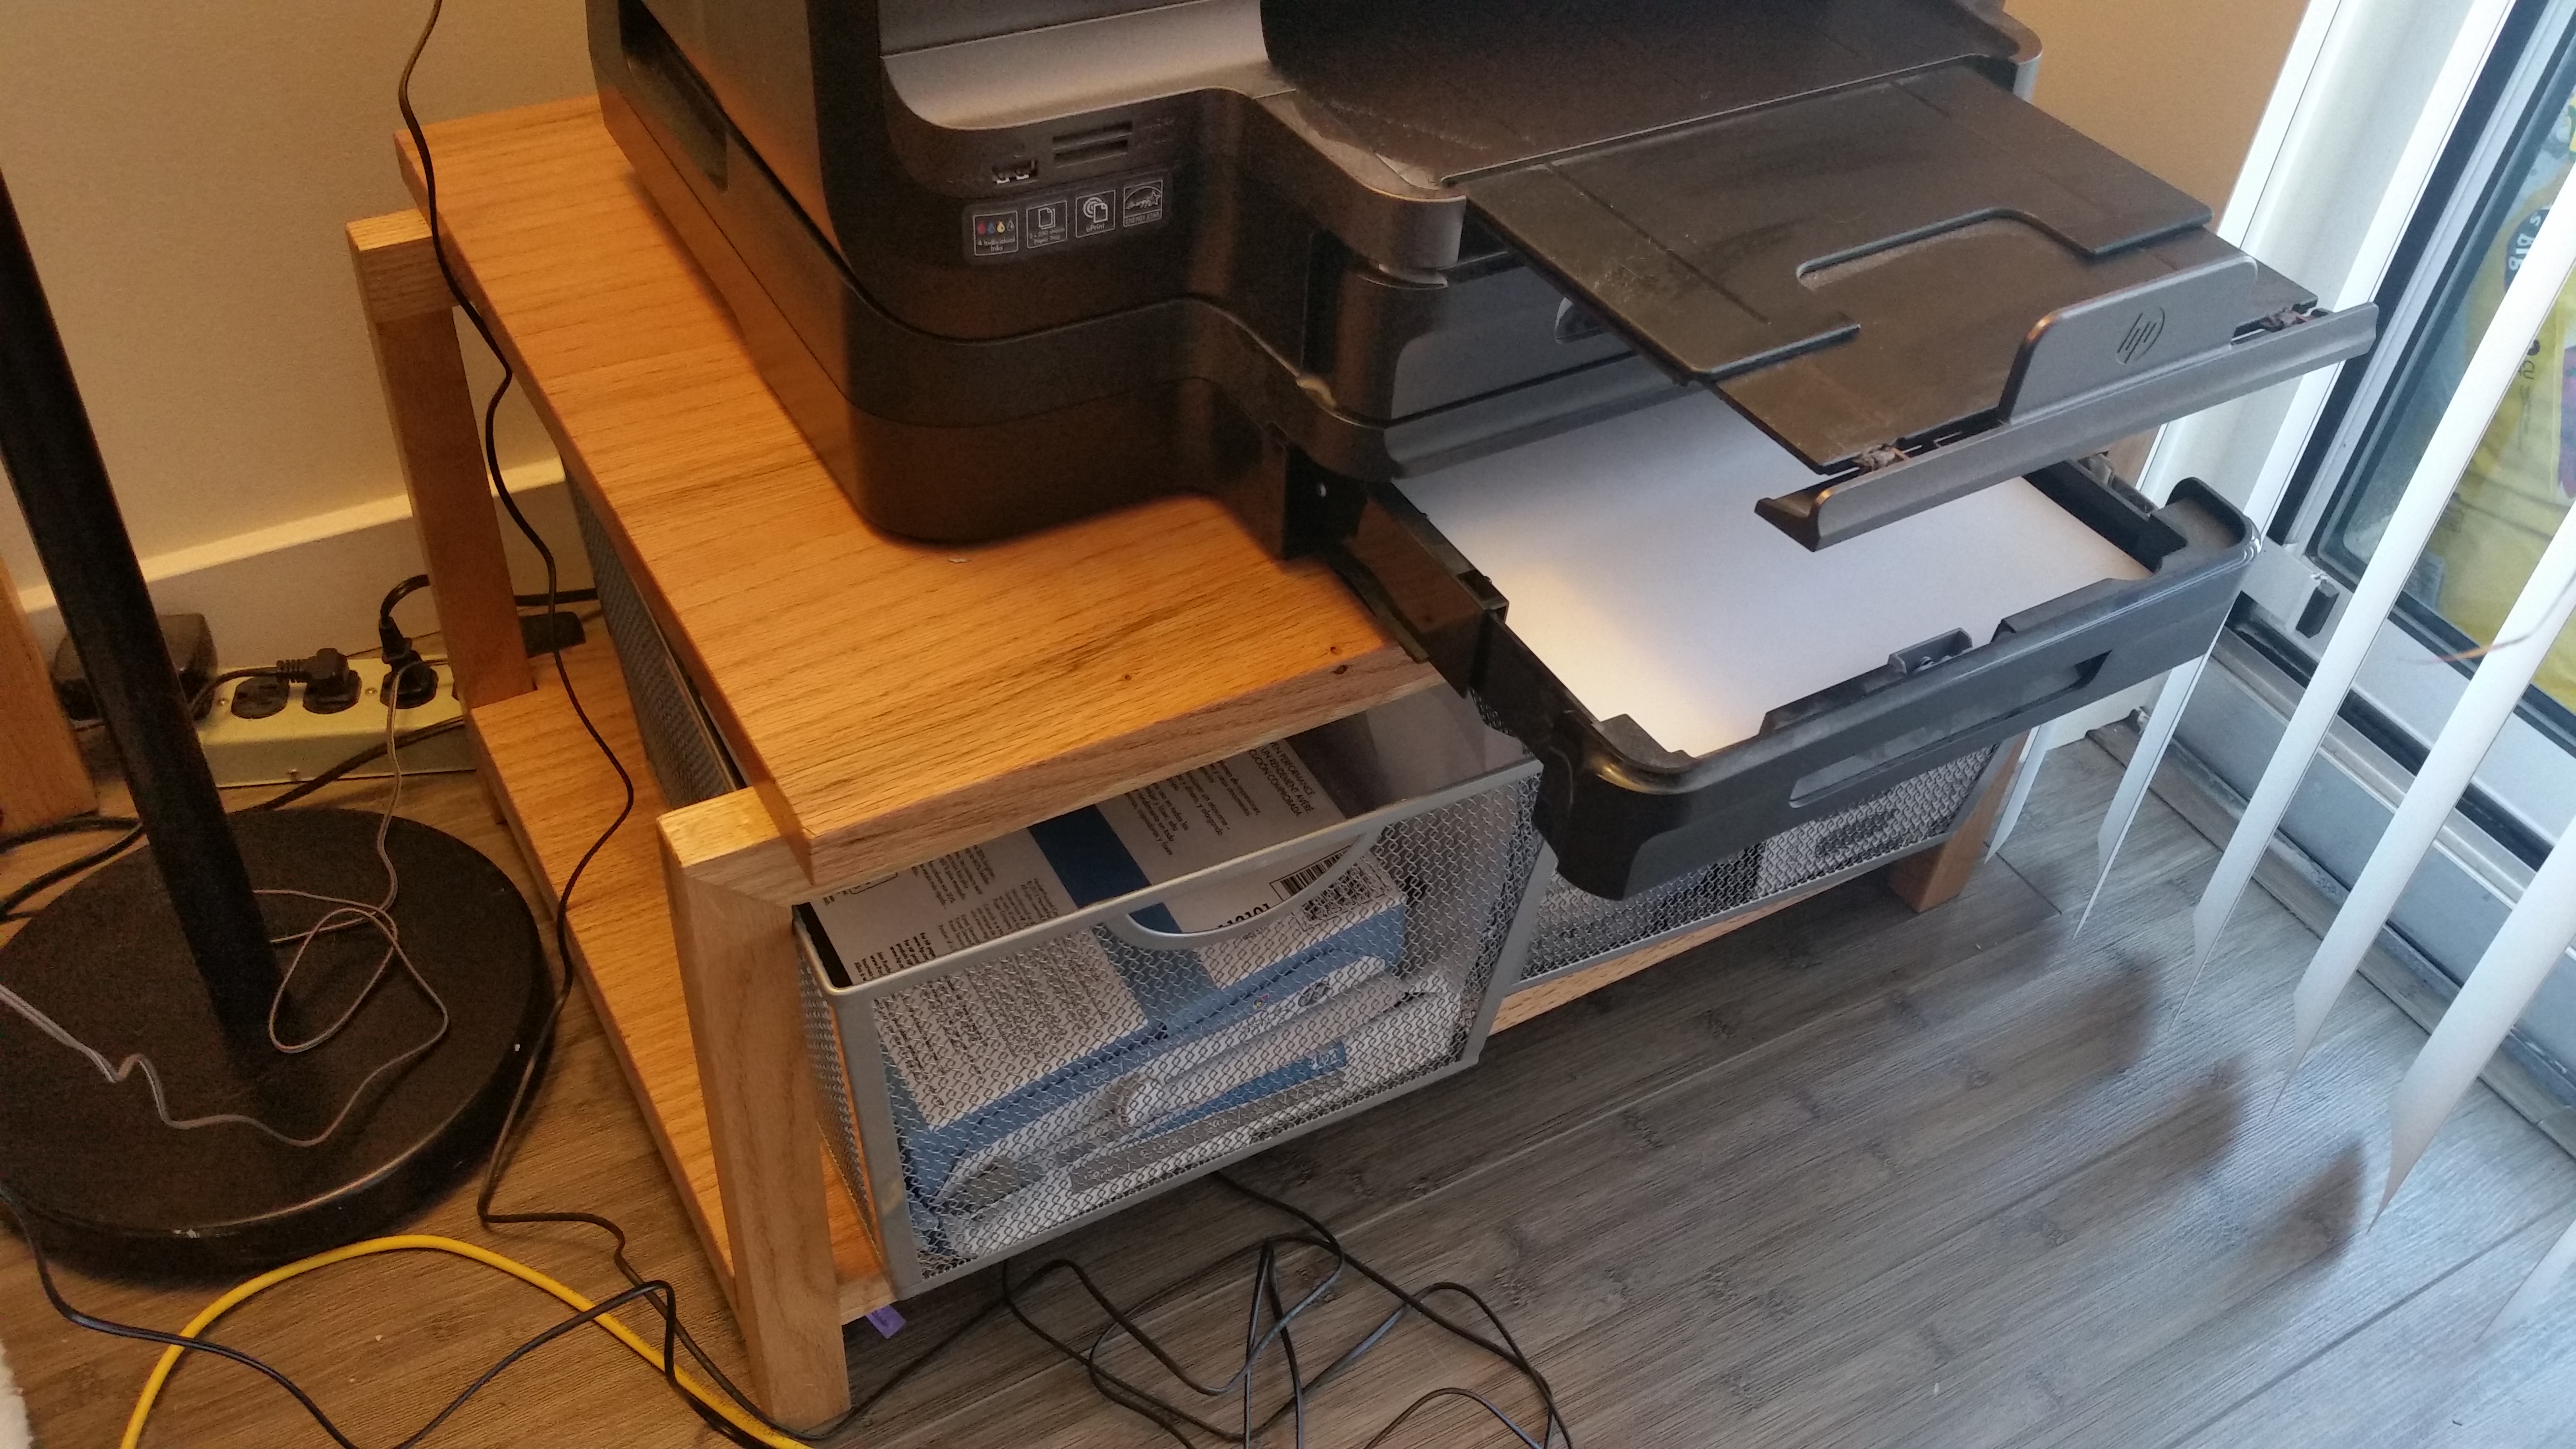
There is also a matching printer stand that fits two metal baskets on the bottom shelf (because I didn’t know how to make drawers back then).
There will be significant stock preparation involved, and I have other projects in the works already, so the desk revisit will likely take a while. I’ve already sketched a few possible design tweaks, which I will share when I discuss the build.
JPG
