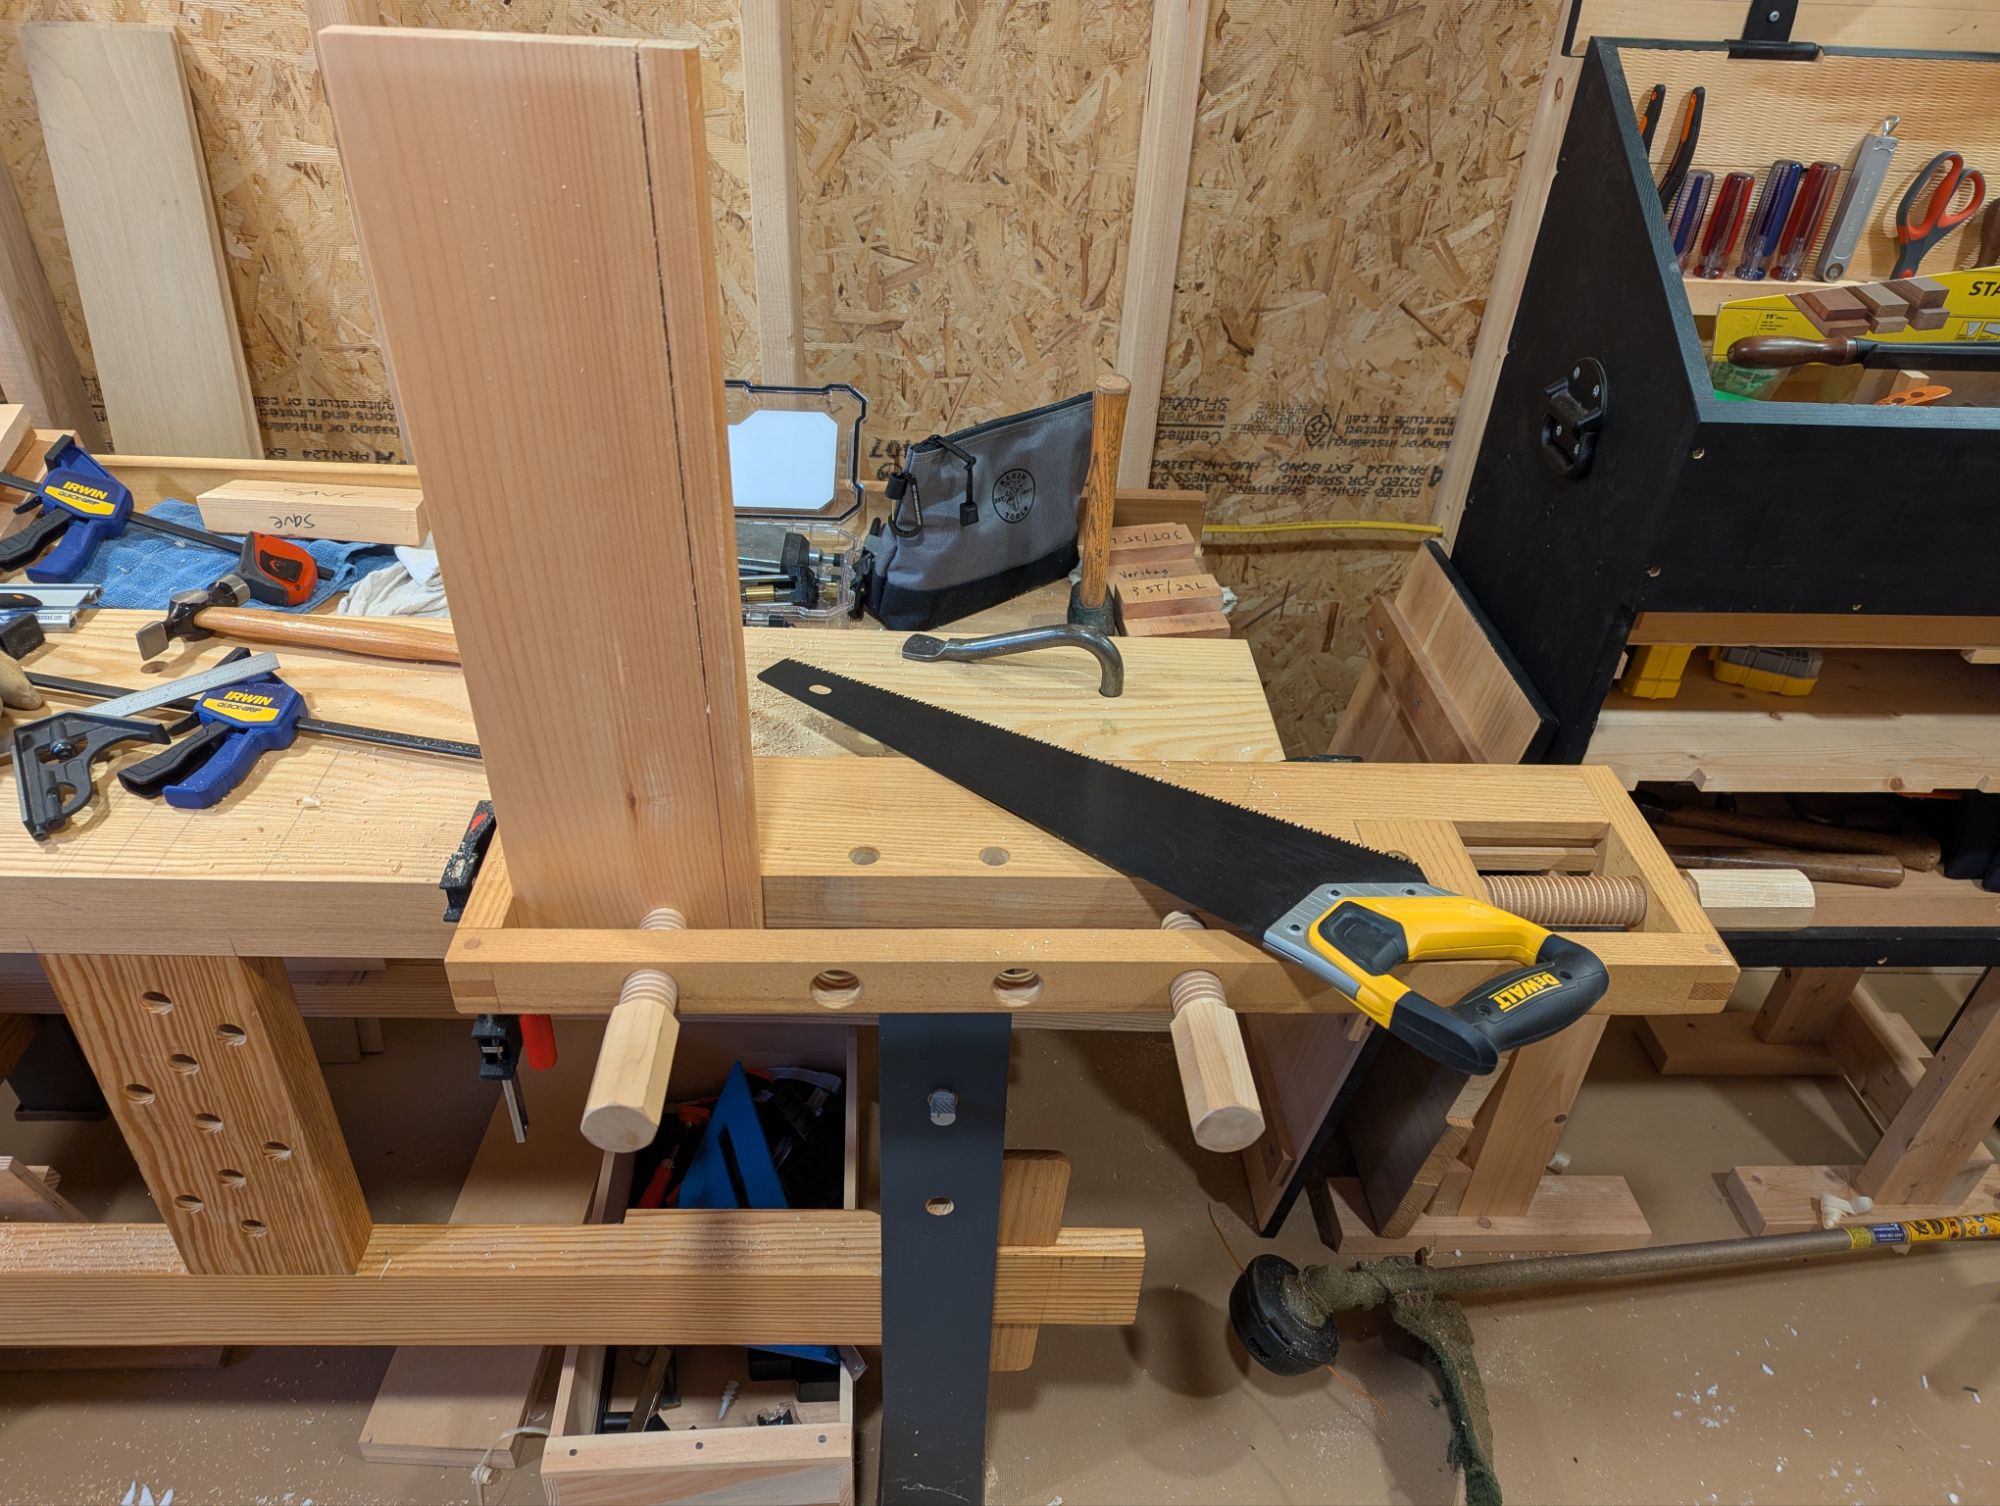
I’ve had the same shooting board for 12 years. It’s a clone of the Lost Art Press plans (made of 1/2″ baltic birch plywood) and has served me very well. But after a dozen years, it’s pretty chewed up (mostly from being too lazy to flip it over when using it as a bench hook for sawing).
So, over the last week or so, I took the time (and some pine scraps) to make a new one. This is in the Richard Maguire style, with no bed (meaning the plane rides on the benchtop) and assembled with a wedged fence and cleat. I didn’t get any pictures during the making, but it’s all 3/4″ white pine throughout. You should click the link to Richard’s youtube video. He’s a great entertainer in addition to being a great craftsman and instructor.
No bed means your benchtop must be relatively flat across its depth to support the plane.
Each of the cleat (which hooks onto the bench in use) and the fence (which establishes the 90 degree reference for shooting things square) is recessed into the board with dado. The cleat dado is a full 1/4″ deep (for strength), while the fence dado is only 1/8″ (to preserve some additional height for the fence to function as an effective backer board. Recessing the fence and cleat cross grain into the board helps keep it flat over time (better explained in Richard in the linked video).
Better shot here showing the wedged fence and cleat.
I have worked on long shooting boards without fences in the past. But they are almost always used for squaring edges to a reference face; not for shooting end grain square. This one is shorter and specifically designed for end grain.
Work has been very busy so it was good just to get a little shop time. Hope you can do the same.
Happy New Year, everyone! Hopefully everyone has fully recovered from their New Year’s Eve partying and is back in the shop. I certainly am.
As with every new year, I try to tackle a few small but important projects (I call them “fixgasms“) around the shop. The term is not exclusive to the workshop. A fixgasm can be anything that’s been on the to-do list for too long and won’t really take a ton of effort to complete, but will have outsized impact when done.
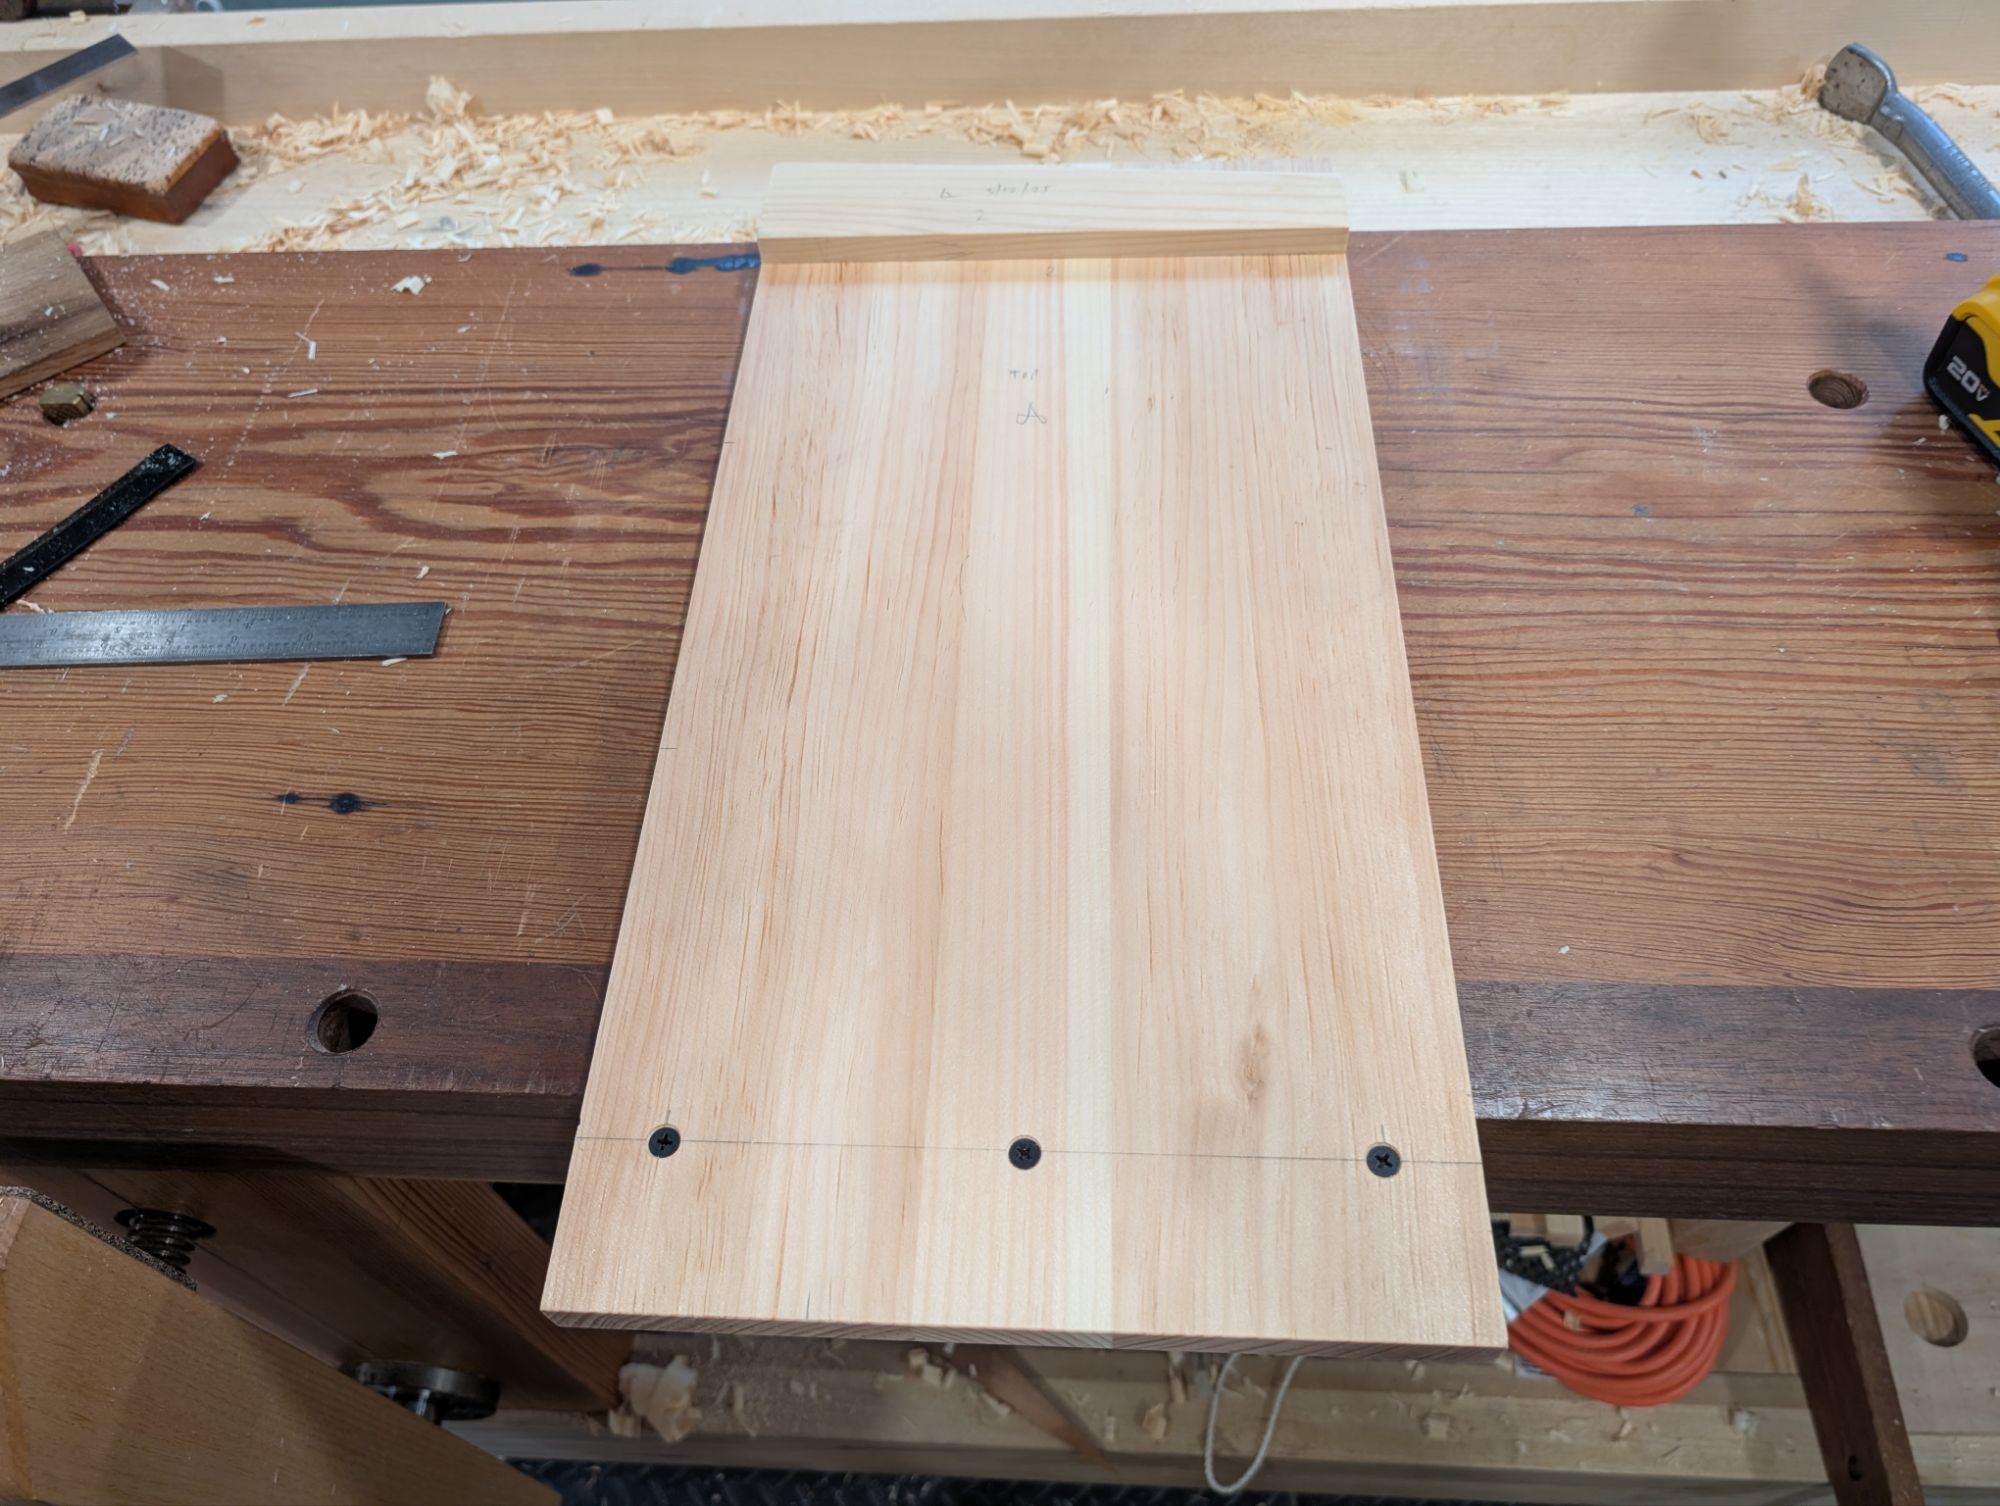
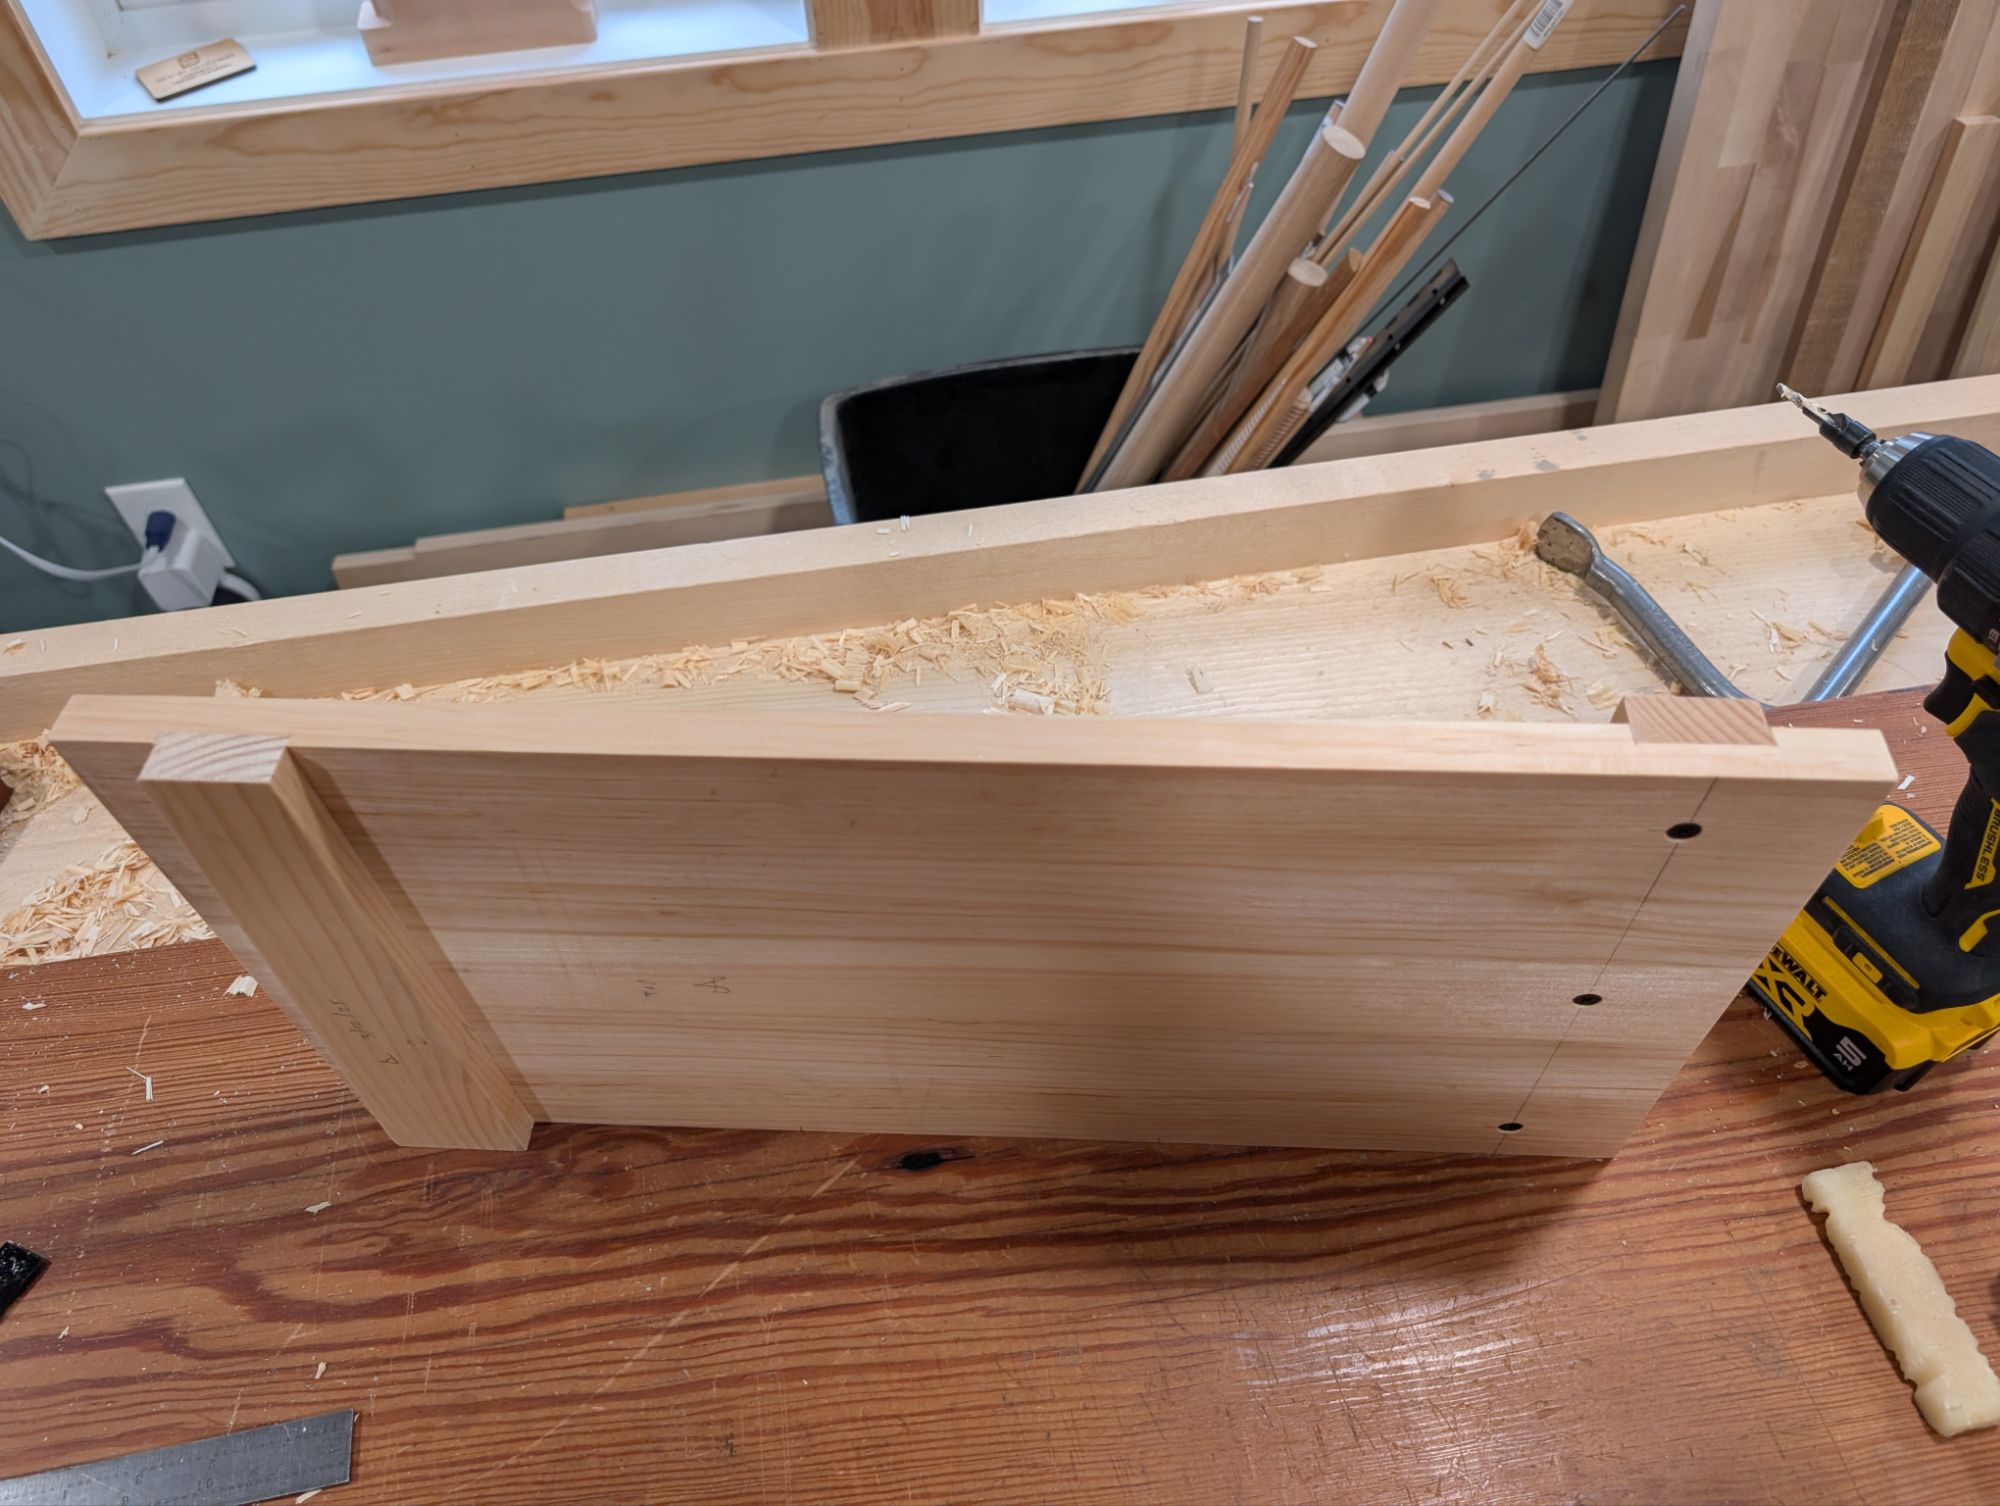
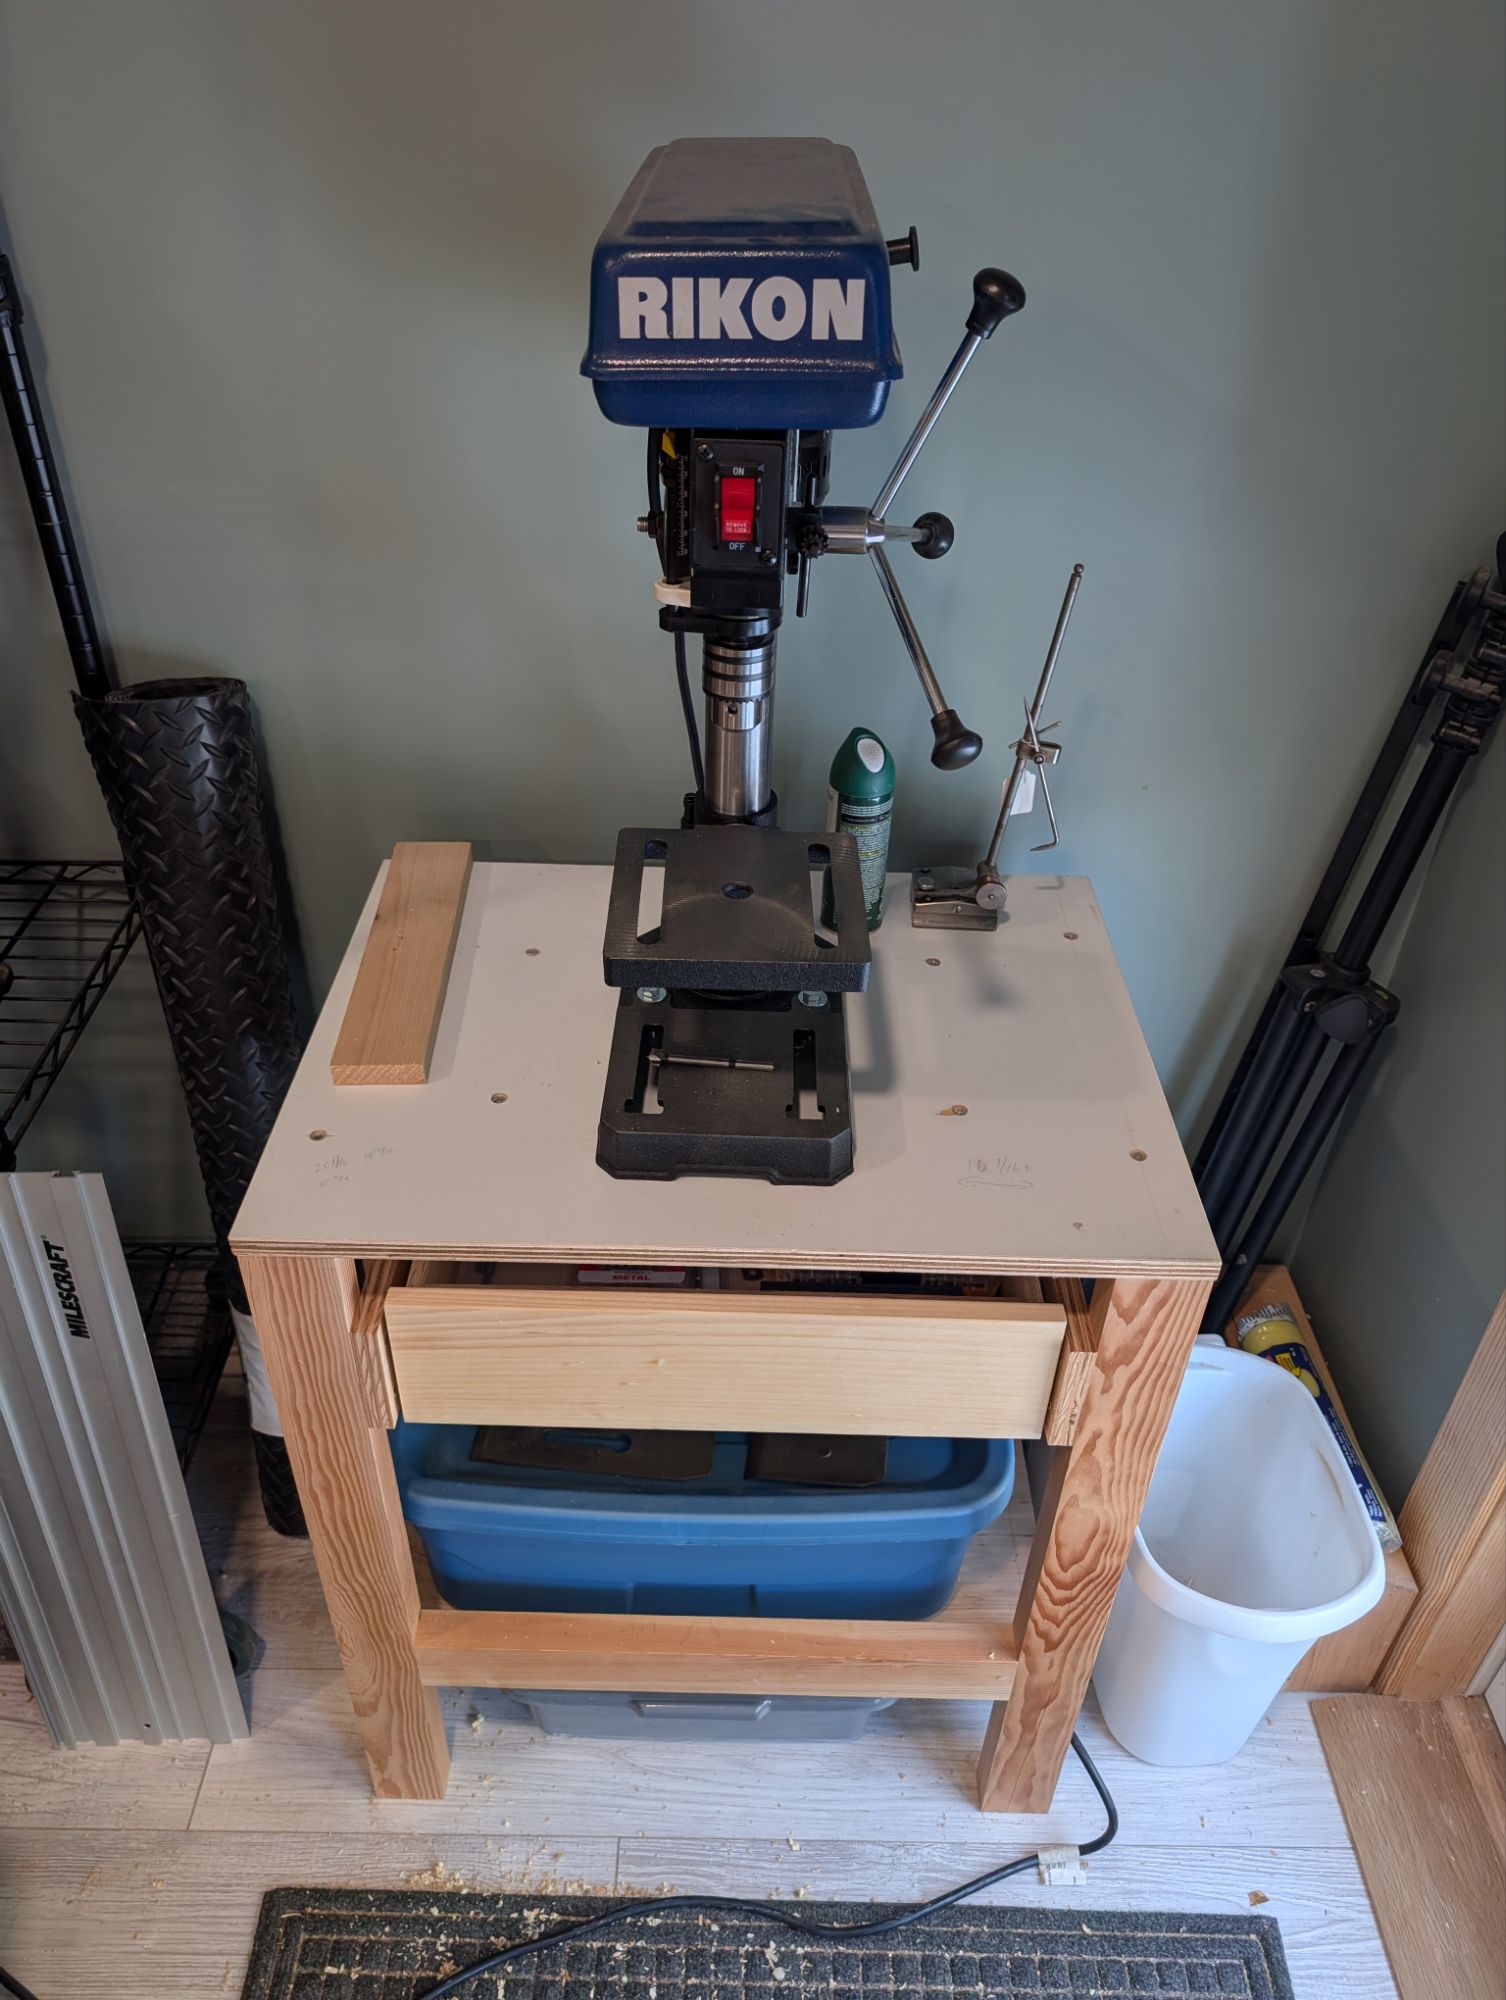
First one up is a drawer for the drill press table. The table frame is Douglas Fir and joined with glue and pocket screws. I’ve come to really appreciate pocket screws for these types of shop furniture. The top is 3/4″ painted plywood reclaimed from some kitchen cabinets. It’s slick but pretty water resistant.
An 8″ drill press is all I ever really need for the hand tool shop.
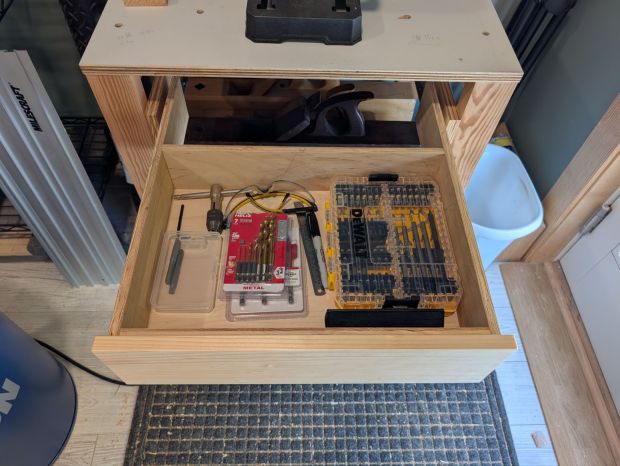
The drawer is made from scrap 1/2″ plywood, also joined with glue and pocket screws. The drawer bottom is 1/4″ plywood glued and nailed on. The drawer front is white pine and there is a 3/4″ lip underneath to use instead of a separate drawer pull. The drawer inside dimension are about 16×12 and 3.5″ or so deep. More than enough for drill bit sets and accessories.
I used some full extension drawer slides from the home center and they work well enough (they are “soft close” according the packaging). I contemplated making oak drawer runners, but laziness won out in the end.
I still need to migrate my Forstner bits from the garage Craftsman chest.
The next fixgasm on my list (for today or tomorrow) is to hang some wall mounted clamp racks and free up floor space. I never really move my mobile clamp cart around the shop, so it’s pretty much just in the way. It’s also way too big and not a super efficient use of space anyway.
I hope you all find some time in the coming weeks to tackle those little but important projects around the shop.
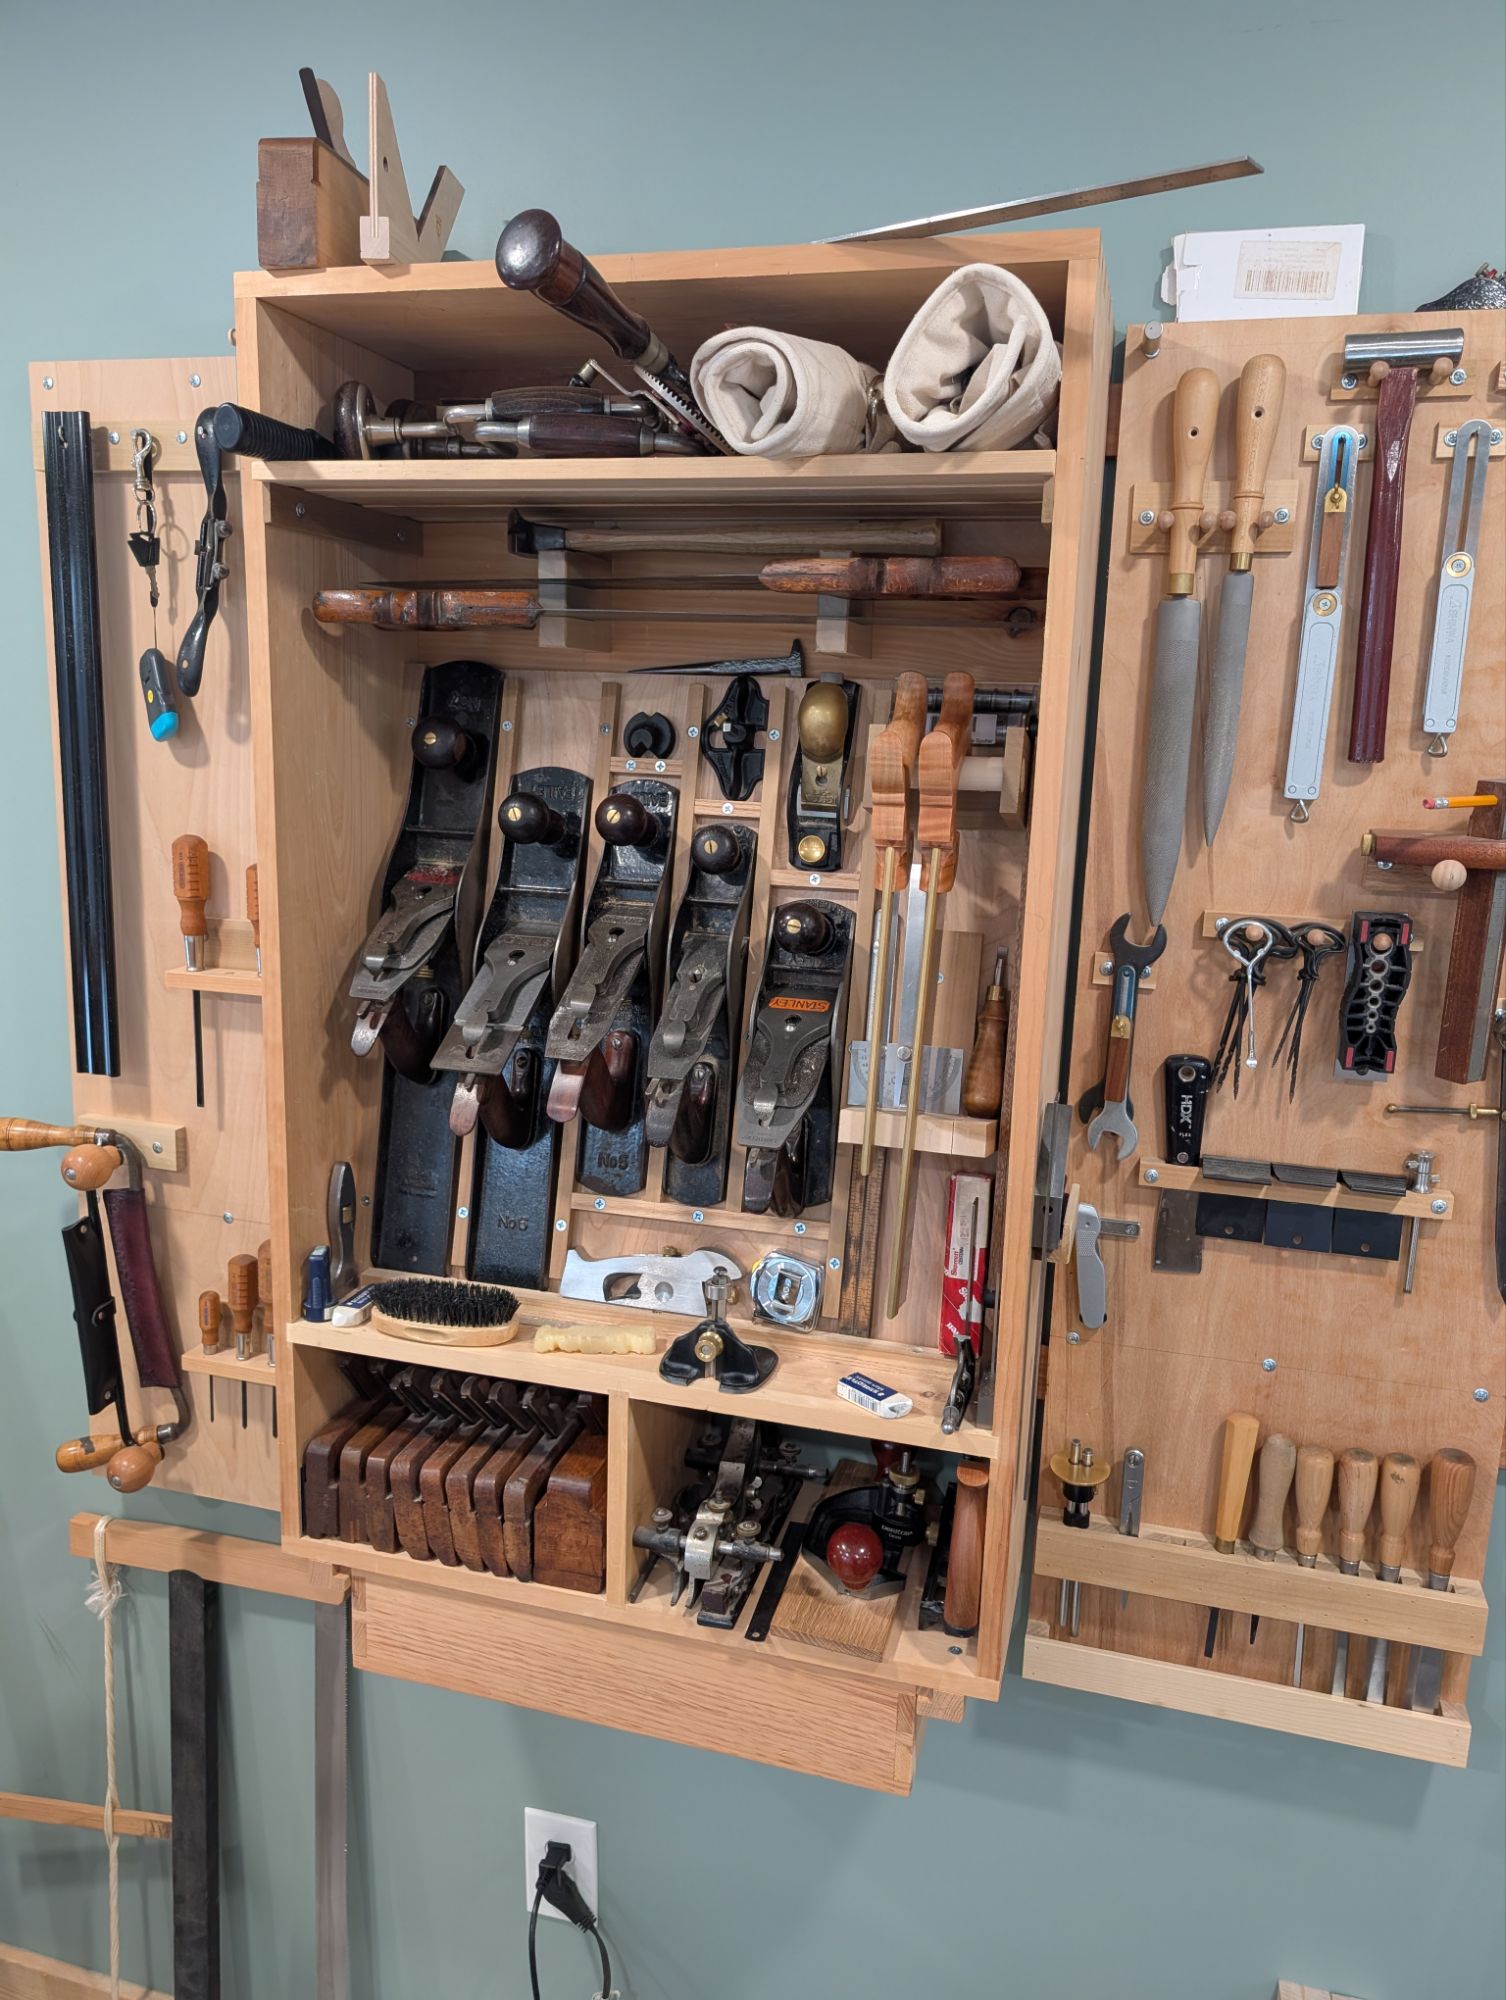
When I first built my wall-hanging tool chest, I had only a handful of moulding planes. Basically a quarter set of hollows and rounds, plus a wooden fillister (rabbeting) plane. So the little cubbies at the bottom were more than sufficient for both those and my couple of joinery planes.
Being a 3/4 metal tongue and groove plane, large router plane, and combination plane.
But since then, I’ve accumulated more worker moulding planes, including a few beading planes, two more tongue and groove double planes (for 9/16 and 7/8), some rabbet/shoulder planes, and so on. So on a snowy weekend in Southern New England, I made a new moulding plane cubby.
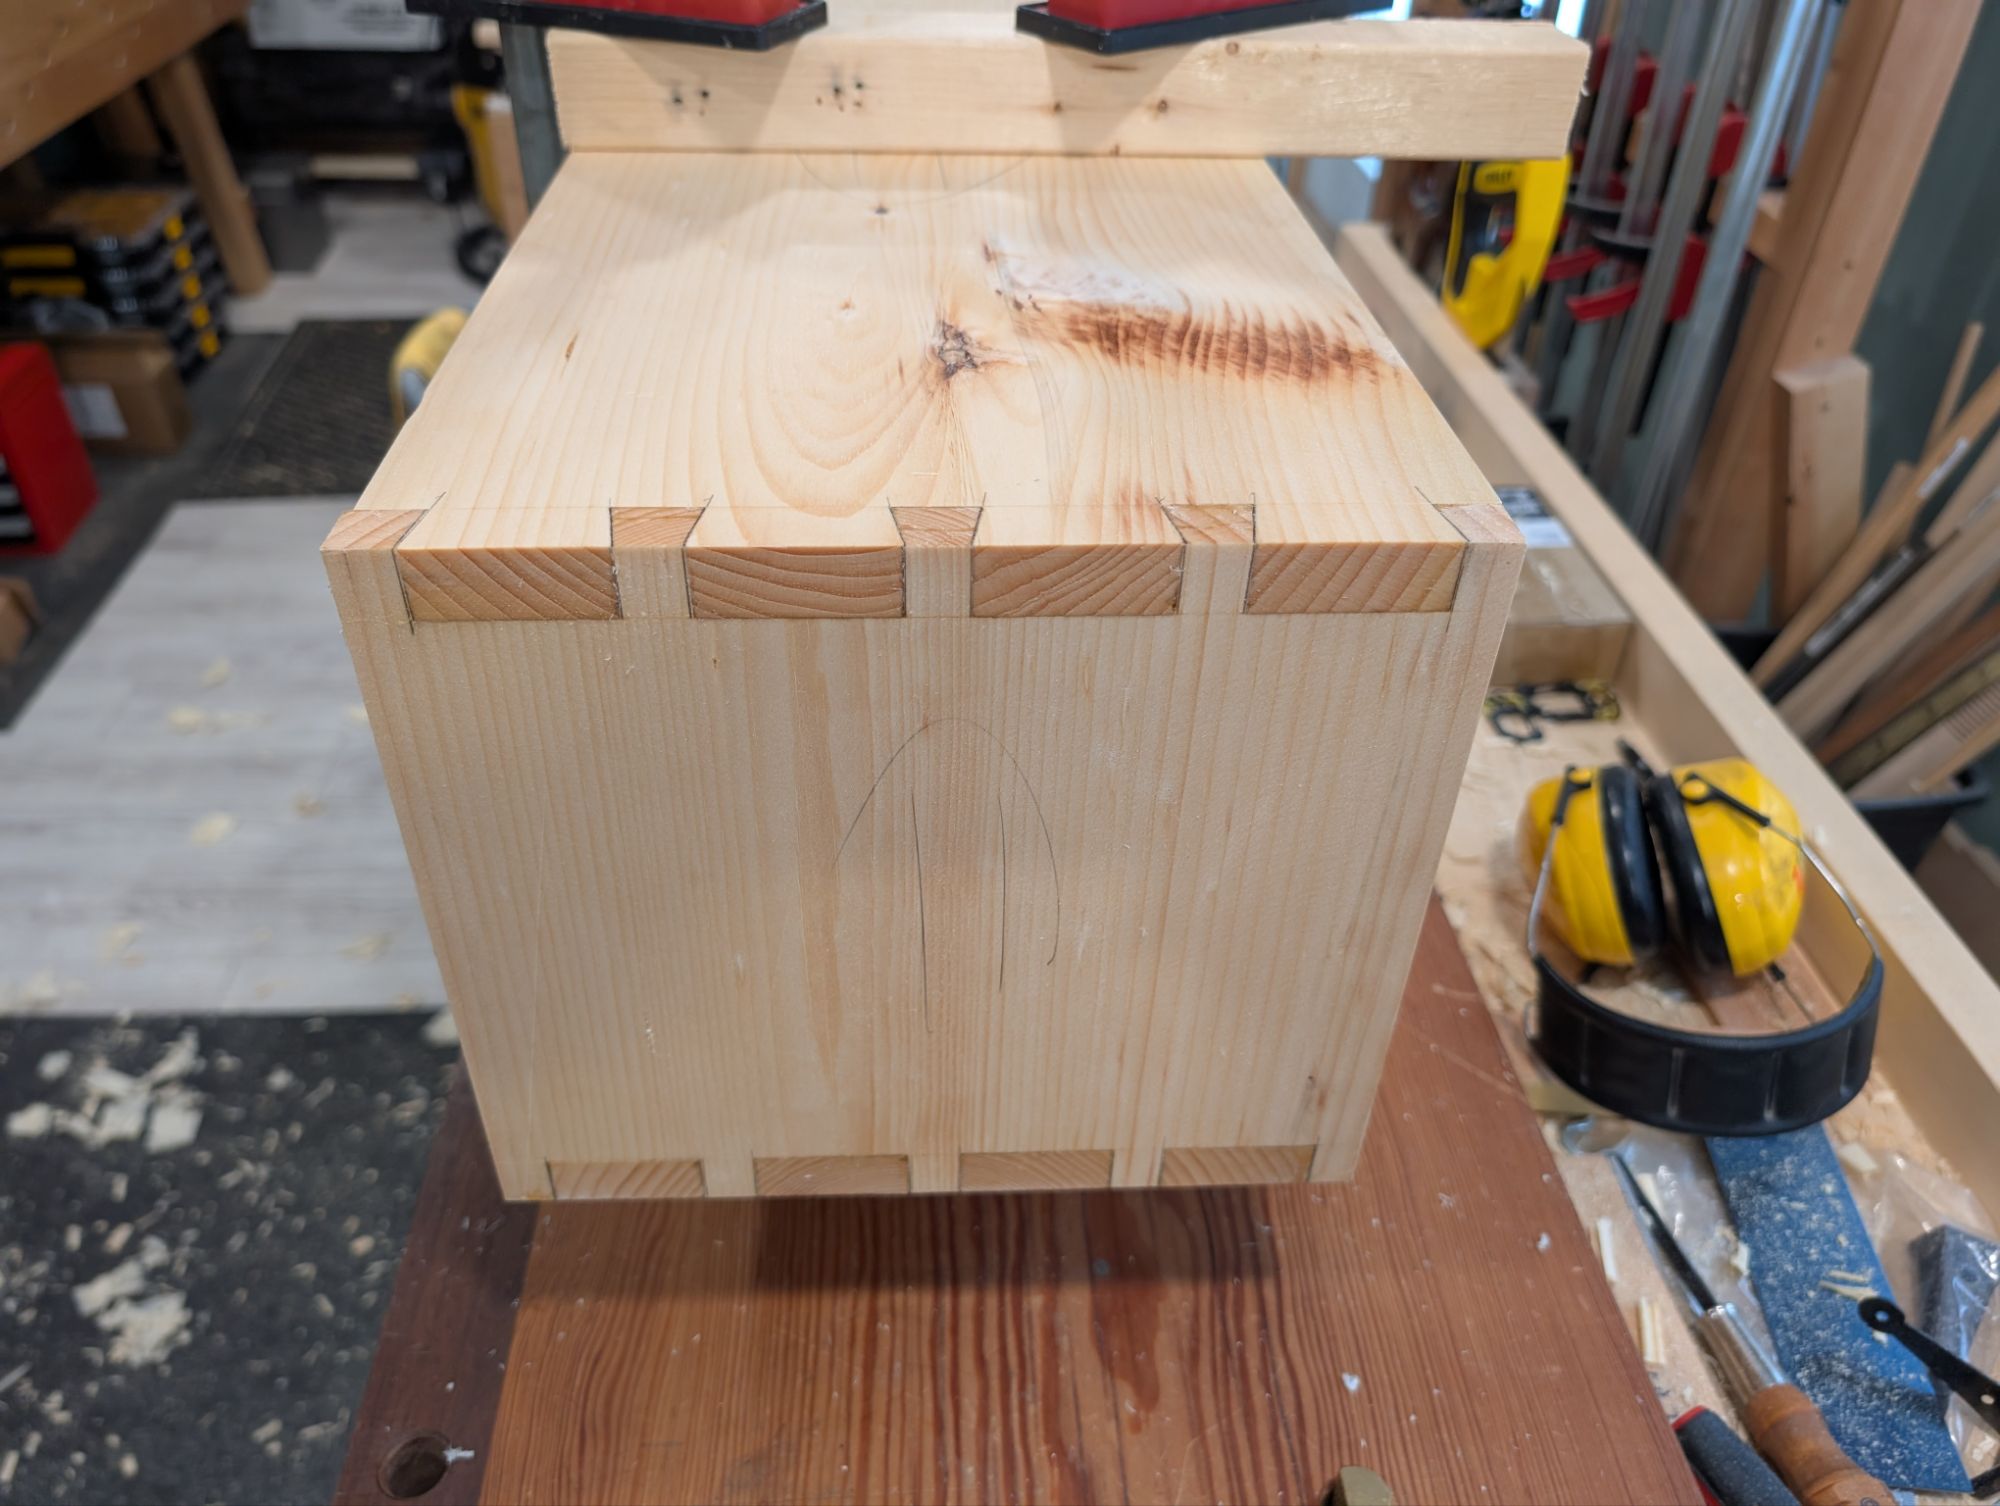
When your dovetails fit nicely, the clamp on the dado is all your need.
The dimensions are exactly the same as the lower cubbies, other than a little extra depth (since I don’t have to account for the French cleats. Once the glue dries, I’ll run a few screws into the dado board (more for peace of mind than actual fastening) and screw this new cubby down to the top of the current wall cabinet. The joinery is very much overkill (pocket screws or even rabbet and nails would have been more than sufficient for this, as it will experience no significant forces). But I needed the dovetail practice for another project.
I prefer larger pins. Larger than English style, anyway. Not quite Central European.
The wood for this little cubby is pretty scruffy. It’s just a home center white pine 1×12, planed flat and thicknessed to about 11/16. Even home center white pine isn’t usually this brittle and stringy, though. It’s basically the definition of “deal”. And deal is useful for many things, including shop projects.
If I ever get around to remaking my wall mounted tool chest in nicer wood (this was, after all, just a prototype), I will probably add this cubby into the main carcass. I have some old genuine mahogany that I’ve been saving for that in particular. But that’s a long way off.
In any event, I hope everyone is staying warm and dry.
Happy [American] Thanksgiving to those who celebrate! It’s November 27, 2025 and things are in a weird place. It’s been a busy year for me, professionally. Workflow is good; the pipeline is strong. And all I want to do is spend some quiet time in the workshop and forget about the chaos out there.
It’s important to take some time for ourselves, if we can. Especially around the holidays.
This morning, I spent a couple hours turning an otherwise useless stick of poplar into a plant stand for a colleague of mine. Something that could certainly be acquired at the home center or a big box store for less than $20. And I have indeed bought my fair share of small wooden items even after I started woodworking, both for myself and as gifts.
But it’s the meditative process of making. The weight of the tools in my hands. The smell of the workshop. The empty space on the rack where the material used to be, in potentia. The smug satisfaction of seeing it get use at the office day to day.
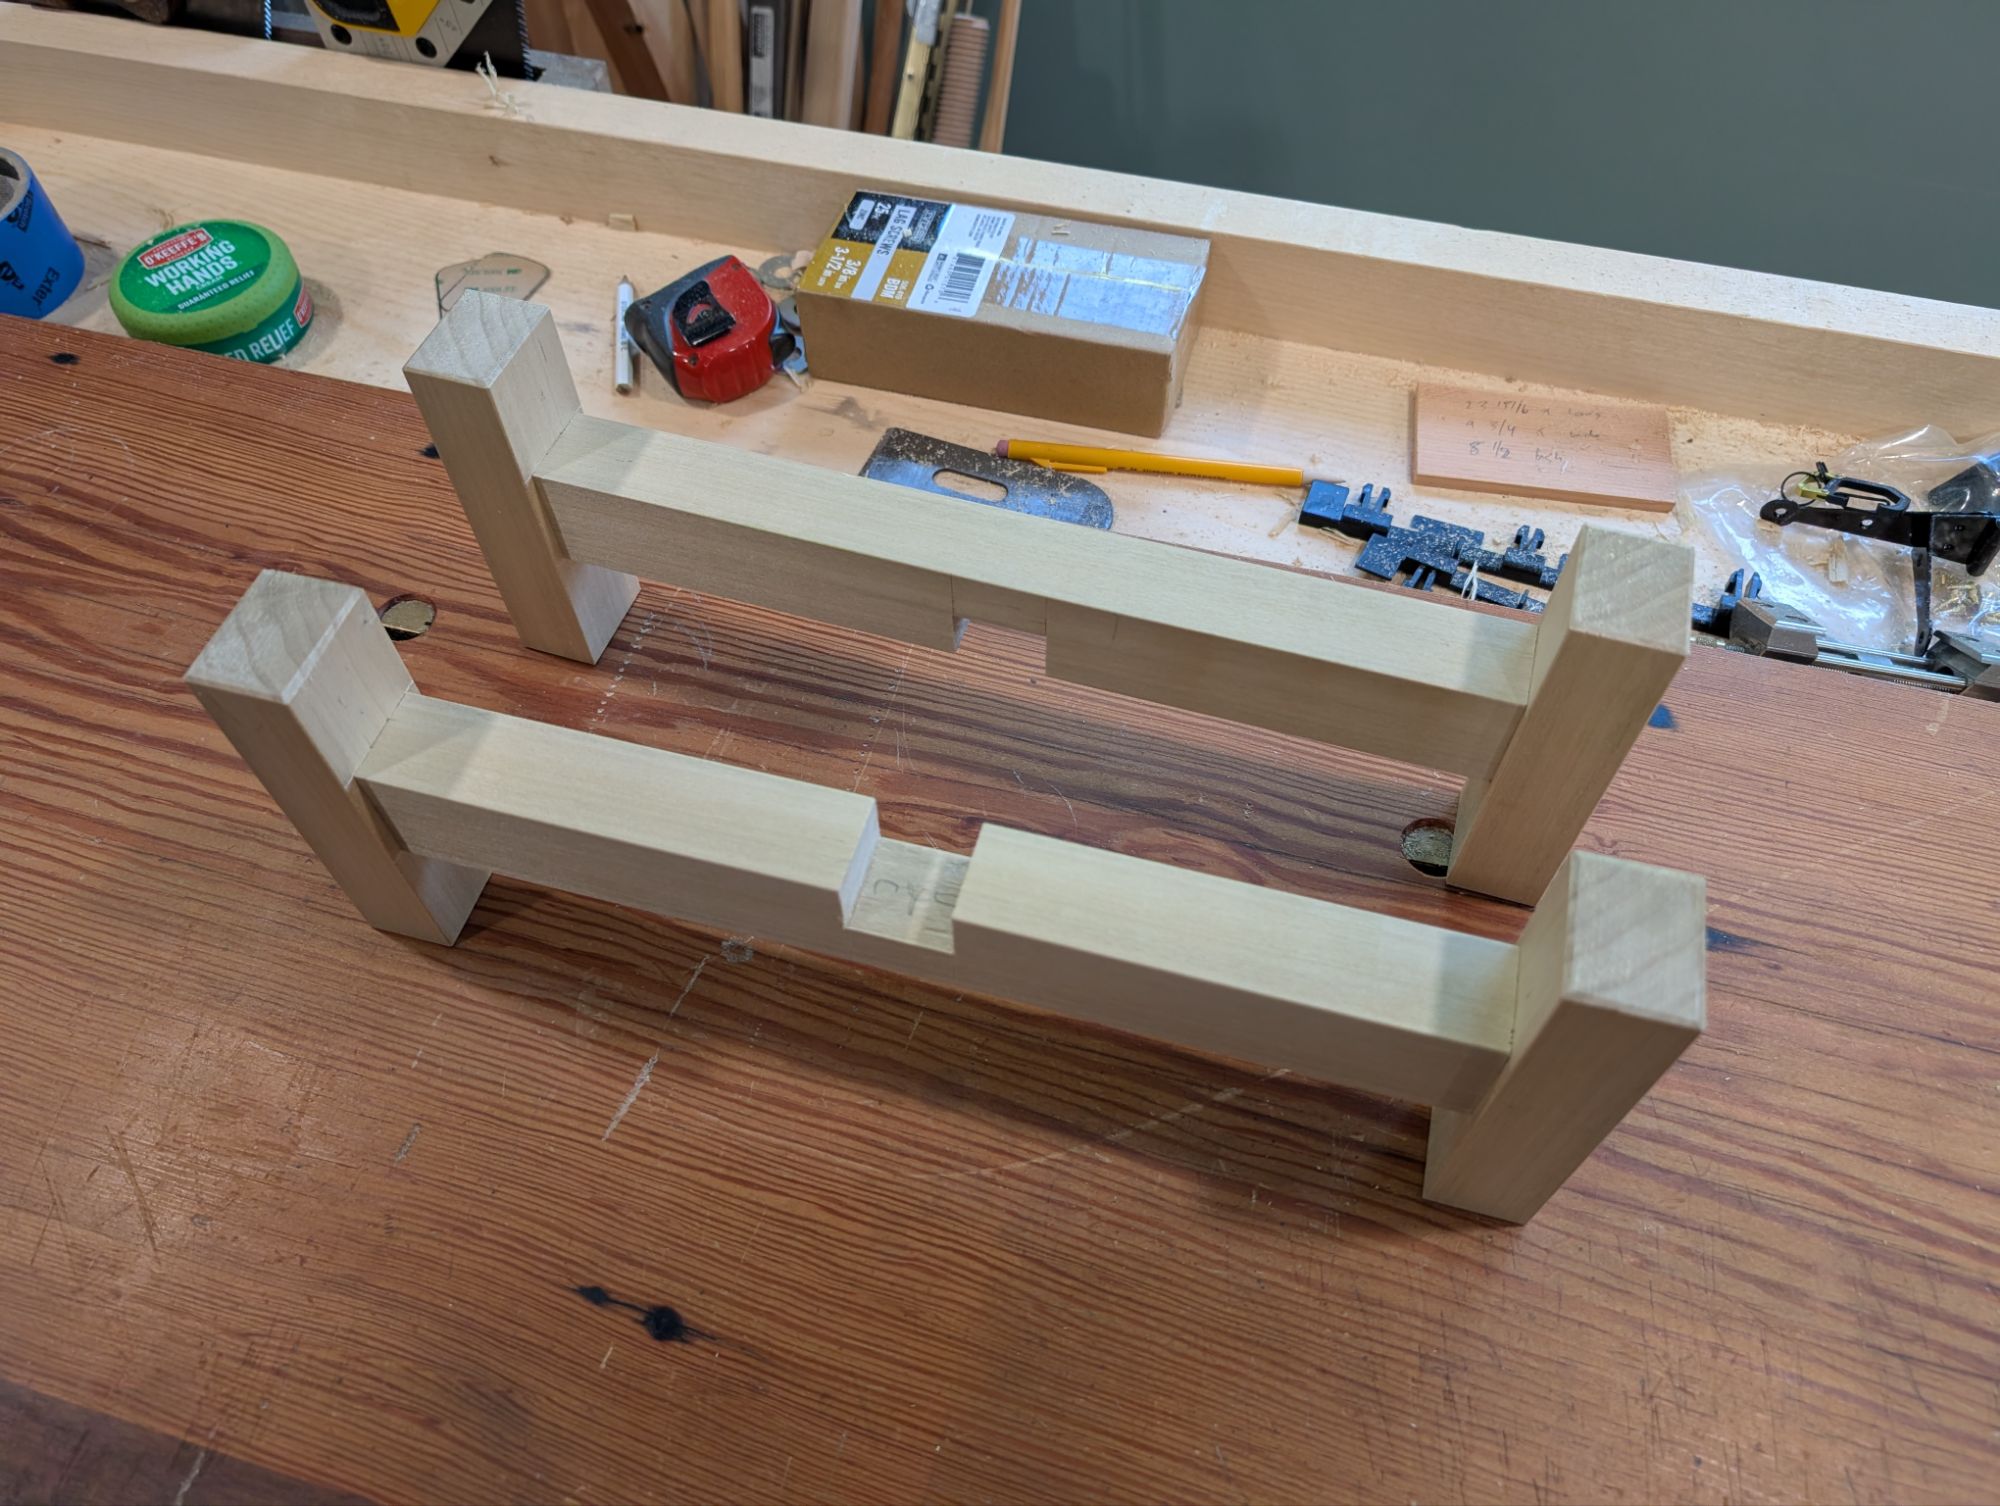
Those protruding tenons will get trimmed when the hide glue dries.
I like these little plant stands because they are an efficient use of materials. Pretty much anything at least 1 inch square will work; I typically use poplar or spruce. And the only critical measurement is the length of the two beams (sized to fit the pot it will support). You can otherwise tailor the height of the legs as needed or desired. And they are collapsible, so they travel well.
Just a simple lap joint in the middle, well fitted but not glued.
You can make them with a basic kit of tools. I use just a No. 6 hand plane, a 1/2 inch chisel, a 1 inch chisel, a crosscut saw, and a router plane, plus a marking knife and a try square. I’ve always meant to do a Basic Projects post on these. Maybe in 2026.
In any event, I hope you and yours have a warm, safe, and happy Thanksgiving.
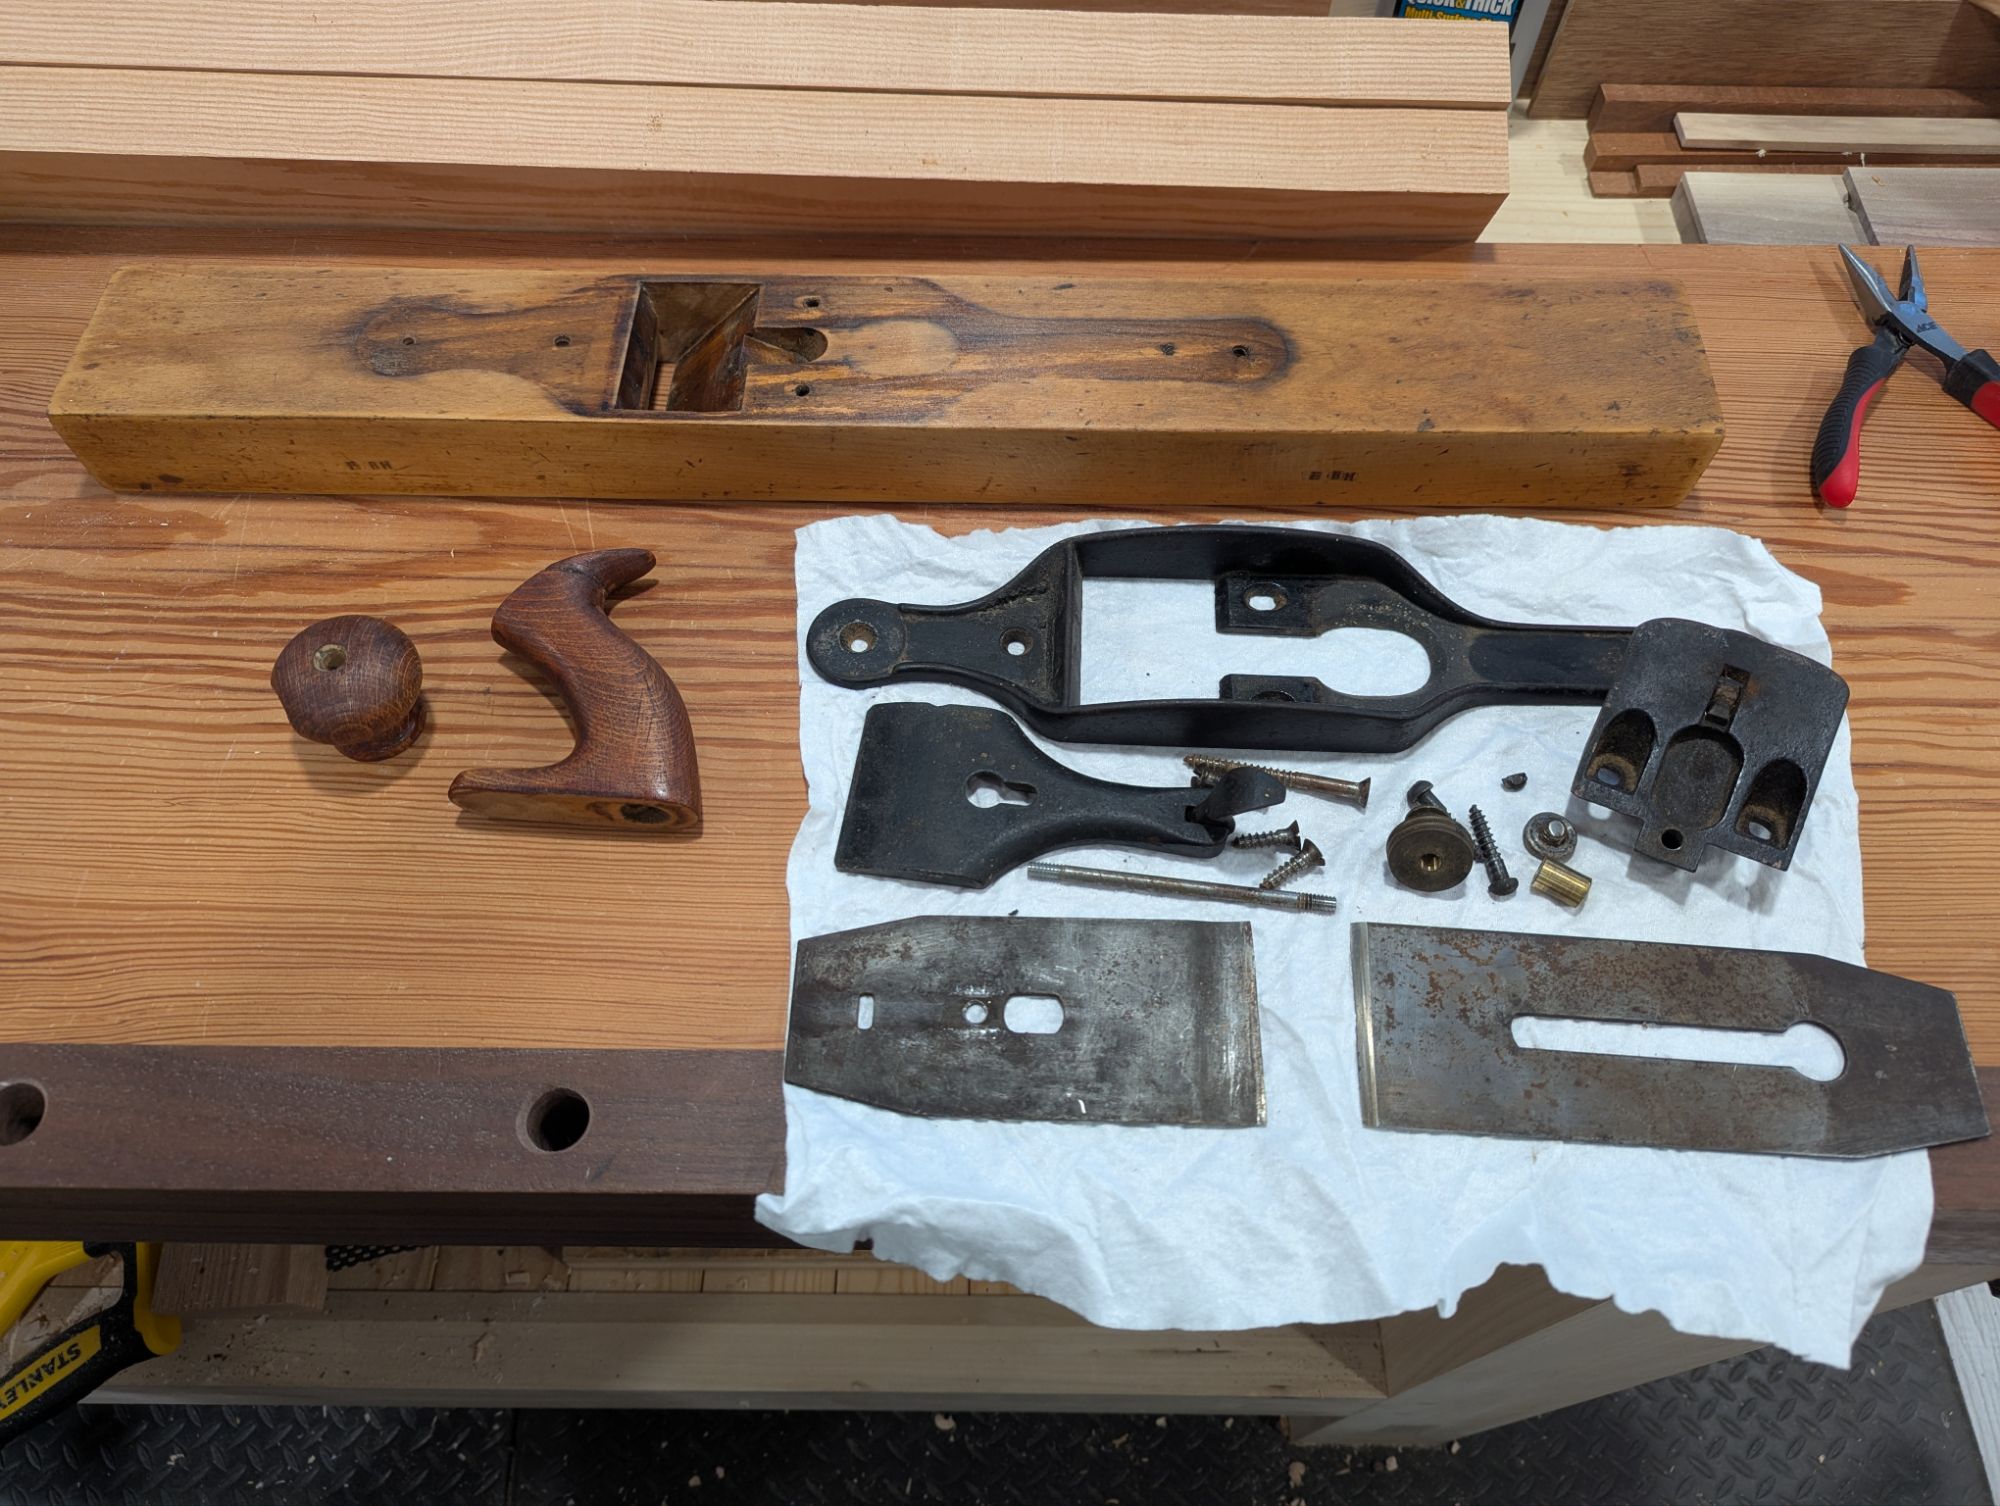
I was up at the Vermont house the other day and made my periodic pilgrimage to The Red Carrot in Rutland. The store is great for things like rustic boxes (more on that some day), but as a woodworker and general DIYer, I prefer the related warehouse down the street. They have most of the interesting tools (at least for me, not needing any more planes or saws). I usually pick up a few odds and ends (like screw taps or T augers). Once in a while, though, the warehouse will hide a real gem.
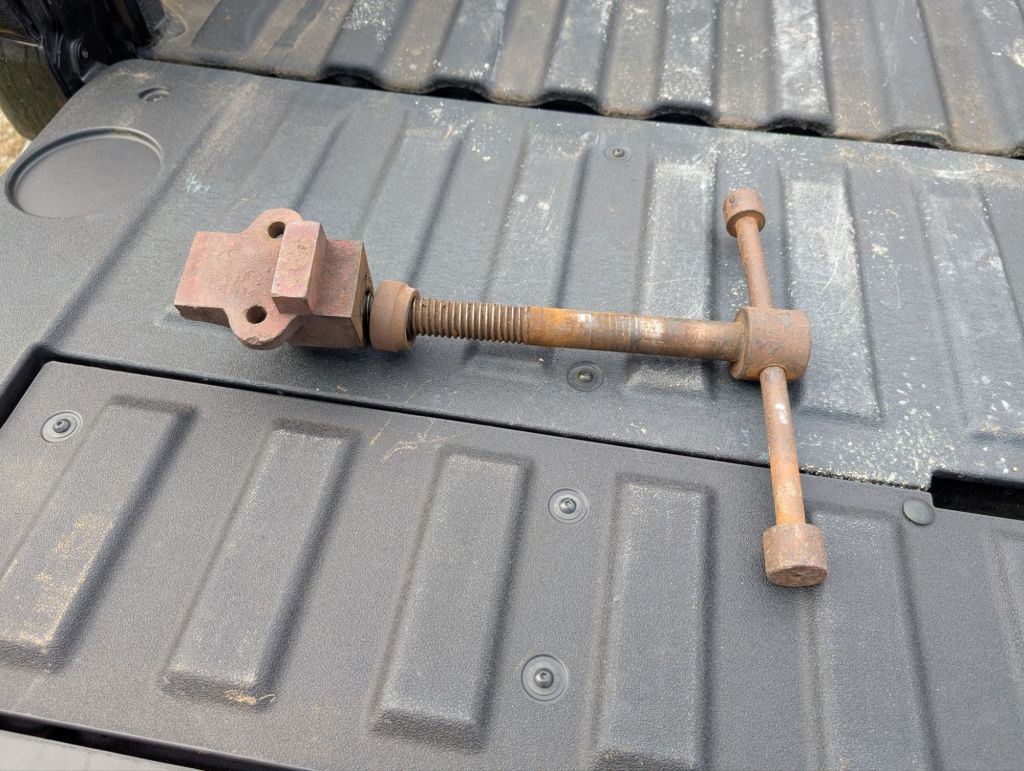
It will clean up nicely.
The metal screw above came from what I think was a portable leg vise. It had two white oak jaws: insect riddled and good for nothing but throwing in the woods to rot. But the screw is in great shape and the nut is rather beefy. It just needs a de-rusting and to straighten the handle.
Unlike typical woodworking leg vise screws, which mount horizontally (in line with the screw itself), the nut had vertical mounting holes and a flange. This means it’s screwed into the underside of the work surface (like a modern bench vise). It could also be for blacksmithing too.
I don’t have a place for this right now. But for $20, how can you go wrong?
I have an office job (M&A attorney) and my principal place of employment is in town. I like being at the office; I go 4-5 times a week. But I do work from home from time to time (especially evenings and on weekends), so it’s important that my home office is both functional and cozy. My home office also doubles as my gaming room (what cretins would call a “man cave”). It’s a 12×13 ground floor bedroom.
Oh, and it was my hand tool woodworking shop for almost a decade.
When I had a workbench in here, I was always frustrated that it wasn’t level front to back. Depending on where which bench, the front was anywhere between 1/8″ and 1/4″ lower than the back. Meaning tools would always roll forward and off the bench (terrifying if it was an awl or chisel and I was barefoot, which I tend to be in my shop). Convinced I was a bad craftsman, I banished the thought from my mind (putting aside that when I moved the same workbench into the new workshop, it was basically level).
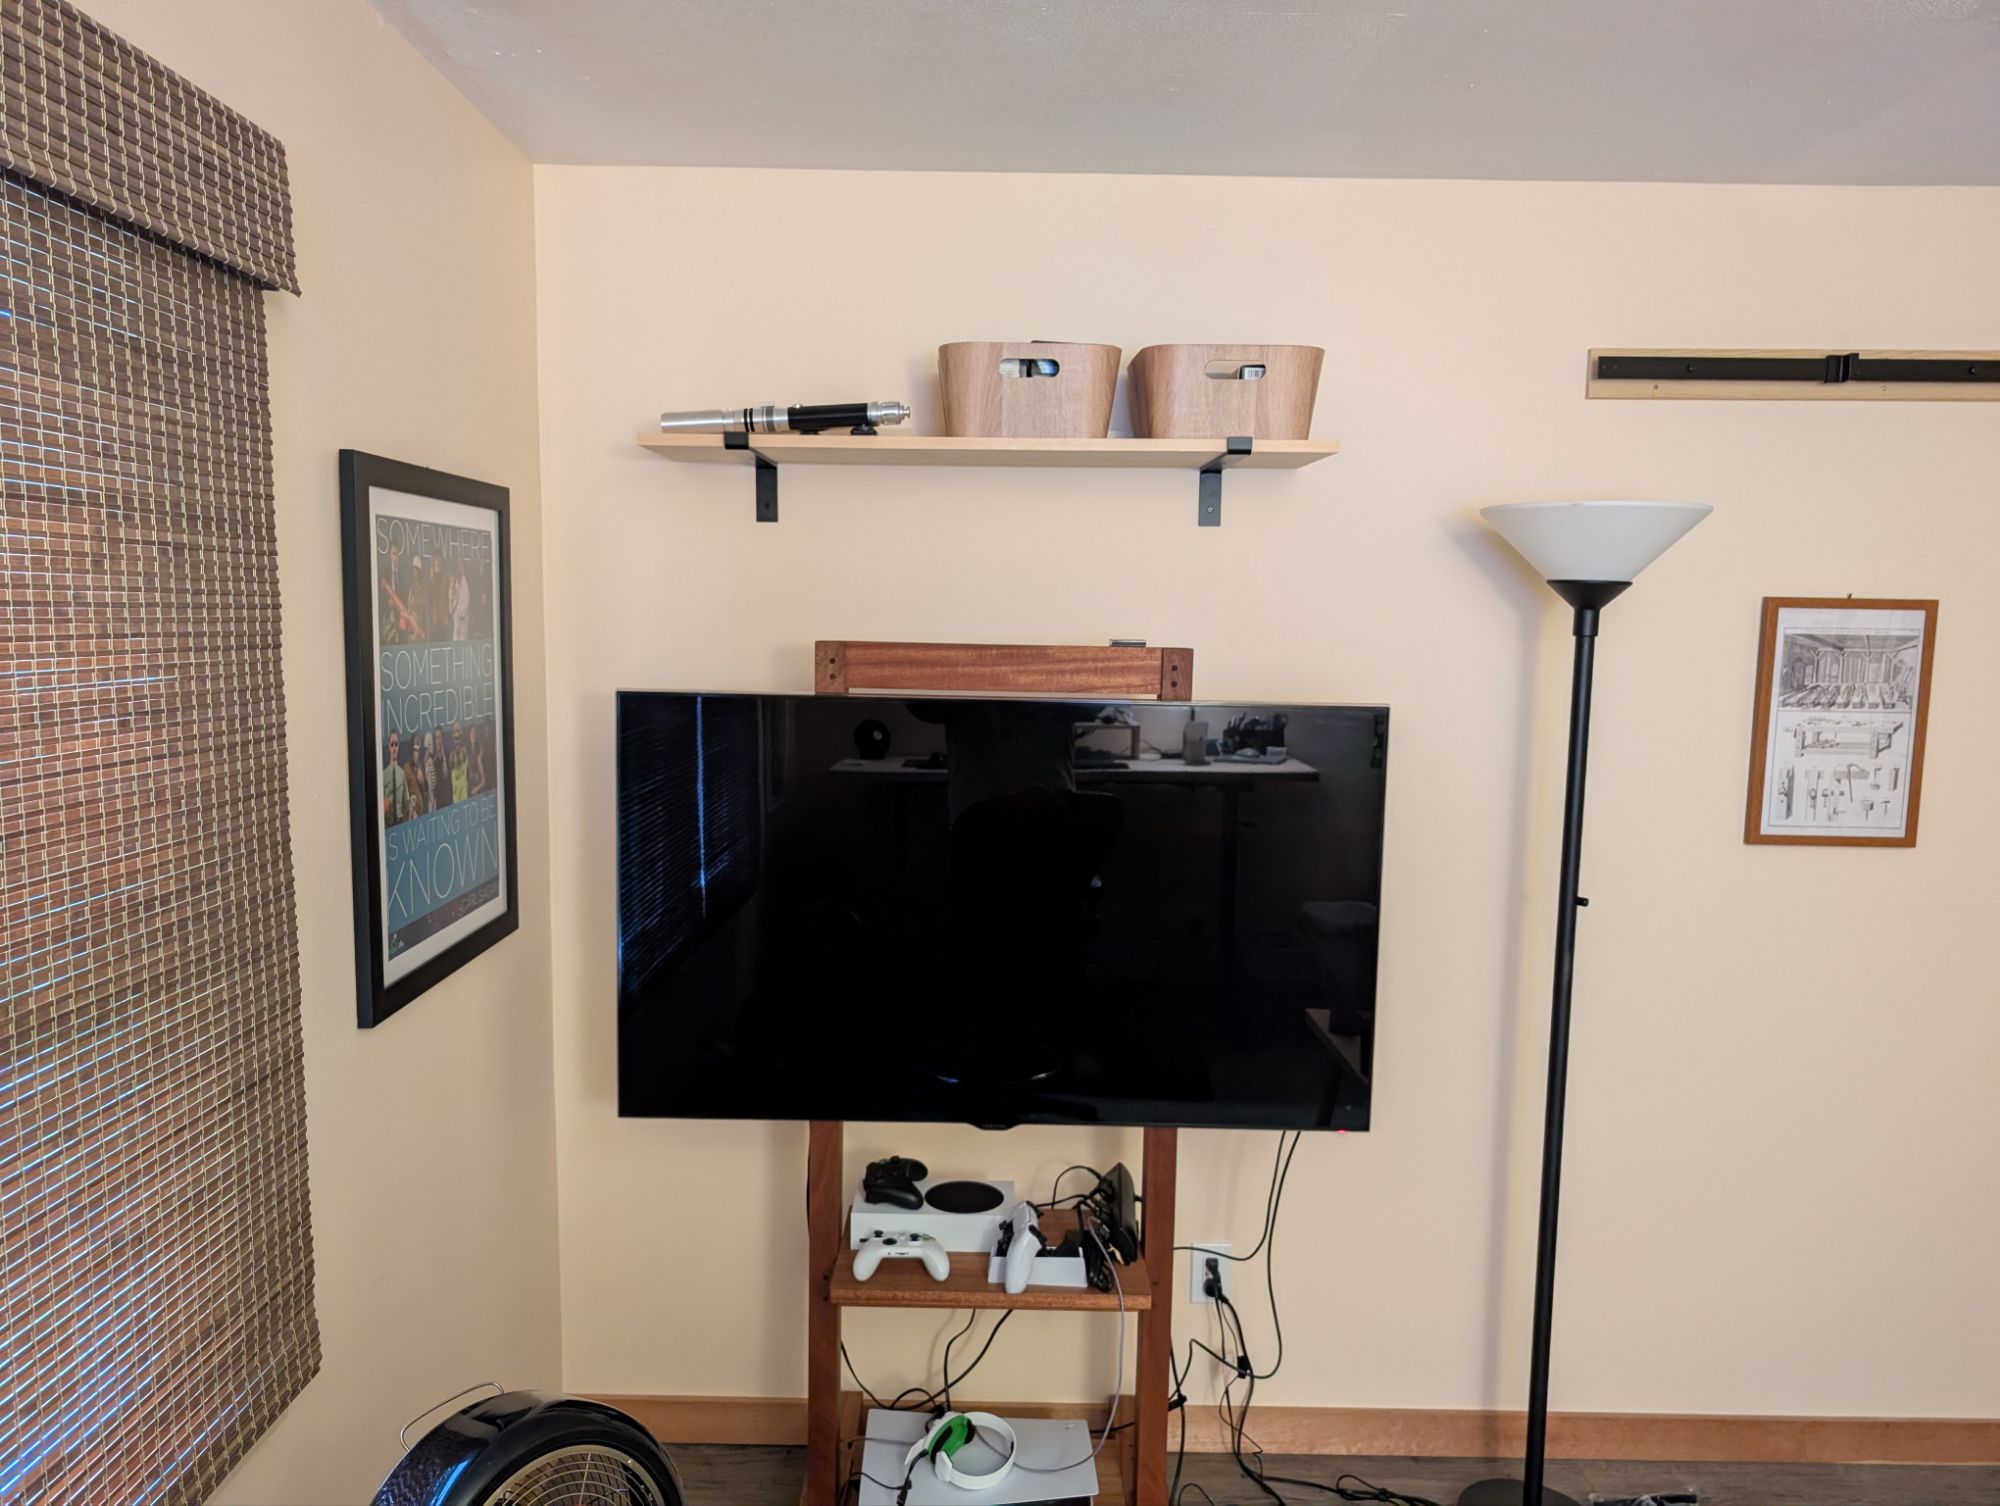
But then, the other day, I decided to hang a wall shelf and what do I notice? There is actually a 1/4″ downward slope in the floor across just 24 inches. I know for a fact the TV easel is square to the base; I built it myself. But you can clearly see the TV leans to the right compared to the wall hung shelf. Just look at it, face on. And the right side of the easel is exactly where the front of my workbench was when this was my shop.
That’s Benjamin Moore: Winter Melon for all paint.
So all this time, I thought maybe I over-flattened the front edge of the benchtop. Or perhaps I just measured the shoulder on the back legs badly when cutting the joinery. But, in fact, it was some mason in the 70’s fault. Not mine.
For those who know me personally (or who have followed me for long enough), you’re aware that I am atheist. I grew up very Catholic. And like all good Catholic boys, the only vestige of my Catholicism now is periodically invoking the name of the Father, the Son, the Blessed Mother, or whatever Saint fits the bill in the most violently profane torrent needed at the time. Never the Holy Spirit, though. Fuck that guy.
And as a vehement atheist, I have come to appreciate actual biblical scholarship. I feel like I know the Bible way better now than I did earlier (even as one of the few people who have actually read the motherfucker all the way through). For the record, “Then came Shamgar, son of Anath, who killed 600 Philistines with an oxgoad. He too saved Israel.” Shamgar: absolute fucking legend.
So as I was listening to the Data Over Dogma podcast the other day, Dan McClellan (a scholar of the Bible and Religion) said something that surprised me. He said that how he writes and how he speaks are very different. To the point where narrating an audiobook of his own work was a chore.
This is very strange to me. Except for drafting actual legal documents (I am an M&A attorney, after all), I write and speak in exactly the same way. Work emails, personal emails, this blog. National CLE’s where I teach the economics of Mergers and Acquisitions transactions. It’s all the same voice.
Perhaps it’s a luxury of being the kind of lawyer who never has to go to court, know any actual laws, or be particularly formal. Perhaps it’s just taking intellectual honesty to its logical conclusion.
But when you read these words, know that you’re getting the unvarnished and truthful James. That is my promise to you.
Editor’s Note: Buckle up. This will be a long one and will at times feel like James is just ranting. In an effort to pander to his international audience, James is also adding metric parentheticals. Even if using anything other than Freedom Units is anathema to him.
I’ve a number of small trips on my calendar for Fiscal Year 2025. Between concerts throughout the Northeast of the United States, a beach vacation in the Cape of Cod, and, of course, my spring pilgrimage to the house in Central Vermont, I will be away from my home shop quite a bit over the next 6 months. And I’d like to be able to do some vacation woodworking.
Vermont is not an issue. I have, over time, migrated a full size workbench and entire complement of essential woodworking handtools up to permanently live in the utility shed on the property. As a result, though, I don’t really have a travel tool kit anymore. I’ve never been much of a tool hoarder and I foolishly gave away my travel tool box once it did its job and moved everything up to the aforementioned utility shed.
So I’ve been forced to start at essentially square one in putting a new travel tool kit together.
Over the years of making many, many, many travel tool chests, and in refining my thinking on what specific tools one actually needs for casual, on-site, vacation woodworking, I’ve learned a couple lessons. Many the hard way.
First and foremost, vacation woodworking (for me) is not fine furnituremaking. I know of very talented folks who vacation carve beautiful and intricate panels. And I envy them. But that’s just not me. If I’m making furniture outside the home shop, it’s utilitarian: an extra table or a bench or stool. Or if you can’t sit on it, it’s probably a shelf or a rack or a quick shadow box to display some quirky knick-knack picked up at a local antique shop.
That is the long way of saying that my vacation tool kit can an should be small. And I mean small. One saw that crosscuts well and can rip decently (if not efficiently). One bench plane. Two chisels and a mallet. A knife, a square, a bevel gauge, an awl, and a way to bore small holes. Something to keep all of the above sharp. A small hammer and nail set, some pliers, and a measuring tape (although everyone should have one of these in their car anyway). That’s about it. And I’ll probably be tossing in a bag of nails, a bottle of glue, and other miscellany as well (because I just can’t help myself).
All told, that’s 30 lbs. or so of tools (or 14 kg for you metric cretins), before you add the container to store it all in. About that…
I grew up (and still live) by the coast in Southern New England. Between sailing and swimming and other salt-water related activities, canvas tote bags are second nature to me. I have many, and I love them for a broad range of holding and storage tasks. But you cannot just throw a bench plane into a canvas bag, even in a plane sock. No matter how careful, you’ll eventually break the tote or ding another tool. I have in the past made a plane box to keep the bench plane safe, but even that’s not ideal since it still rattles around and can crash into other tools.
And what about your hand saw? Even if you sheath it in a proper carpenter’s saw bag, you could still bend the plate if it bangs around too much in the bag (for instance, against the heavy bench plane). Folding saws are great, but they tend to cut on the pull stroke and I work in the English style (being a steadfast disciple of Paul Sellers).
You can spend money on a nice tool bag with storage pockets to segregate the edge tools and other small tools into pockets. I especially like CLC bags, and any of the Husky bags from the purse aisle at the Homeless Despot will work. But the big stuff is still rattling around inside, if they will even fit. And don’t get me started on metal toolboxes, which can hold a small arsenal in perfect organization but will undoubtedly snag and tear the upholstery in your back seat if you’re not careful.
So where does this leave you? Well, we are woodworkers after all. So I would suggest making a pine box that you can french fit to keep your tools safe.
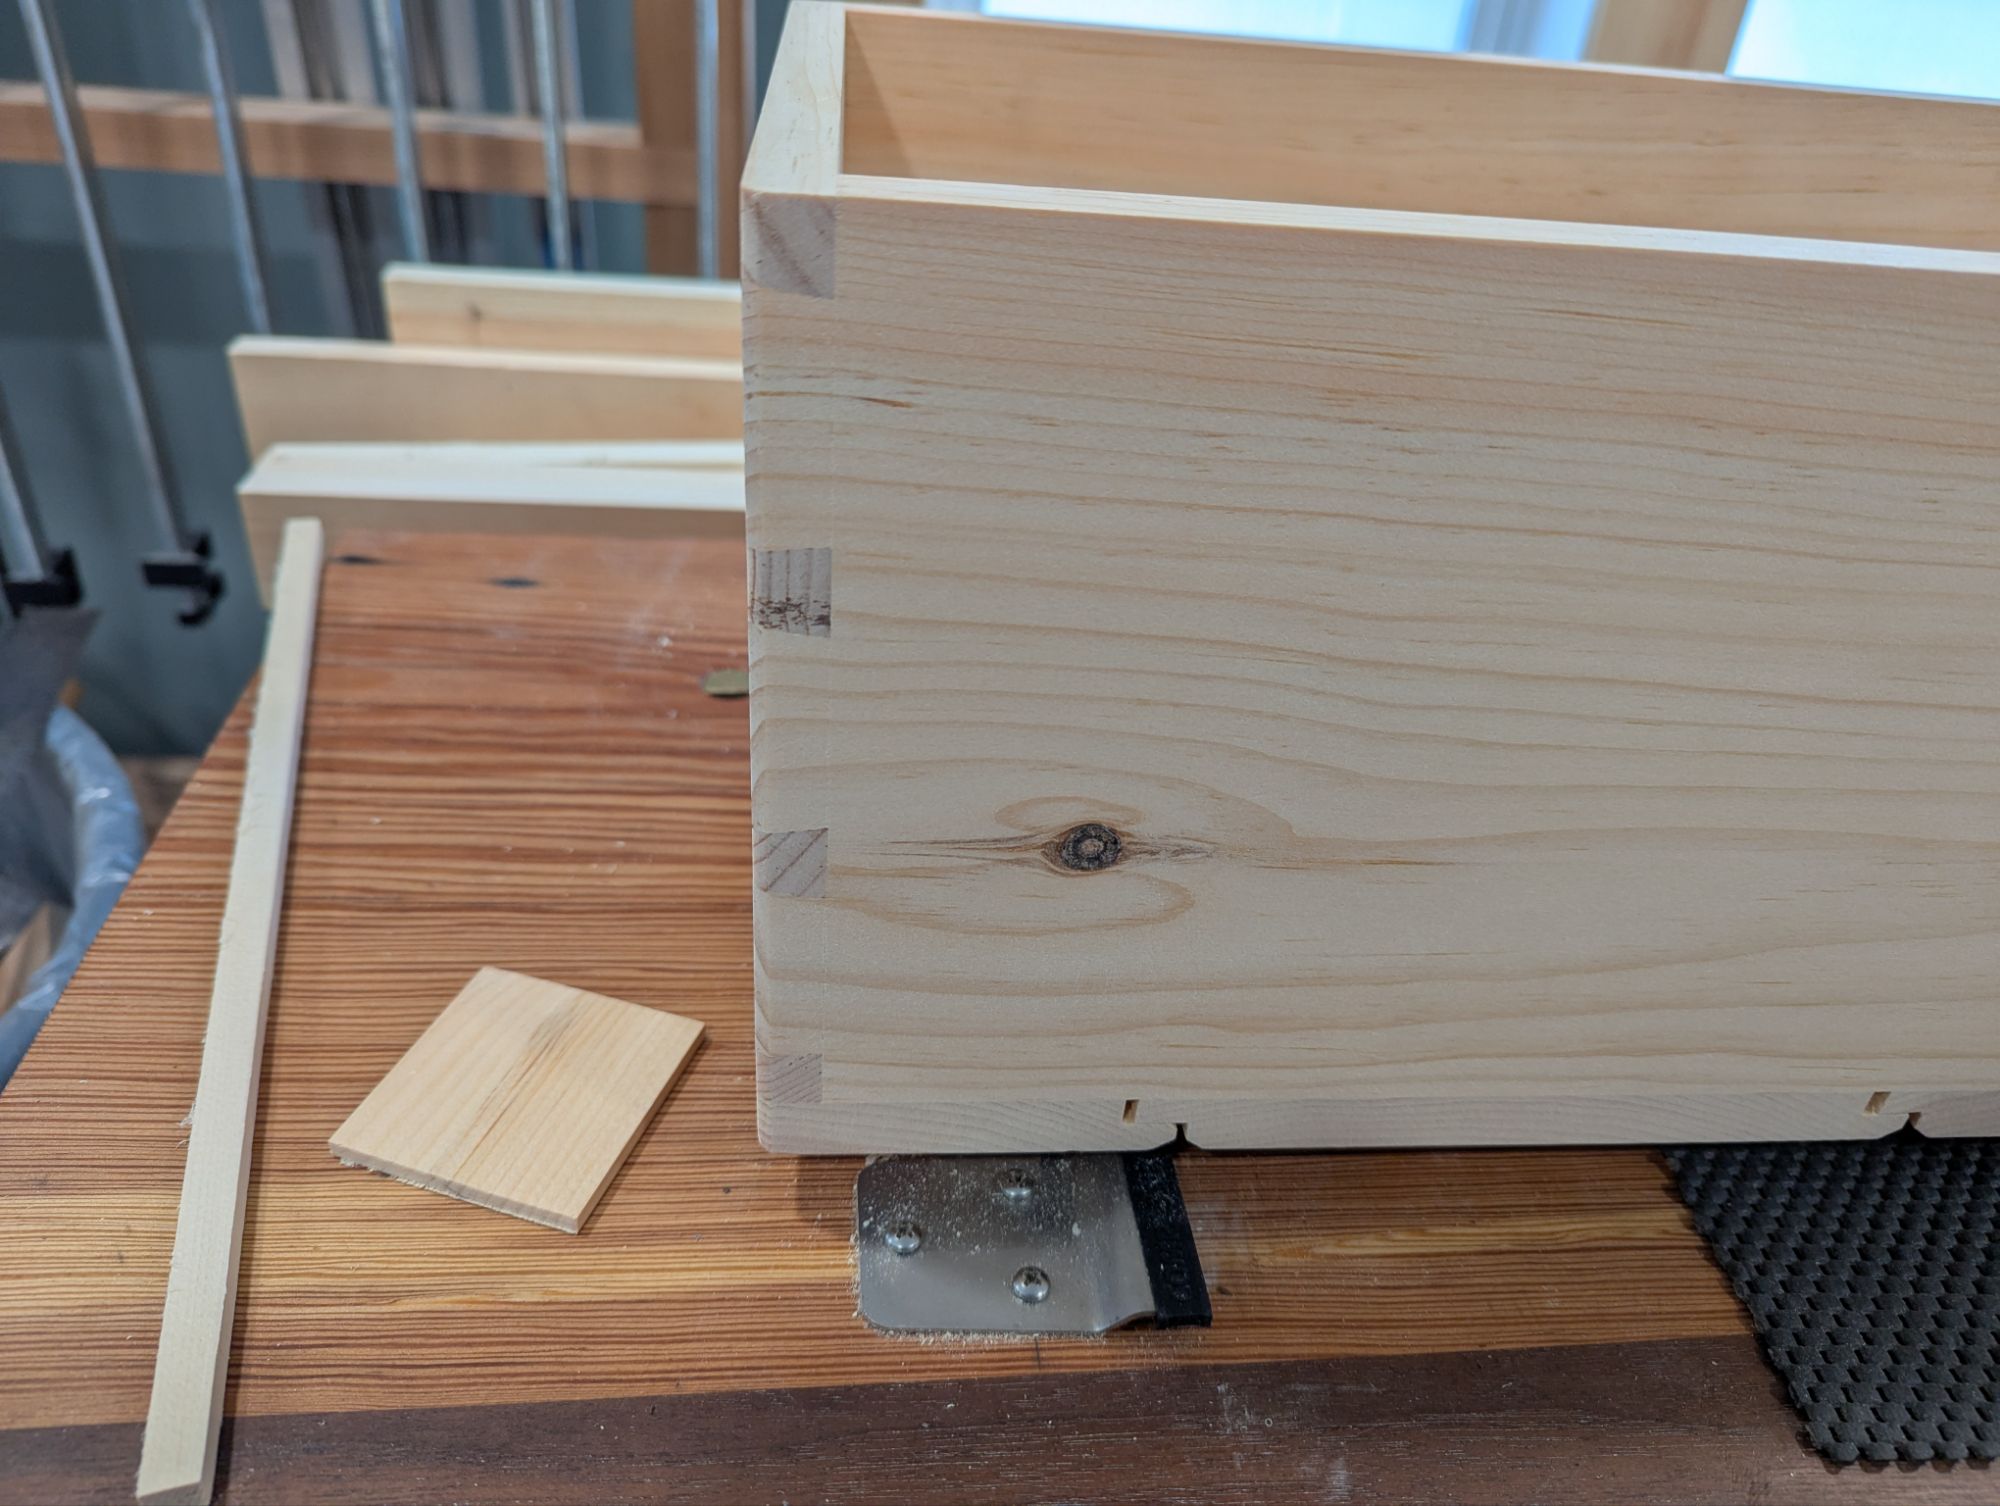
It’s a travel tool chest, though, and will need to haul at most 50 lbs. (again, 23 kg for you metric types), inclusive of the box itself. The 3/4″ or even 7/8″ stock you might see in a proper English floor chest is way overkill here. For a travel tool chest, I typically take the thickness down to 9/16″ or even 1/2″ (13mm or so), with the actual thickness depending on wherever ends up actually flat across the width.
Funny thing is: when working in stock of that thickness and this application (where strength really matters), you really can’t do posh Western European dovetail patterns with super narrow pins. I like wider pins anyway and these travel tool chests are a good excuse to make the pins noticeably beefier. Like so:
Those heavy chamfers on the corners are prep for the iron angle reinforcement.
So how big should a travel tool chest be for the type of rustic vacation woodworking I tend to do? Well, your saw is always going to be your longest tool in the kit. Frankly, if you’re intent on hauling around one or more 20″ panel saws, you might as well just make a full size Dutch Tool Chest and bring an entire workshop with you. But I have found you only really need about 15 inches (380mm or so) of tooth line for most woodworking sawing tasks. It’s less efficient than a longer saw because of the shorter stroke, sure. But it still works fine.
A saw like that will fit into a tool box that’s got 19-20 inches (480-510mm) of internal length. You could buy a small home center hard point saw, and they work well. But they sure don’t look very nice and aren’t terribly comfortable to use for long periods, especially when ripping. So what are the other options?
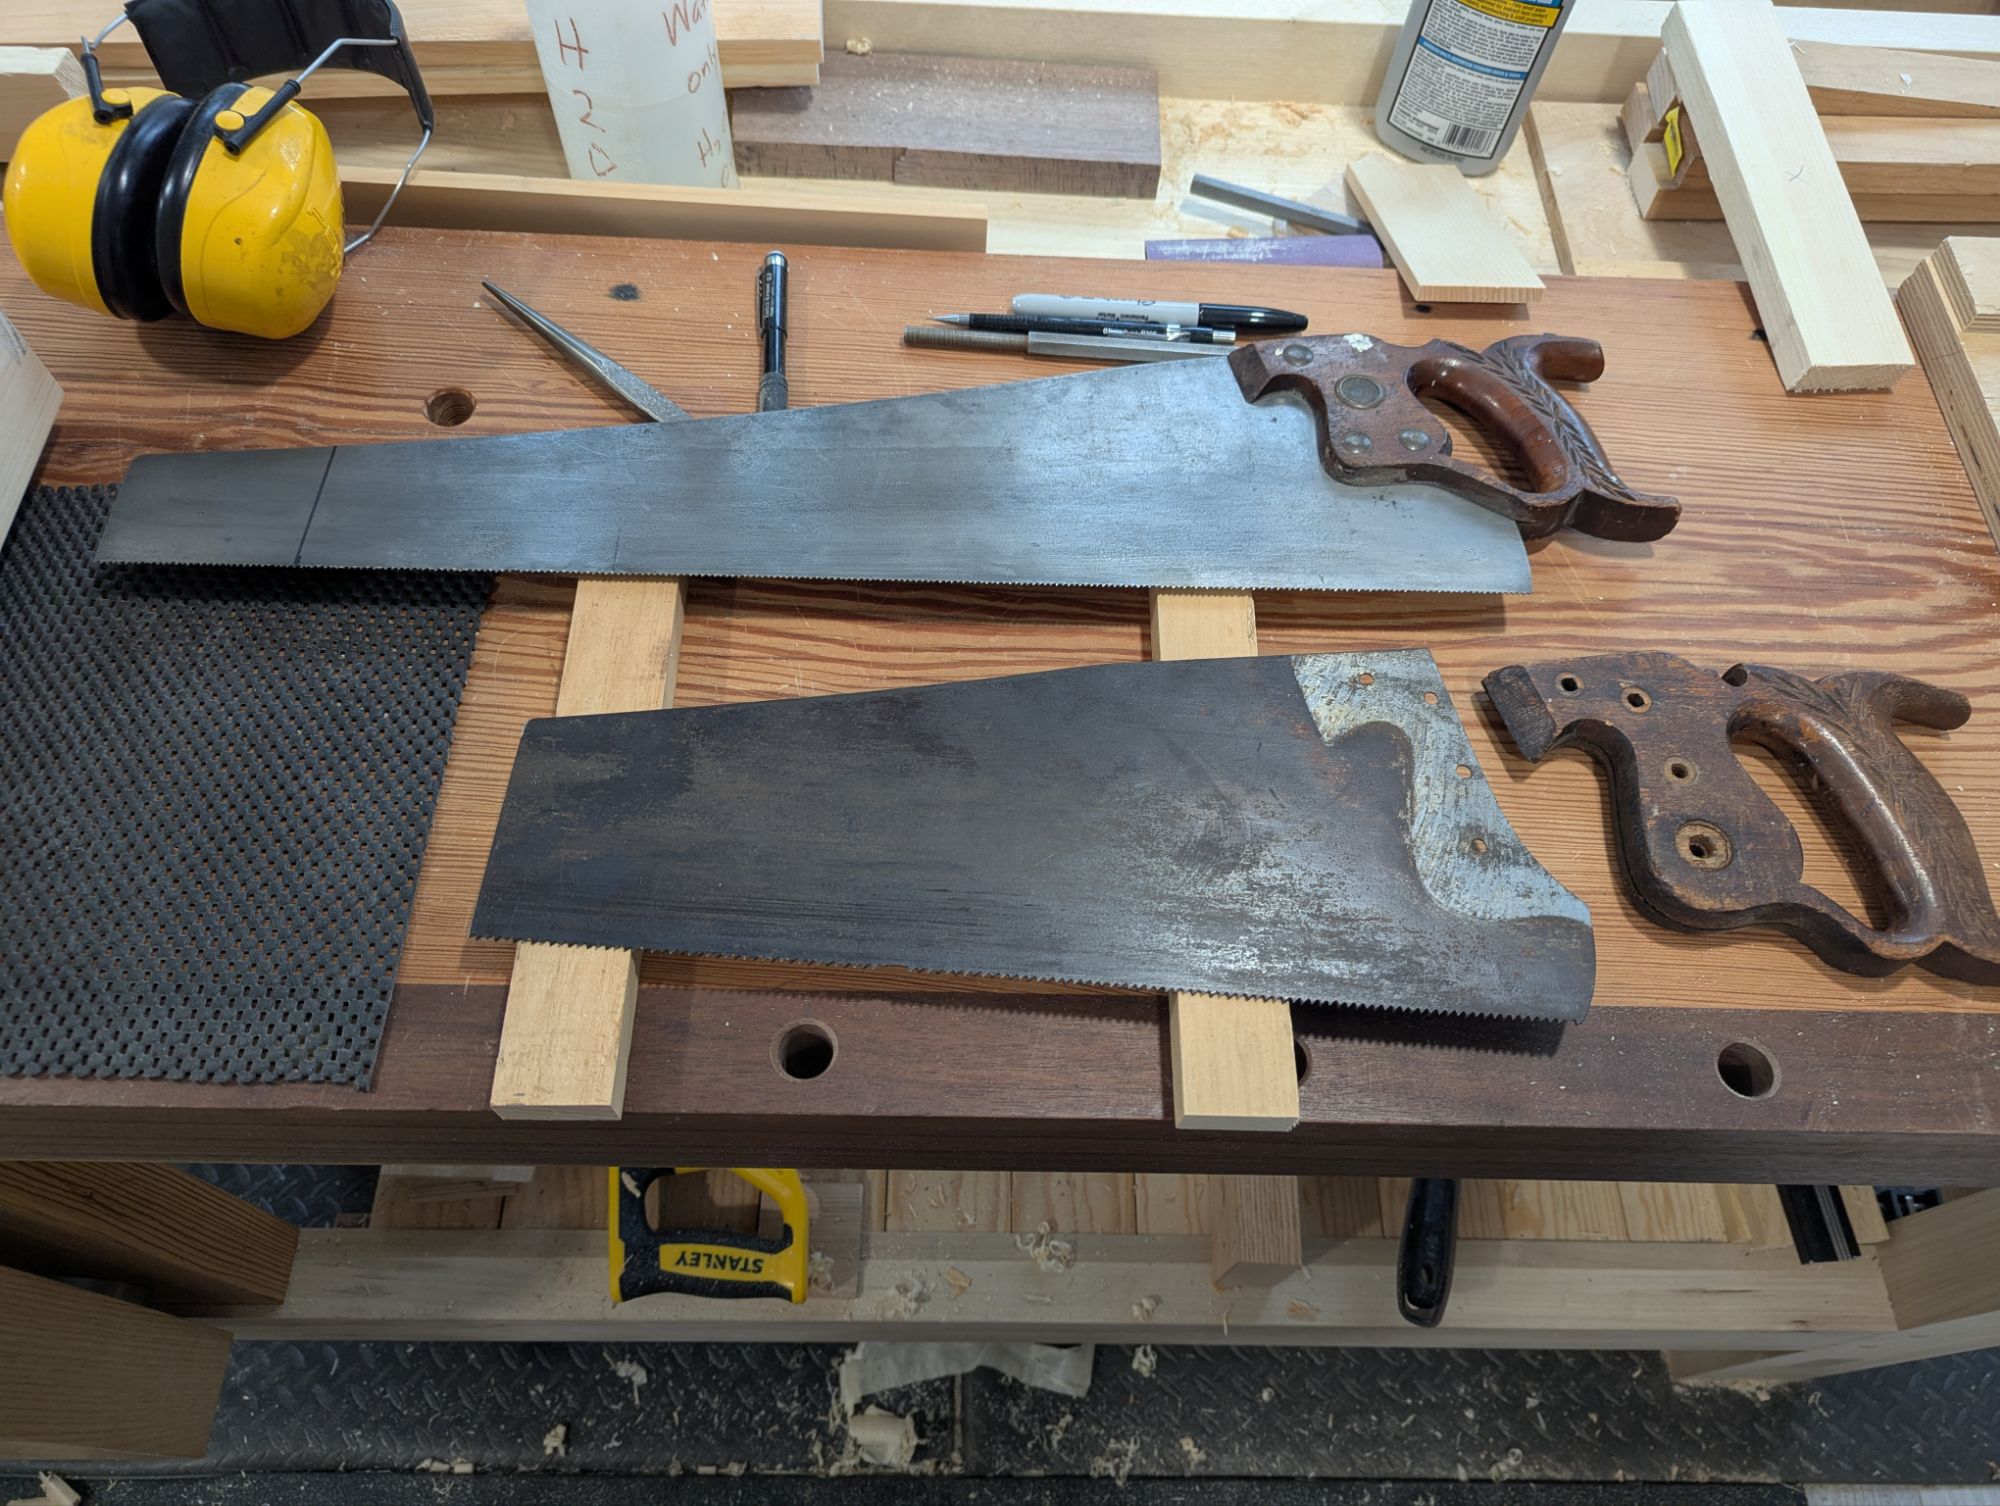
Well, vintage hand saws are abundant and cheap. If the tote is in decent shape, and the plate itself still has some life, odds are it’s got a kink in the tooth line. And that kink is probably around 1/4 or 1/3 of the way back from the toe. You’ll never get that kink out (and even if you do, you probably just work hardened the area around the kink so it will just kink again, or shear). But what if you could just angle grind off everything past the kink and make a shorter saw? Suddenly, that saw would fit into a travel tool box of manageable size.
Something like this, perhaps?
A 20 inch panel saw shown above for length comparison.
I find with shorter saw plates (physics for the win) that they are more rigid and more controllable. After making several travel saws of various tooth pitch this way, I’m starting to think that backsaws (and especially half back saws) are somewhat superfluous. You can do fine joinery tasks with a backless hand saw that’s short enough. The lost stroke length is meaningless when you’re aiming for precision. And 15 inches feels like the sweet spot for rigidity and control.
So when you allow for the saw and other tool kit described above, plus the french fitting, I find a tool chest that is about 20″ long (510mm) x 8″ wide (200mm) x 7″ high in the well (175mm) will hold everything I need, even if it’s a bit cramped. If you can get away with some more width, go for it. But remember to subtract about 1 inch (25mm) to determine the inside dimensions when planning out your tool storage.
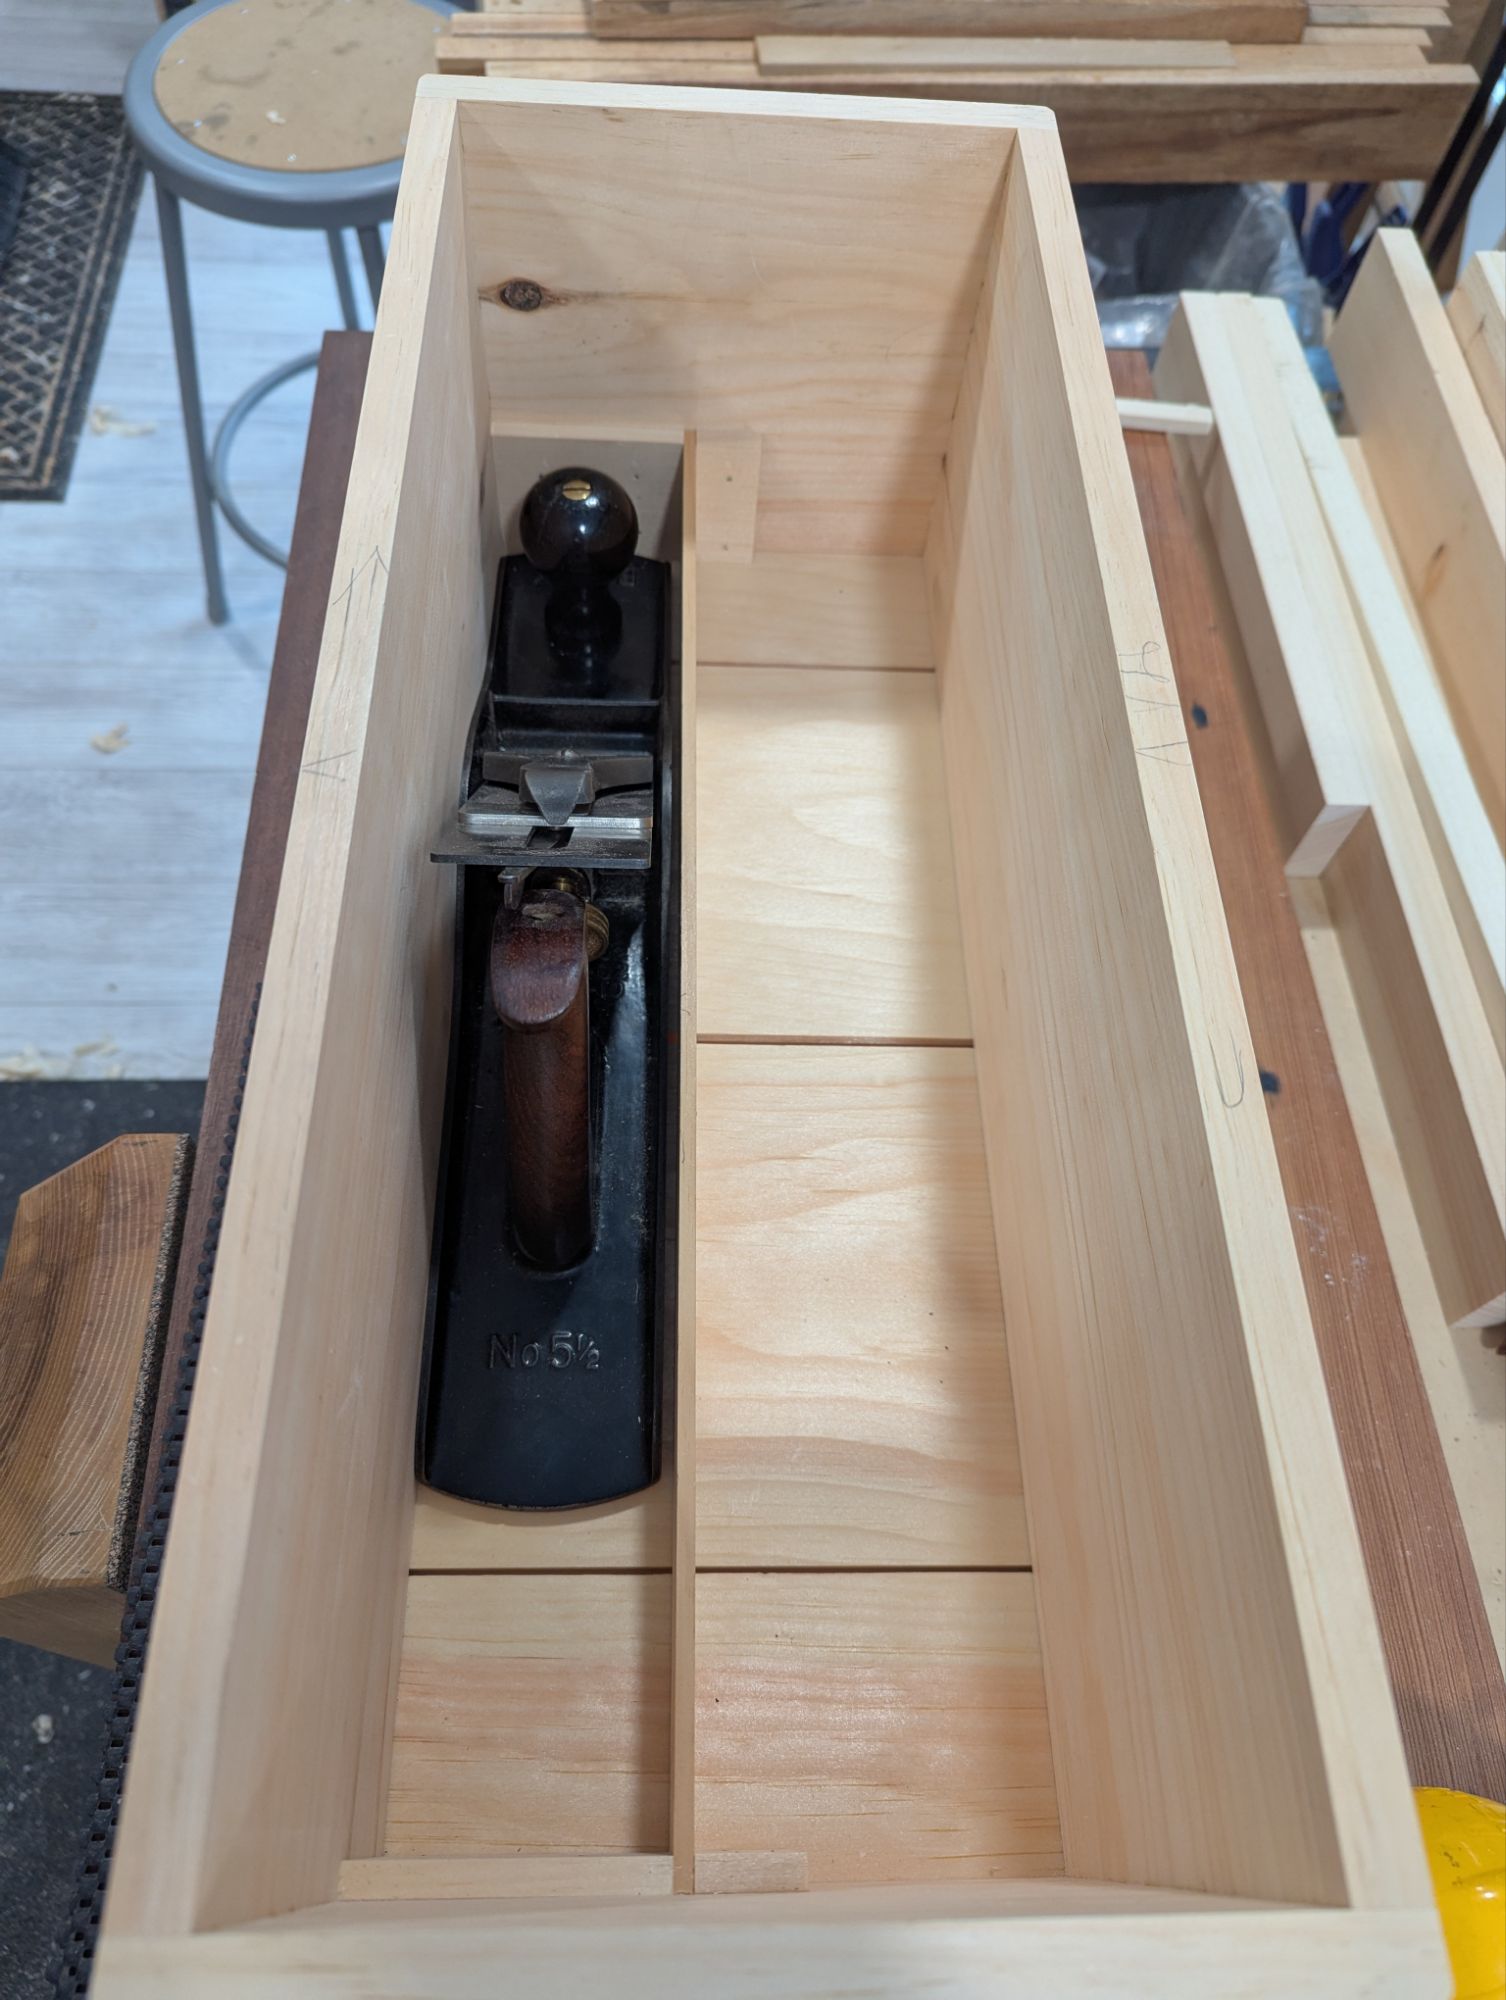
The second lesson on travel tool kits, and probably even more important, is that you can’t bring a thickness planer with you to the beach. I mean, you can. But then you’re a psychopath. So you’re probably working with dimensional stock (home center pine or construction lumber) that needs to be flattened and/or trued on site. And unless you are a different type of psychopath, this rules out anything smaller than a No. 5. I typically use a No. 6 fore plane for everything in home shop (other than the absolute final smoothing before finish). However, I prefer a No. 5 1/2 jack plane for travel work. It’s the right combination of length and width (and heft) for being on the go. And this is where a corrugated sole really shines, in fairness.
That extra room is for a little box that will hold a measuring tape and some other bits and bobs.
In a 20 x 8 toolbox, your jack plane will take up less than half of the total width, and not all of the length either. A hand saw till is about 1 1/2″ (38mm) wide and you can cram a few smaller tools around the saw itself. So you have around 4″ of width for everything else, which I typically fit out with a rack (for the edge tools and pokey bits) and another well for sharpening gear). You can make a lid with some depth to it that will add a new dimension (pun intended) to your storage space.
But I’m going to stop there, before this becomes a veritable novella.
In the meantime, that cut off saw plate needs to sit in some Evapo-Rust for a day to get cleaned up. Pretty sure that saw was a Disston, but it could be an Atkins. It’s definitely not a Simmonds (my preferred brand of vintage saw).
We’ll see. In any event, Happy President’s Day, all!
Hope everyone’s 2025 is off to a great start! I am actively ignoring the shitshow that is the United States federal government for the next 2-4 years, so that means more woodworking!
I was recently up north where I have a basic set of hand tools and a pretty good workbench in a shed. My tool kit consists of a few bench planes (No. 5 1/2, No. 4, and scrub plane), saws (a 20 inch hardpoint and a 12″ hardpoint, plus a 12TPI crosscut carcase saw), chisels (1″, 3/4″, and 1/2″), plus a small router plane, a small shoulder plane, a brace and bit, and all the basic marking and measuring tools. This is, in my view, an essential hand tool woodworking kit and I can do most home improvement and general construction tasks that cross the bench. Speaking of which, the workbench is 62″ long and the main benchtop slab is 15″ deep, which is plenty.
I have a dedicated Milkman’s Workbench for when I need vises.
But when I’m up north, when I’m not making spice racks and rebuilding exterior stairs, I like to scour the antique stores for two things: gate leg tables and vintage handtools. Most recently, I found a nice double gateleg table that now sits under a window in my living room. For furniture, I highly recommend The Red Carrot in Rutland, Vermont. Especially when the warehouse down the road is open. They also have a great selection of rustic boxes, most of which seem to have been joiner’s chests at some point. I don’t buy them to use them, but rather to study the techniques.
For tools, though, I find the foofier antique stores and thrift shops tend to be goldmines. While everyone else is looking at the jewelry and lamps and sewing machines up front, I’m digging through the back corner to find Disston and Simmonds hand saws and Stanley bench planes. On this trip, in addition to a nice 9 PPI Simmonds crosscut hand saw (26″ plate length) I extricated from a pile of painted kitsch, I finally bought a transitional jointer plane I’d been eyeing for a few years as it migrated around the store.
Not bad for 150 years old.
As far as I can tell, it’s a Stanley No. 31 transitional jointer plane, Type 4 (manufactured between 1871 and 1872). No lateral adjustment, right handed threads on the depth adjustment knob. The japanning on the casing is like 95% intact and aside from the horn of the tote being cracked (I’ll make a new tote), and one of the slotted frog screws having split (you can see the half moon fragment next to the frog, and replacement screws are readily available on electronic bay dot com), it’s in amazing shape. The beech sole, while a bit twisted, seems never to have been seriously flattened. The mouth is still crisp and tight and should remain so after truing the sole. The throat has shrunk a bit (again, 150 year old wood), so I might have to grind 1/16″ off the iron width so it adjusts easier. Or just get a modern replacement blade which is a bit narrower. Even the knob is sound (despite a small flake off the side).
Do I need a transitional jointer plane for my toolkit? Definitively no. I have a Type 1 Stanley Bedrock No. 7, and one of the very last Old Street Tool trying planes ever made. Plus I have a No. 6 fore plane that is just as good as a jointer for most of the work that I do. And is my every day plane, as it were.
But this transitional plane was $45 dollars and a piece of history. So I will clean it up and use it as I see fit.
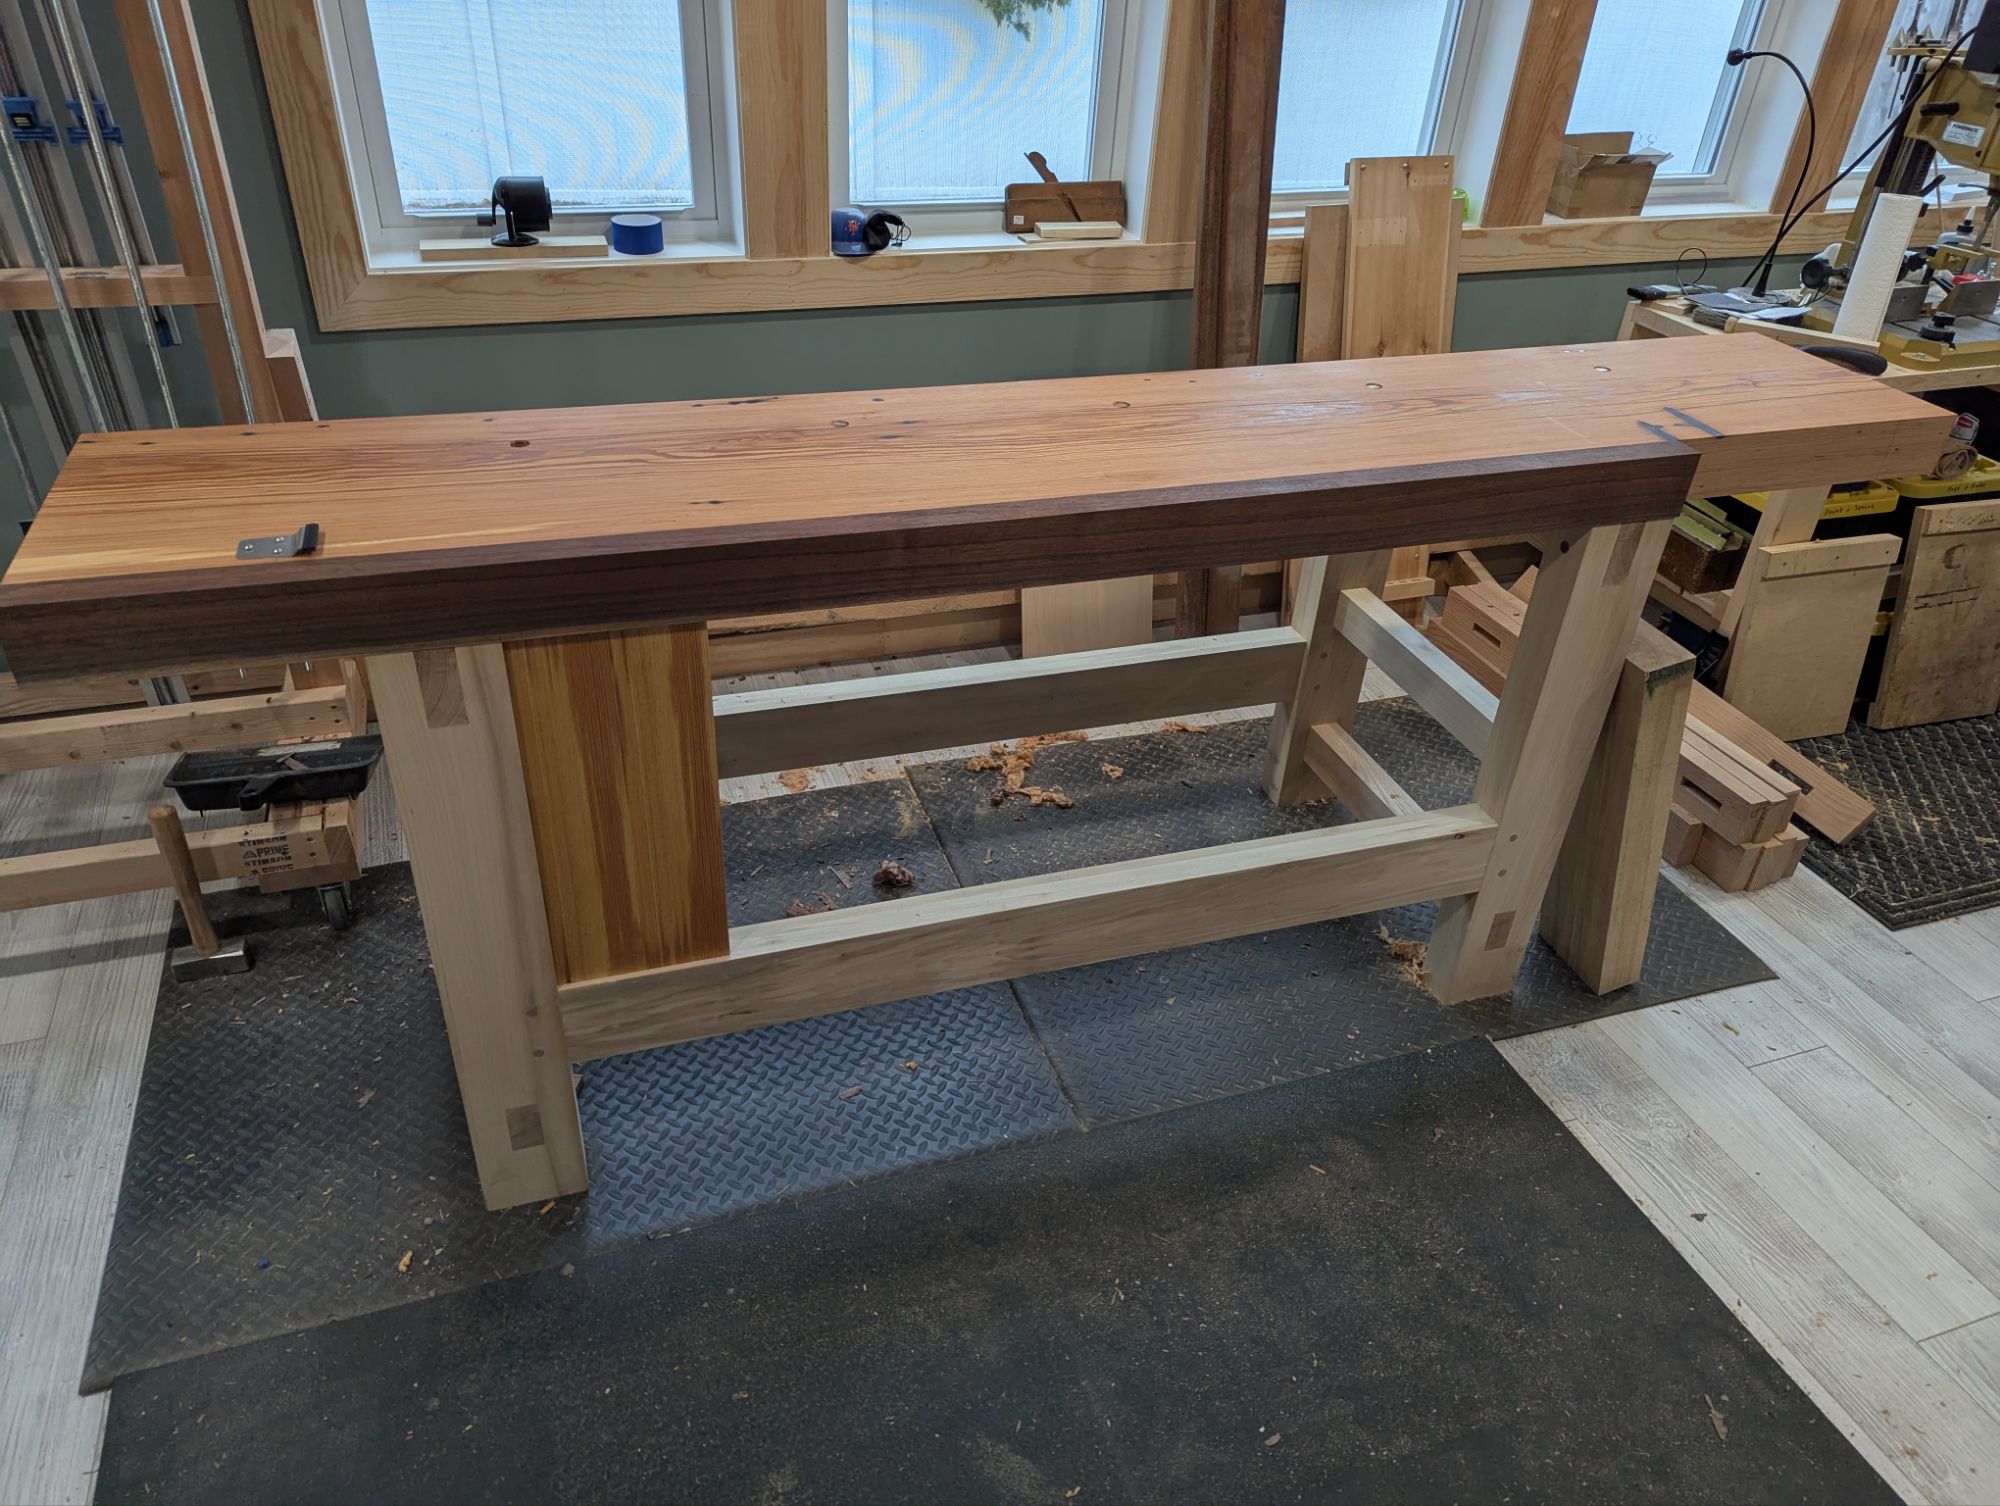
Just a quick update on my new workbench: I have attached the slab top (with pegs like a Moravian workbench) and oiled it a few times (with untinted Danish Oil), which I think looks super neat.
I’ve also bored holdfast holes in the top (12″ back from the front edge of the bench and 14.5″ on center, which I think is the right spacing for Grammercy Holdfasts) and attached a Compass Rose planing stop. Finally, the vise back is mortised into the stretcher and the underside of the top, so I’m ready to work on the vise chop itself.
I’m not one for sentiment, but that top sure looks nice with a couple coats of oil.
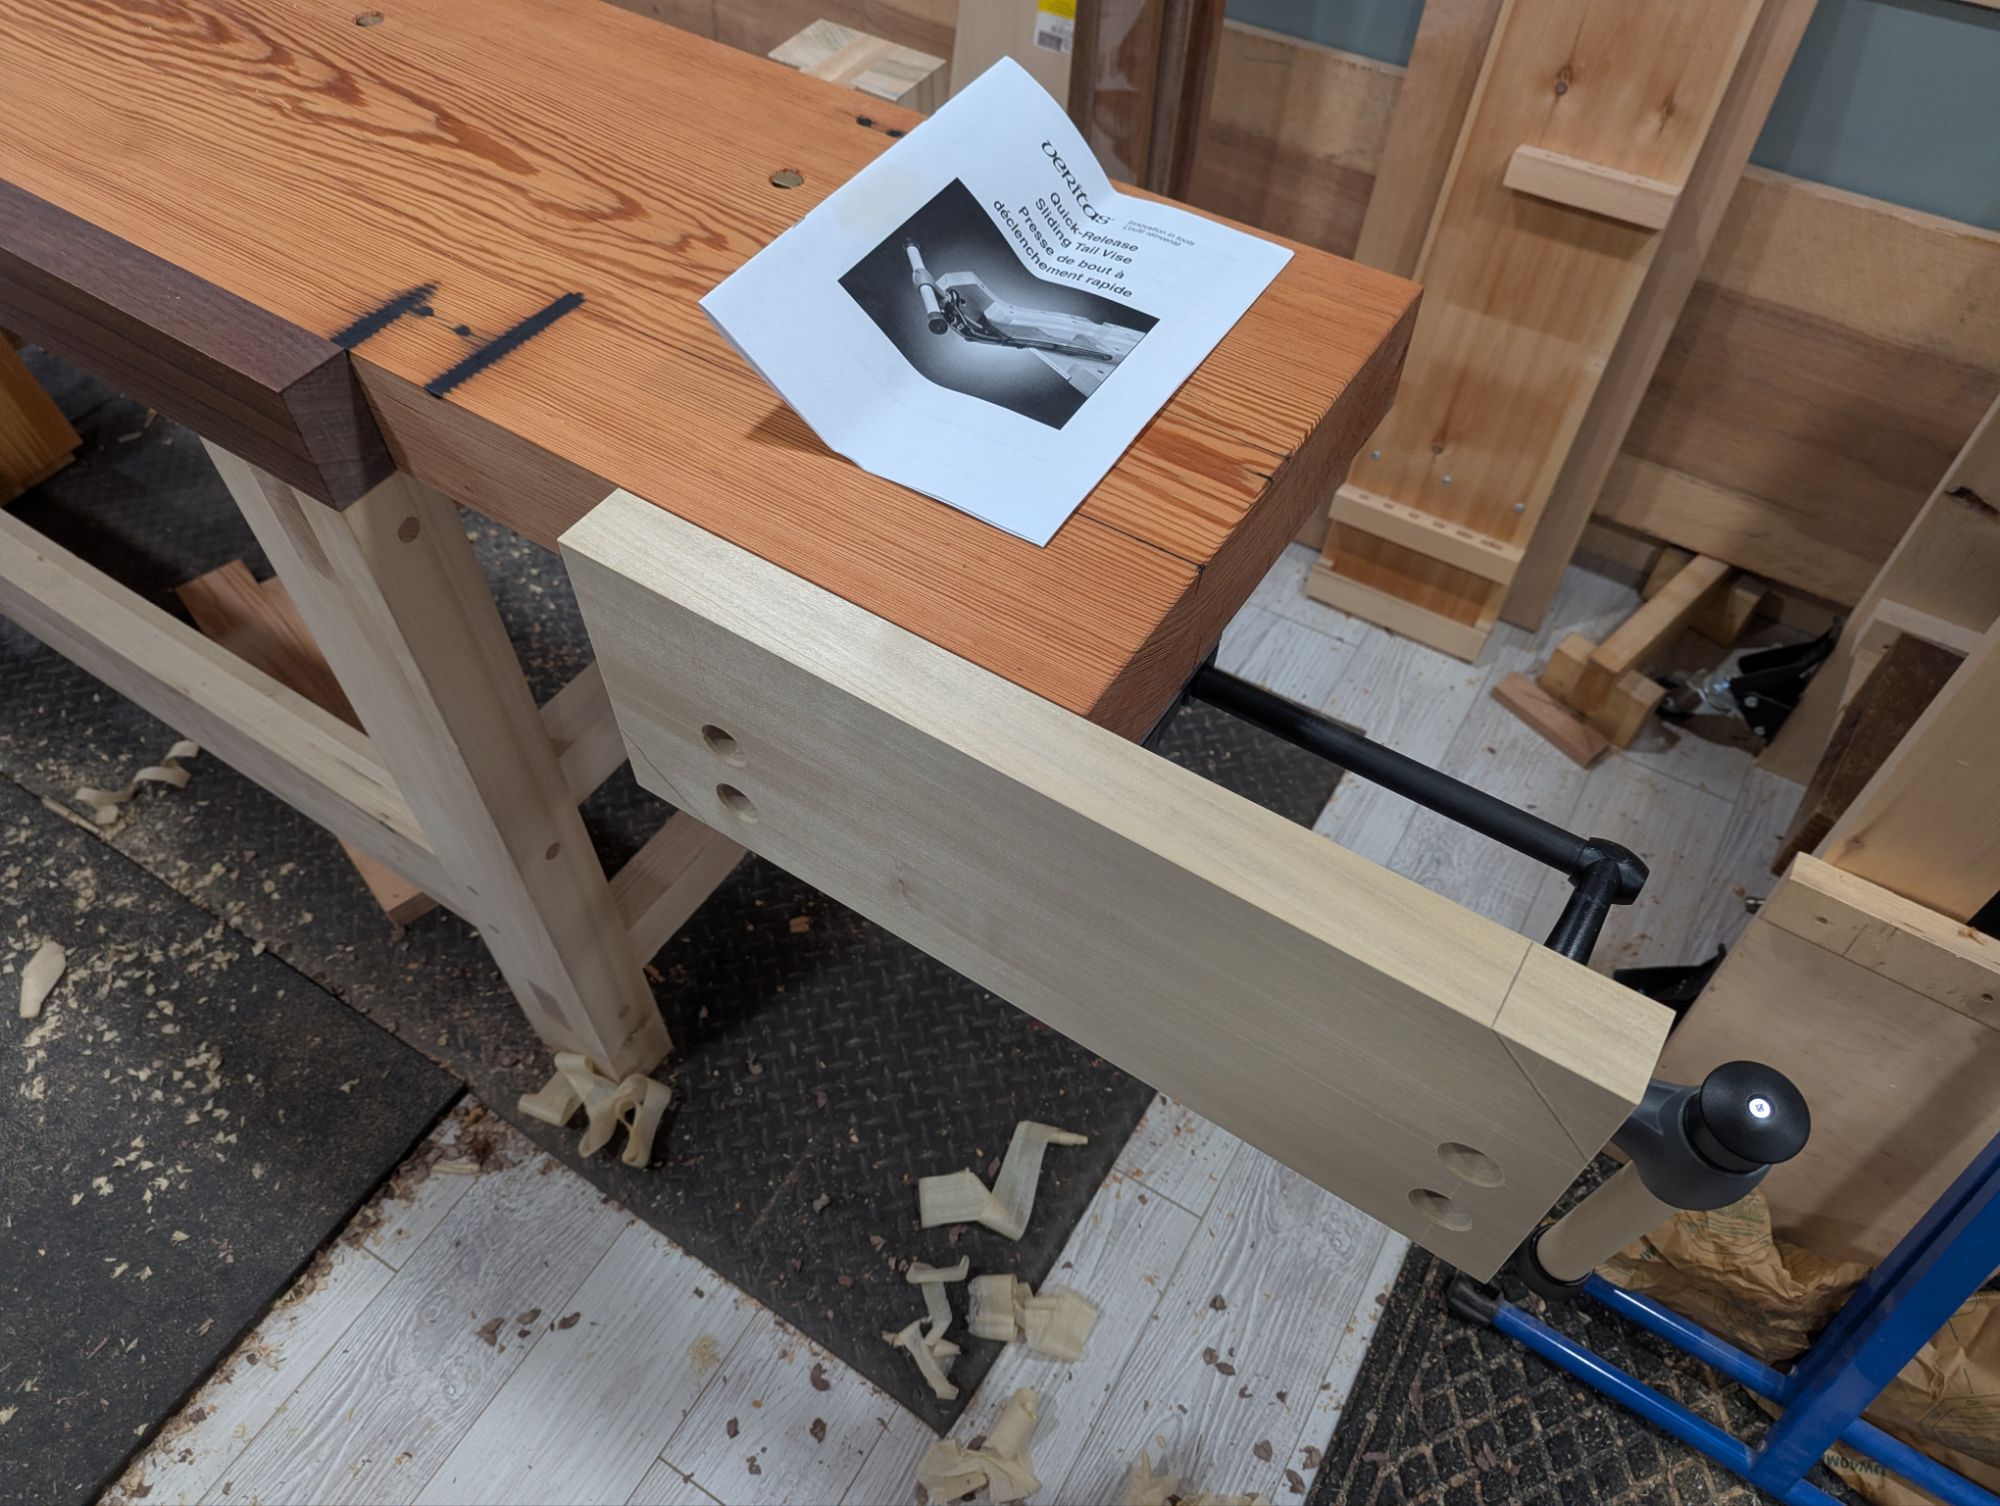
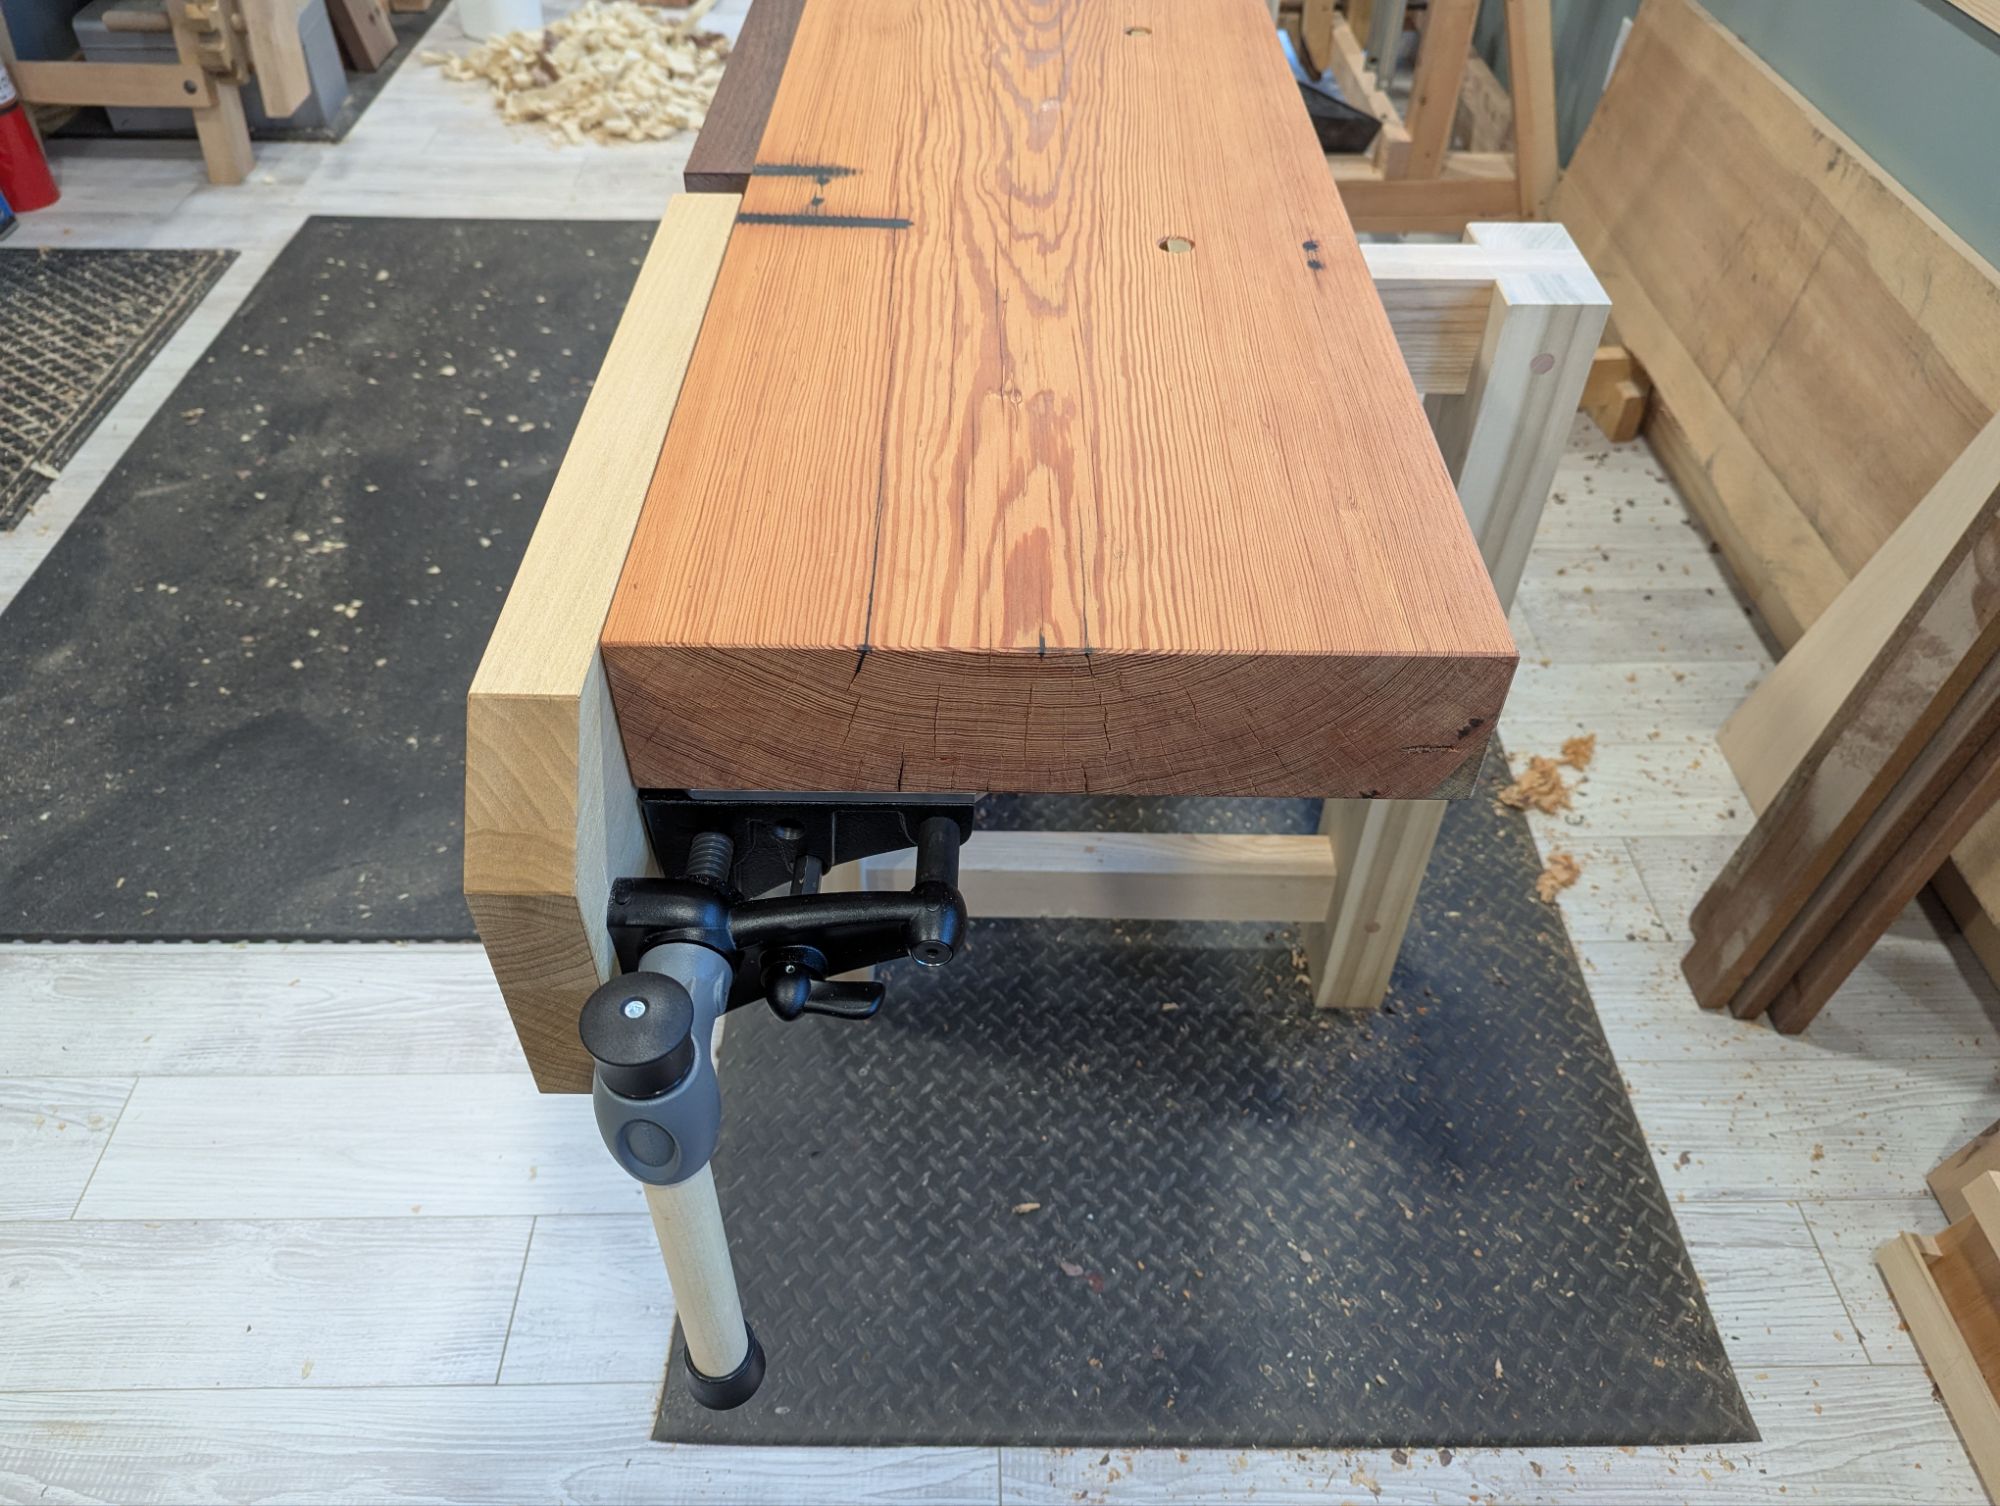
In addition, I finally unboxed my Veritas Quick Release Sliding Tail Vise and attached it to the workbench. I followed the directions exactly but I guess my vise (which I bought for myself in 2021, right in the thick of the pandemic) had some issues with the casting or the machining. The attachment points for the vise chop were not in plane (more than 1/16″ off) and the threaded holes for the bolts to attach the vise chop were not spaced as described in the instructions (exactly 1/8″ off). Perhaps there was a setup issue in the factory?
This meant I had to scrap the continuous grain walnut vise chop and laminate a new one out of poplar (again, trying not to buy new materials for any part of this workbench).
Kind of annoying but ultimately not an issue.
It’s still a very nice piece of hardware and works great (after I was able to sort out the problems with some fender washers as shims and the aforementioned replacement vise chop). Outside of the irregularities the build quality is great. I have no doubt it’s just a bum unit from the dark times when quality control wasn’t ideal. It happens.
I by no means intend to stop shopping at Lee Valley and I don’t want anyone to think I’m disparaging them. The instructions for the vise were detailed and super useful. If the mounting holes hadn’t also been off, I don’t think I’d even be posting this.
This thing is really becoming a Frankenbench, though.
Having used the finished vise for a few days, I’ve noticed a couple things, though. First, the vise is clearly designed for thinner workbench tops. The first attachment point is 5/8″ below the underside of the workbench, so there is a lot of unsupported chop on a 3 1/2″ workbench top. This leads to some vise chop lift. I’m not quite how much clamping pressure would be lost on an even thicker workbench top because of the twisting force on the unsupported part of the vise chop.
Second, everything is attached with screws (No. 14 wood screws for the mounting plate and 3/8″ lag screws for the vise assembly). They are beefy, for sure. But especially for softwood benchtops, I bet carriage bolts would be a better long term option. If it works for metal face vises, it should work for this.
That said, I am not a production woodworker. So I doubt I’ll ever put enough stress on this vise to test either of my theories.
This weekend, I’ll be building the leg vise. This one will be pinless, with a metal screw (also Lee Valley) and a 1 1/2″ linear bearing (and carbon steel shaft), both from McMaster-Carr.