Happy New Year, everyone! Hopefully everyone has fully recovered from their New Year’s Eve partying and is back in the shop. I certainly am.
As with every new year, I try to tackle a few small but important projects (I call them “fixgasms“) around the shop. The term is not exclusive to the workshop. A fixgasm can be anything that’s been on the to-do list for too long and won’t really take a ton of effort to complete, but will have outsized impact when done.
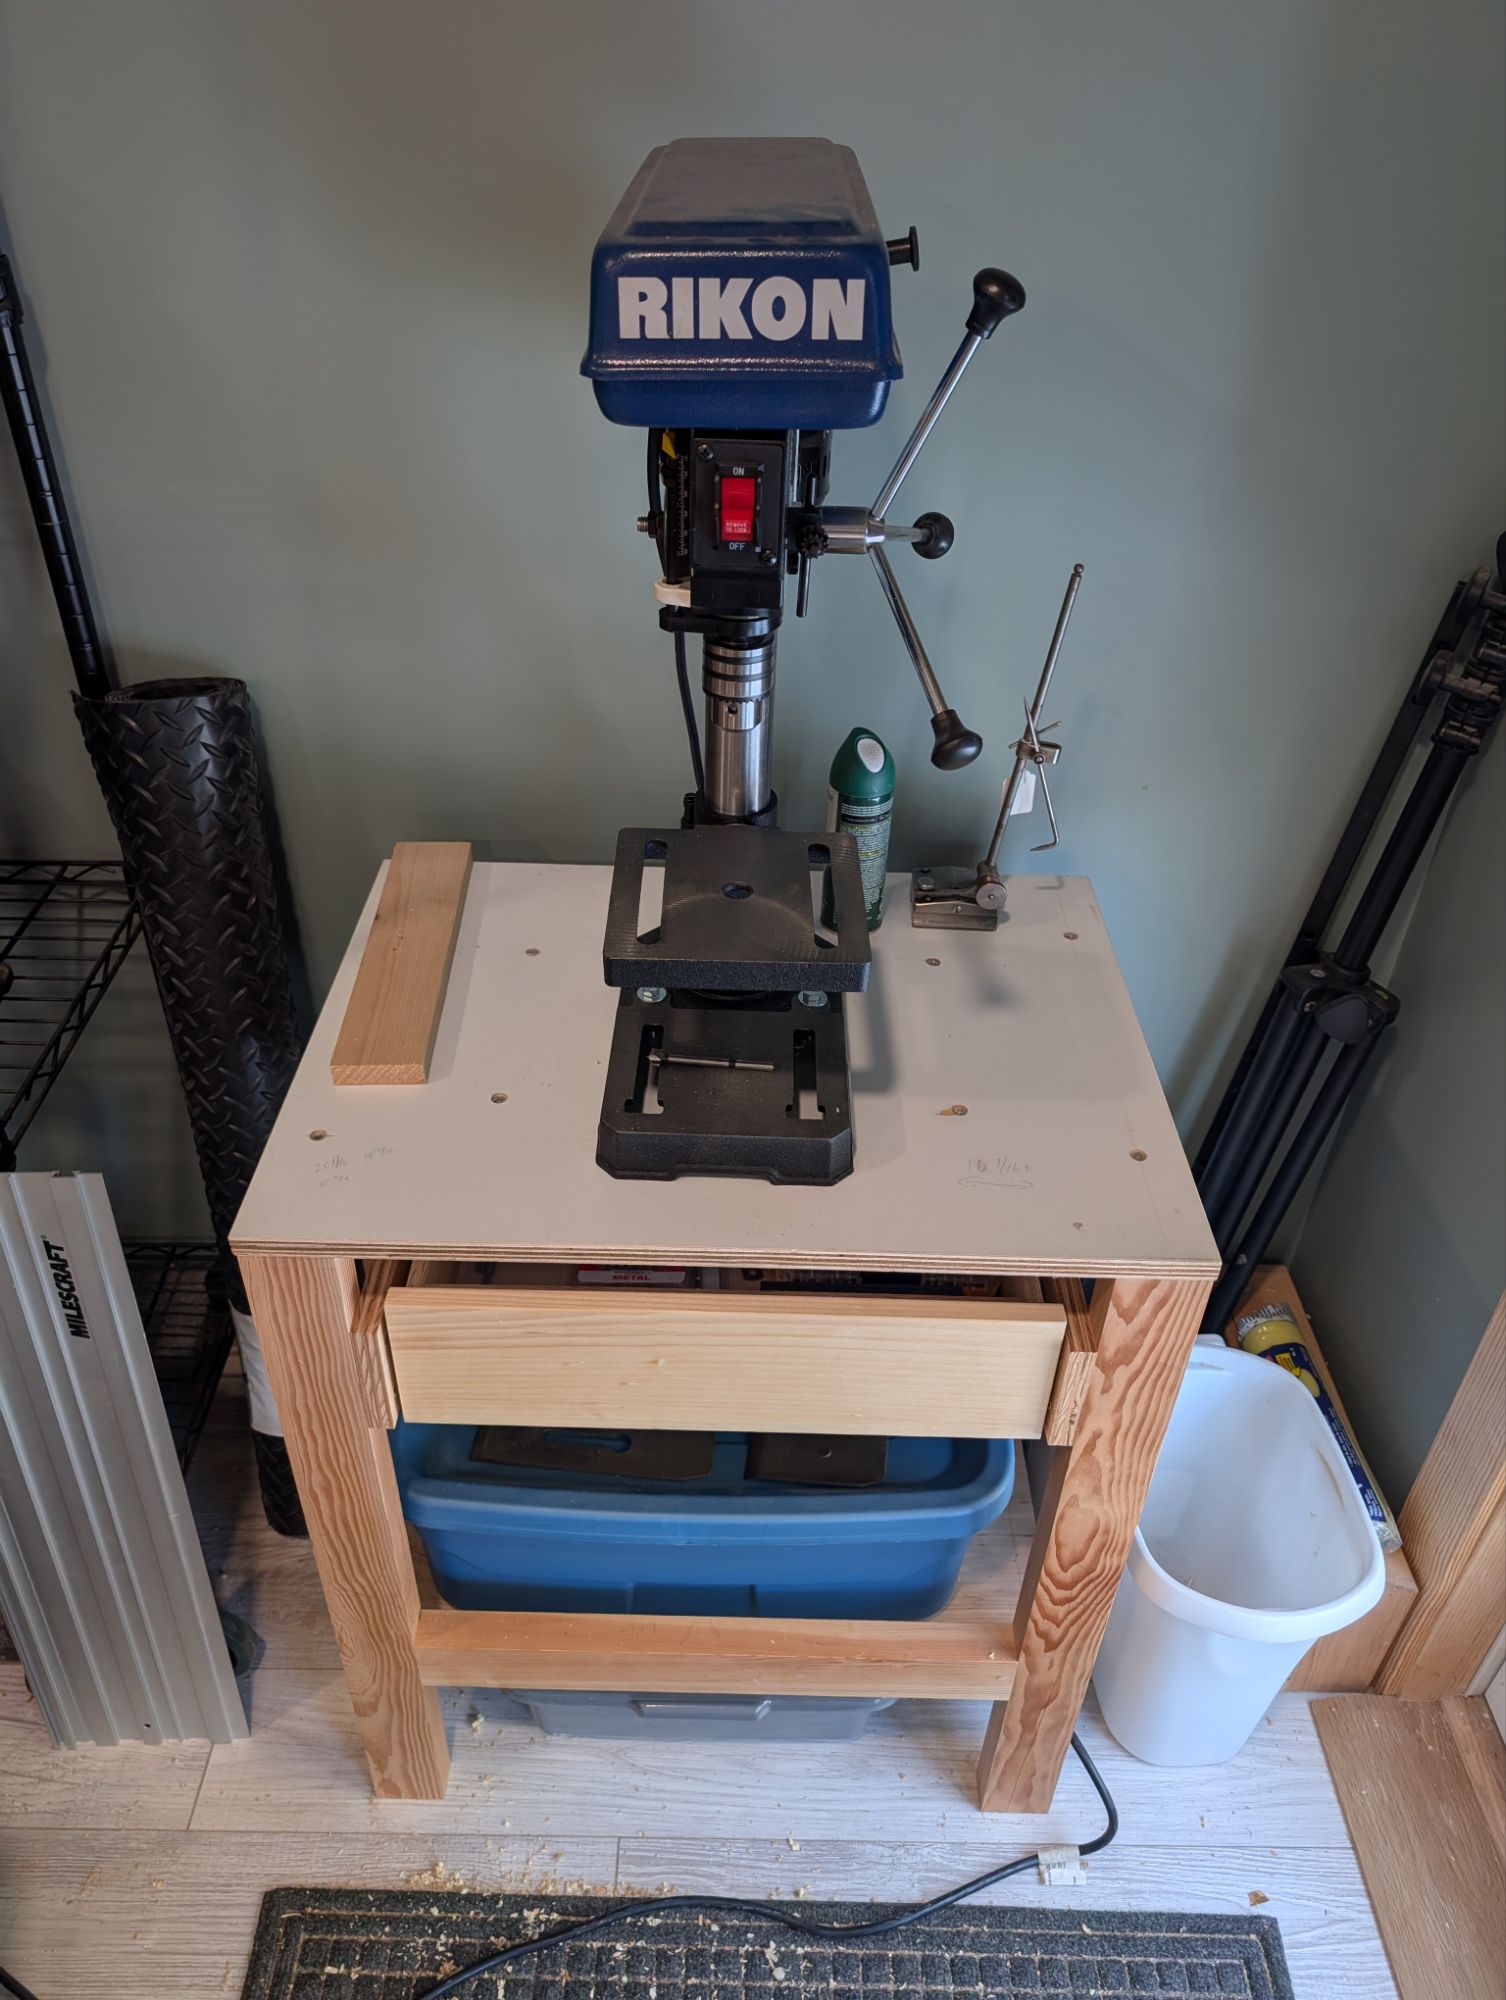
First one up is a drawer for the drill press table. The table frame is Douglas Fir and joined with glue and pocket screws. I’ve come to really appreciate pocket screws for these types of shop furniture. The top is 3/4″ painted plywood reclaimed from some kitchen cabinets. It’s slick but pretty water resistant.
An 8″ drill press is all I ever really need for the hand tool shop.
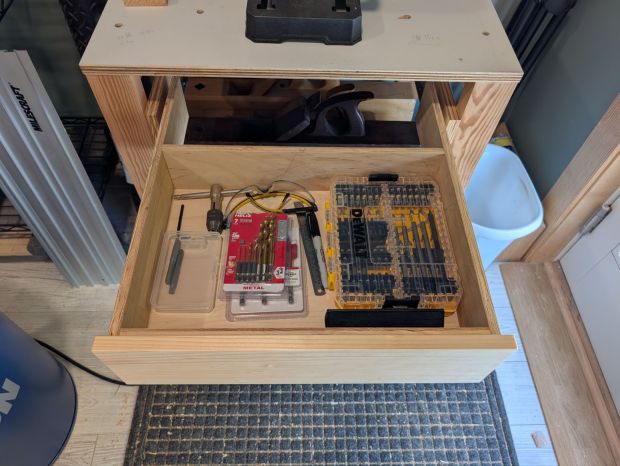
The drawer is made from scrap 1/2″ plywood, also joined with glue and pocket screws. The drawer bottom is 1/4″ plywood glued and nailed on. The drawer front is white pine and there is a 3/4″ lip underneath to use instead of a separate drawer pull. The drawer inside dimension are about 16×12 and 3.5″ or so deep. More than enough for drill bit sets and accessories.
I used some full extension drawer slides from the home center and they work well enough (they are “soft close” according the packaging). I contemplated making oak drawer runners, but laziness won out in the end.
I still need to migrate my Forstner bits from the garage Craftsman chest.
The next fixgasm on my list (for today or tomorrow) is to hang some wall mounted clamp racks and free up floor space. I never really move my mobile clamp cart around the shop, so it’s pretty much just in the way. It’s also way too big and not a super efficient use of space anyway.
I hope you all find some time in the coming weeks to tackle those little but important projects around the shop.
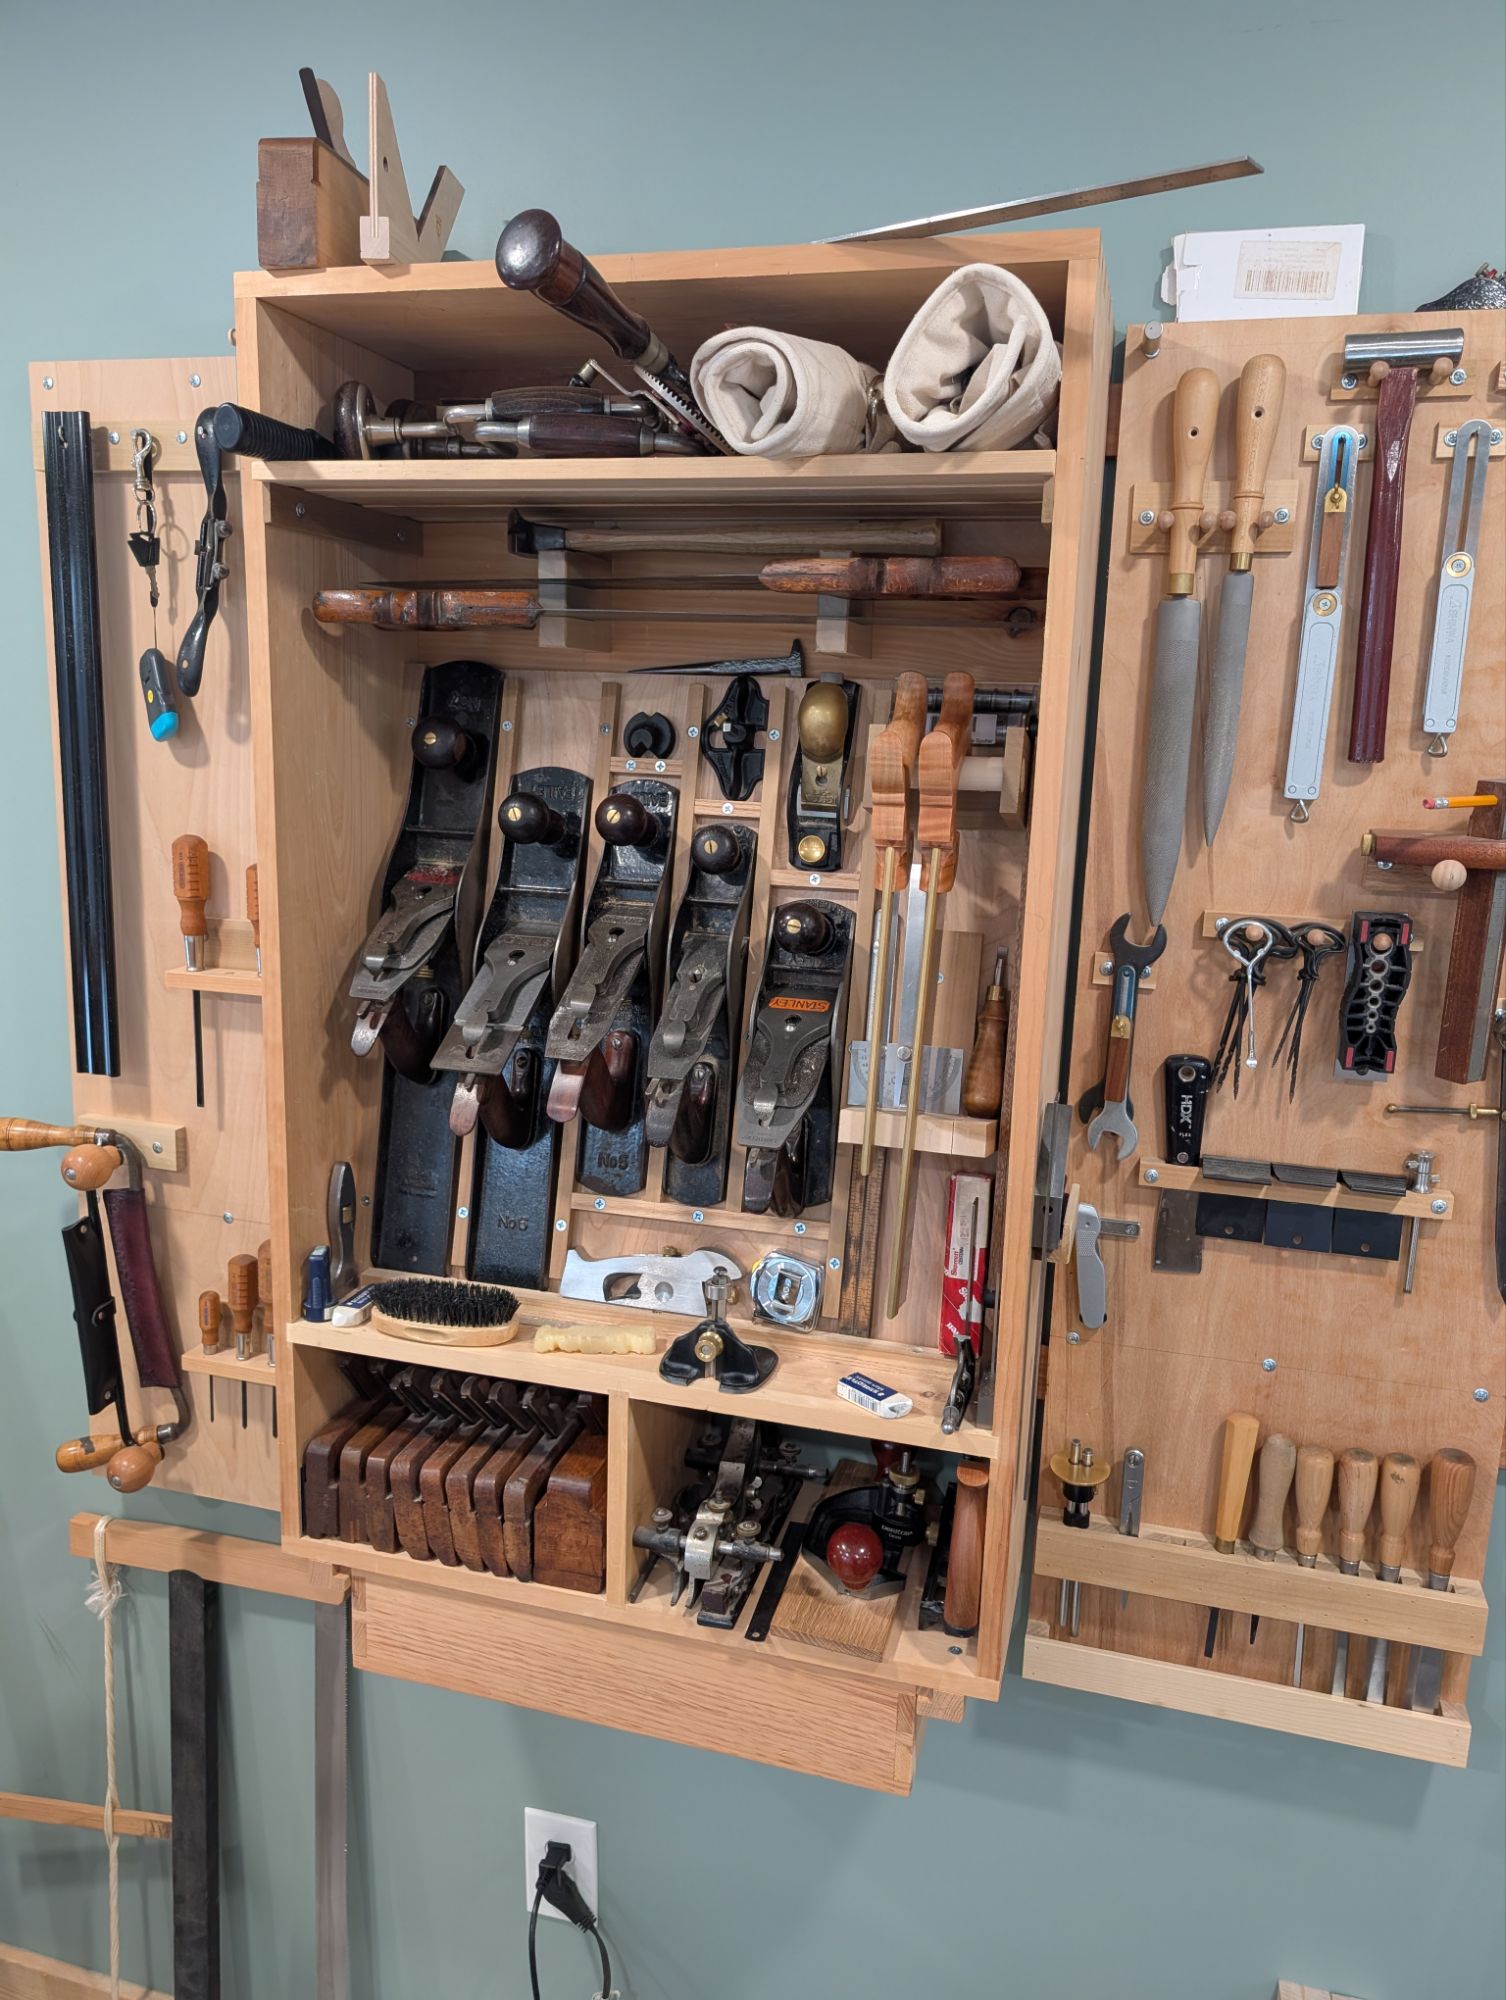
When I first built my wall-hanging tool chest, I had only a handful of moulding planes. Basically a quarter set of hollows and rounds, plus a wooden fillister (rabbeting) plane. So the little cubbies at the bottom were more than sufficient for both those and my couple of joinery planes.
Being a 3/4 metal tongue and groove plane, large router plane, and combination plane.
But since then, I’ve accumulated more worker moulding planes, including a few beading planes, two more tongue and groove double planes (for 9/16 and 7/8), some rabbet/shoulder planes, and so on. So on a snowy weekend in Southern New England, I made a new moulding plane cubby.
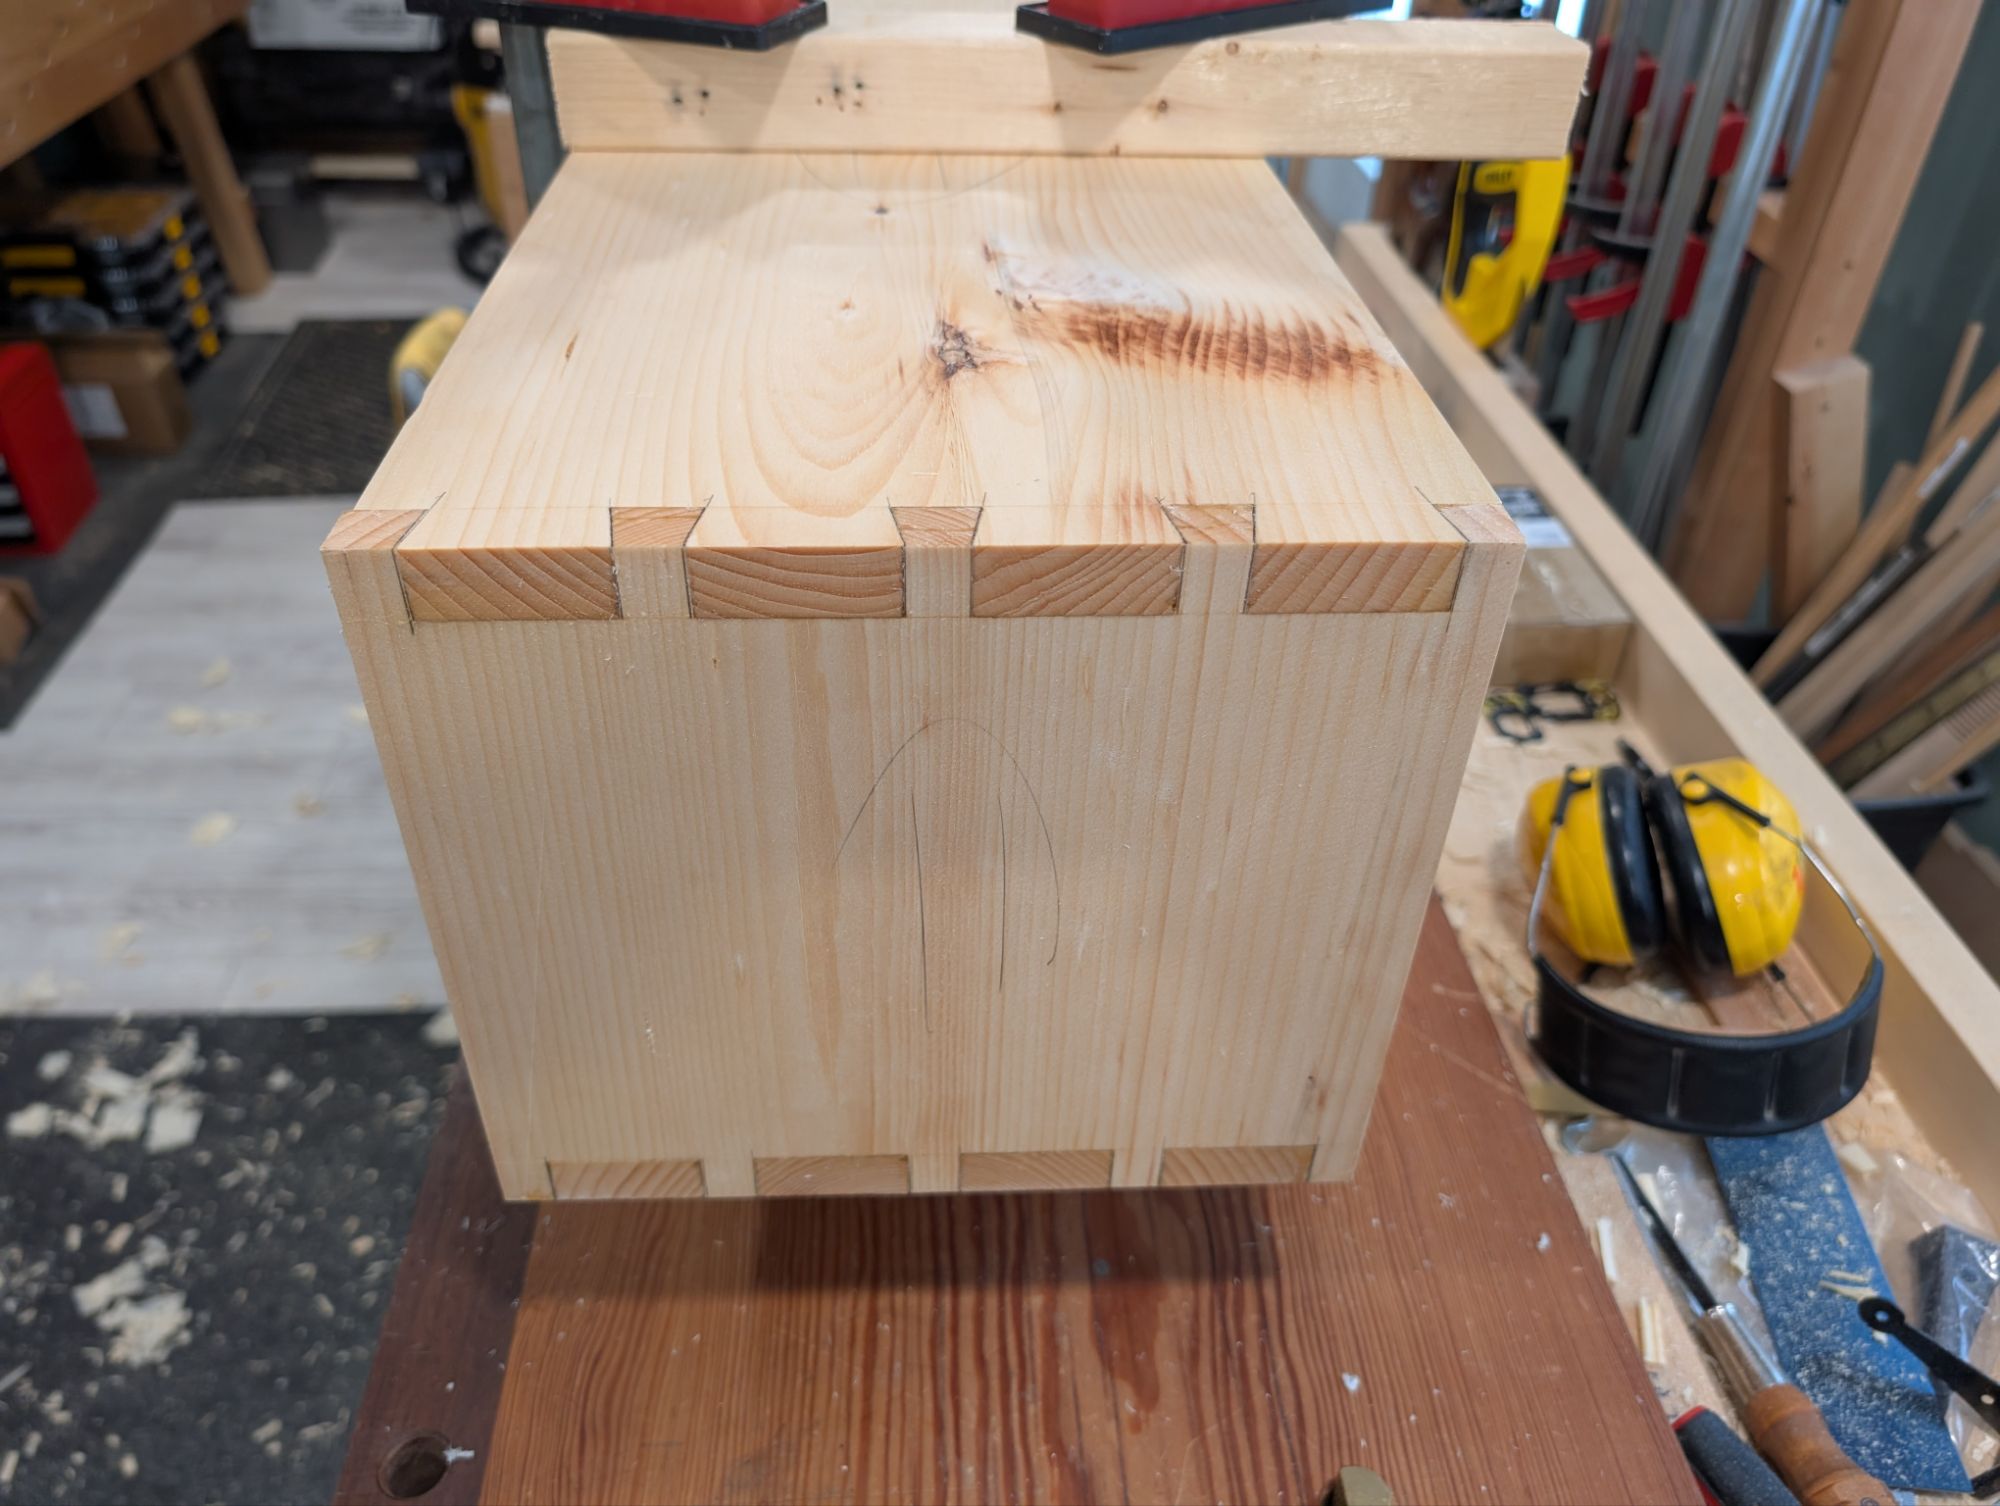
When your dovetails fit nicely, the clamp on the dado is all your need.
The dimensions are exactly the same as the lower cubbies, other than a little extra depth (since I don’t have to account for the French cleats. Once the glue dries, I’ll run a few screws into the dado board (more for peace of mind than actual fastening) and screw this new cubby down to the top of the current wall cabinet. The joinery is very much overkill (pocket screws or even rabbet and nails would have been more than sufficient for this, as it will experience no significant forces). But I needed the dovetail practice for another project.
I prefer larger pins. Larger than English style, anyway. Not quite Central European.
The wood for this little cubby is pretty scruffy. It’s just a home center white pine 1×12, planed flat and thicknessed to about 11/16. Even home center white pine isn’t usually this brittle and stringy, though. It’s basically the definition of “deal”. And deal is useful for many things, including shop projects.
If I ever get around to remaking my wall mounted tool chest in nicer wood (this was, after all, just a prototype), I will probably add this cubby into the main carcass. I have some old genuine mahogany that I’ve been saving for that in particular. But that’s a long way off.
In any event, I hope everyone is staying warm and dry.
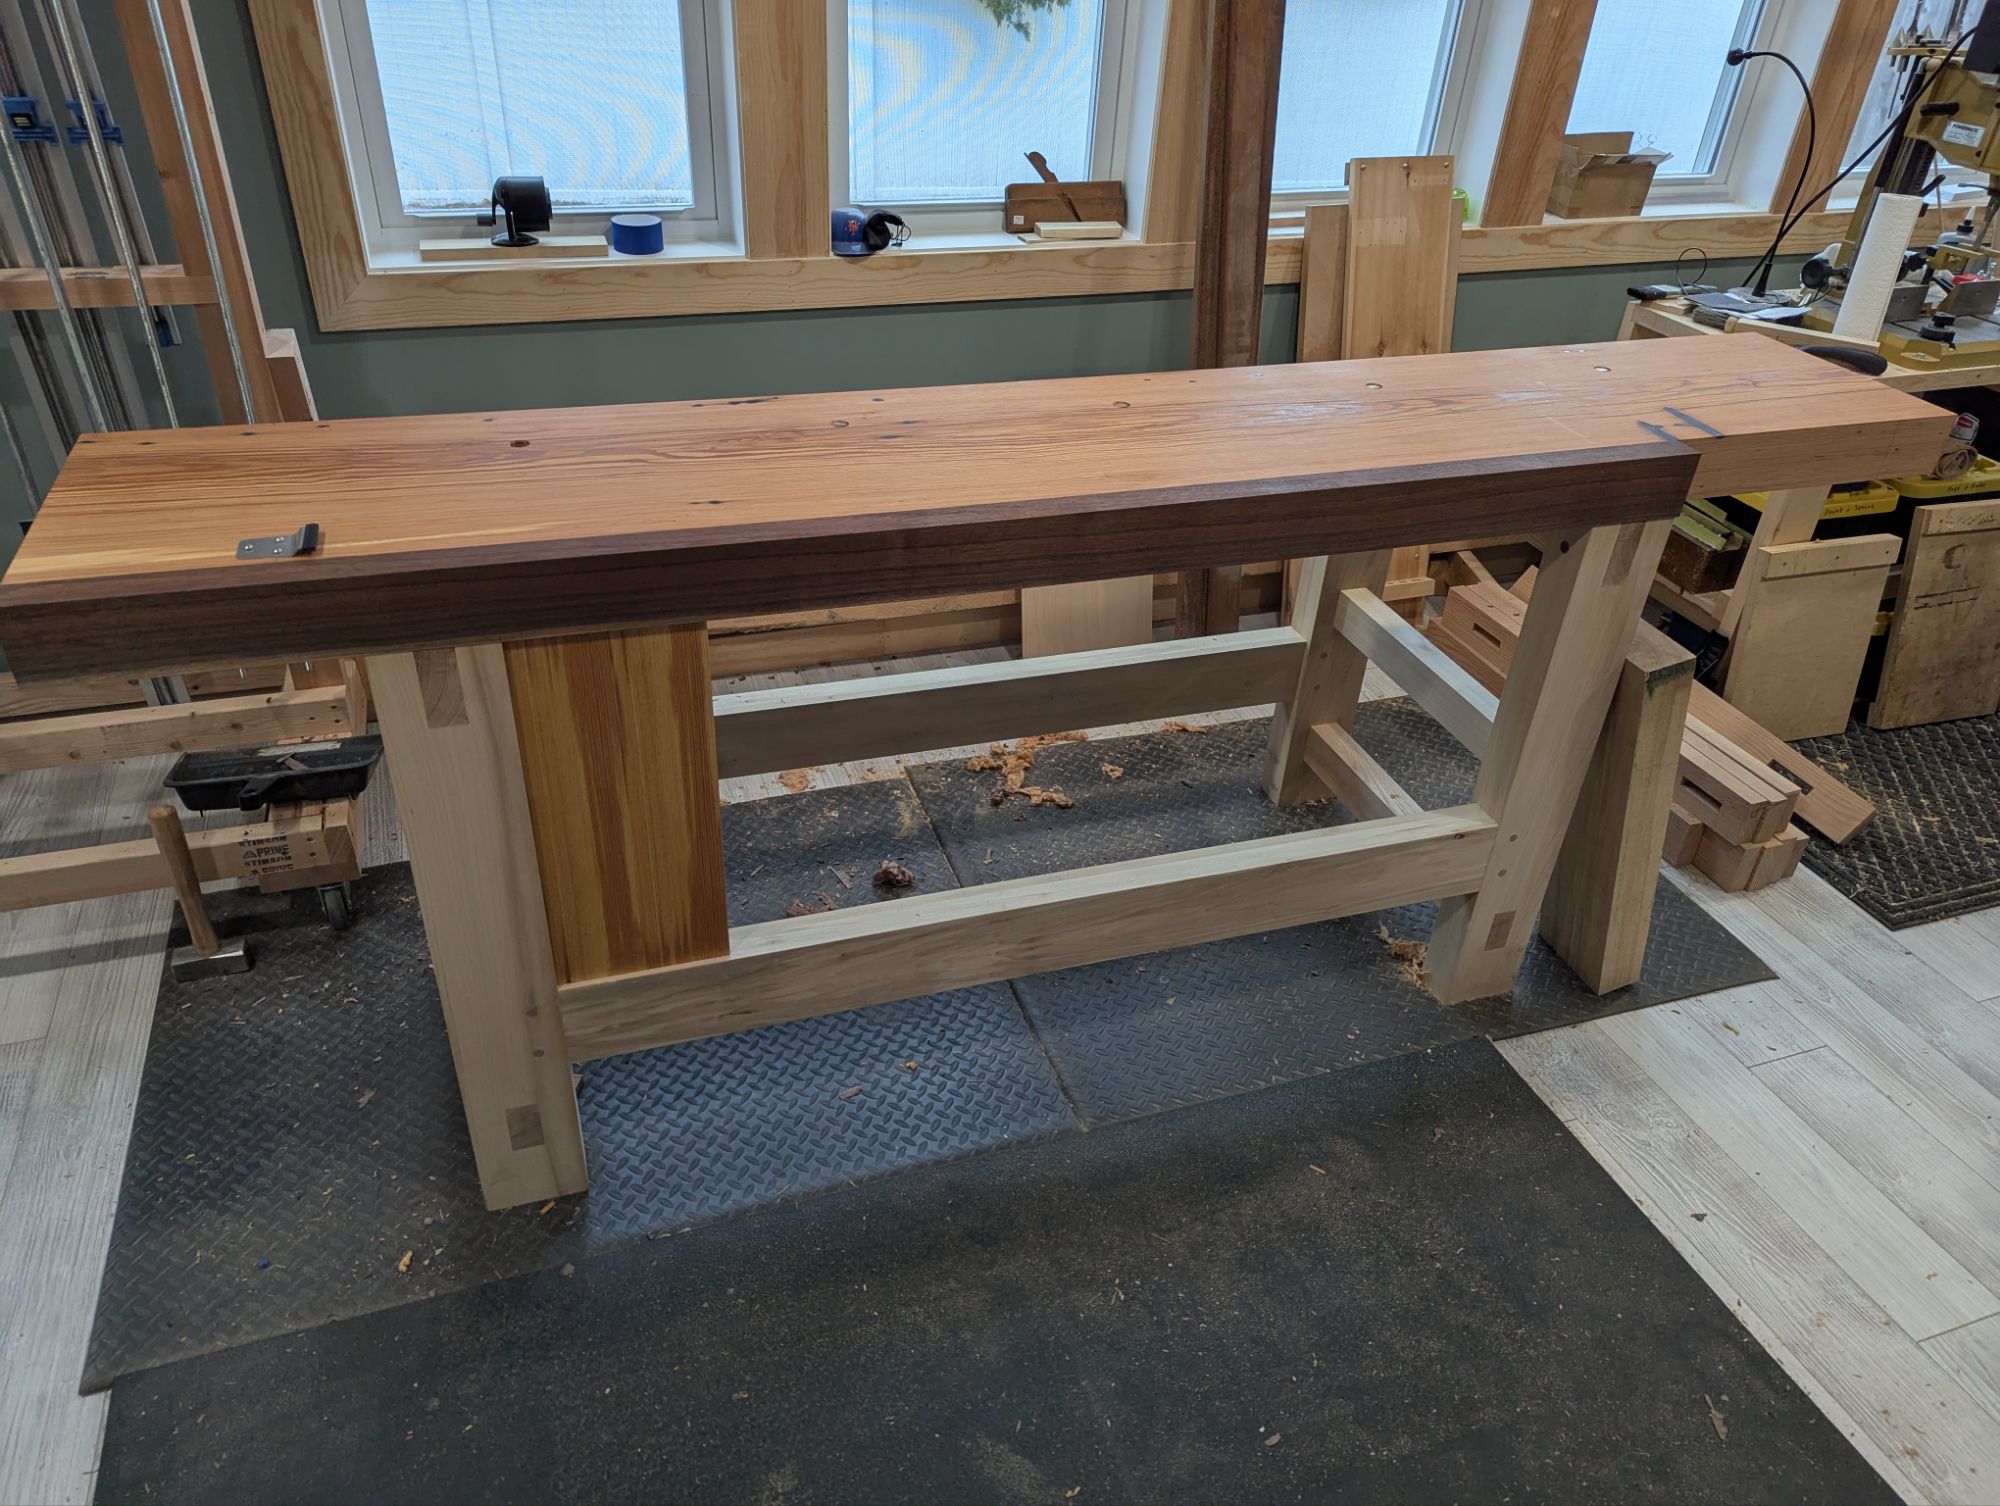
Just a quick update on my new workbench: I have attached the slab top (with pegs like a Moravian workbench) and oiled it a few times (with untinted Danish Oil), which I think looks super neat.
I’ve also bored holdfast holes in the top (12″ back from the front edge of the bench and 14.5″ on center, which I think is the right spacing for Grammercy Holdfasts) and attached a Compass Rose planing stop. Finally, the vise back is mortised into the stretcher and the underside of the top, so I’m ready to work on the vise chop itself.
I’m not one for sentiment, but that top sure looks nice with a couple coats of oil.
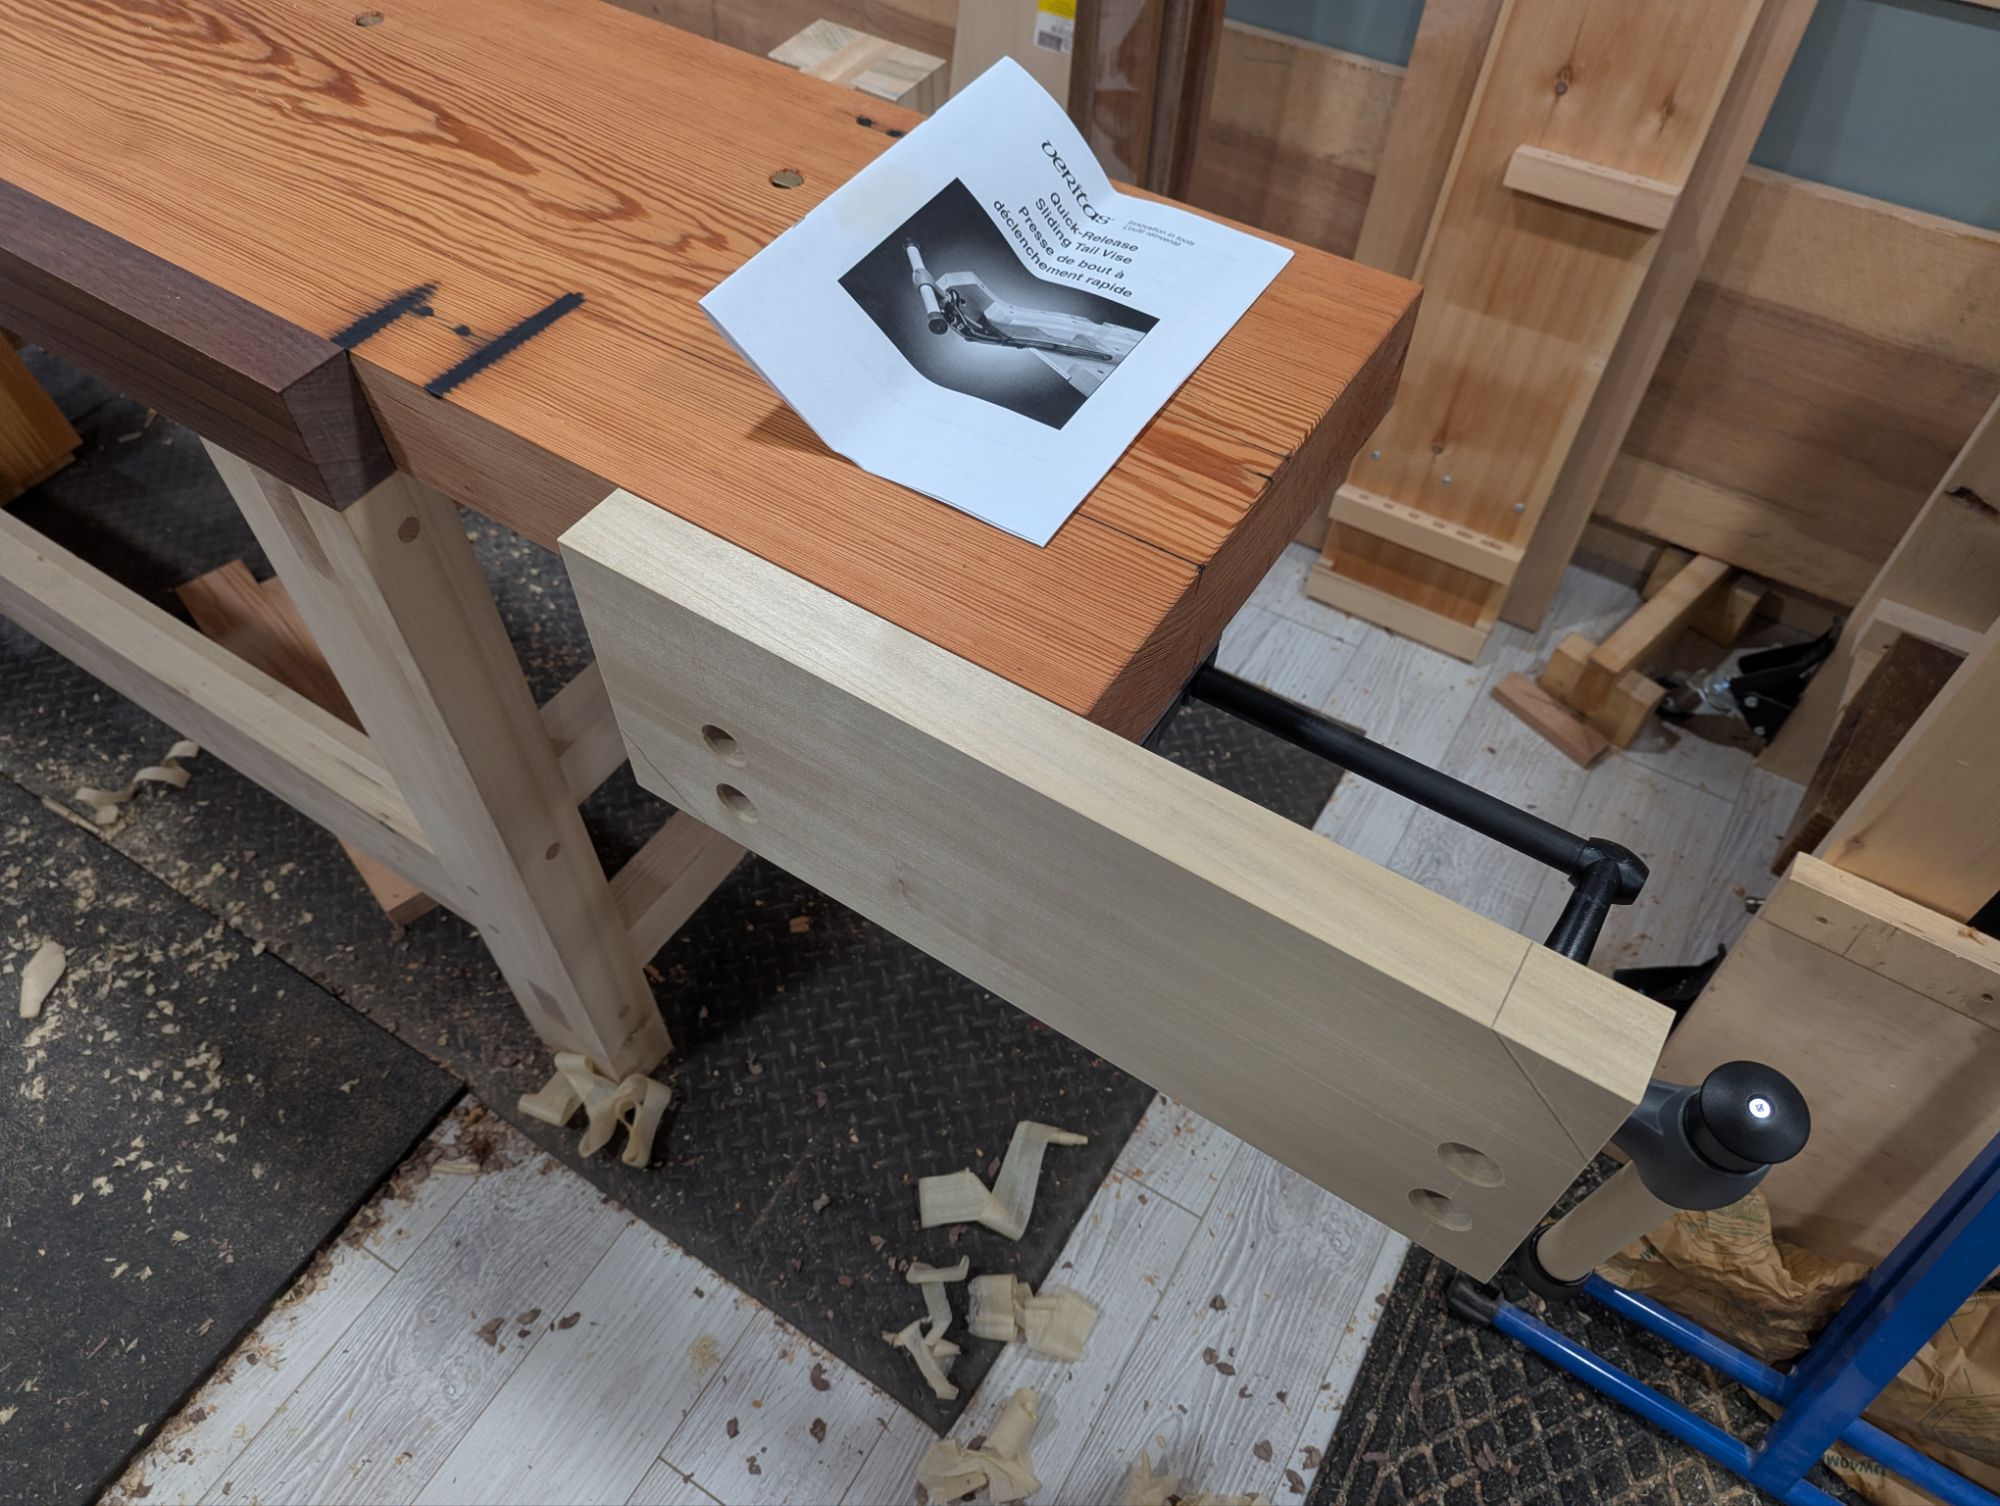
In addition, I finally unboxed my Veritas Quick Release Sliding Tail Vise and attached it to the workbench. I followed the directions exactly but I guess my vise (which I bought for myself in 2021, right in the thick of the pandemic) had some issues with the casting or the machining. The attachment points for the vise chop were not in plane (more than 1/16″ off) and the threaded holes for the bolts to attach the vise chop were not spaced as described in the instructions (exactly 1/8″ off). Perhaps there was a setup issue in the factory?
This meant I had to scrap the continuous grain walnut vise chop and laminate a new one out of poplar (again, trying not to buy new materials for any part of this workbench).
Kind of annoying but ultimately not an issue.
It’s still a very nice piece of hardware and works great (after I was able to sort out the problems with some fender washers as shims and the aforementioned replacement vise chop). Outside of the irregularities the build quality is great. I have no doubt it’s just a bum unit from the dark times when quality control wasn’t ideal. It happens.
I by no means intend to stop shopping at Lee Valley and I don’t want anyone to think I’m disparaging them. The instructions for the vise were detailed and super useful. If the mounting holes hadn’t also been off, I don’t think I’d even be posting this.
This thing is really becoming a Frankenbench, though.
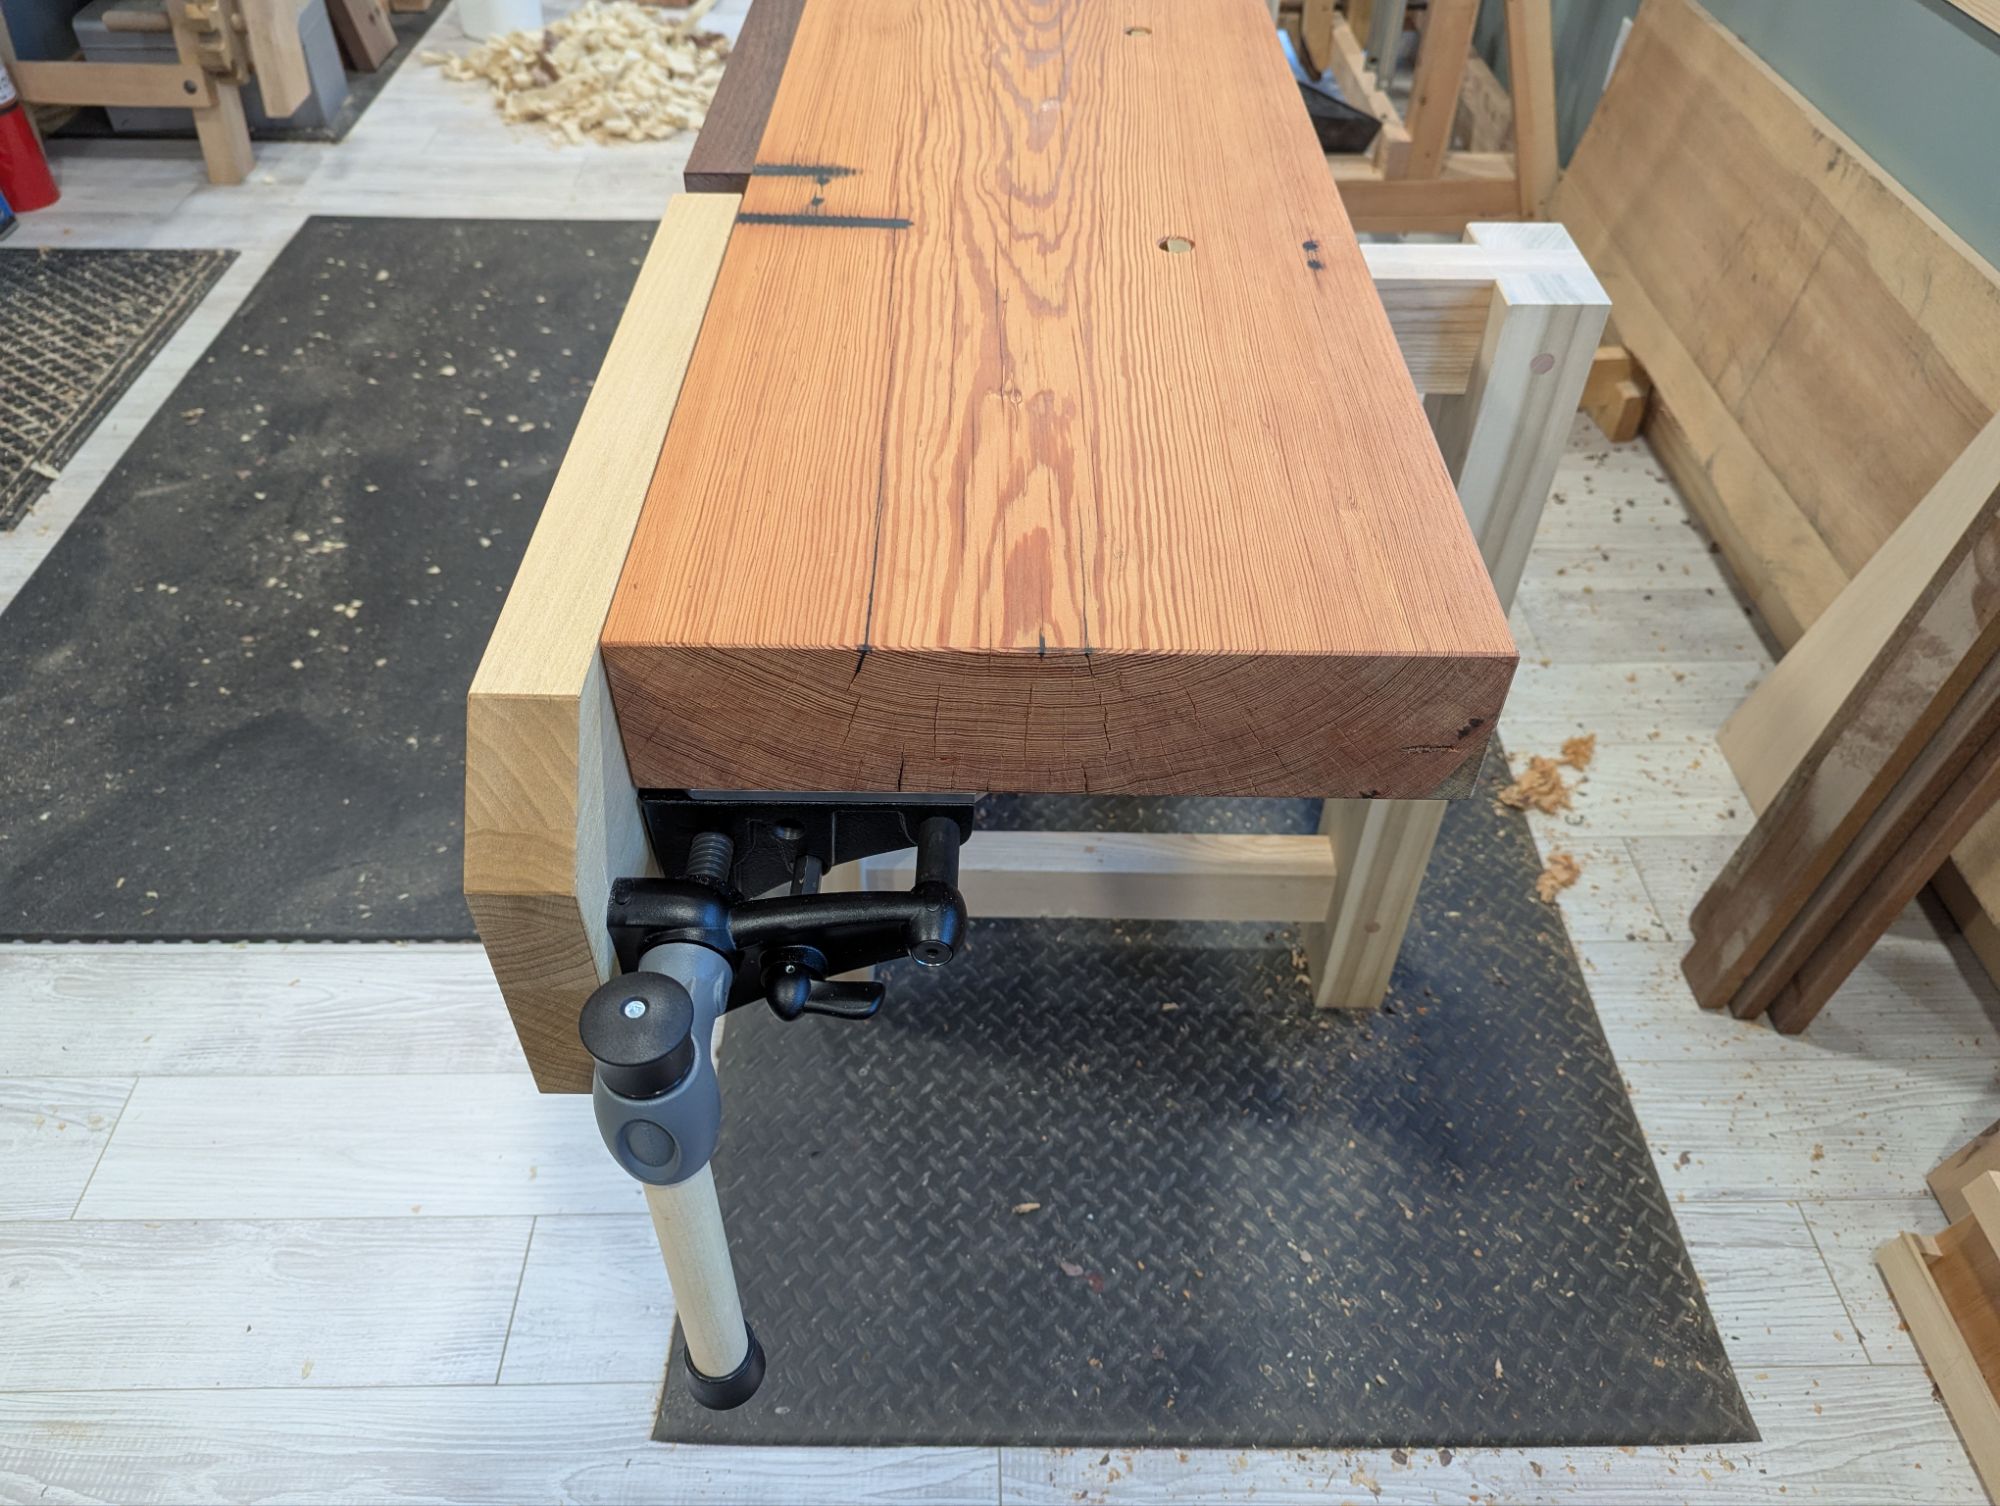
Having used the finished vise for a few days, I’ve noticed a couple things, though. First, the vise is clearly designed for thinner workbench tops. The first attachment point is 5/8″ below the underside of the workbench, so there is a lot of unsupported chop on a 3 1/2″ workbench top. This leads to some vise chop lift. I’m not quite how much clamping pressure would be lost on an even thicker workbench top because of the twisting force on the unsupported part of the vise chop.
Second, everything is attached with screws (No. 14 wood screws for the mounting plate and 3/8″ lag screws for the vise assembly). They are beefy, for sure. But especially for softwood benchtops, I bet carriage bolts would be a better long term option. If it works for metal face vises, it should work for this.
That said, I am not a production woodworker. So I doubt I’ll ever put enough stress on this vise to test either of my theories.
This weekend, I’ll be building the leg vise. This one will be pinless, with a metal screw (also Lee Valley) and a 1 1/2″ linear bearing (and carbon steel shaft), both from McMaster-Carr.
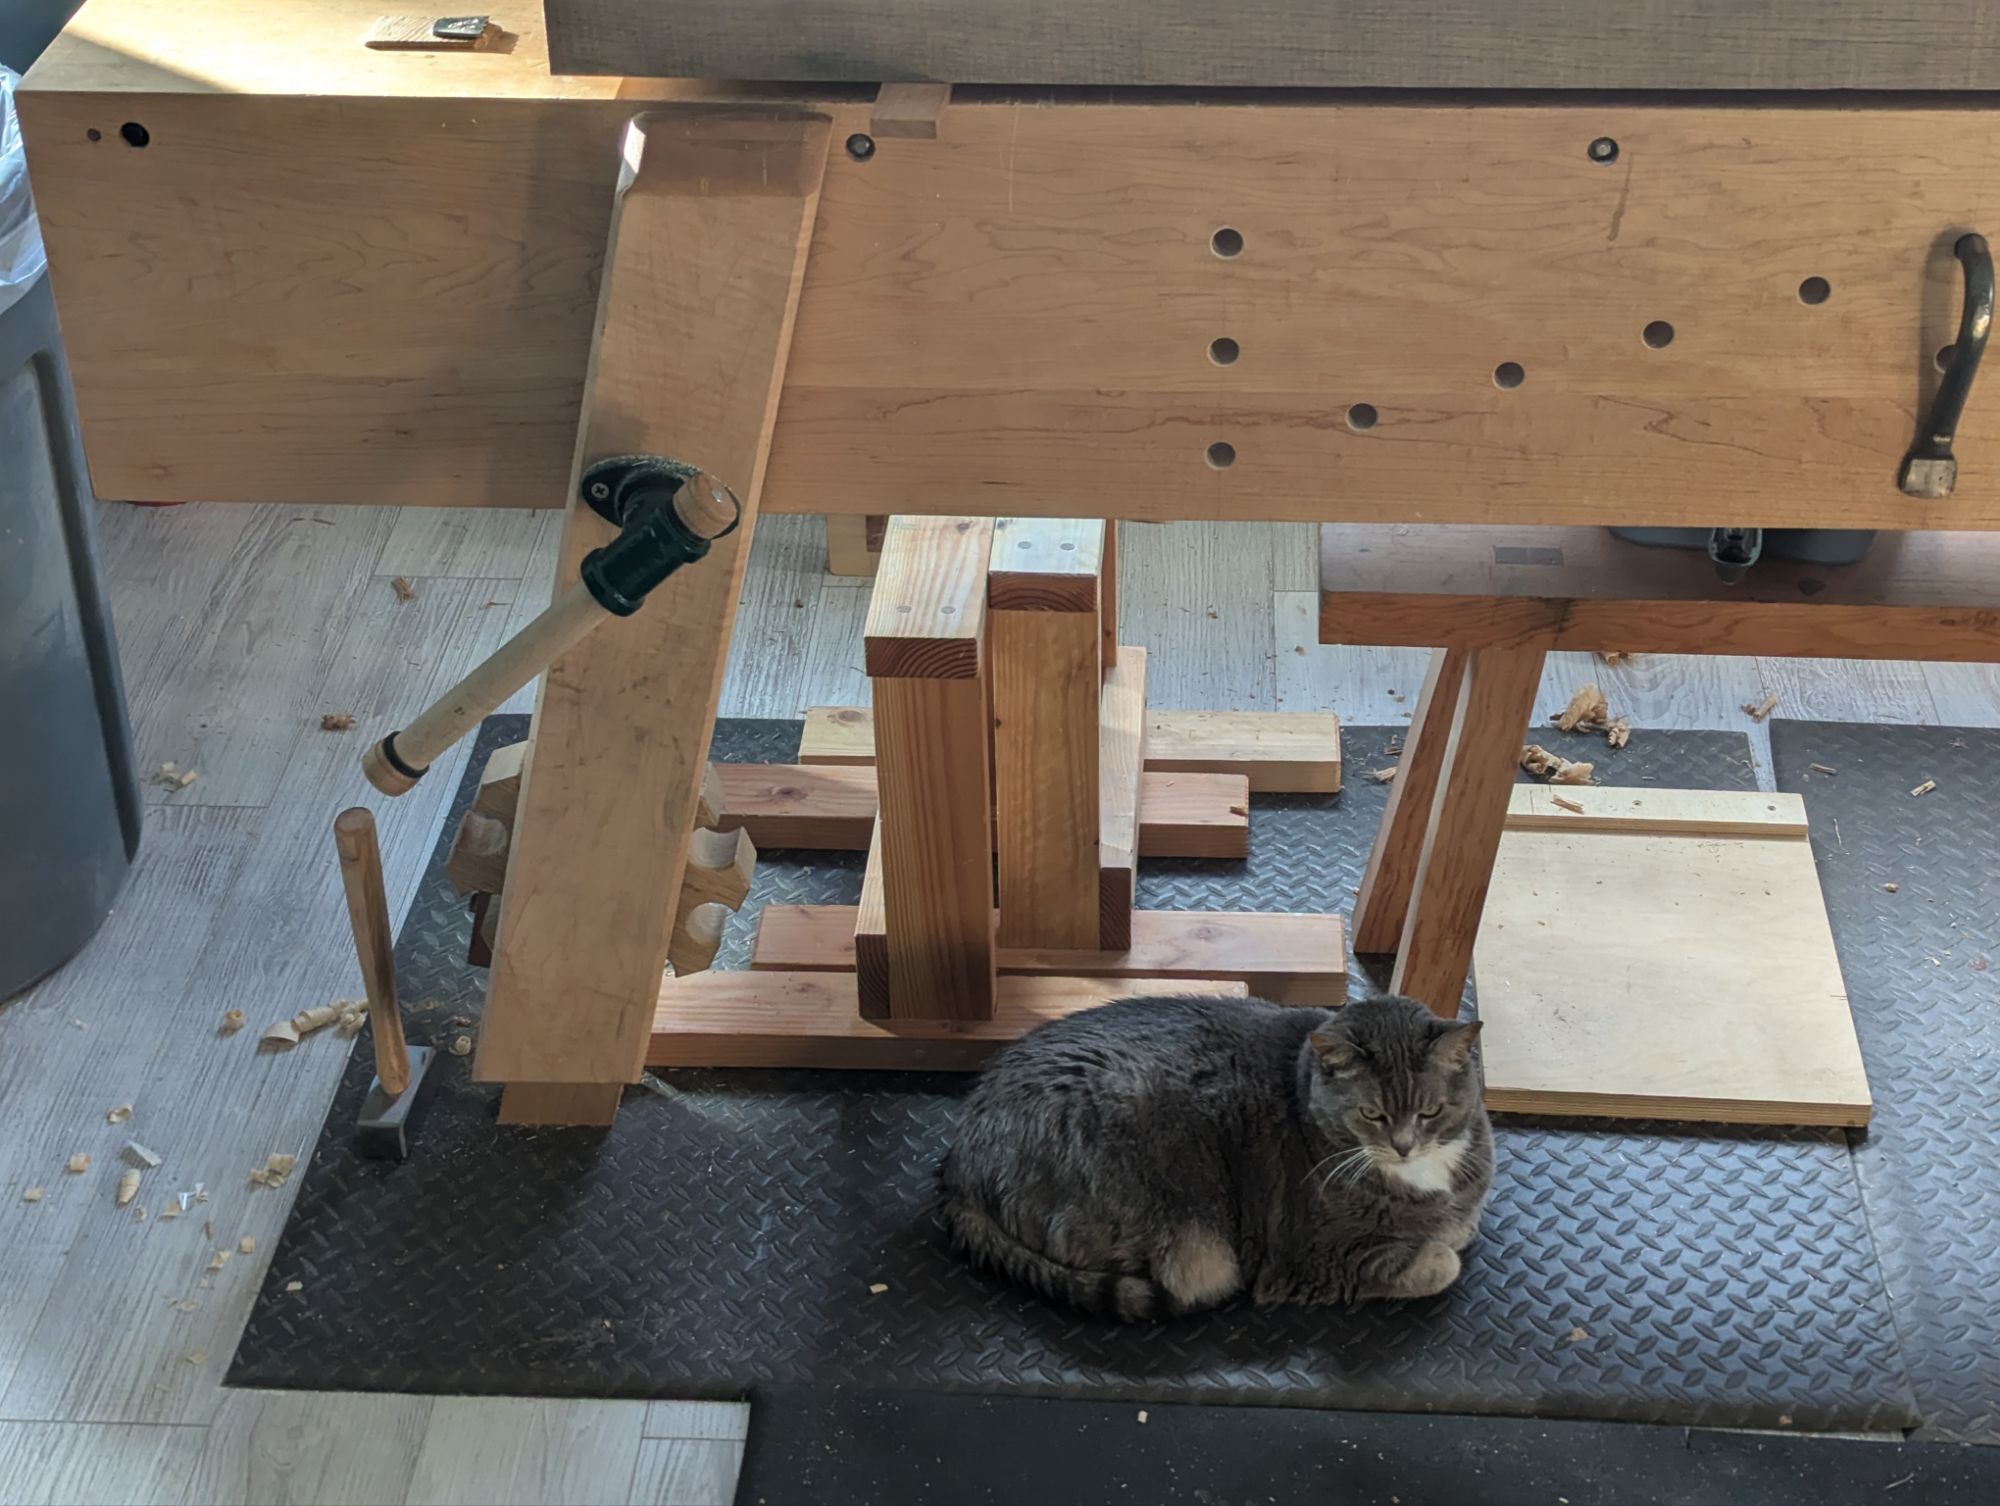
Hello, everyone! It’s July 2024 and things are weird, generally. The Mets, despite being a pretty shaky team, are in the playoff hunt. The world is on literal and figurative fire. And I have a new workshop.
Complete with shop cat!
More on that soon.
But today I’d like to revisit something I’ve talked about previously: rectangular tenons on low benches. It’s no secret that I’m a fan of the traditional Chinese workbench. And in the past I’ve showed off several versions of a sawbench or sitting bench that use angled, rectangular tenons. But today, I’d like to do a deeper dive on how I lay out the angled mortises. Because if you lay them out correctly, it’s tough (but not impossible) to screw things up.
By definition, for any angled mortise, the mortise hole on the top of the slab is in a different position than the mortise hole on the bottom of the slab. Unless you want a super tippy bench, the top of the mortise hole should closer to the center line than the bottom of the mortise hole. And if it’s a compound angle, the mortise hole on the top of the slab will be closer to the midpoint of the slab than the bottom of the mortise hold (which will be closer to the end of the slab). This means that since the mortise (and the corresponding tenon) is a three dimensional object, there will be a portion of the entire mortise is completely vertical. Making angled tenons is, essentially, just strategically relieving the wood around that vertical mortise.
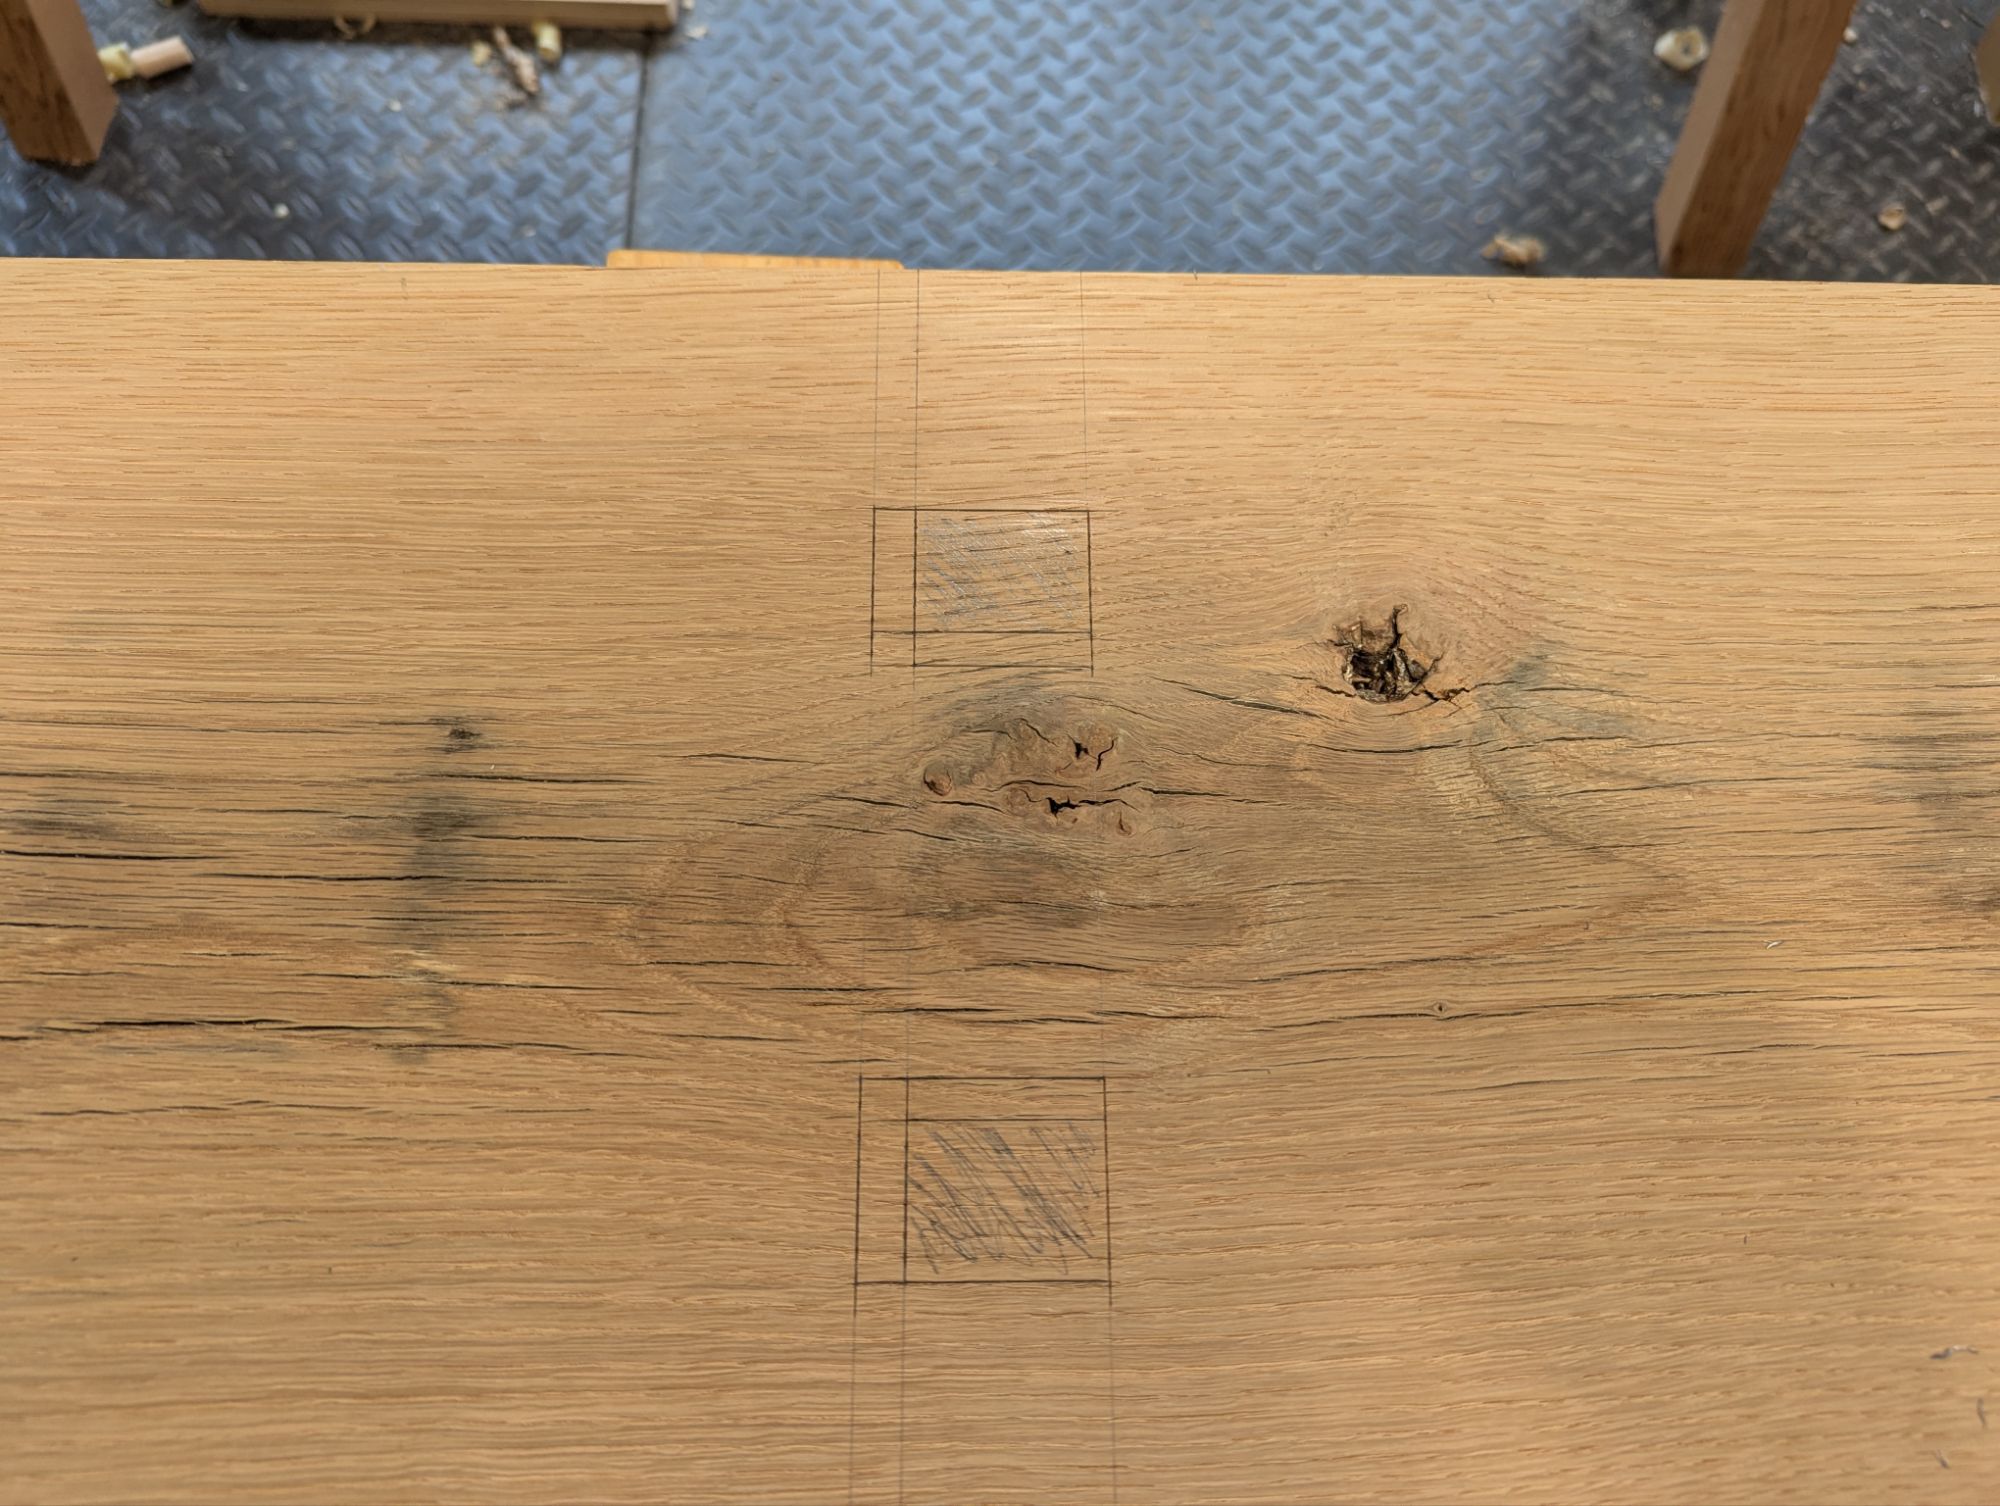
Take a look at the below image, which shows the layout for the mortise on the top of the slab. The greyed out area is the entirely vertical part of the mortise. The unshaded boxes between the other knife lines are the extants of the angled mortise. You’ll see that on the top of the slab, the mortise angles inward. In this case, because of the compound angle, it’s both inward toward the center line and inward toward the mid point of the slab.
The end of the slab is to the right.
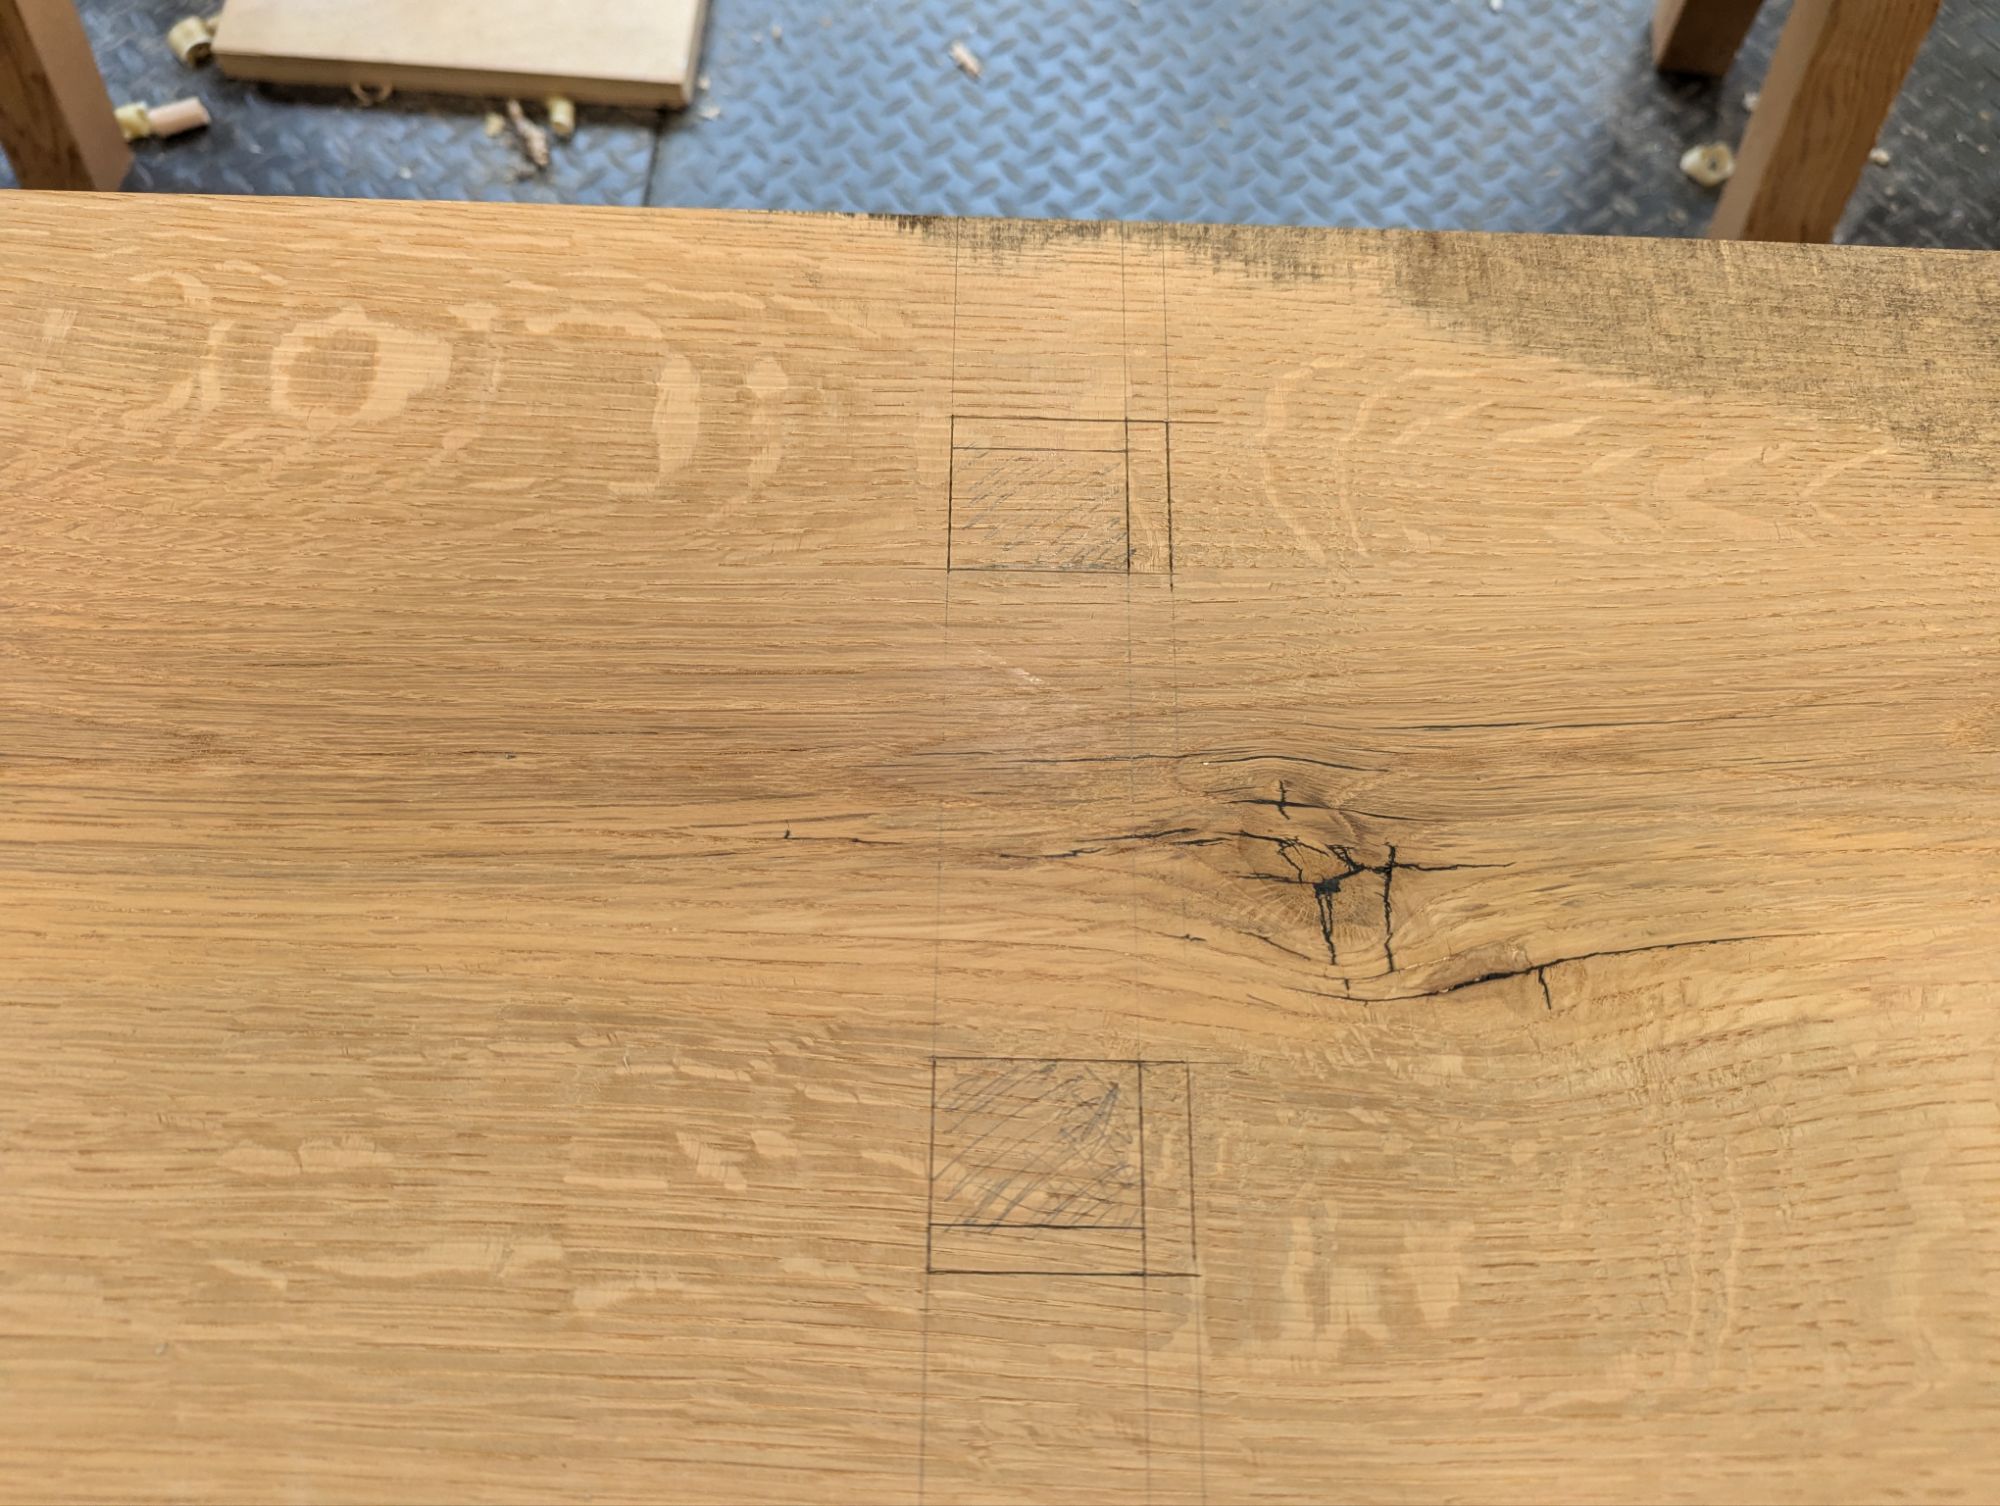
Compare that to the underside of the slab (shown below). The vertical part of the mortise is greyed out again. Because the legs are angled both forward and out, the mortise angles outward (both outward from the center line of the slab [and toward the edges of the slab] and outward from the mid point of the slab [toward the end]).
End of the slab also to the right.
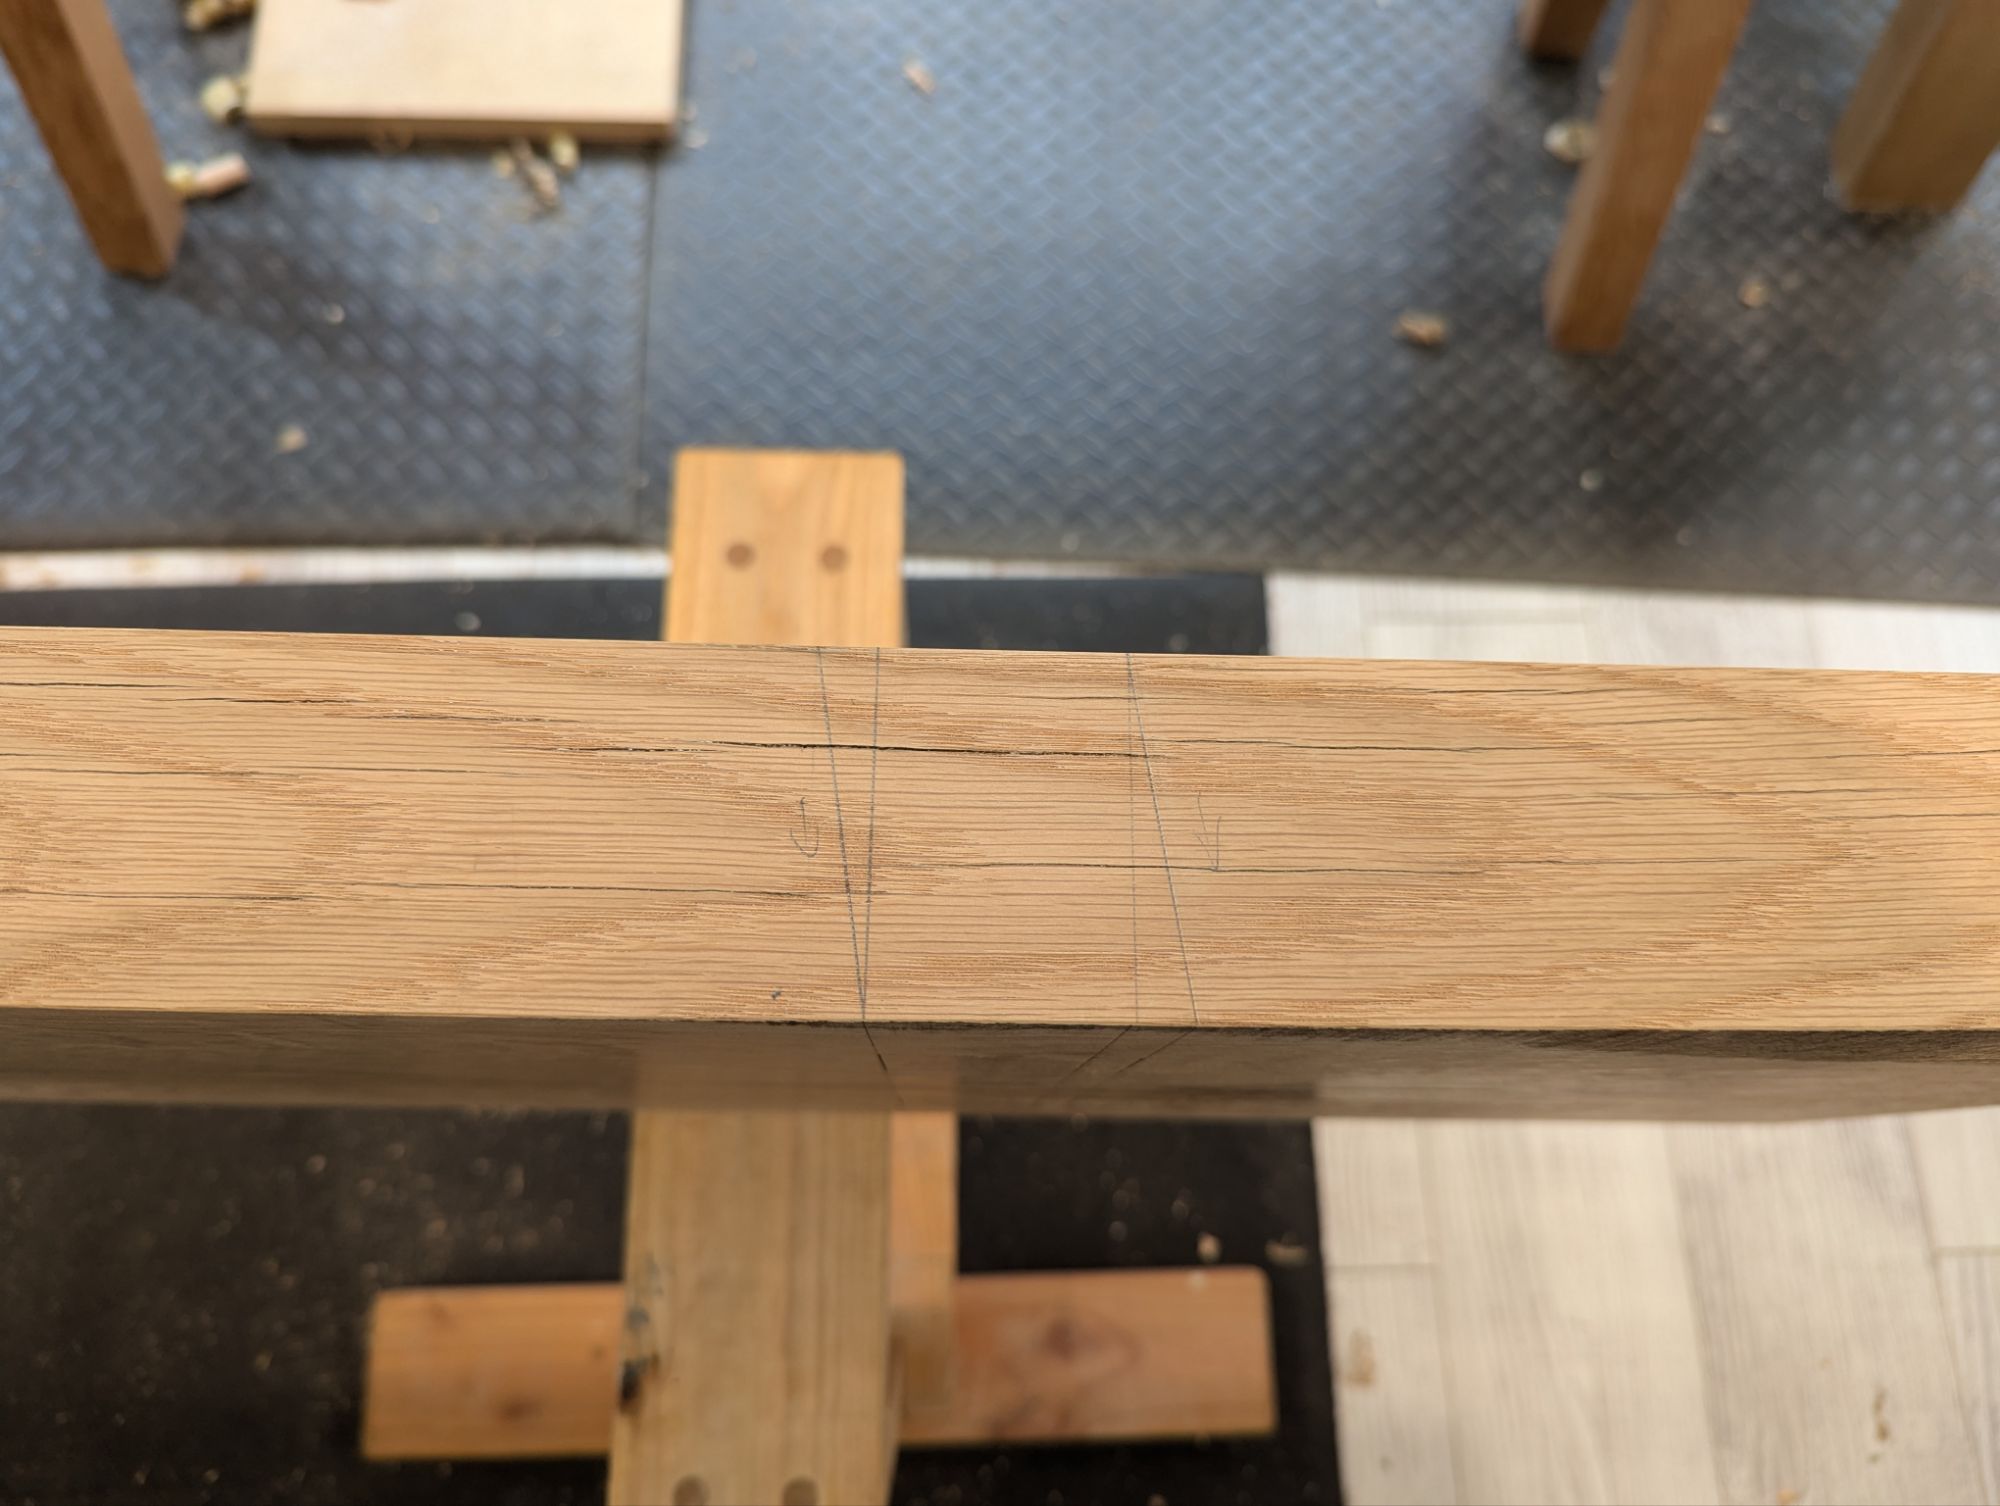
One more note: when laying out, I find it helps to carry your lines down the sides of the slab. This also can show the vertical parts of the mortise more clearly and make sure that is accurately carried around the edge.
I also use a trigonometry calculator to figure where to start the mortise on the top of the slab so the legs don’t stick out too much beyond the plan of the slab itself. For most slabs in the 10-12″ range, the mortise on the top side of the slab should be centered around 2.5″ away from the center line.
This just lays out the forward rake.
So what is my preferred method for cutting these angled mortises?
First, I would bore out the vertical part of the mortise with a brace and bit and then pare roughly to the lines. Second, set up a bevel gauge and chop down the angles until I get pretty close. Finally, use a block of wood as a paring guide to refine the mortise until the angle is perfect. Then cut the tenon to fit each mortise, as there will likely be some slight variance in mortise width (and the wedge will take care of any variance in mortise length).
What are some other viable techniques? If you go the chisel only route (i.e., no boring it out first, which is the traditional method), I would still recommend chopping the vertical mortise first. Then you can pare it down to the lines as described above, with or without the guide block. I do not recommend freehanding the angled mortise right off the chisel. At least not for furniture grade pieces. For a workbench, it’s probably fine.
Once you have the vertical mortise, you could use a floats, rasps, or files to shape in the angles. These tools are also helpful to refine the angles and make everything as uniform as possible.
The nice thing about rectangular mortises is that you really don’t need any of the above special tools. You could do the entire thing with a chisel and mallet no problem (and I’ve heard that the lack of boring tools in China is how the form came to be). Although, although a bevel gauge and a rasp or coarse file will definitely help.
Next time, we’ll talk about cutting the tenons. Including how to cope the shoulder so it mates perfectly with the underside of the bench.
Happy New Year, everyone! I realized I missed my usual “6am Eastern on New Years Day” post. I think that’s because I went to an actual party and didn’t get to bed right at 730pm like I have for as long as this blog existed. But anyway…
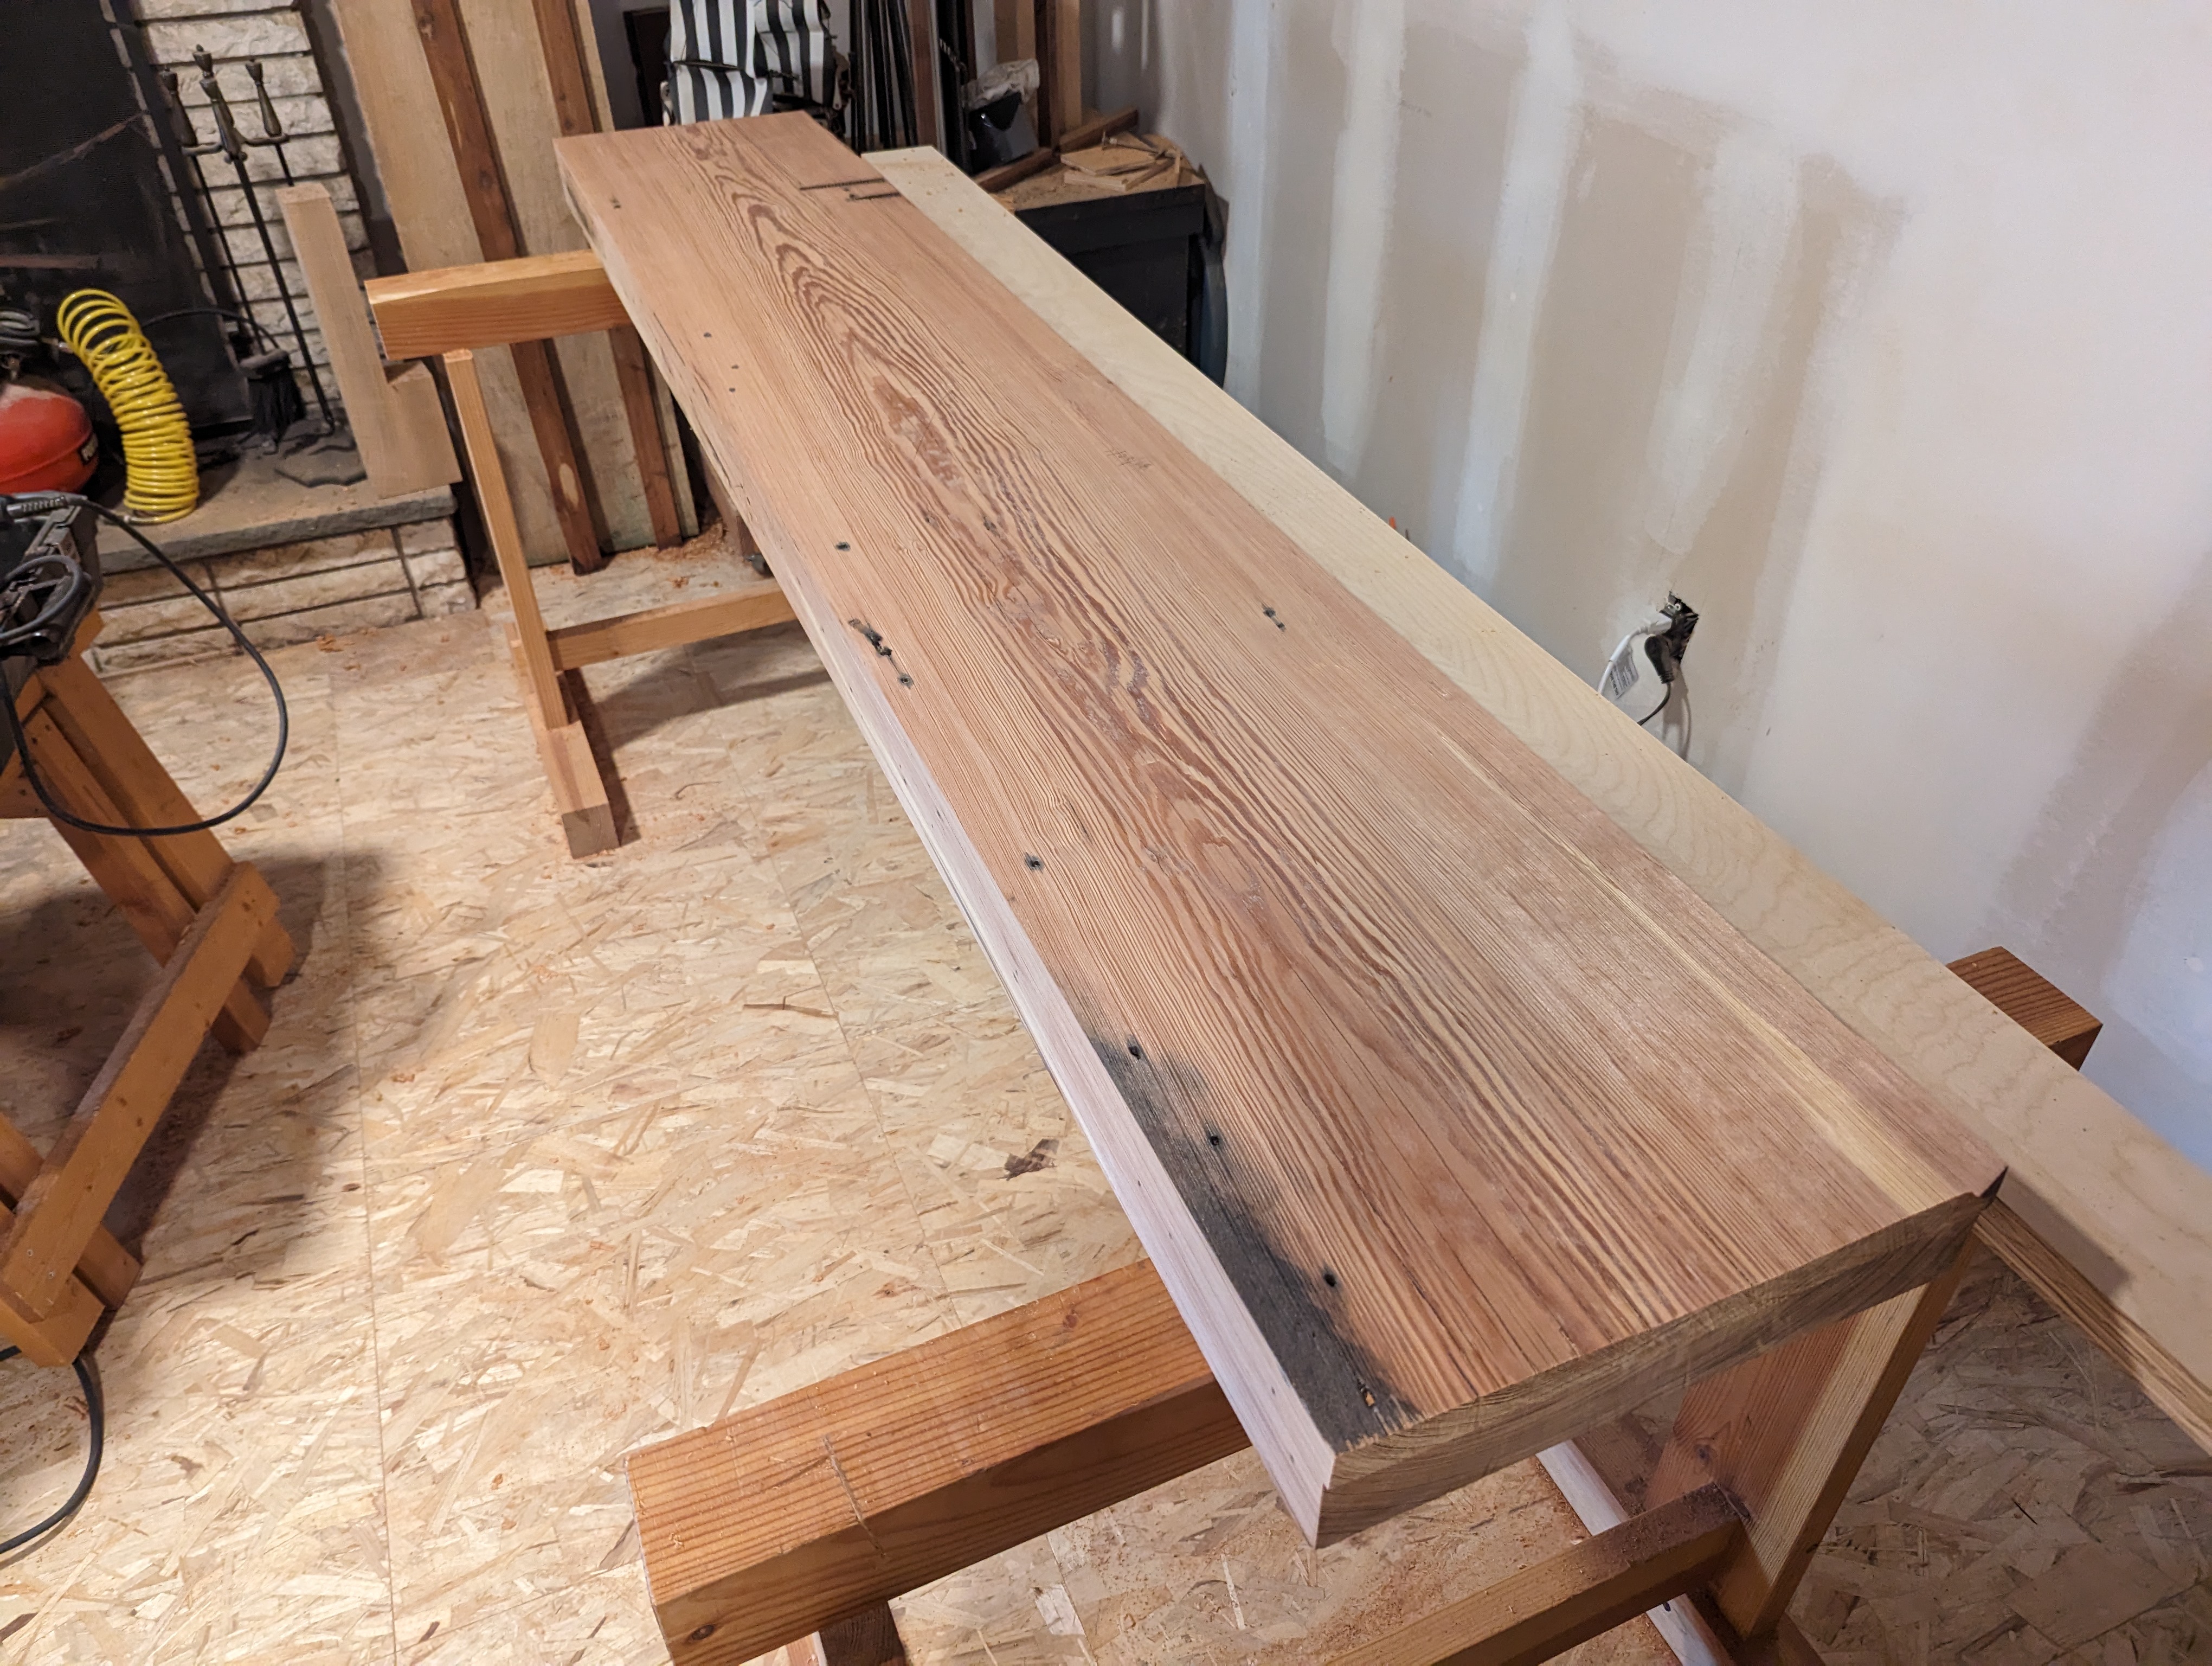
A while ago, I obtained an old growth slab of what I believe is Slash Pine (one of the species of Southern Yellow Pine) from a reclamation sawmill. It’s about 16 inches wide, 90 inches long, and after flattening is still a solid 3 1/2″ thick. It’s mostly flat at this point, anyway. I actually made an impromptu router sled because it’s so damned hard (the resin long ago crystallized and, between that and the barn grit in the checks, it was eating O1 steel for breakfast). This slab will make a wonderful workbench top once I laminate a fascia board along the front edge and square the ends, though.
And after I fill all the nail holes and bolt holes with tinted epoxy offscreen.
Another workbench, you say? Well yes, of course. I’ve been working on my 8 foot maple Nicholson which I made in the thick of the pandemic. It’s got the nicest leg vise I’ve made (it’s angled, uses a cog and screw instead of a pin board, and opens and closes very smoothly). But I’m kind of over front aprons again; it makes using bench dogs in the top too difficult, even if the apron is great for edge planing long, wide boards. And I have just the one workbench at home after giving all the others away. A second wouldn’t hurt.
This new bench will be in the Shaker style, like at Hancock Shaker Village. Leg vise, tail vise, sliding deadman, some drawers underneath. In fact, I’ve already made the leg assemblies. But unlike the Shakers, this bench will knock down (like a Moravian workbench). And I have a linear bearing and a 1 1/2″ hardened steel shaft to use as a parallel guide for the leg vise instead of a pin board (or even a cog and screw or crisscross). McMaster-Carr is the best.
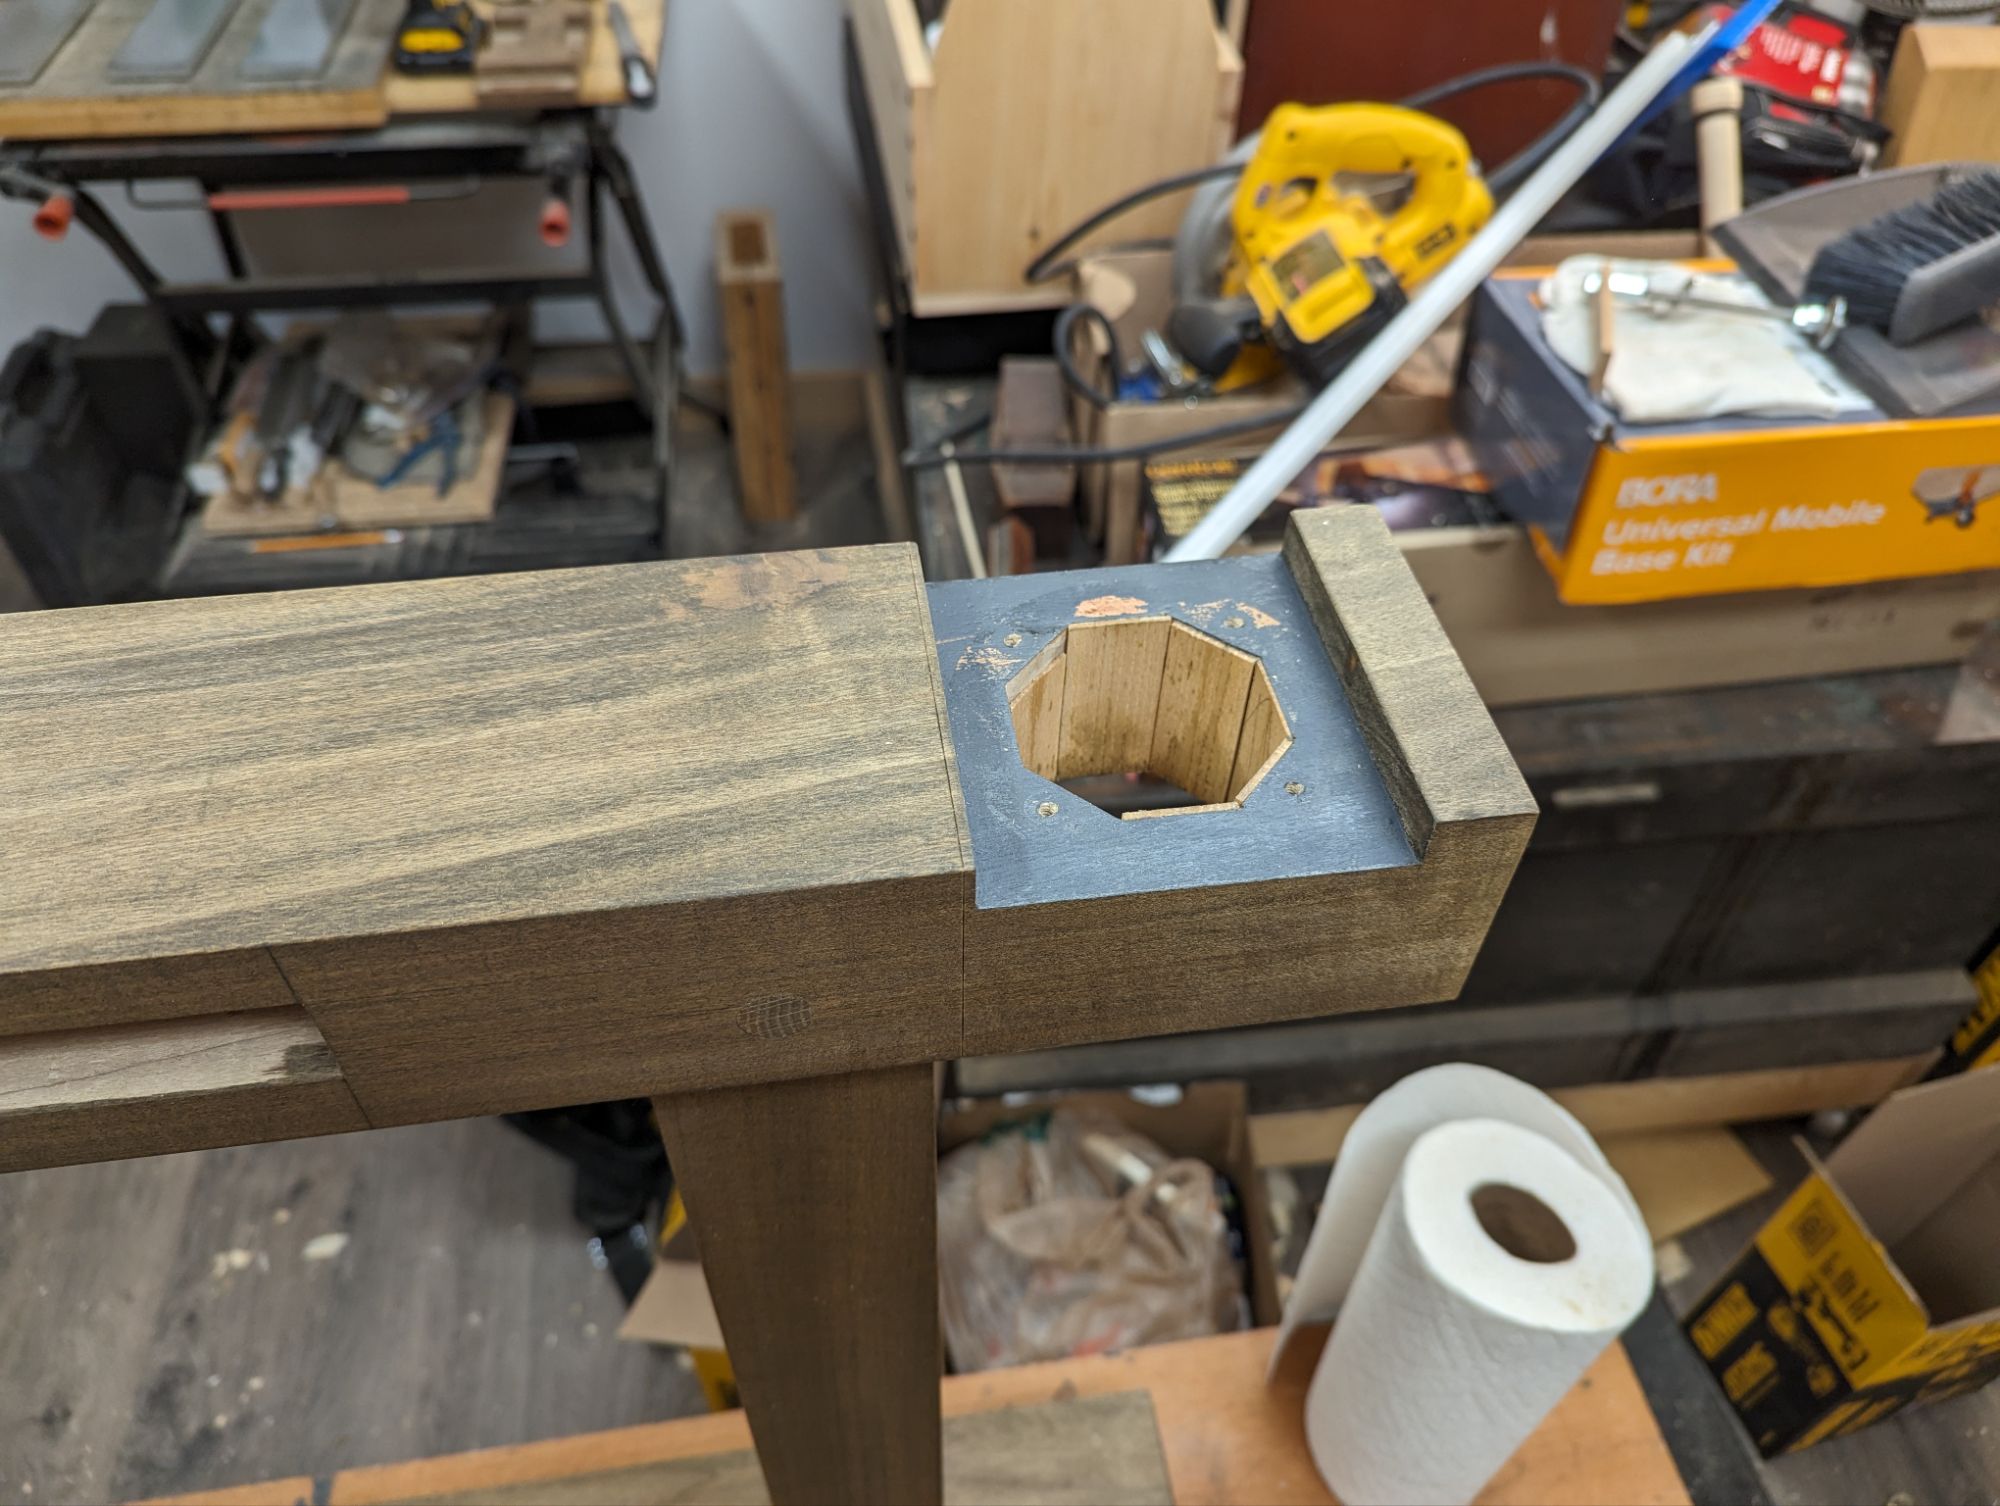
When making the recess for the linear bearing, though, I didn’t have a good way to make a 2 3/8″ hole. So I chopped it out octagonally. And it was scruffy and didn’t fit well and I had to shim it. All of which ate at my brain and caused me to set the whole project aside for a while.
I’ve finally come back to it. And it still eats my brain.
This is just not the quality I’m used to producing.
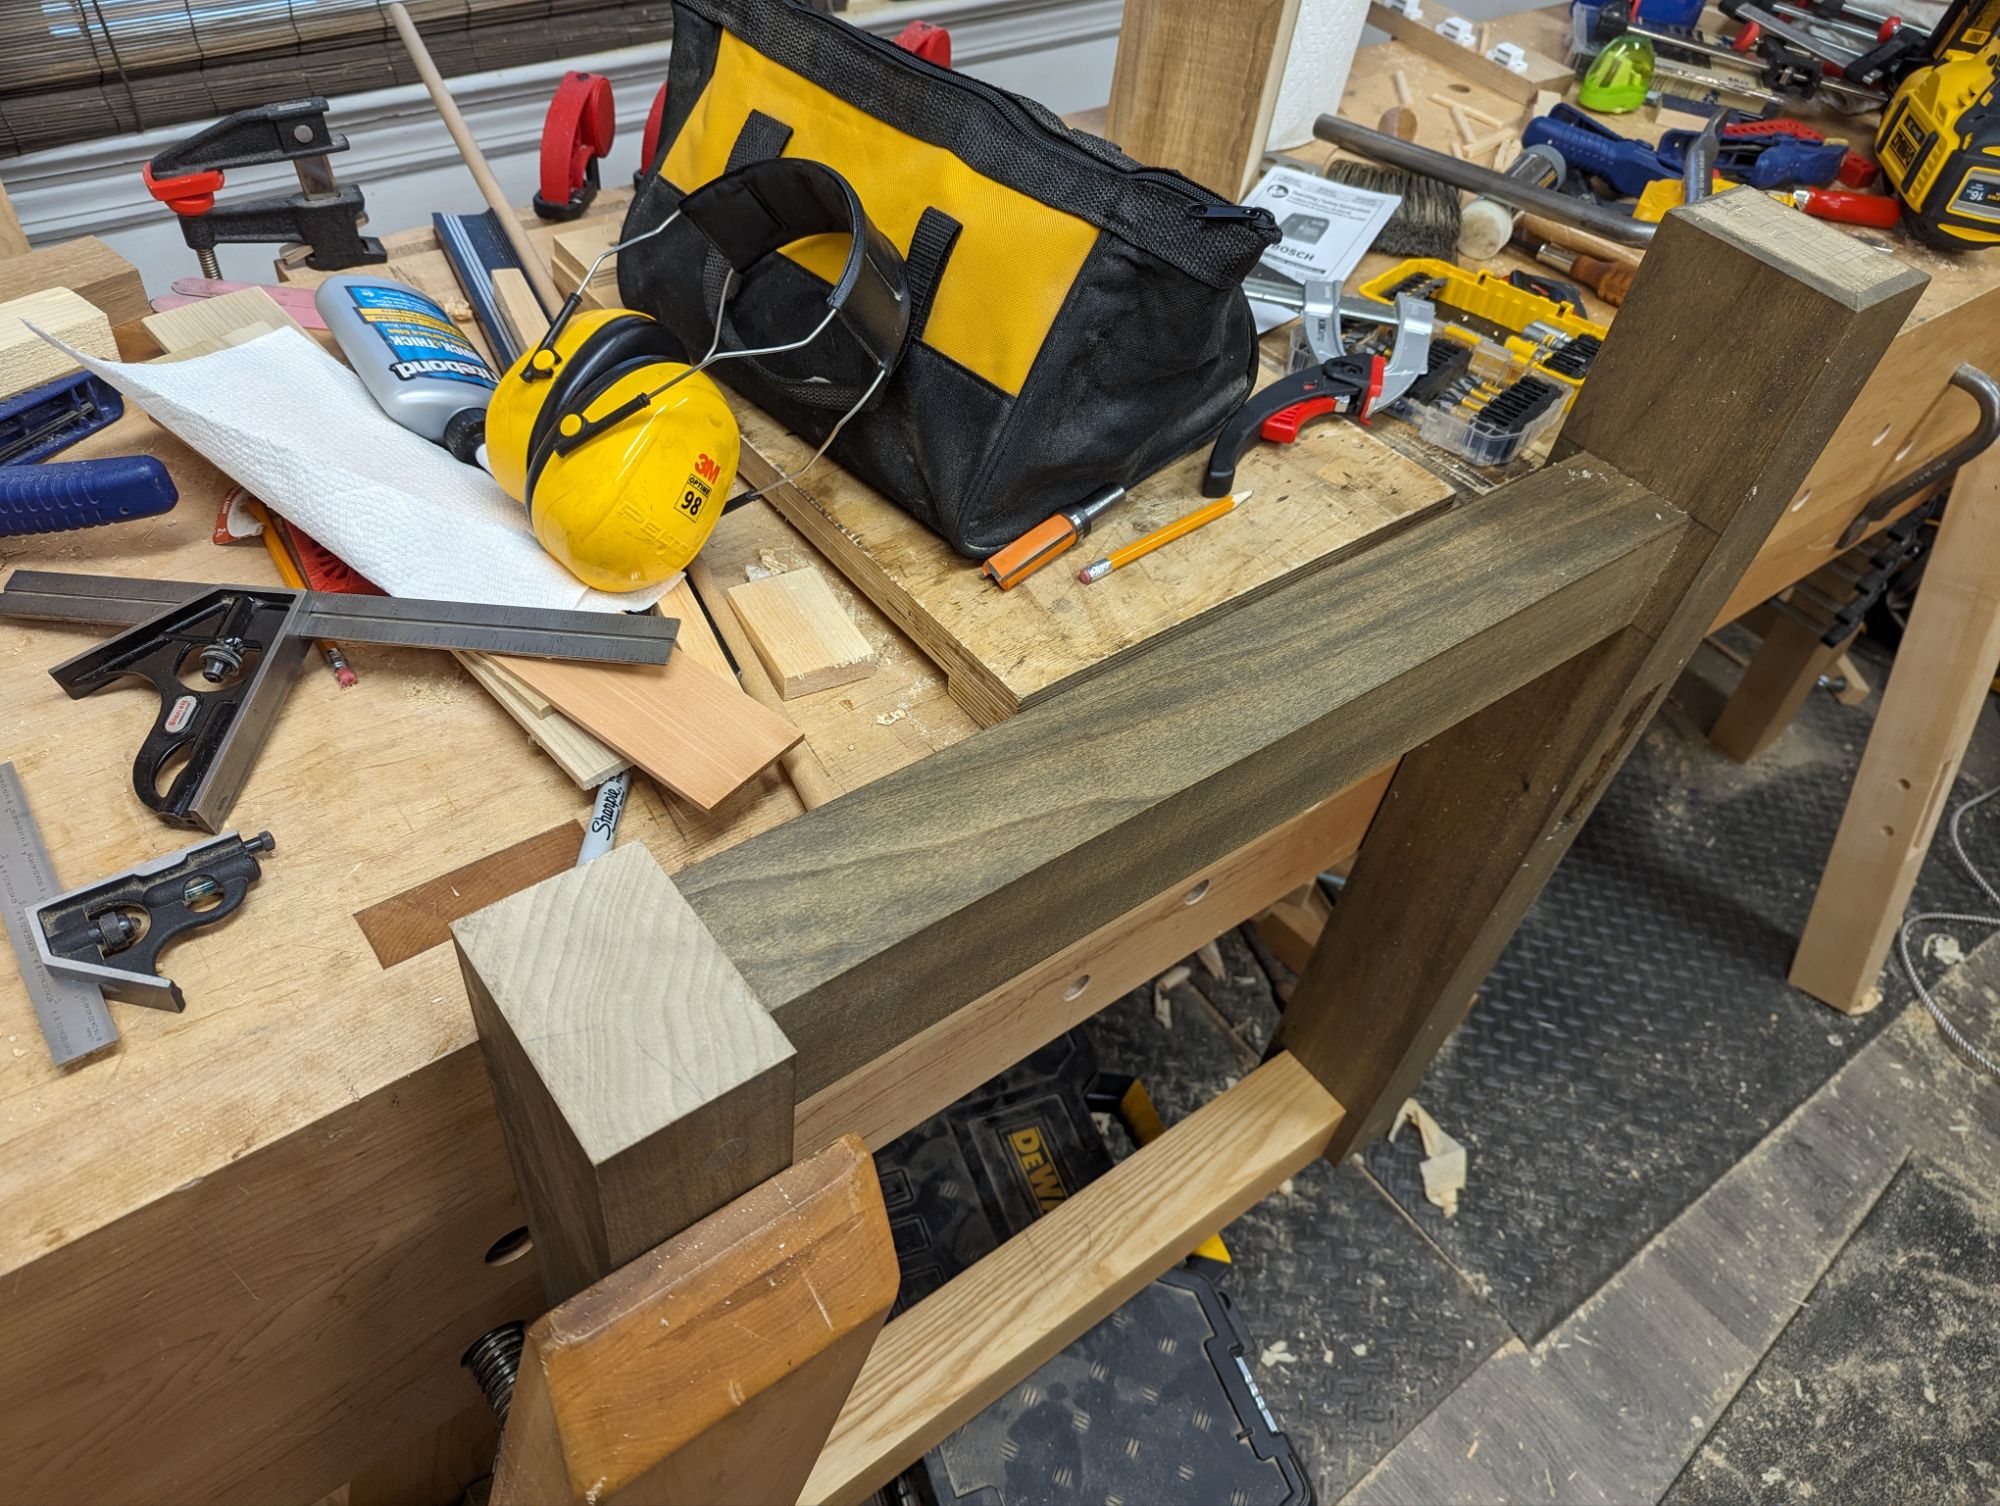
And what is a fellow to do when a bad bench installation is ruining a good time? Cut the offending portion of the leg off and add some wood back on, of course. About that…
First step was to saw off the offending area and square up the end grain. And also dig out and prepare an offcut of the same species that has a decent grain match. If I had access to a Festool Domino, this would essentially be the end of the process. Four dominos and some glue: Bob’s your uncle.
My workbench is an absolute mess as I do a few renovations.
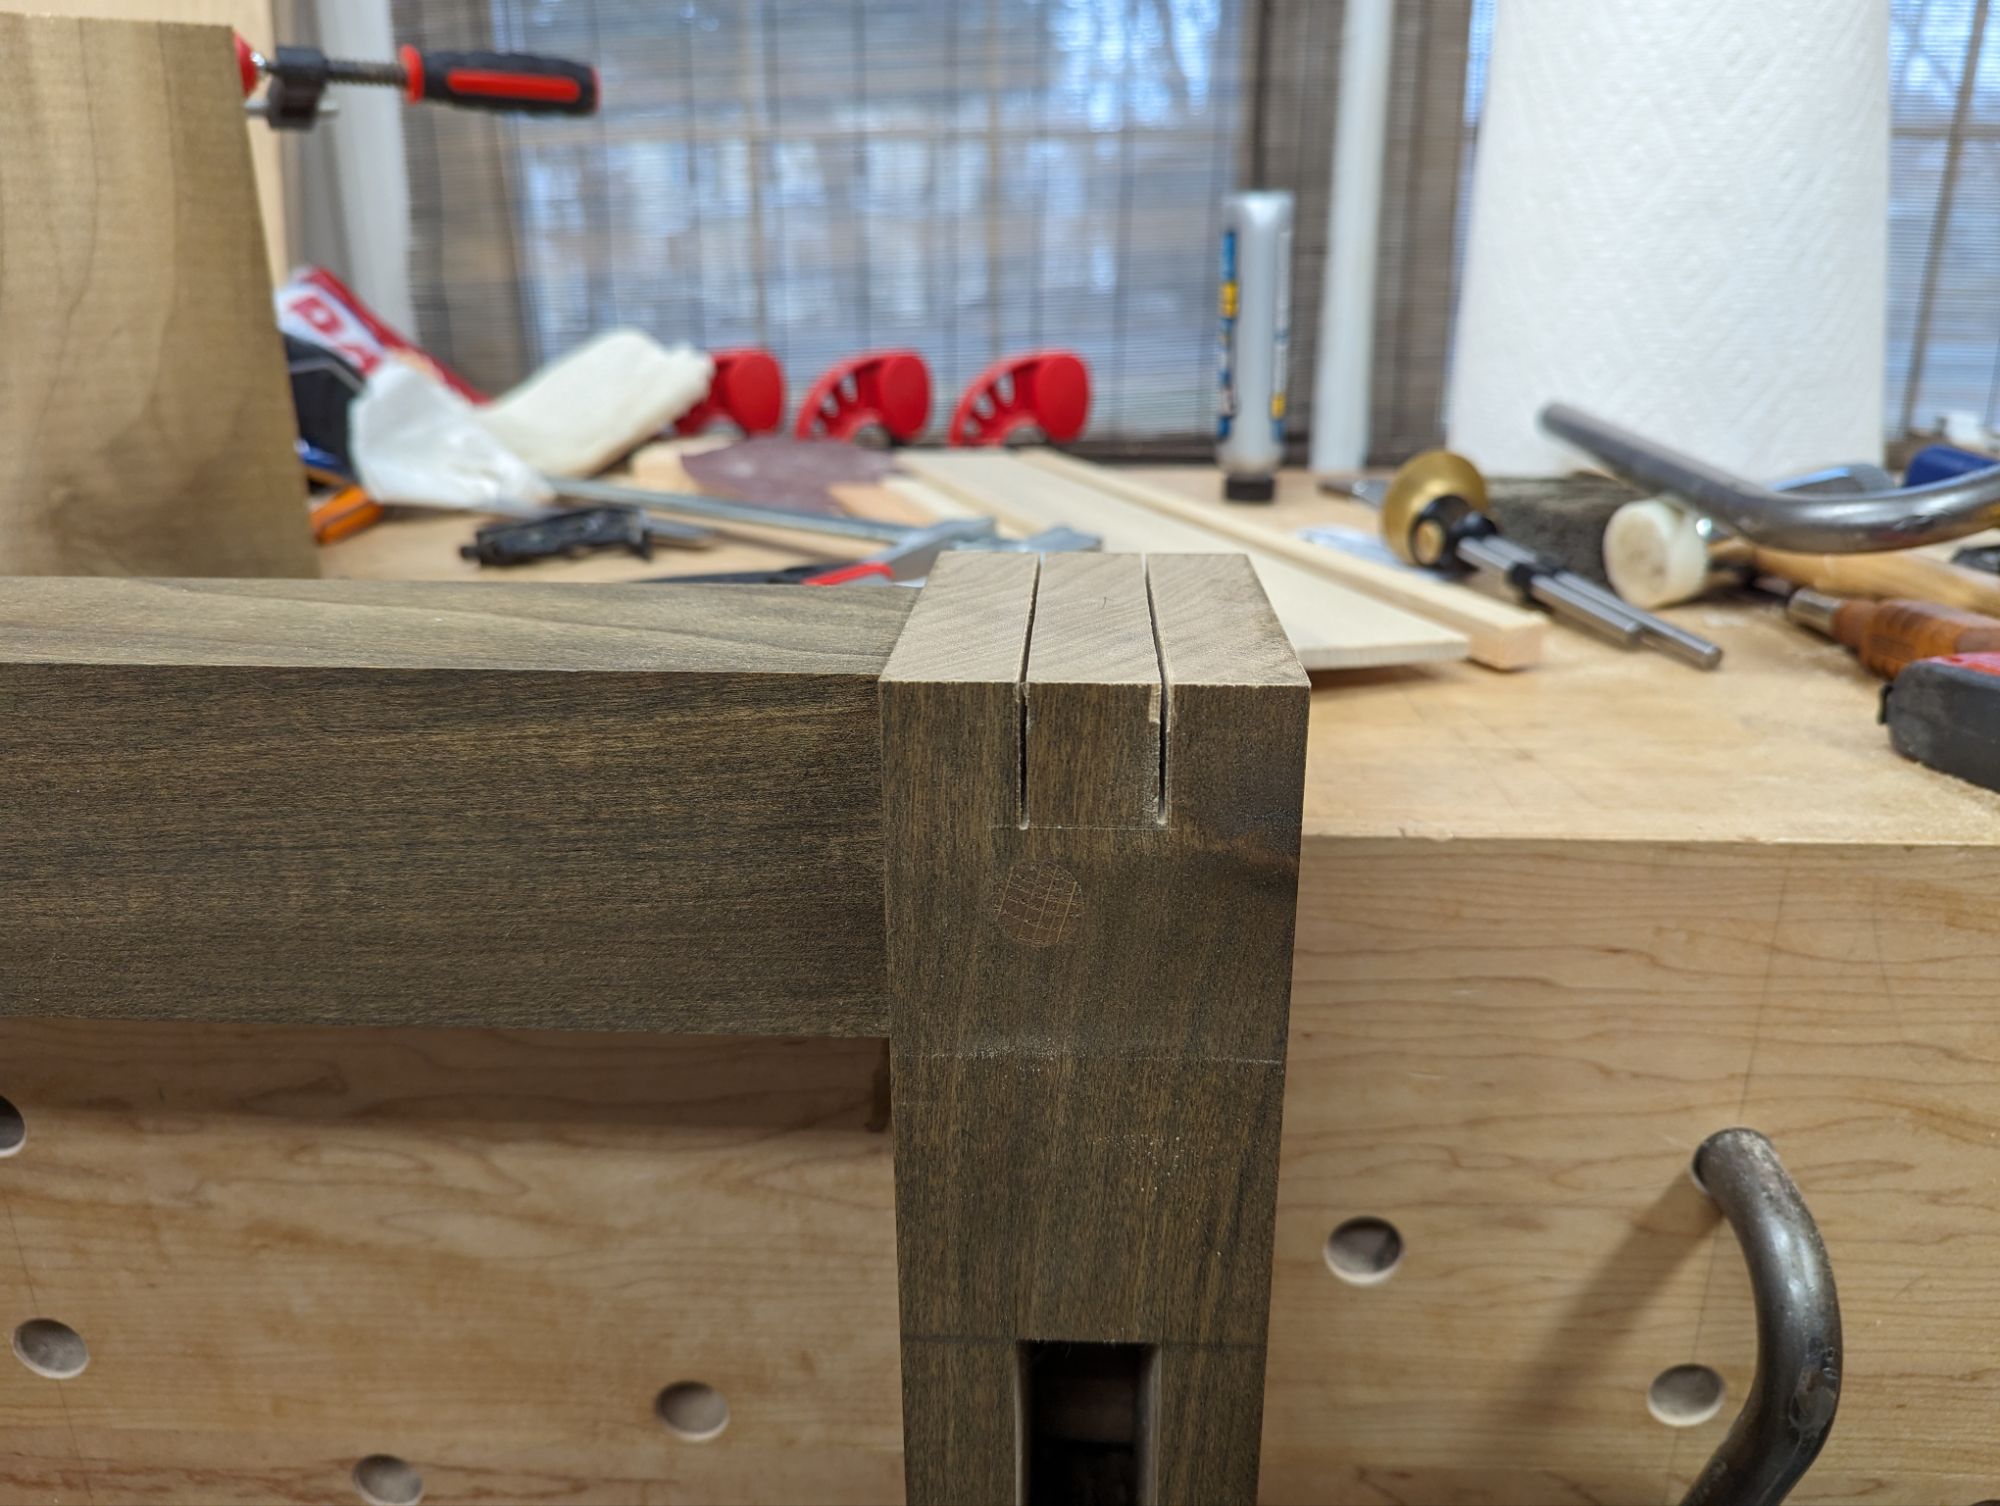
But absent a Festool Domino, how does one join two boards, end grain to end grain? Finger joints are probably the best option, because of the large amount of long grain gluing surface. For a hand tool guy like me, that’s essentially a bridle joint. I think in this application, it would be strongest if the mortise was in the remaining leg and the tenon on the added piece. I almost made bridle guides, but that probably would have taken longer than just sawing and paring.
Now to saw down the sides of the mortise.
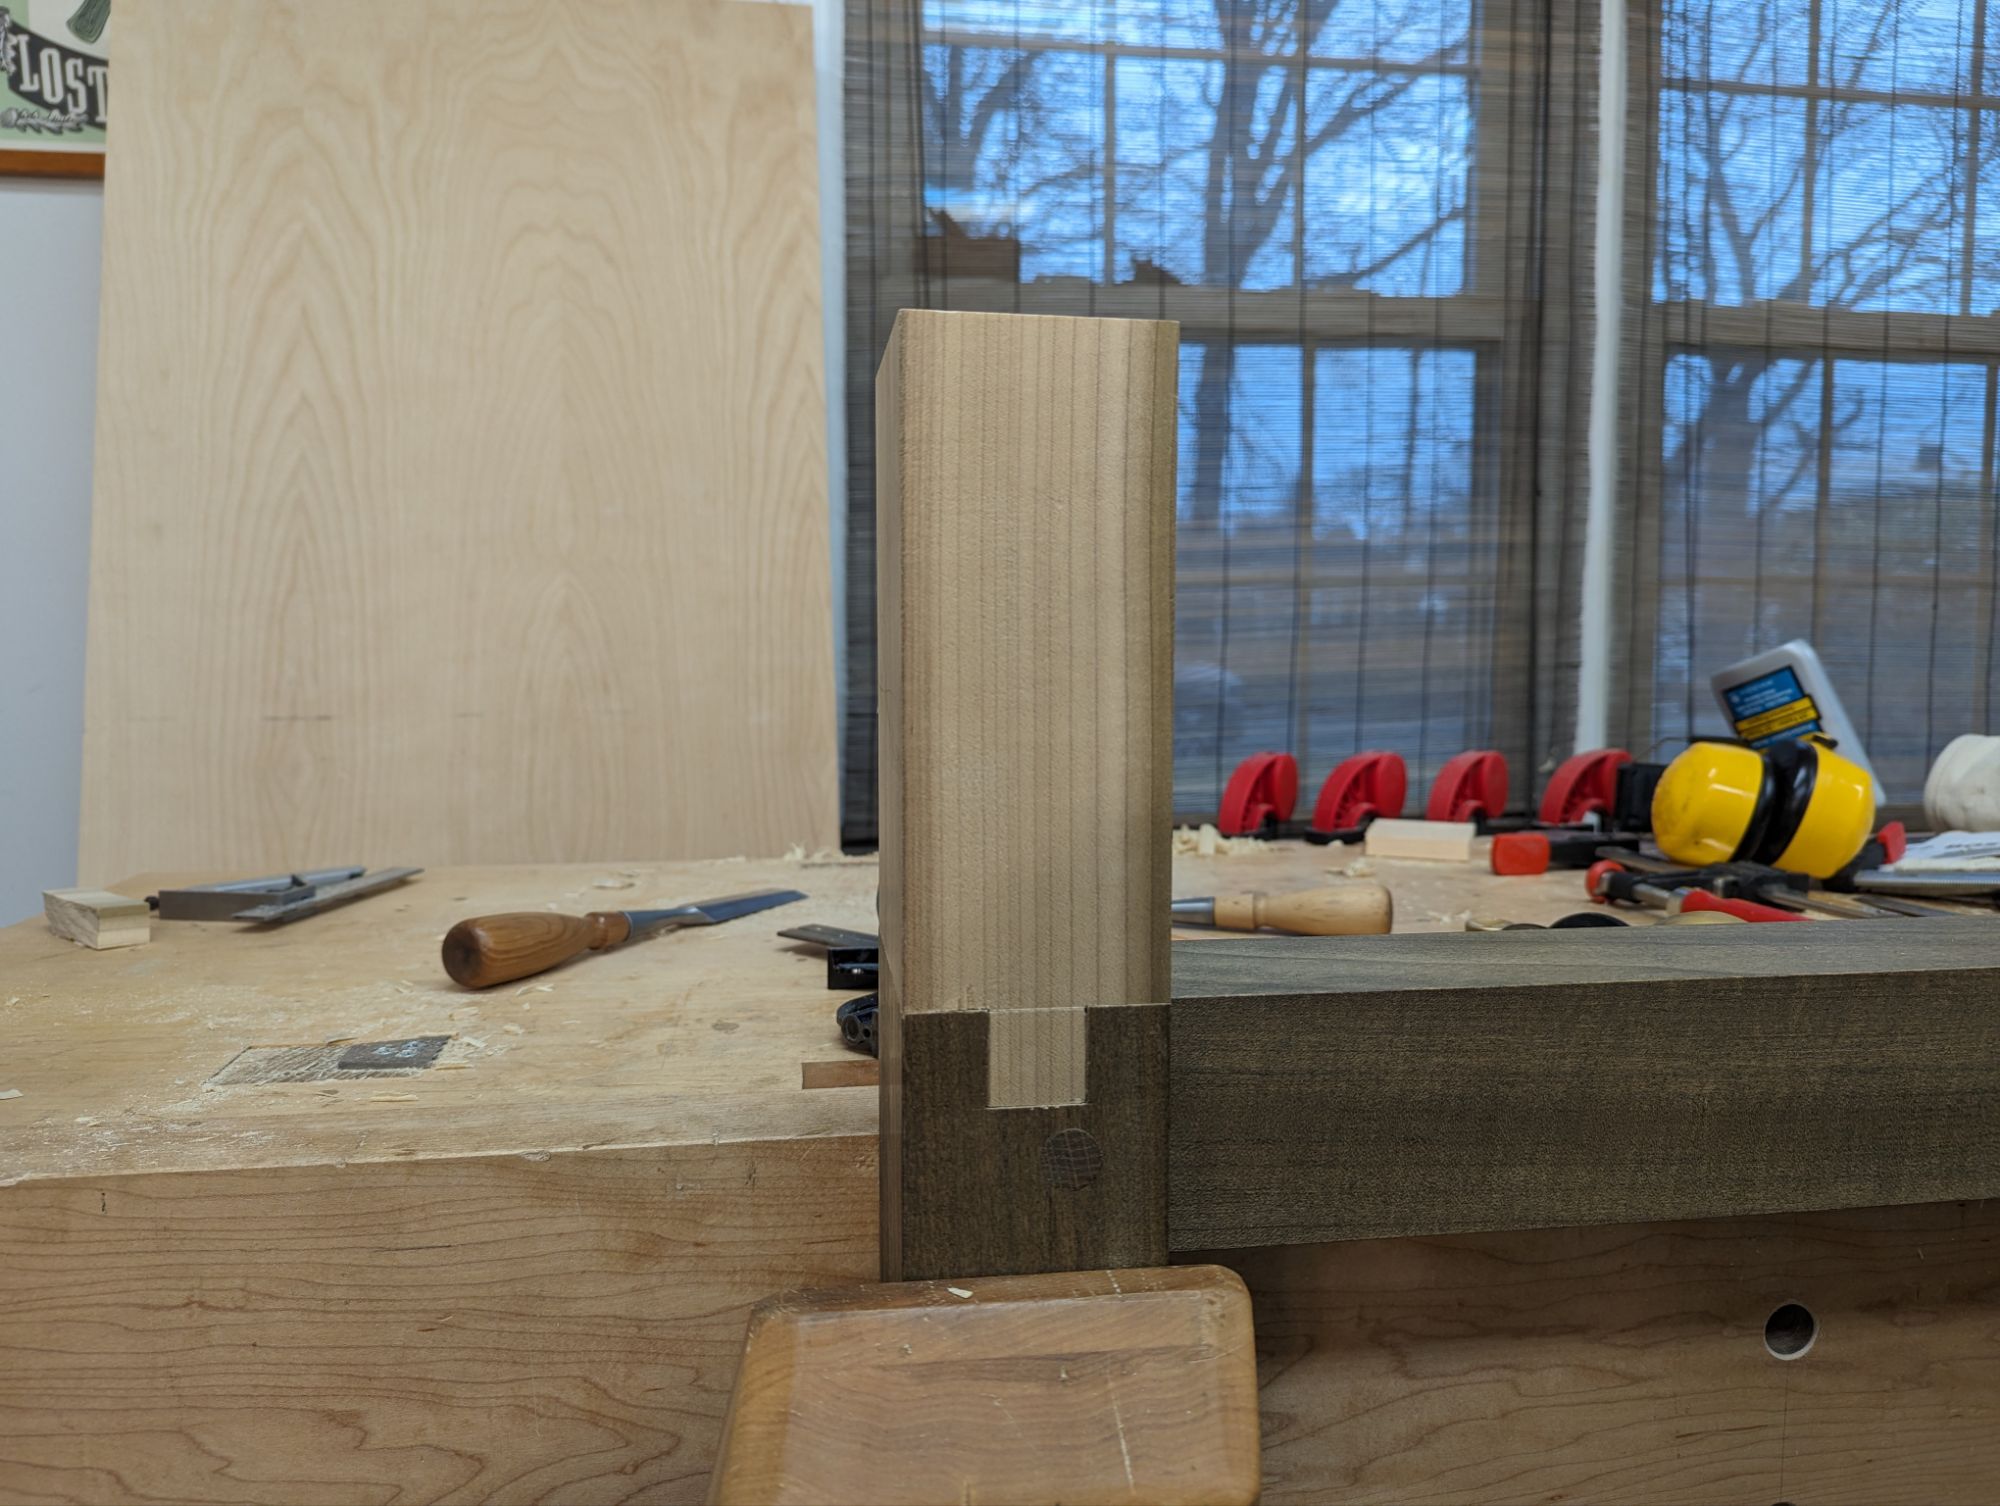
Once the mortise was nicely pared to the lines, I roughed out a tenon and finessed it to a friction fit with a router plane. Remember to ease the inner parts of the mortise to leave room for glue on the mating surfaces. A dry fit looked like so:
It was at this point when I realized the offcut was actually from the same board as rest of the leg. Fortuity!
Will a 1″x1″ tenon (with 7/8″ mortise walls) be strong enough for a front leg of a workbench, even with TiteBond Thick & Quick PVA? Fuck if I know. But this is poplar, which doesn’t split easily, so I think I’ll be okay. I plan to add a trio of 3/8 oak pegs as reinforcement along the length of the tenon, which should help. Maybe a couple of metal mending plates too just for luck. But I think it will be strong enough, even without pegs, as long as whatever parallel guide I use for the leg vise doesn’t bear just on the new wood.
Hopefully I can find the stain I used for the rest of the leg too.
To be clear, I almost bought a Festool Domino today. But I’m glad I stayed strong and didn’t. Not that having a Festool Domino is bad; I just kind of enjoy doing things the hard way. And I do think this fix is a good solution and should stand the test of time.
Things are weird right now. Well, now and for like the last couple of fiscal quarters. But one of my happy places is casual dovetailing with whatever scraps I have hanging around. Often, that casual dovetailing ends up in a toolbox which gets gifted to a friend or loved one. This one, though, I’m keeping for myself.
Why does everything look like a casket?
This particular tool chest is for outside woodworking, so one of the important things is making sure the rot strips hold up. So I went to the MAX with some sort of plastic that is used in boat building. They’re pretty slick when sitting on engineered surfaces, but they work great on grass and concrete. Plus they (and the stainless screws) will never rot away.
That’s a lot of nails!
The inside of the chest is pretty utilitarian; essentially, it’s a gentleman’s chest. The well is big enough for both a No. 7 and a No. 4 or No. 5 bench plane, and the saw till holds one back saw (a carcass saw) and one hand saw (a modified Simmonds that I cut 4″ off the toe and re-toothed at 11tpi rip cut). I also added a sliding till for holding chisels and marking tools, although a combination square sits on top of the saw till at the back of the well.
I actually use my Narex spare chisels and my Veritax spare carcass saw.
All in all, I think I’ve hit the right balance with this tool box. Some prior versions didn’t quite work out, for various reasons. But this one is easy to carry, holds the right amount of tools, and best of all, it used up the last of my Driftwood paint from General Finishes and cleaned out some of the scrap pile. I didn’t get a good shot at it, but I also got to use a few pieces of scrap cherry as battens along the edges of the lid to keep it flat.
The lid is the nicest piece of pine in the entire build.
So if you’re wondering why it’s been so long since I last posted, it’s because I’m rather displeased with the new wordpress blocks system. They’ve removed some basic functionalities that I’ve relied on since the beginning and it’s so dumbed-down it’s clearly meant for non-facile folks. It takes far longer to do basic posts and I’m really sick of it. They even got rid of the click only autofill on tags. It’s fucking bullshit.
If anyone has a recommendation for another platform, let me know.
Sometimes it feels like the only joinery I cut is dovetails. A distant second to dovetails are dadoes (a/k/a housing joints). And the mortises and tenons I cut for the ash sitting bench felt like the first I’d done since building my workbench, and the first for furniture in years. I
n my view, dadoes are the easiest (and most satsifying) joint to get right. You can even cut the dado overly-tight and later fix the mating piece to fit. The thunk of a fully-seated housing joint is a beautiful thing. And it can be a very strong joint, in the presence of glue or nails (or both).
An overly-tight joint works quite well in compressible pine.
Whenever possible, though, I will use a stopped dadoes for the show face of a piece. A through-dado is just fine if it won’t be seen (either on the back of the carcase or covered by a face frame) or the piece isn’t fine furniture. But on the show face, a through-dado looks too much like a mortise haunch to me. No matter how perfect it is, I’d rather have the clean shoulder line.
Isn’t a dado pretty much a shallow mortise with a shoulderless tenon, anyway?
The trickiest part, I find, is the act of fitting the mating piece into the final joint. Boards can cup between dimensioning and assembly. Driving a cupped board into a straight dado is a recipe for brusingt the surrounding face grain. To combat this, I clamp on a caul to flatten the mating piece. After it’s seated, the dado itself will hold the board flat.
Dovetails typically do this work without need for a caul.
On an unrelated note, I’m deciding on whether to paint the wall cabinet before I glue it together. I wouldn’t normally, but I’m using latex (not milk) paint for this one. So working out the kinks on the underside of the bottom board before assembly is probably a good idea.
It’s a magic thing. Starting from 7 linear feet of home center 1×12 eastern white pine. Adding the plane, the saw and the chisel. Then ending up at the finished piece. In this case, a 14″ x 30″ x 7.25″ wall cabinet, with through-dovetails at the corners and stopped dadoes for the shelf. It is as perfect as I am capable of making.
And perfect for hiding in a bathroom corner behind a door!
But it looks a bit plain to me. I can only imagine how drab it will be when painted grey to match the vanity in the bathroom. Rather than shape the sides, though, I may spruce it up with small molded face frame. Or perhaps just an applied moulding on the shelf. In any event, something I can do with moulding planes.
It feels like everything I make is square and flat. Maybe it’s time I learn to cut compound dovetails.
Once upon a time, as a supplement to my Milkman’s Workbench, I made what I called a “planing slab”. It was 6 feet long, 13 inches wide and about 2 inches thick (after several flattenings), with a Veritas Inset Vise on one end. It clamped to my dining table with angle iron, just like the Milkman’s Workbench. And now, it has reached its full potential.
Yes, that’s a second Japanese-style saw horse as well.
I had always meant to add a cleat to the underside so it could function like a Japanese-style workbench. Nothing fancy, like the sliding dovetail shown in the source material. Just dado and glue. I used PVA, so I’m pretty sure it’s permanent.
So tight, it needed clamp persuasion to seat.
The most important thing I’ve learned in this process is that the coefficient of friction on douglas fir is not significant. A layer of adhesive-backed sandpaper on the underside of the slab in front of the cleat or (better yet) on the tops of both sawhorses does wonders to keep the slab in place. A couple of F-style clamps holding the cleat tight against the front saw horse also work.
If you haven’t picked it up yet, I highly recommend Roman Workbenches, published by by Lost Art Press. I don’t have a suitable board at the moment, so I plan to scour the home center for a nice 2×12 (either 14 or 16 feet) and give one a try. I’ve never made a staked bench before, but after the Mortise and Tenon Magazine roman workbench build along, I’m inspired.
In the meantime, I did add a little Holy Roman magic to my existing workbench, in the form of a hurricane nut for the crochet screw.
I never did remove the old vise nut from the failed face vise.
It was a fun exercise in shaping, and it’s pretty symmetical. All while posing a smaller chance of damaging my nether regions. The screw spins freely (with a generous helping of beeswax) and clamps down tightly. I’ve actually been using it as my main vise for some small dovetailing.
Way less pokey.
Also, the bullet catches for the DIY bench dogs finally arrived, and although I was a little off in my drilling, they work just fine. Using the dogs, though, made me realize that I need one more holdfast hole, on the far left of the bench. I conveniently have one more bullet catch and some extra dowel. Crazy how that works out.