Today, I made a box. Nails and glue and care. The finest of each. My mark on the world.
(a poem by The Apartment Woodworker)

Today, I made a box. Nails and glue and care. The finest of each. My mark on the world.
(a poem by The Apartment Woodworker)
I recently celebrated my 10th woodworking anniversary. About this time in 2012, I got sick of paying for furniture that didn’t quite match my sensibilities and took matters into my own hands. I’ve probably covered this before, but growing up, we were a New Yankee Workshop household (not a Woodwright’s Shop) household. So when I decided to get back into woodworking as an adult, I went first for some power tools. A home center run with my father resulted in 12″ chop saw, a plunge router kit, a cordless handheld tool bundle, and a boatload of wood screws (plus one hard point saw and one chisel). Those tools alone got me through a bed (that was reclaimed into the base frame for my bar), a desk (that was reclaimed into the base frame for my regular outdoor workbench), and a console table (reclaimed into god knows what).
But I quickly gravitated toward working primarily without power. Not just because it’s loud and dusty using a plunge router in your foyer, no matter how great your shop vac. But also because it’s meditative to me. Now I am sure there are some folks who Zen out with the random orbit sander. But not I. My happy place is a No. 6 or No. 7 hand plane and a stack of rough sawn lumber to S4S.
Sure, I still have that same chop saw and cordless circular saw. And I regularly use them, along with a hollow chisel mortiser and a thickness planer. I even bought an impact driver a couple months back and can’t believe how I’ve lived without one for all these years. But the fact is, nowadays my power tools support my hand work; not the other way around.
Although I joke that I am an artist, I will never make anything that ends up in a museum. I’m not a savant at anything woodworking related (although I consider myself well above average at hand cut dovetails). I have a day job, that keeps me very busy. And in these 10 years, I’ve devoted enough time to the craft to have picked up a thing or two. And I’d like to share that collected wisdom with the world.
This will be a multi-part series. I’m not sure how many installments there will be, and I certainly expect I won’t make it straight through without deviating to regular posts. I have literally no sponsors.
Getting Started in Woodworking
If you’re here, it may be because you’ve searched “Woodworking in an Apartment” or “Small Space Woodworking” and took a flyer. If so, welcome. I’m James and I have very strong opinions on literally everything.
If you think you might want to get into hand tool woodworking with a limited tool kit and limited space, there are better resources than me. You should go to YouTube and check out Paul Sellers and Richard Maguire. Paul and Richard are giants to me. Paul’s 10 part workbench video came out a few months before I started woodworking (although I didn’t discover Paul until 2014, after 2 years of fapping about with power tools). Paul is like a combination of Mr. Rogers and Bob Ross.
Richard started posting a year into my woodworking career. Paul’s website, Common Woodworking, didn’t exist when I needed it most. Richard’s site, The English Woodworker, has long form content (both paid an unpaid) that cannot be beat. Richard is at the same time exceedingly practical and esoteric. Trust me; you’ll see.
So check their stuff out and maybe come back here if you want more of those very strong opinions of mine. If you’re open to using more substantial power tools, the Woodworkers’ Guild of America and the Wood Whisperers Guild are both good resources.
Beginner Woodworker Hand Tools
People have written entire books on this question. I have my own thoughts, sure. My only piece of real input is to buy a few tools of good quality, rather than a bunch of tools of crappy quality. But if you want my 10 year retrospective take on the absolute core tool kit, here it is.
And that’s it. Don’t forget the glue and the mechanical pencil.

Workbenches
I currently work on a Moravian-style knock down workbench based on Will Myers’ excellent video series. And Christopher Schwarz of Lost Art Press is the modern authority on workbenches of all styles. His Ingenious Mechanicks book changed my life.
But for my money, I would check out either The Naked Woodworker workbench, which can be built with just dimensional framing lumber from the home center and the tool kit described above. Or check out Rex Krueger on YouTube and his “Joiners Workbench“, which is similar but arguably easier to build with the same kit.
Or just find a thick plank and make that Grandpa Amu low workbench, which I love.

I’m going to stop it there for now. I could otherwise go on forever.
Btw, I’m not on twitter anymore. I have a strict “no social media owned by delusional man child” policy (I’ve been off facebook for several years for the same reason and never had an instagram).
JPG
I am by no means an innovator. Folks have had small shops in the past and they will have them in the future. I invent nothing, as the saying goes. But because I am a hobbyist woodworker who strives for a manageable tool kit within a finite shop space, I don’t always have the exact tool I need at hand.
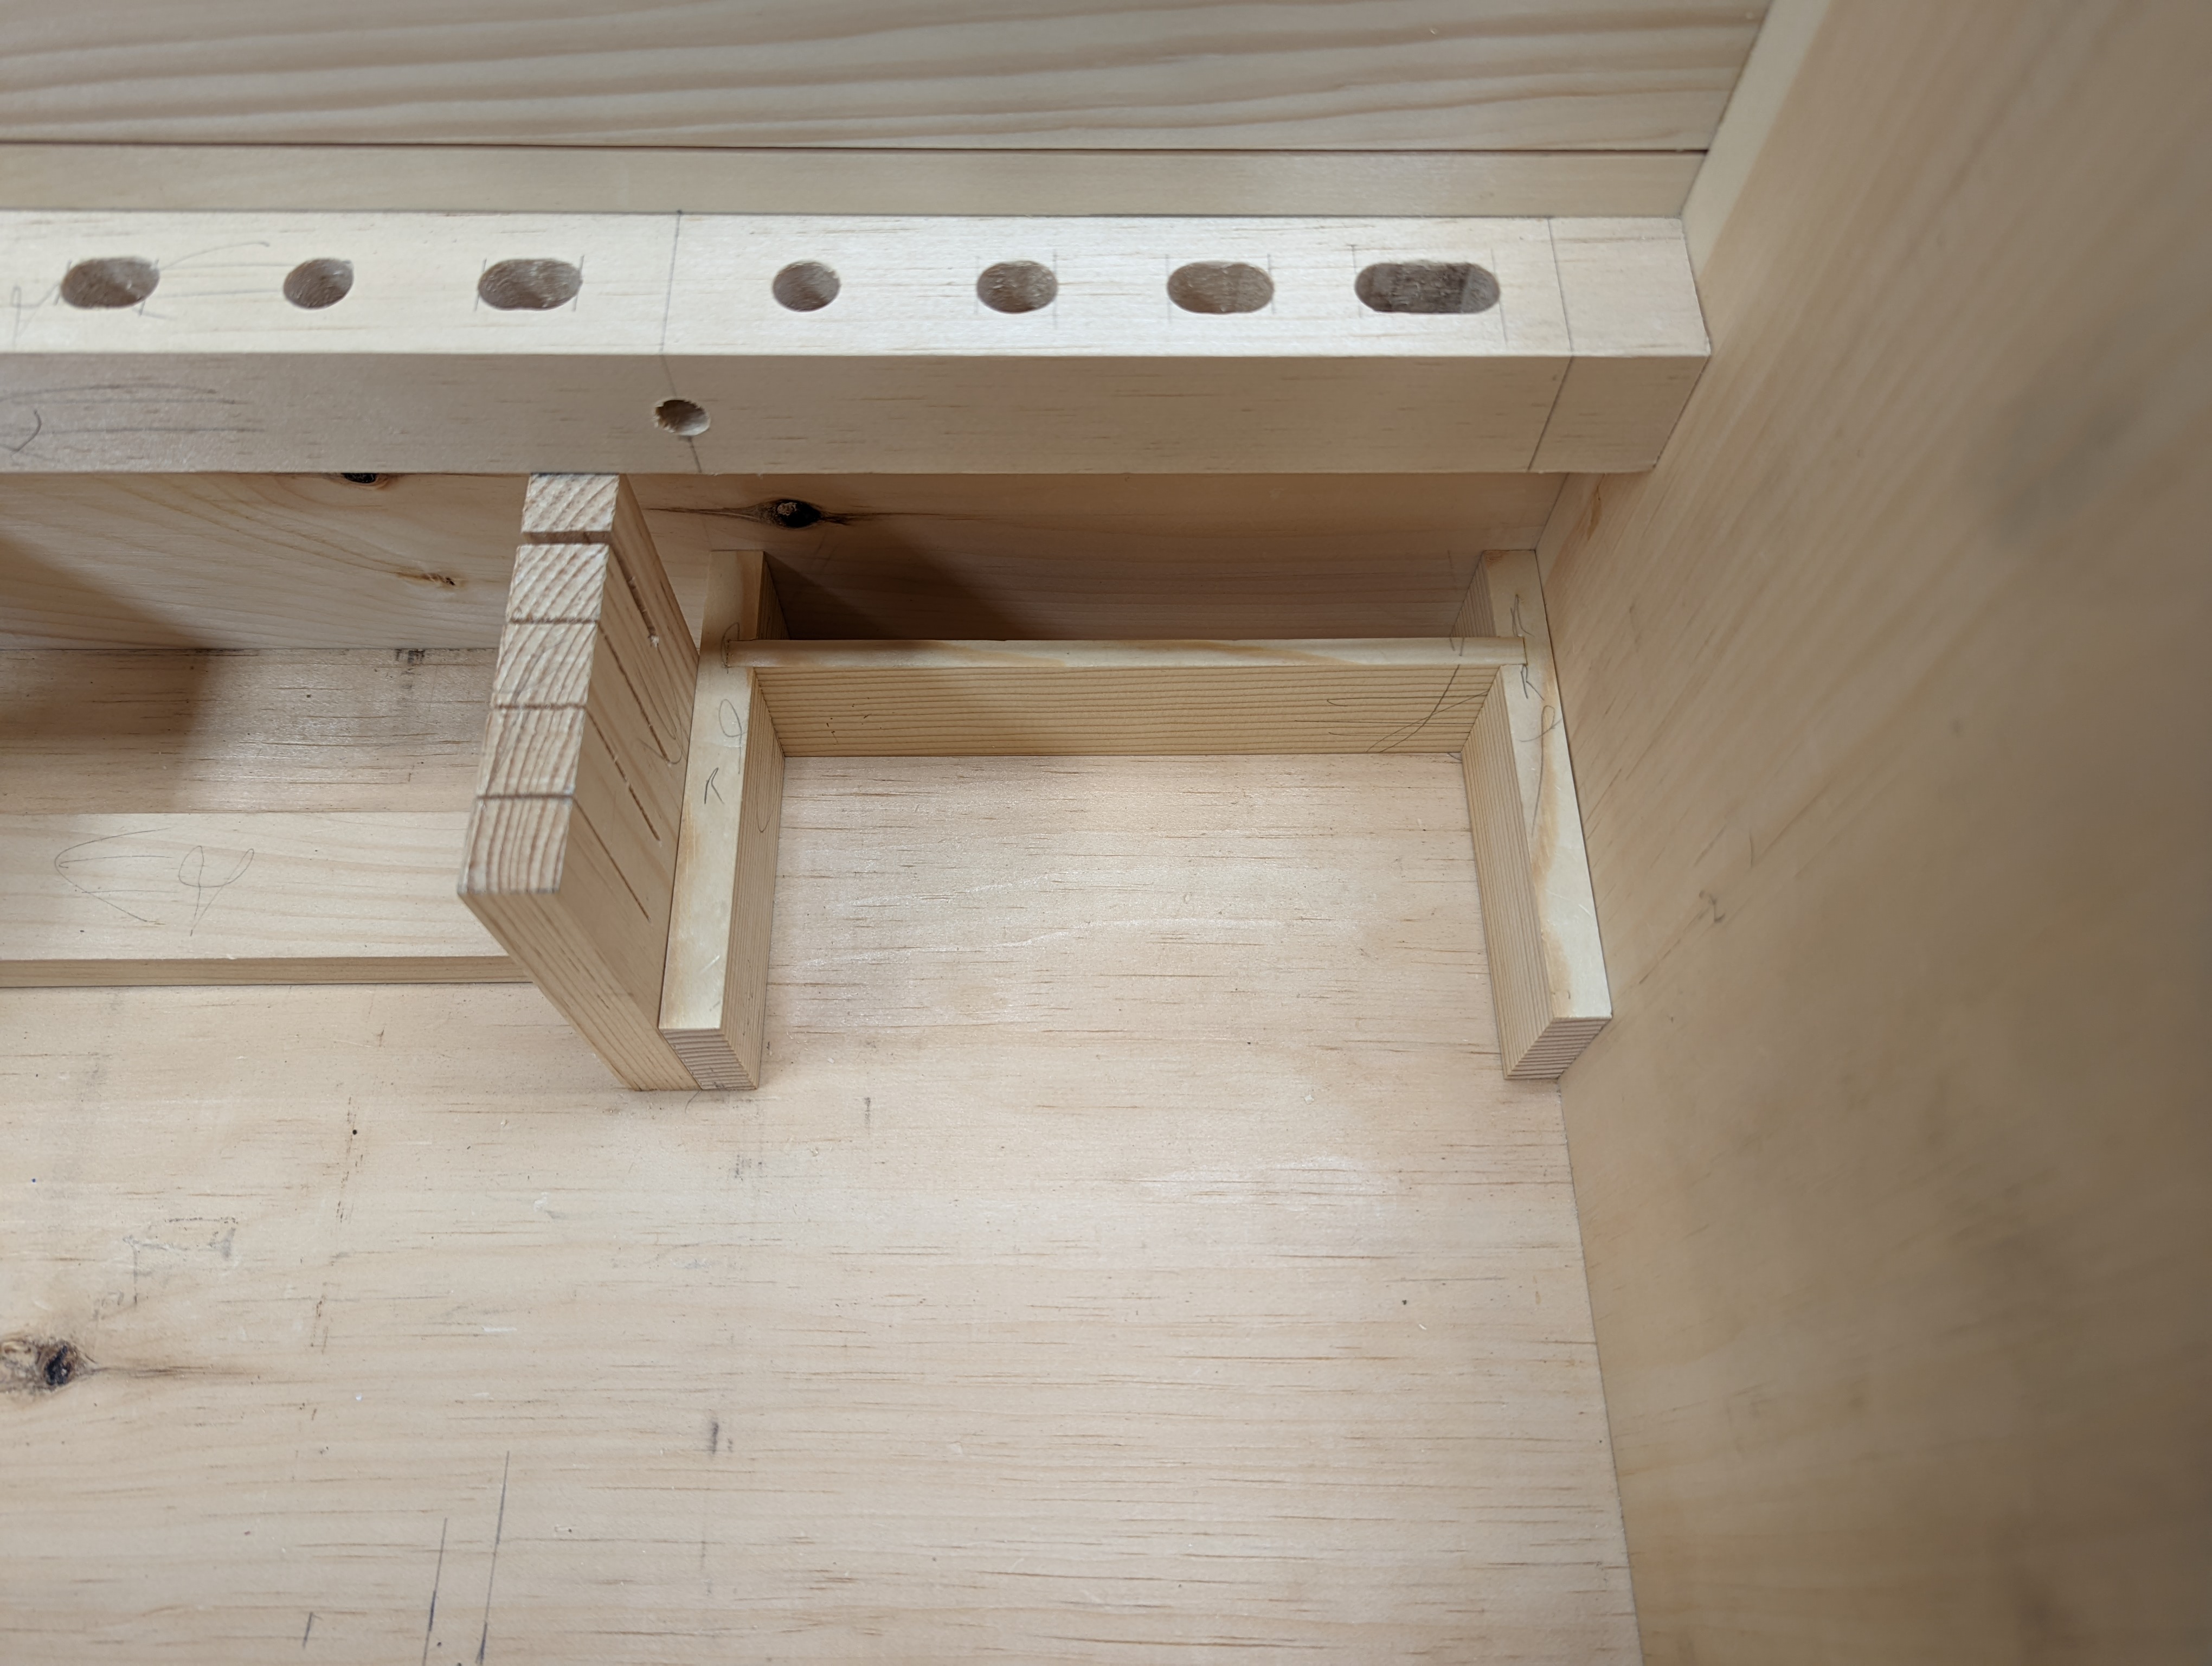
Take, for instance, the timber framed saw horses I’m making as a gift for a new homeowner (and close friend who will inevitably ask me for help on home improvement projects). I’m using the Richard Maguire design (he calls them saw donkeys, lol). Which means beefy tenons with drawbore pegs to keep everything cinched under the extra strain of having no lower stretcher.

The most important part of a drawbore is ensuring the peg can pass cleanly through the joint, flexing but not plowing or crushing as it’s pounded through the offset holes. That’s why it’s important to observe the three finer points of successful drawboring: (i) don’t use too extreme of an offset on the tenon hole, (ii) use a longer taper on the front of the peg, and (iii) ease the entrance to the hole on the tenon. The fourth point (in my experience) is to wax your pegs, but some folks like to glue their drawbored pegs in. I don’t.
When doing smaller drawbores for furniture, I have a couple of machinist alignment pins that work great as drawbore pins where 5/16″ and 3/8″ pegs are used. You assemble the joint, insert the drawbore pin, and the taper of the drawbore pin draws the joint to full closer and also reams (really compresses, but still) the entrance of the hole on the tenon (thus fulfilling finer point (iii) above and illustrating the purpose of finer point (ii) above).
For these sawhorses, though, the pegs are 5/8″, and I’m not even sure they make a machinist alignment pin for that size. So, instead, I use a countersink bit to ease the start of the holes in the tenon. This is functionally the same as properly using a drawbore pin.

I almost always use a hollow chisel mortiser for these big mortises, but the tenons are cut by hand.
In fairness, I do use 5/8″ pegs for a lot of workbench and workbench-adjacent building. So maybe I would be justified owning an appropriately sized drawbore pin. But drawbore pins are single purpose tools. My countersink bit, however, has many uses across the full gamut of my woodworking. And I’m not sure a drawbore pin of the right size would have much effect on the oak, ash and maple that I use in my workbench building activities. So I will continue to use my countersink bit. And I could probably take the drawbore pins out of my toolkit entirely.
I learned all of the above finer points of drawboring through trial and [lots of] error. I’ve had pegs fail to flex through the offset hole, split down the middle and blow out the back of the board with the mortise (and in doing so fail to cinch the joint together). I’ve had pegs fail to flex through the offset hole and snap (making the usual solution, to drive a new peg all the way through the joint, unavailable because the peg didn’t clear the offset hole cleanly). And I’ve had pegs that made it through the offset hole and still do both of the same.
But if there was one of the rules that each situation could have been fixed by, it’s probably finer point (iii): easing the entrance to the holes in the tenon. And when all it takes is a countersink bit, that’s a pretty efficient solution.
JPG
When I start something, I nearly always finish it. So when I set out to make a wall mounted cabinet for my workshop, it was clear the old tool storage solution (the aforementioned Dutch Tool Chest) had to go.
So it’s for sale, $750 cash, and you have to pick it up (I’m in lower Fairfield County, Connecticut).

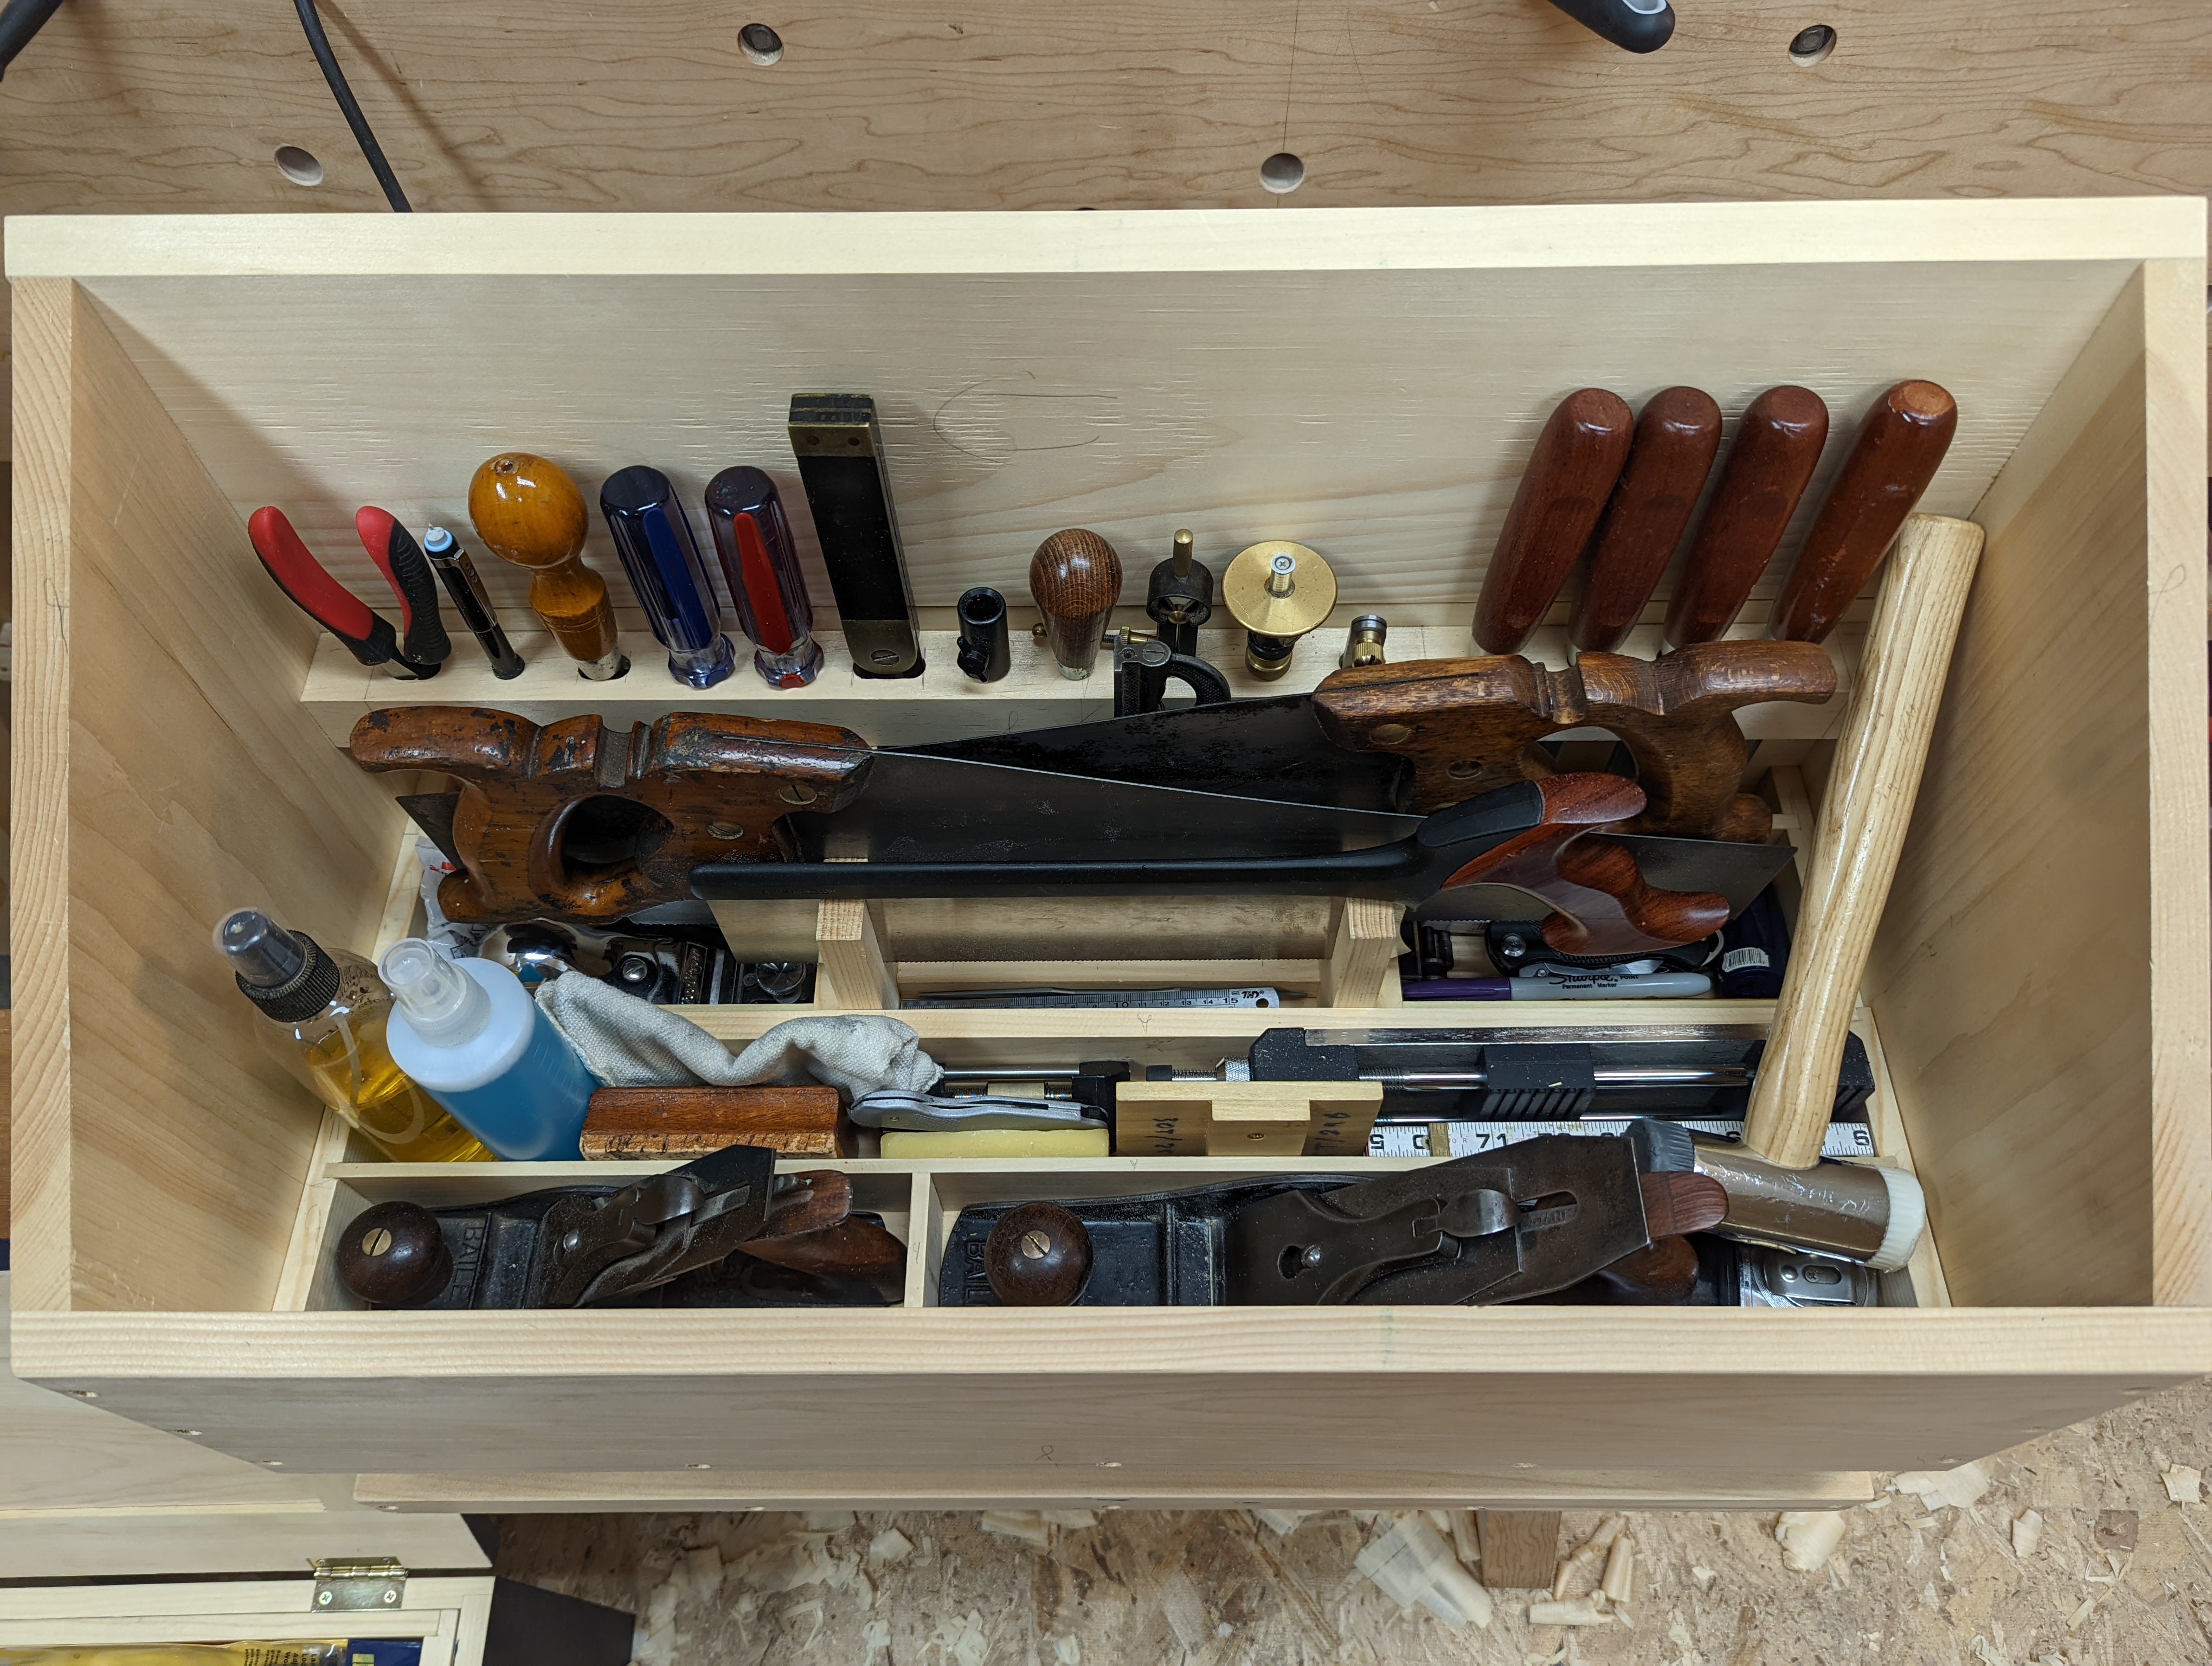
The case is made with usual DTC construction: through dovetails at the lower corners, shelves are dado’d and nailed into the sides of the case. The face boards are screwed on. Lamp Black milk paint on all external faces.
This DTC is a bit larger than standard varieties. In addition to being the large version at 30″ tall (with two shelved compartments AND a sliding tray), it’s 30″ wide (up from the usual 27″). This means it’s wide enough to hold a No. 7 and a full size block plane left to right (it also holds a No. 5, No. 4 and a general compartment for tape measures.
In addition, the storage area is 13″ deep (instead of the usual 11.25″). I made it this way to accommodate a No. 10 (jack rabbet) plane and some larger tool rolls, all of which can be fitted front to back instead of being piled in lengthwise. The drawer runners are just nailed on so the drawer can be easily removed if not desired.
The lid has a till for two panel saws and the tool well, in addition to being french fit for the planes described above, has a saw till that will fit dovetail, carcass and tenon saws plus two combination squares (or one with an extra beam). All of this stuff is just tack nailed in, so you can remove it easily.
The tool rack on the back wall has holes on 1.5″ centers and is screwed in from both directions. Totally modular.
Some more pictures for your reference (tools not included, obviously).


As with everything else, please email for more details. I’ll even throw in a couple of saw bucks to elevate it off the floor.
JPG
The last few months, I have been [very] slowly making a wall-hung tool cabinet. While my dutch tool chest holds all of the tools I could ever need (and quite a few I don’t), I have recently added a No. 6 to my everyday kit and there was no room in the DTC for the new plane. I have also gone back to using a No. 4 1/2 smoothing plane (instead of a No. 4) and, similarly, the DTC didn’t have room for it. Even with the No. 4 back in storage.

It also started to feel cramped in the workshop. The DTC lived on the left wall of the shop, near the leg vise. The chest (and the platform it sat on) took up significant floor space that I couldn’t get back. The area below the cabinet is now free for a saw bench that is otherwise blocking my sharpening station at times.
I have never built a wall-mounted tool cabinet before. So this is just a prototype of white pine, poplar and cheap birch plywood; the usual materials for figuring thing out. And I have in fact figured a few things out in this project so that. If I ever make a better one out of my nice, reclaimed genuine mahogany, it will be better.
What I struggled with the most was the saw till. The backing board for the plane till is pretty steep (to accommodate the 9″ case sides) and therefore a regular saw till didn’t do the trick. The saws just fell out of them. And, unlike with the planes, there is no quick fix with rare earth magets.
I thought for a while and realized that my three back saws are all of the same make and therefore the totes should all be roughly the same shape. I could hook them onto something (like a 1″ dowel) and then use a till block to keep the plates aligned and safe.
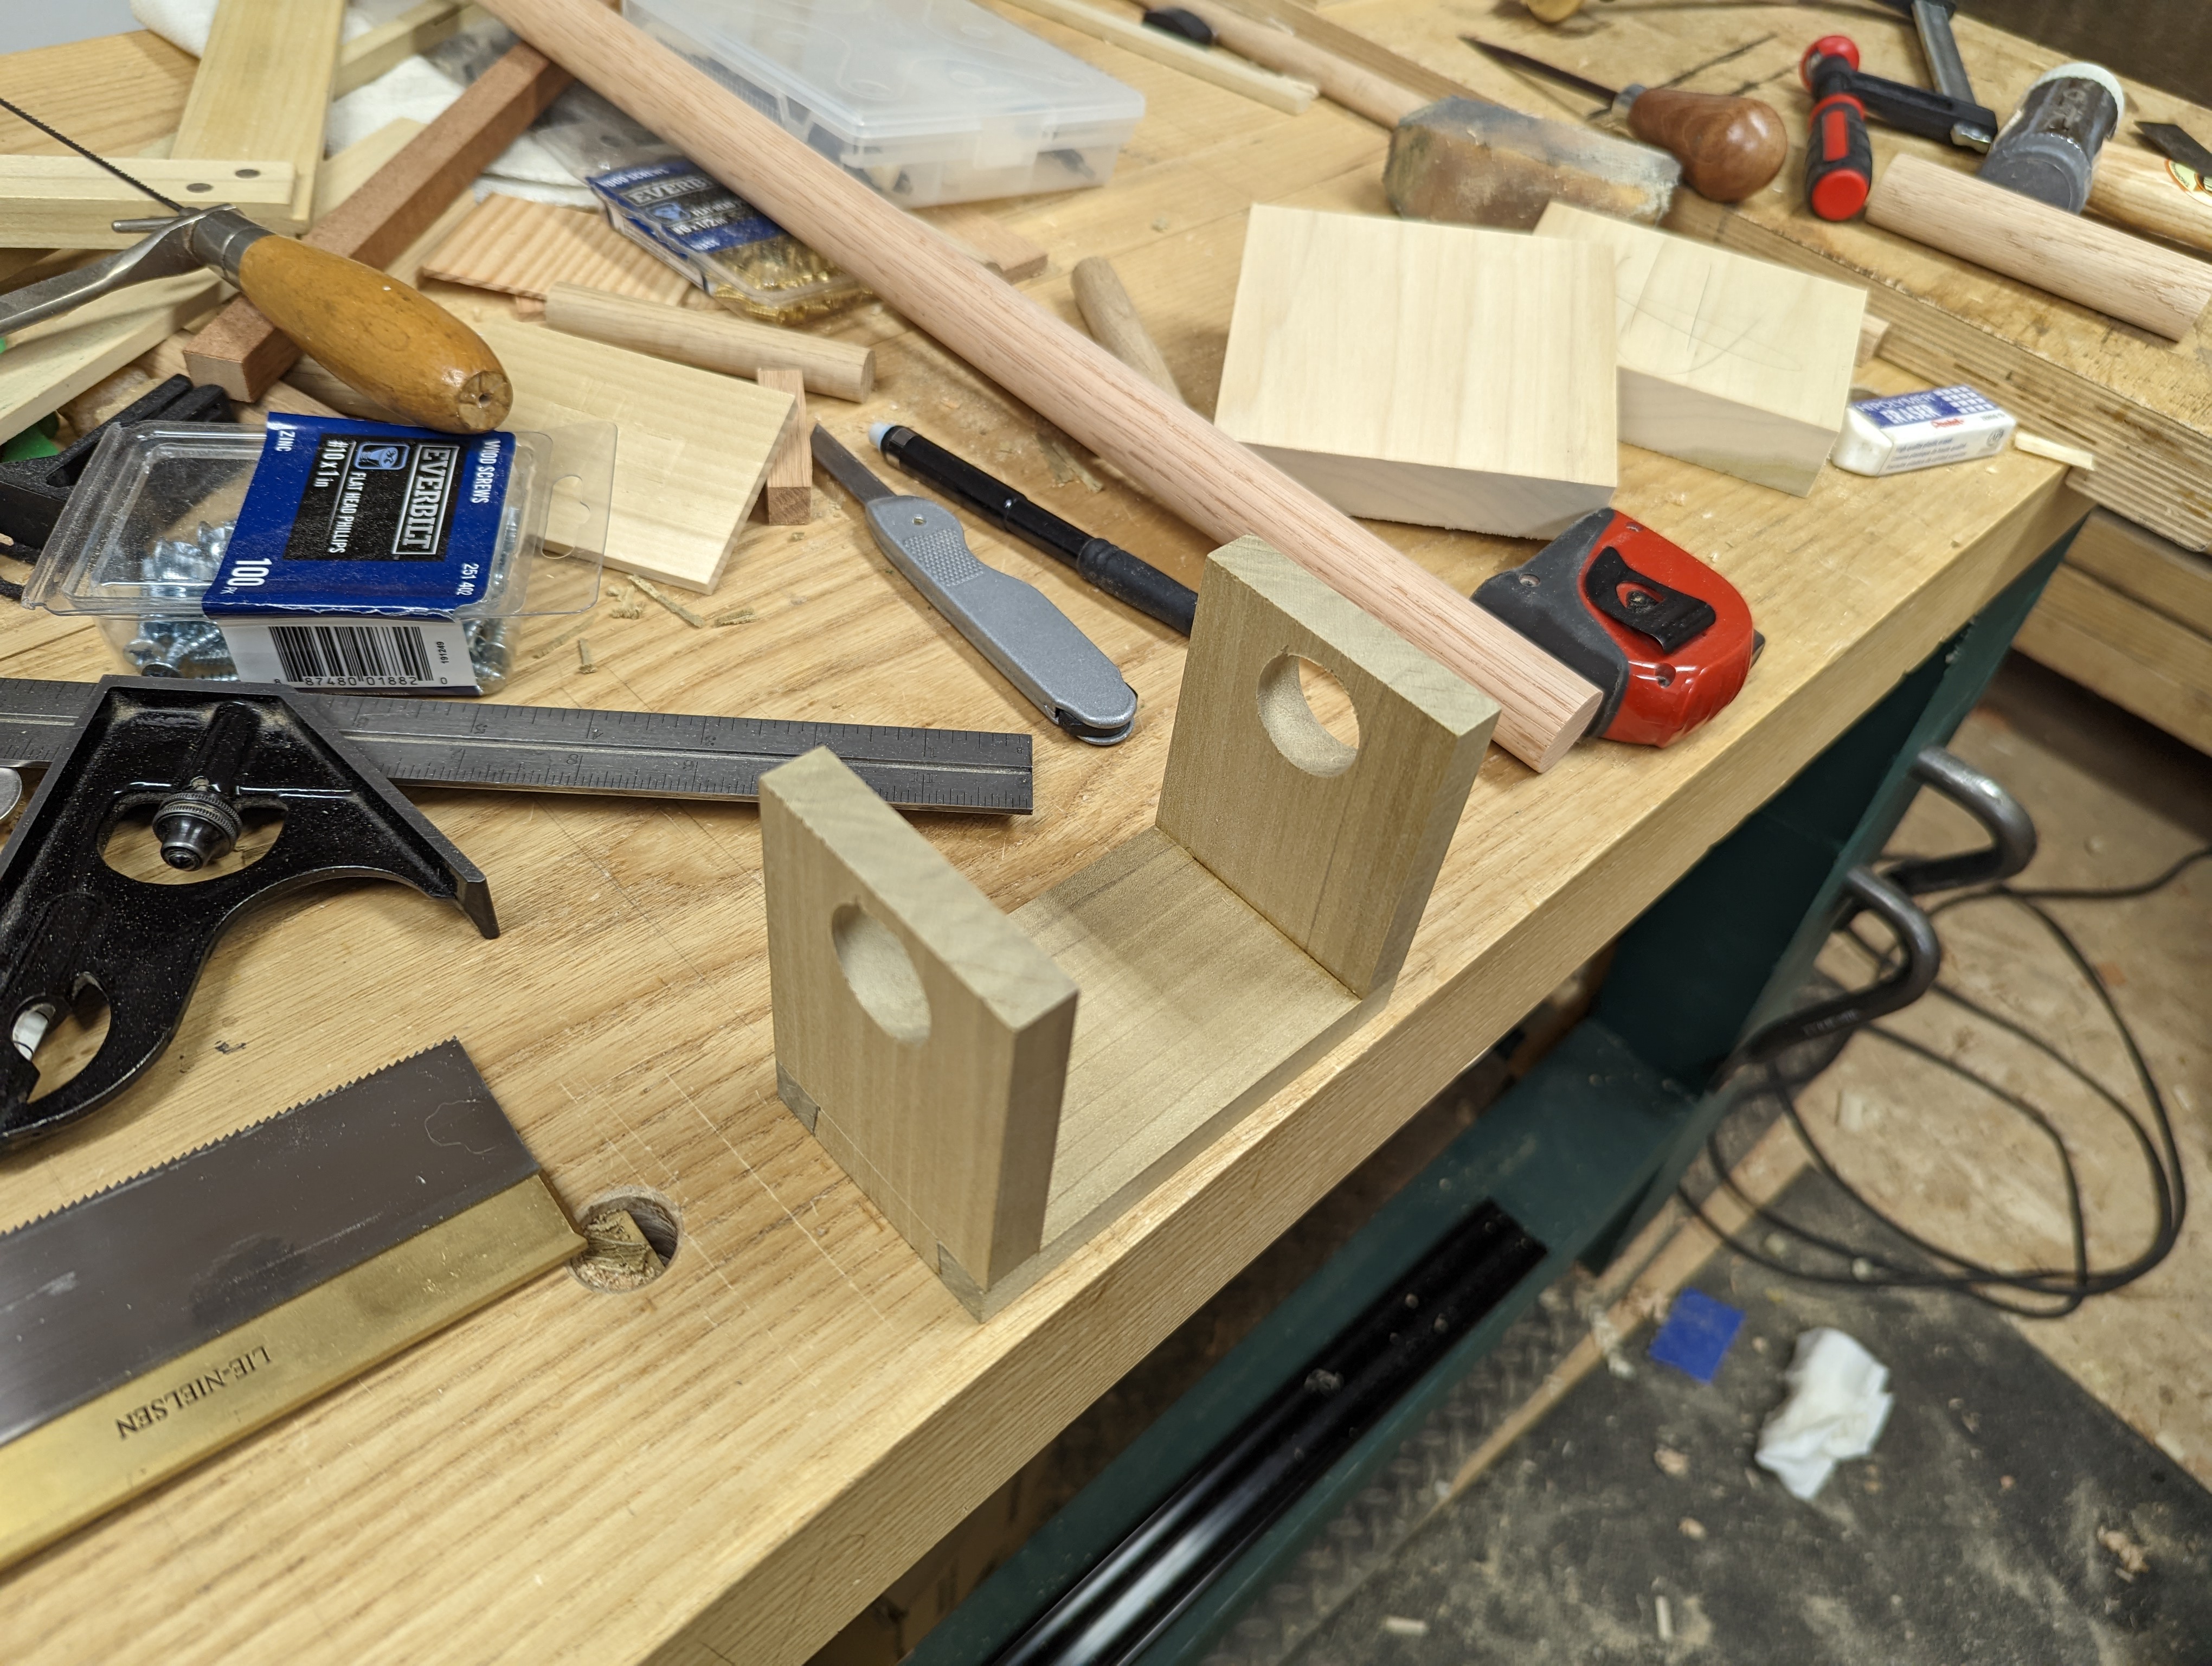
I started with dovetailing together a U-shape out of some 1/2″ poplar. The sides each took a 1″ hole to accommodate the dowel, which was screwed (but not glued) into place so I could easily get to the screws attaching the hook to the backer board.
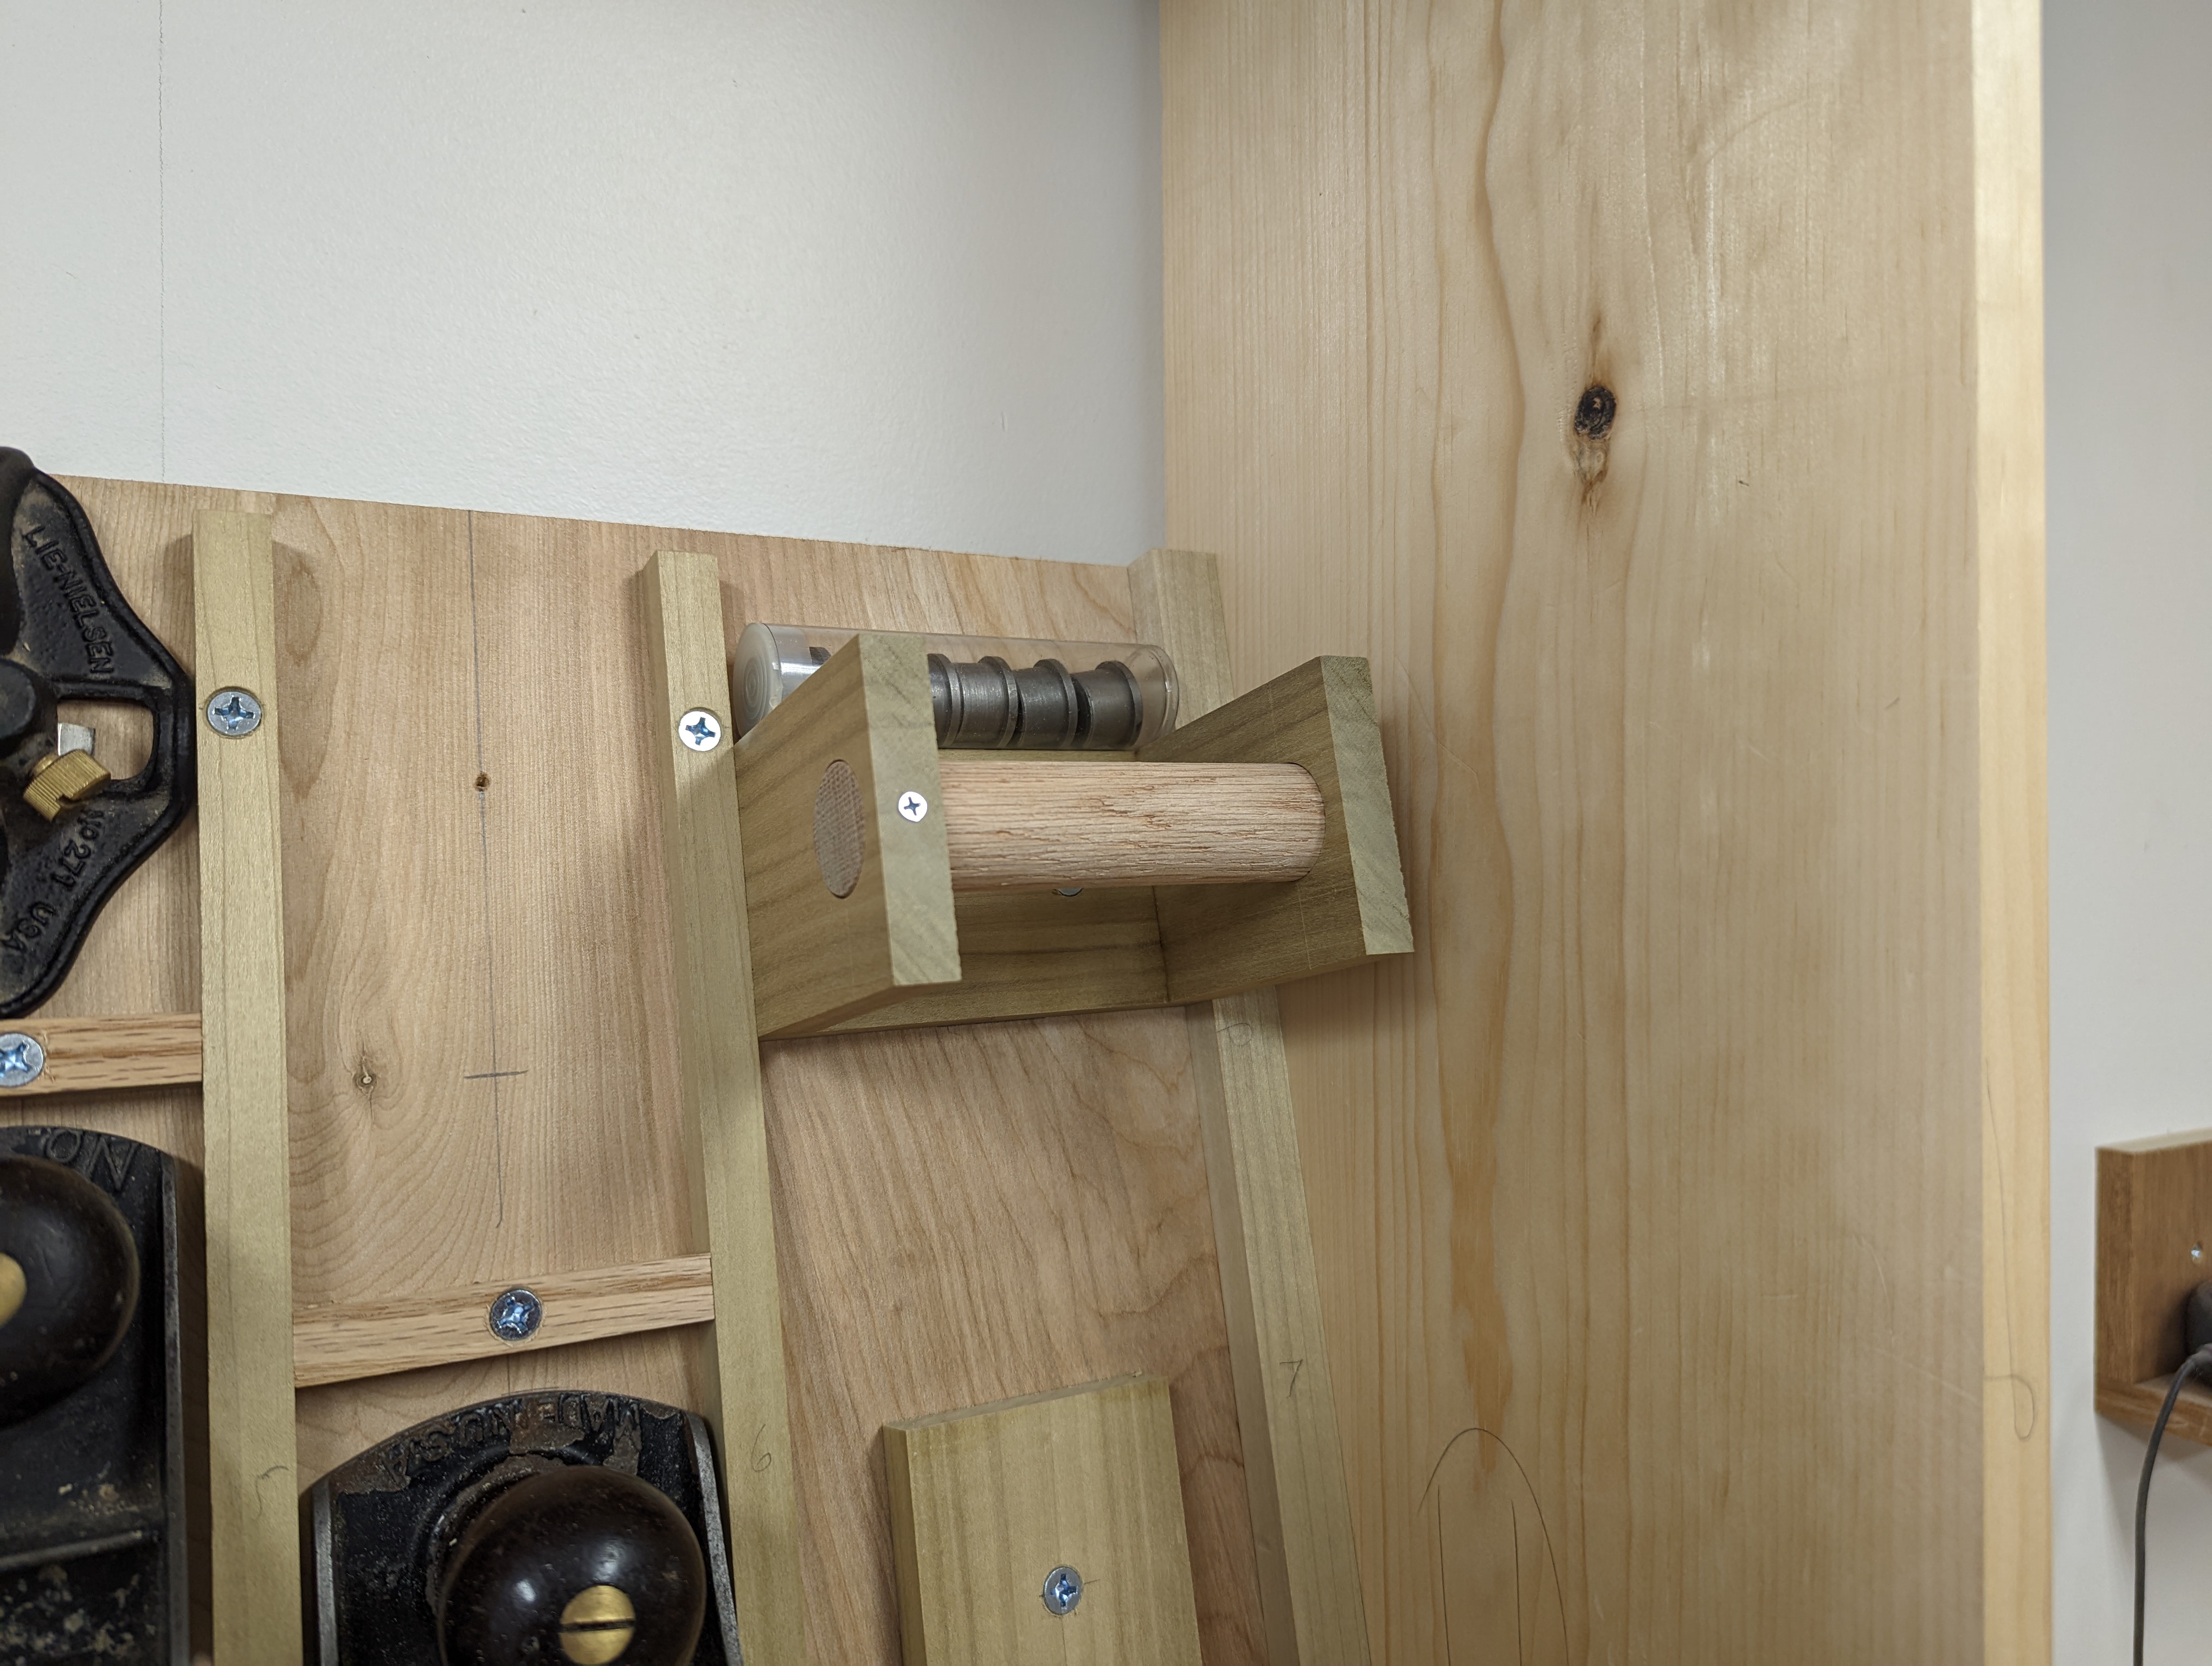
I then located a till block (with a 1/2″ thick tongue on it for ease of attaching to the backer board) so it supported the saw plates without breaking the plane of the carcass. The kerfs in the till block (which is 5/4 material) which hold the saw plates are cut with a fine panel saw. I wish I had left more meat below the ends of the kerfs. But poplar doesn’t split like pine or oak, so it should be okay. I will report back if it ever splits apart.

The overall saw till assembly has usable space around it. I’m no Henry Studley, but I was able to fit some tools into the available crevices. My 3/4″ dowel centers, which I use quite a bit for bench-making to reuse existing benchtops that attach via pegs, sit above the hook. Under the saws are a few machinist squares I don’t use often and also some brass calipers. My pinchrods hang off the side of the saw till between it and the case wall. And a 12-1 tool rests in a free nook.
As you can see, there is an unused area at the top of the case. I’m not 100% sure what to do here. I’ll hang another panel to the right of the main cabinet with racks for chisels, screwdrivers, gouges, raps, and other handled tools. So that just leaves my panel saws, a mallet, a hammer, and the boring tools (braces, auger bits, etc.). I could hang a shelf up there and pile the boring tools in (like with the middle compartment of the DTC). That feels a little like cheating.
Let let me think on it some more and revert.
JPG
In my day to day life, I am attorney. My practice focuses on Mergers and Acquisitions and Complex Corporate Governance (with a fair bit of Commercial Contracting and Emerging Companies and Venture Capital matters). While I love what I do, not everything in my day job is intellectually stimulating. It’s true, there are sometimes novel (to me) issues that need sorting. But the typical deal is, well, pretty typical (at least after about 15 years). So woodworking often fills the void of intellectual expansion for me.

A person I care very much about asked for a lap desk to make her home office (read: couch) more comfortable. While I myself am a work from work person, I appreciate a good thought experiment that I can sort out with my hands. So I made a lap desk with non-right angle corners.
I personally think dovetails are best. But I also like finger joints. Not the cross cut sled on the table saw version, but the hand cut, assembled-like-dovetails variety. Contrary to popular belief, it is much harder to saw square in two directions than it is to saw angles. Or at least it is to me. And, when cut right, finfer joints can look wonderful and only need a couple of nails to be as permanent as well-fitting dovetails.

Making these angled finger joints was an exercise in working things out. Sure, I could have just searched YouTube for a tutorial (James Wright has an excellent how-to on angled dovetails, btw). But I chose to work it out myself. And, dagnammit, it worked pretty well.
In my (admittedly limited) experience, this is one place where it pays to have deeper baselines (and protruding pins/tails to pare down) really pays off. I tend to scribe base lines exactly to part thickness for regular dovetails, but that doesn’t seem ideal for non-square corners.

In any event, after sawing the pins, my process for angled corners is to chop down, on the bench, from the higher side perpendicular to the baseline. This high side is the inside corner all around. Then, I discovered, it’s better to pare in the vise, in small bites, instead of trying to get the angle correct with chisel and mallet on the bench. It takes a bit longer, true. But the fit is far better when you sneak up on it in small bites.

And, so, I had an intellectually stimulating time at the bench making a thing for a person, using a technique I had not done before. It only took an hour or so (after stock prep). And now I know how to do it, for all time.
I just need to chop off 5″ from each foot because apparently a 15″ high lap desk doesn’t really work for non-giants.
JPG
I’ve been making low benches (both workbenches and general furniture) for a while now and I’d like to talk about the various ways to join the legs to the top. In my experience, some are better or worse than others, depending on several factors, including: (i) the purpose of the finished piece, (ii) the thickness of the benchtop, (iii) the materials used, and (iv) the tools available.
Let’s discuss several choices to join the legs to the top (I swear this is not a clip show):
First, we have cylindrical through tenons. The tenon can be hand carved, turned on a lathe or made with a round tenon cutter (like for rustic joinery). The mortise is bored with a large auger bit or some other boring bit.

Next, we have conical through tenons. The tenon is hand carved with a drawknife or plane and then typically refined with a special tapered tenon cutter. The mortise is bored with a smaller bit and enlarged with a tapered reamer.

In addition, we have rectilinear through tenons, which can be cut with regular edge tools. The tenon is sawed to shape with an angled shoulder. The mortise is chopped out with a chisel. No boring tools needed.

Finally, legs can be joined with notched lap joints. The tenon is sawed at an angle with a birds mouth shoulder. The mortise is just a dado in the side of the top. Also no boring tools needed.

There is also the tapered sliding dovetail used on Roy Underhill’s Timber Bench, but that’s outside the scope of this article.
Let’s take these in order. This is just my opinion based on experience; others may have their own takes.
Round Tenons
Pros:
Cons:
Tapered Tenons
Pros:
Cons:
Rectilinear Through Tenons
Pros:
Cons:
Notched Lap Joints
Pros:
Cons:
So what do you think? Did I miss anything in the pros and cons lists? Have I ruined everything forever?
I mean, yeah. Of course I have. But maybe not because of this article.
JPG
*Editors note: This is James’ first attempt at a long-form woodworking article. He is aware it is a departure from his usual format and tone.
There is an idiom, often attributed to either Benjamin Franklin or the anonymous Shaker craftsman, that goes, “A place for everything, [and] everything in its place”. I doubt Old Richard Scary actually came up with the phrase. I also doubt the Shakers would disagree with the notion. After all, if you can be one thing, you should be efficient. And for those of us who have small shops, this is more than just an aesthetic; it’s a way of life.
There are, as far as I can tell, there are two main approaches to tool storage in woodworking (although I would imagine these concepts apply to all crafts and shops). The first, just keep it open and pile everything in, works fine for things like full size, stationary English floor chests with banks of sliding tills and ample room for everything. The other, divide it up and create slots for individual tools (sometimes called “French Fitting” [double capitalization intended], which is the term I will use for the rest of this article), excels in chests that will travel or where space (read: organization) is at a premium. I prefer a hybrid of those approaches, but skewed heavily toward the latter.

When there is a place for everything, and everything is in its place, the tool you need is more likely to be easily findable and at hand. In addition, the tool is likely to remain set, tuned and sharp, having been protected from jostling against its neighbors. This is especially true for chests that get moved around, loading in and out of the car or dumped on the lawn for some sunshine woodworking. But even for stationary chests that live inside the shop, there is a level of French Fitting that I believe benefits everyone. It goes without saying that this is a handtool-focused approach. I only use a few machines, and each of them directly complements my handtool-first approach. If you are a machines-only woodworker, please feel free to keep reading. But this article might not have as much utility for you.
In my workshop (which is a 12×13 bedroom), I work out of a large Dutch tool chest (a “DTC”) in the Schwarz design from 2013. The chest lives to the left of the leg vise, pretty centered on the left wall of the room. In the main compartment of the chest (the “Well”), each of the primary tools (e.g., bench planes, back saws, hand saws, chisels, and other frequent-use tools) lives in a rack or a divided till and no other tool fits on that slot. A tool comes out, does its job, and goes back to its home. Directly below the Well is a drawer that holds longer, more fragile tools (e.g., rasps, paring chisels), as well as other small tools that wouldn’t fit nicely into the main well. This drawer is not French Fitted. And, honestly, it gets pretty cluttered.
The rest of the chest is two open compartments where tools are just piled in. The middle compartment holds tool rolls with augur bits, plane and joinery floats and gouges, plus the boring tools (braces and eggbeater drill). The bottom compartment holds a quarter set of hollows and rounds and my joinery planes, plus some drill and driver bits and sharpening slips (and a hammer that doesn’t fit anywhere else). A few odds and ends are strategically stashed throughout the chest.
But, like I said, that chest doesn’t ever move. When I woodwork outside or get called to a buddy’s house to fix something, I ask so much more of the tool chest I bring with me into the wild. That chest must not only hold (and organize) everything I need to do the job, but it must also keep everything secure and safe through the bumps and bruises of lugging it around. So let’s talk about French Fitting a DTC-style traveling tool chest.

Chisels and Other Handled Tools
When I begin planning tool storage in any tool chest, it starts first with a rack for chisels and other handled tools that attaches to an inner wall of the chest (the back wall, for a DTC). Christopher Schwarz has covered this topic in depth previously, but in my experience, starting with 1/2″ holes at 1 3/8″ centers does the trick. I like a 1 3/8″ x 1 3/8″ pine board for the rack. Although many tools will fit into the 1/2″ holes, a good portion of the holes must be elongated to fit, among other things, wider chisels. So a drill press is your friend here. Map out your strategy for this and pay attention to the width of the tool above the rack. For example, two marking gauges side by side will probably crowd each other even with 1 3/8″ spacing. So maybe find something with a narrower handle to put in between them to space things out. I like my chisels on the right side of the rack; others prefer the left side. Just don’t put them in the middle, though (for reasons that will be come clear in a bit).

Before I hang the rack to the inside wall of the DTC, I need two measurements. The first is how much below the top of the rack the largest chisel (in this case, 1″) will hang. Add 1″ to that and you get a rough height for the gap from the floor of the well to the underside of the rack. That extra inch should ensure both that your largest chisel will never hit the floor of the Well and also there is clearance for other, longer tools (e.g., a sliding bevel or brad awl). The second measurement is how much space that leaves to the top of the chest. If there is not enough clearance for the tallest tool in the rack, lower the rack until it the largest chisel doesn’t dig into the floor of the well but there is still clearance for the chest lid to close. Now affix this rack to the back wall of the chest with countersunk screws. I like to drive two from outside of the chest about 1″ from the ends of the rack, and one from the inside of the chest centered between the narrow chisel and the next tool to its left. This rack carries a lot of weight so attaching from both sides helps distribute the pressure.
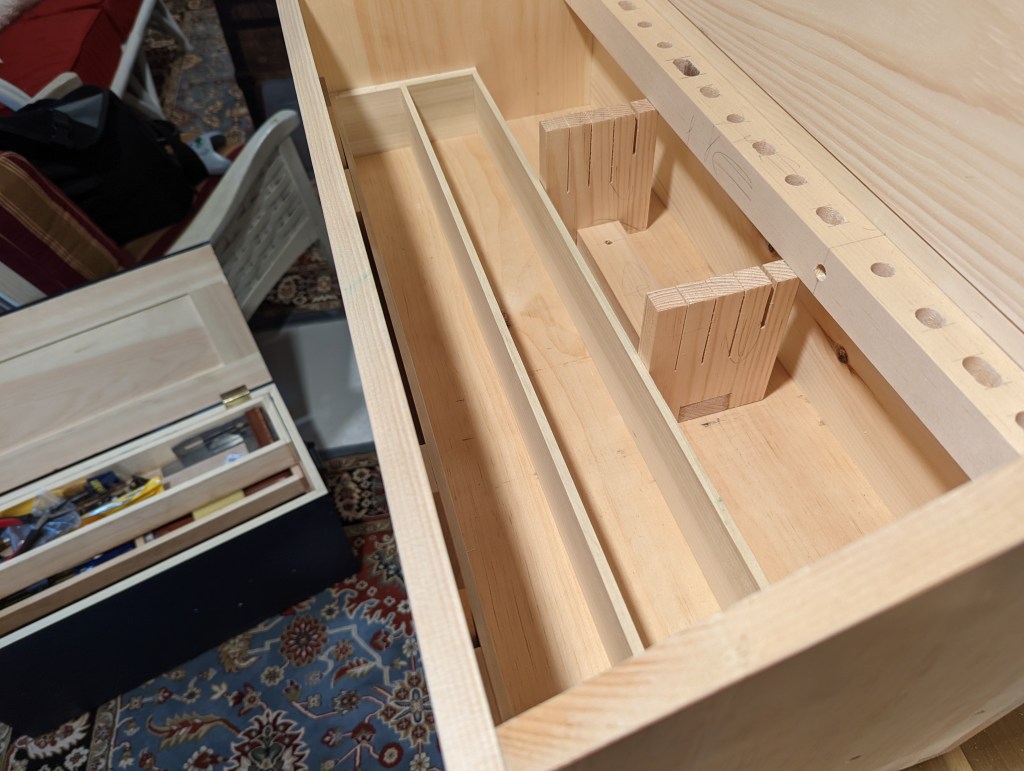
Saws and Combination Square
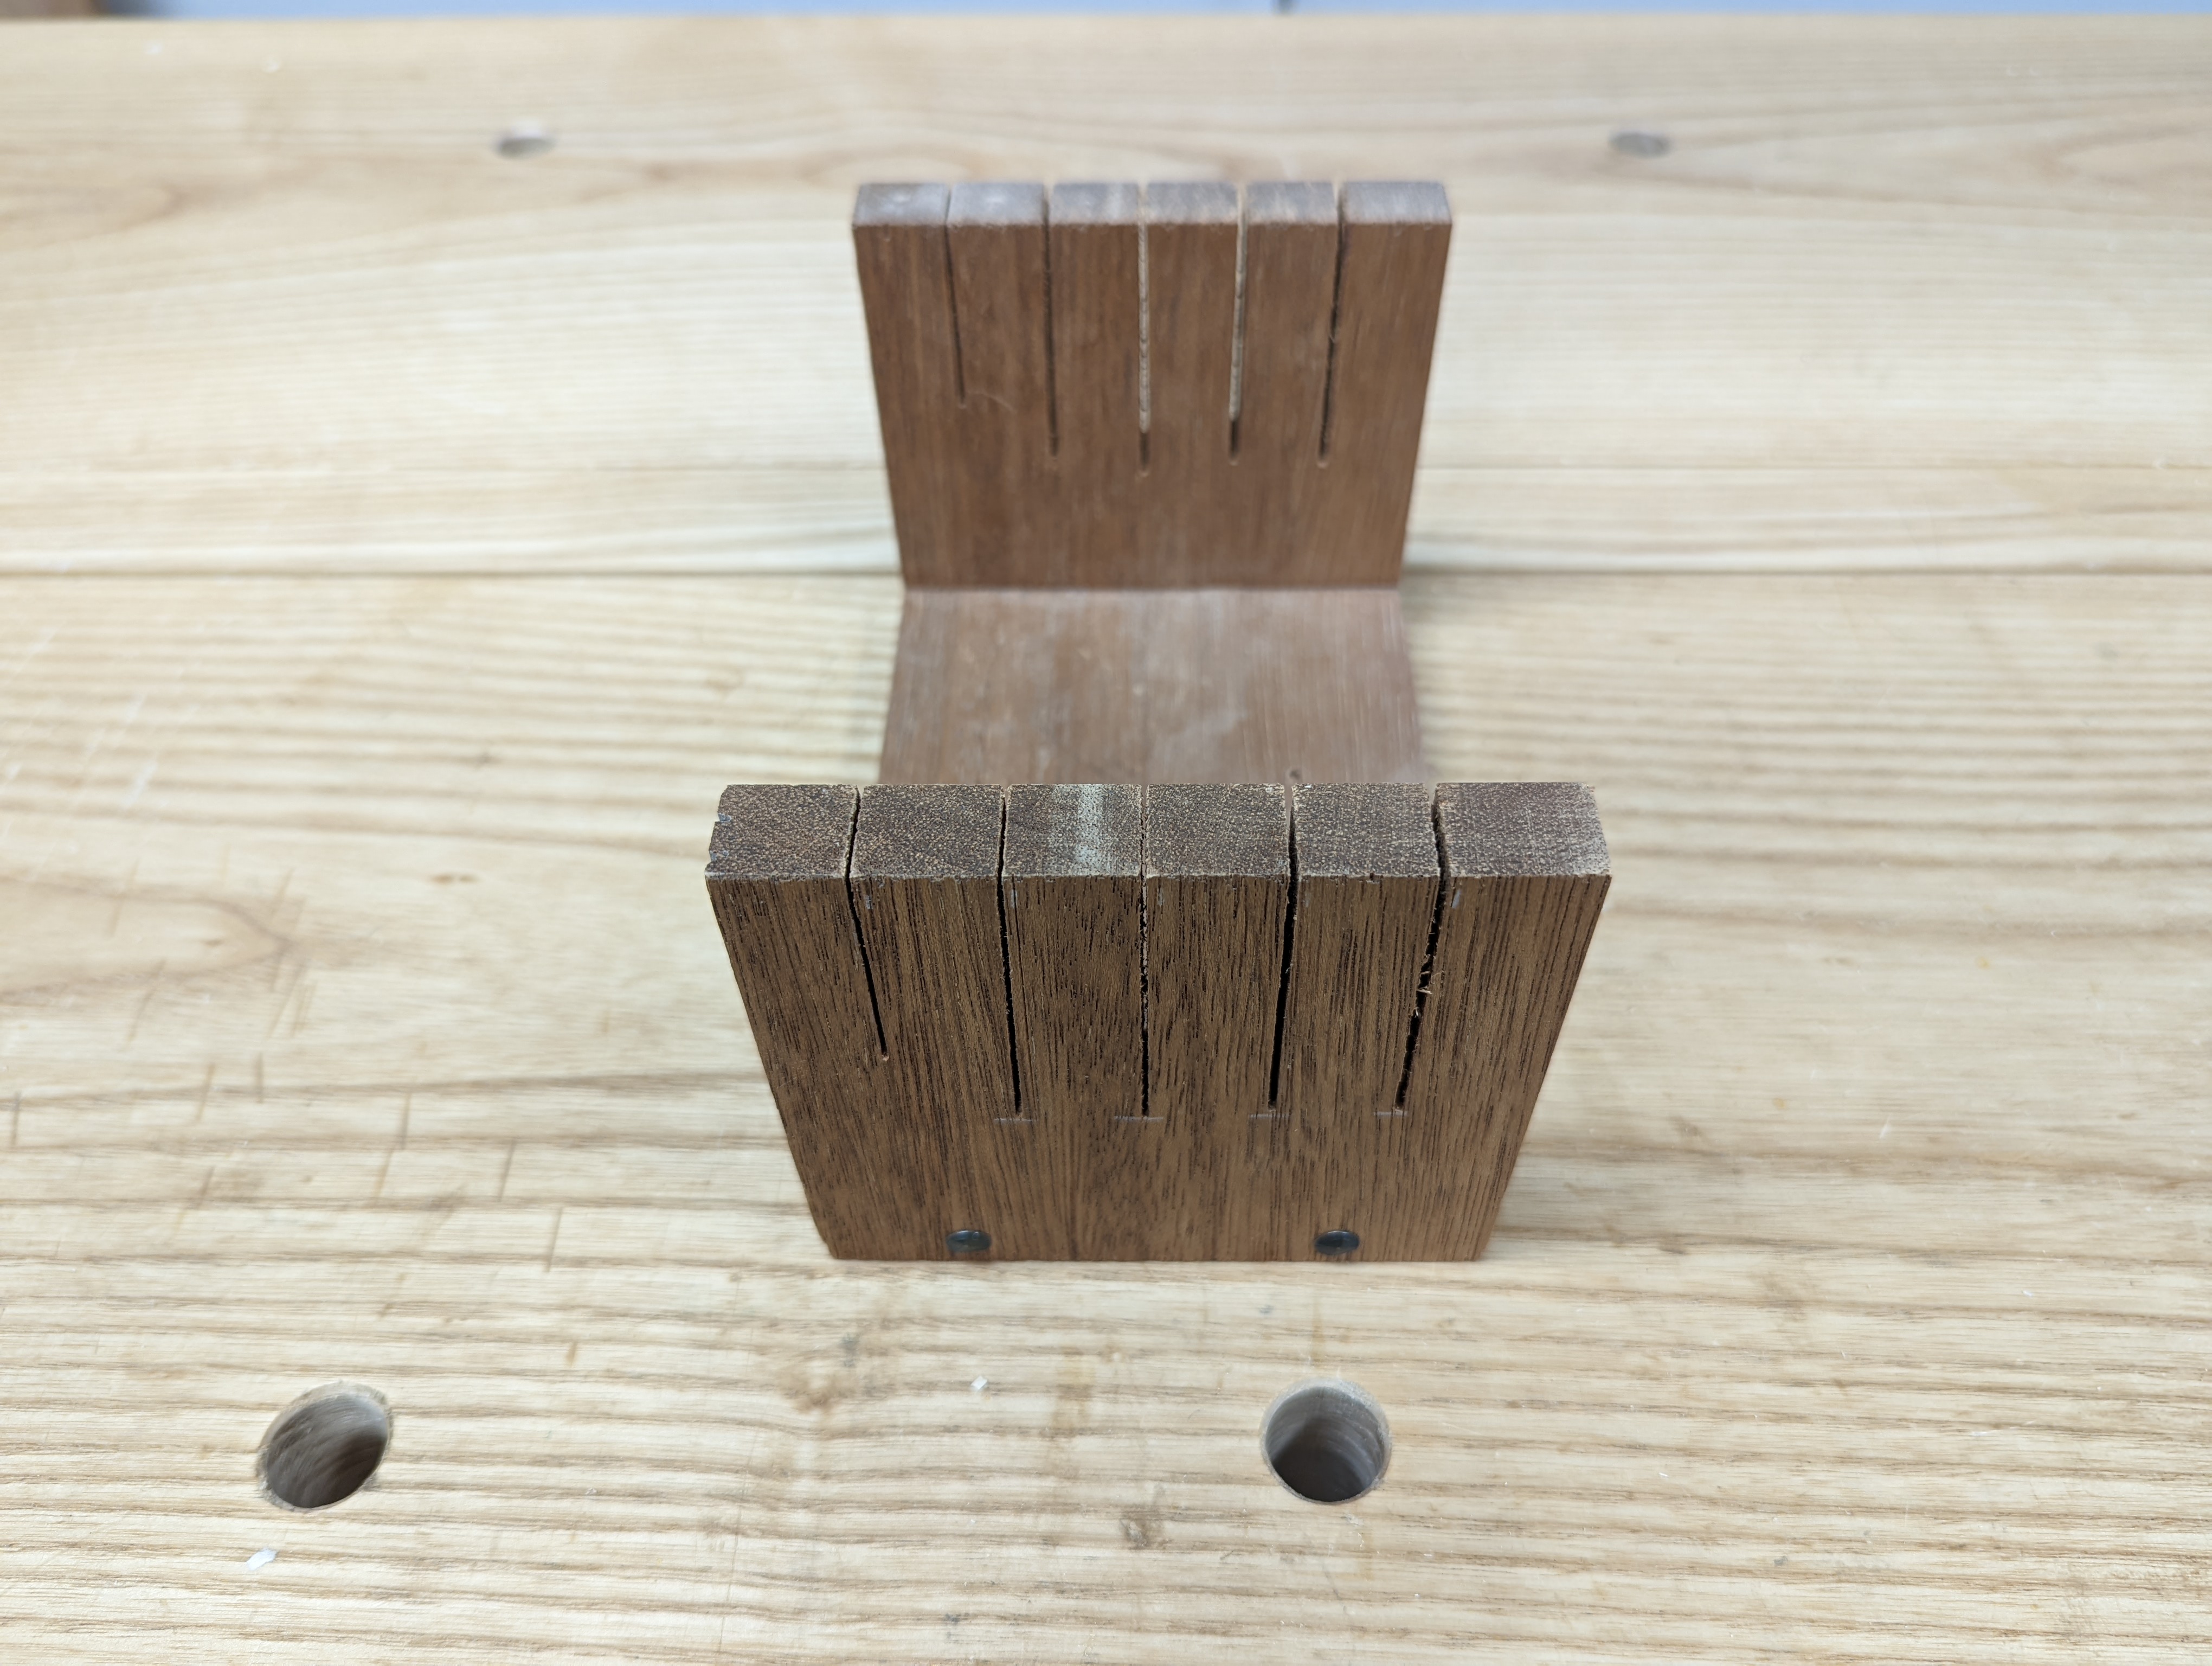
After the tool rack is attached, it’s time to make the saw till. When traveling, I carry three saws: a 12 TPI rip cut back saw (the Veritas ones are pretty nice and very durable), an 11 TPI rip cut panel saw (it also crosscuts) and a 6 TPI rip cut panel saw. The saw till I prefer is U-shaped and joined at the corners with either dovetails, finger joints or rabbets and nails. Pine is just fine here (and for eveything else), although any wood will work.
The saw till has slots cut with the saws that it will hold (3/4″ on center spacing works great for most saws) and its height is just whatever will friction fit below the tool rack (it adds even more support to prevent the tool rack from sagging). Remember to leave at least 2″ beneath the lowest slot and (at least for the backsaws) don’t make the slots so deep that the saw teeth don’t bite into the till itself. If there is room, I also add a 1/8″ slot for a combination square.
For this saw till, you can can just make ends and screw them in place from the outside of the chest and from the underneath. But I find a bridge in the middle makes the saw till easier to affix (and remove, if needed). Regardless, space the ends based on the saw plate of your shortest saw; an overall width of 2 inches less than the length of the saw plate should work for most saws. When you screw it in place, it should be roughly centered and tuck under the back till just 1/8″ or so. If done right, this saw till has the added benefit of also supporting the middle of the tool rack, which can sag over time.
General Small Tools
The tool rack and the saw till have now created 3 zones of tool storage. The front of the well is for planes and other large items (more on that in a moment). And on each side of the saw till (remember, you left at least 2″ beneath the saws) there is now a great place for general storage. I fill these zones with H-shaped semi boxes that are flush to the front of the saw till. The top of the H is a dead zone that protects the edges of the chisels and other edge tools as they hang down below the tool rack. We’ll call these the “general tills”.
These general tills are just friction fit into the spaces on each side of the saw till and will get closed off later. These general tills are a great place for things like nail punches, drill driver bits and other small items that don’t have edges to protect and can be piled in. You can also use the now-closed-in area below the rack and between the ends of the saw till for specialty storage. I keep my small router plane and dovetail guide there (both are tools I rarely use while outside or on site) that won’t damage anything if they rattle around a little bit.

Plane Till
We’ve now come to the most important part of the operation: the plane till. This is entirely based on the bench planes (and other items) you’ll have in the chest. In the case of my traveling tool set, I use a No. 5 1/2 and a No. 3, which (conveniently) fit in a single row of plane storage, so the second row in the plane till can be for other things. In a full size tool chest, you’ll probably need both rows for planes (I use a No. 7, No. 5 and No. 4 in my main DTC, for example). In fact, the length of these two planes, plus dividers, dictates the overall length of the tool chest itself.
Rabbets and nails are the order of the day when making the saw till. I used to dovetail these, but it’s too easy to undercut a baseline and get a bad fit lengthwise. If I used a table saw, I’d probably make these out of 1/4″ stock all around and just brad nail everything together after cutting VERY shallow rabbets. But with hand tools, 1/2″ stock feels better all around (except for the thin middle dividers).
When locating the divide between compartments that will hold planes, I find an extra 1/8″ of length all around works well for getting Bailey-pattern planes in and out of the plane till. For instance, a No. 5 1/2 is 15″ long and 2 3/4″ wide, so the compartment ends up being 15 1/8″ long and 2 7/8″ (or a hair under) wide. Don’t make them too tight, though; the difference between “secure” and “difficult to remove” is basically 1/16″ in each direction. Just FYI, the knob on smaller planes (like the No.3) extends past the toe. I learned that the hard way.

Aside from ensuring your planes sit snugly, the only other critical measurement here is ensuring the ends of the plane till take up whatever space is left between the front wall and the general tills, thereby locking everything in place. If you do have to build up part of the till to fit a smaller plane, glue that spacer to the plane till. That makes a pretty meaty strip for boring some more 1/2″ holes for extra general tool storage (when I get around to it, my nail punches and marking knife will live there). Just make sure the spacer is the same height as the rest of the plane till.

The last part of the plane till is (to use a Rex Krueger term) the “key”. It fits into the space between the general tills and the plane till and closes off the second row of the plane till. But don’t glue it to either the plane till or the general tills. As long as the fit is reasonably tight, it will lock everything in place but still allow you to pull the tills out if needed. I like like to add a couple of spacers to the back of the key, which complete the general till box and keep the general tills from pinching in on each other.


All things being equal, the Well should now be perfectly organized for the tools to be kept in there. There is space on the walls for pouches and magnets and whatnot to hold additional tools; just be sure not to obstruct anything coming in or out. You’ll probably need to remove a saw or two to reach the less commonly-used tools (like that block plane on the left side), but that’s just how traveling tool chests work. Success means striking a balance of security and accessibility.
With a little bit of thought, though, it’s possible to easily store everything you need for meaningful woodworking while also keeping your tools safe from the bumps and bruises of moving the chest around. All the same principles apply to shop storage, if you are so inclined (and I would posit that the edge tool rack and saw till are important for ANY type of tool chest, even with banks of sliding tills for everything).
This is all just a suggestion, of course. Use whatever organization method fits your style of work and tool set. I just want your tools to be safe, secure and ready when you need them.
And that’s it for now. Next week, we’ll examine in more detail the “just keep it open and pile it in” method. Natch.
JPG
Earlier this year, I made a little traveling tool chest to go with my traveling workbench. It works great, and it holds all of the hand tools I need for working away from the shop. But it’s not perfect. I didn’t really think through the bits and bobs I’d need to actually do woodworking. Things like a roll of blue tape, a powered drill driver (and charger), a hammer, and auger bits. Pretty much everything that isn’t french fit into the well or a till just gets piled in and must be unpacked and piled elsewhere to access to the main set of tools.
It’s a well known fact that Dutch-style tool chests are bigger on the inside (having lots of places to stash tools around the inside of the main compartment). And with some wall cabinet projects coming up, I needed some dovetailing practice. I’d been cutting mostly mortise and tenon joints as of late. Even though I consider myself to pretty good at dovetailing, it had been a while. So let’s make a Dutch tool chest.

Now a full size Dutch tool chest (single lower compartment) is portable enough in its own right. But I like the form factor of my current traveling tool chest and have found a full size DTC to be a little unwieldy to load and and out of the truck. So this chest, although 27″ wide, is only 18″ high. That means a full size main compartment but only a 3.75″ lower compartment. Big enough to cram in a drill driver and charger, a roll of auger bits and a brace and bit and some other bulky odds and ends, but not so big that I’m tempted to overpack. I’ve found that as far as traveling tool chests go, the more extra space you have, the more extra tools you’ll cram in. And that defeats the purpose.

One of the beautiful design features of a DTC is the angled top. Not only does it keep you from piling things onto the chest (thereby preventing you from getting at your tools), it also means that you can put a full size tool rack on the back wall of the main compartment. You just can’t do that with a square chest. I prefer a tool rack that is 1.25″ x 1.25″, with 1/2″ holes drilled on 1.5″ centers. A good number of my tools actually require elongated holes (not just the bigger chisels), but a 1/2″ hole on 1.5″ center is good for a great many tools.
Another great part of the DTC form (piggybacking off the angled top) is the plane till. Not only can you fit a plane till into the main compartment of the chest (in this case, one that holds not only my two shortened panel saws, but also a small 12tpi rip tenon saw), but because of the extra headroom in the main compartment, the space underneath the saws on both sides of the till are usable space. In a stationary, shop-based DTC, you can just pile things in there. For this traveling chest, I’ll need to make some little trays (like the plane till, more on that below) to keep things from bouncing around. And the saw till also keeps the tool rack from sagging in the middle.

This is a traveling chest, so I don’t need to fit a full set of bench planes. Instead, I just keep a No. 5 (with both straight and cambered irons) and a No. 3, plus a low angle block plane. Taking into account the saw till, I’ve got 6.125″ of depth for two rows of plane till/general storage. That is enough (with some creative orientation) to fit everything I need, including my sharpening gear. That’s what I currently have in the square traveling tool chest well, at least.
I don’t own a table saw, and making long thin stock is tough by hand (at least without using rolls of double sided tape). So I tend to build up my tills for French fitting with 1/4″ nominal hobby boards from home center. The poplar is best; one can usually find it nicely quartersawn in 48″ lengths. Its true thickness is around 7/16. But when French fitting by hand, it’s just shooting board practice.
I think that’s it for this one. I have a new to-do’s for the rest of the weekend that will take me out of the shop.
JPG
Around these parts (Fairfield County, Connecticut), it’s warming up. This time of year, I’m finally able to drag my workbench outside and get real some woodworking done. My outside workbench, now with new slab and tool tray, is in fact getting quite a workout. I can get a bunch done with just a pair of holdfasts and a few clamps to secure the work. Proper vises are great. But they are not absolutely necessary if you’re not cutting English style dovetails.

One of my goals for this year is mastering tapered tenon joinery for staked furniture. Or at least becoming facile with it. I have experimented with reamer and tapered tenon cutter before, but in situations where strength was not a primary concern. Chairs and stools are higher leverage projects (literally and figuratively) than credenza bases and side tables.
So with a nice weekend, I might as well make some chips on the lawn with a drawknife and spokeshave to prepare some leg stock for refinement. I resolved to take the tapers further than I usually do off the drawknife. I also spent more time with the spokeshave before introducing the tapered tenon cutter. I’m not sure it was faster than doing more rough work, but the results are more consistent than my prior work.

These legs are ash, which was split off from a small timber that checked badly while it was drying I’d have preferred the leg blanks be closer to 2″ square, but you work with that you’ve got (these are 1.65″ square). I’ll add some stretchers between the pairs of legs for extra rigidity.

I am also working through some old boards, some from as early as 2014 that I’ve been dragging from shop to shop all these years. Among that is a red oak 2×12 (nominal size 1.75 x 11.25). It’s about 65 inches long and I could never bring myself to cut it down into smaller boards. So as I figure out how to be precise with compound angled joinery, I might as well make another low bench. The top had cupped and bowed pretty badly so by the time it was flattened, it was only 1.5″ thick. You may not think half an inch of red oak means that much, but it does. This is a sitting bench, not a low workbench, so the little bit of flex means added comfort. But if this were to live in the shop, it would need a 2×4 glued and screwed to the underside for extra support.

I do all my boring and reaming by hand with a brace, so it’s much harder to overshoot an angle or a depth with the reamer that way. But it’s still important to check your angles and go slow. Doing so will ensure the exit holes on the top (ie, visible) of the seat are of consistent size and shape. In the end, some irregularities aren’t fatal to the structural soundness of the piece. But looking nice is important too.
So this is a very long way of saying, if it’s nice outside, I will drag a workbench outside and get a tan while doing some rougher work. It’s harder to rake shavings off the lawn than to sweep them up off the floor.
But such is life.
JPG
