For those who only know me as a woodworker, you probably won’t be surprised to hear that I also love Magic: the Gathering. I’m in my mid 40’s and my first pack of Magic was Unlimited (and I still have the Savannah I opened in it). I largely play Mono White (Life gain or Midrange) or Mono Red (Aggro or Burn). In my youth, I was a control player, but I’ve drifted away from any decks that include Blue. Although I still love me some Mill, especially in limited (I once drafted a Zendikar block deck that had 7 Hedron Crabs in it). I’m primarily a limited player, preferring sealed (although online, I do like the Quick Draft format in Magic: the Gathering Arena).
I do not consider myself much of a contrarian when it comes to my hobbies. I focus on hand tool woodworking, sure. But I do not care if you use a table saw or a jointer in yours. Whatever works for you. I’ve actually come to really appreciate pocket screw joinery in the last two years. Before that, I was the schmuck doing full mortise and tenon for every piece of shop furniture.
But with Magic: the Gathering, I have a much more combative streak. Personal temperament aside (I have flipped a table at a pre-release in anger [although in fairness, I had just quit smoking and was still working in New York big law]), Hasbro’s direction for Magic: the Gathering has been disappointing to me. I do not fault them for wanting to make money (my day job, after all, is mergers and acquisitions attorney). But I think this Universes Beyond crap is getting out of hand.
I have not and will not buy a single pack of Spiderman (either in paper or as Through the Omen Paths online, which is an entirely different rant). Nor will I buy a single pack, physical or digital, of Avatar: the Last Airbender, Teenage Mutant Ninja Turtles, Marvel Super Heroes, Star Trek, or whatever other Universes Beyond dreck they are selling this year and in the foreseeable future. And I, in fact, am a huge Star Trek fan.
In fairness, I thought the Final Fantasy set was good. But that was because it clearly had a ton of thought and love put into it. I don’t know a god damned thing about the Final Fantasy lore. But the cards were fun and cohesive and flavorful. A group of someones clearly worked hard on that set. But as someone whose defining sets were from Unlimited (1993) to Alliances (1996), and then back again from Shards of Alara Block (2008) to Innistrad (2011), I just can’t get behind the cash grab that Universes Beyond has become.
So why does it matter and why am I writing about it on my woodworking blog?
Because I love the recent Aetherdrift set. It was a flavorful and fun set. And I’m sick of people shitting on it. Is it as powerful as Final Fantasy or as fresh as Edge of Eternities? Definitely not. But as someone with Hooper in their top 10 favorite movies of all time, Aetherdrift kicks ass. Aetherdrift’s premise is “What if the Magic: the Gathering in-universe canon decided to do a death race?”. And that’s awesome. It still felt like fantasy, where something like Outlaws of Thunder Junction does not.
As the Spiderman set deservedly flops (it’s bad and you’re bad for liking it), I’ve been wondering. Why do M:tG players generally hate Aetherdrift? I think it’s because there was a very unhealthy metagame at the time and Aetherdrift did nothing to shift that unhealthy metagame. But after the bans back in the summer and the metagame becoming even unhealthier since (for the record, my personal view is that Vivi Ornithier is just Oko: Crown of Thorns with the force of a marketing deal behind it), I’m seeing more and more Aetherdrift cards in Standard. Good ones that I identified at the time. Less good ones because they are in colors I don’t like.
So if we’re going to shake Hasbro from this Universes Beyond bullshit, and reclaim the game that we love, I say we start by cherishing the in-universe sets. And giving my favorite set in recent years a chance.
I’ve got a few booster boxes handy if you want to do sealed or a draft.
And if you haven’t taken that survey yet, you can name me as one of the people who shit all over the Spiderman set.
I have an office job (M&A attorney) and my principal place of employment is in town. I like being at the office; I go 4-5 times a week. But I do work from home from time to time (especially evenings and on weekends), so it’s important that my home office is both functional and cozy. My home office also doubles as my gaming room (what cretins would call a “man cave”). It’s a 12×13 ground floor bedroom.
Oh, and it was my hand tool woodworking shop for almost a decade.
When I had a workbench in here, I was always frustrated that it wasn’t level front to back. Depending on where which bench, the front was anywhere between 1/8″ and 1/4″ lower than the back. Meaning tools would always roll forward and off the bench (terrifying if it was an awl or chisel and I was barefoot, which I tend to be in my shop). Convinced I was a bad craftsman, I banished the thought from my mind (putting aside that when I moved the same workbench into the new workshop, it was basically level).
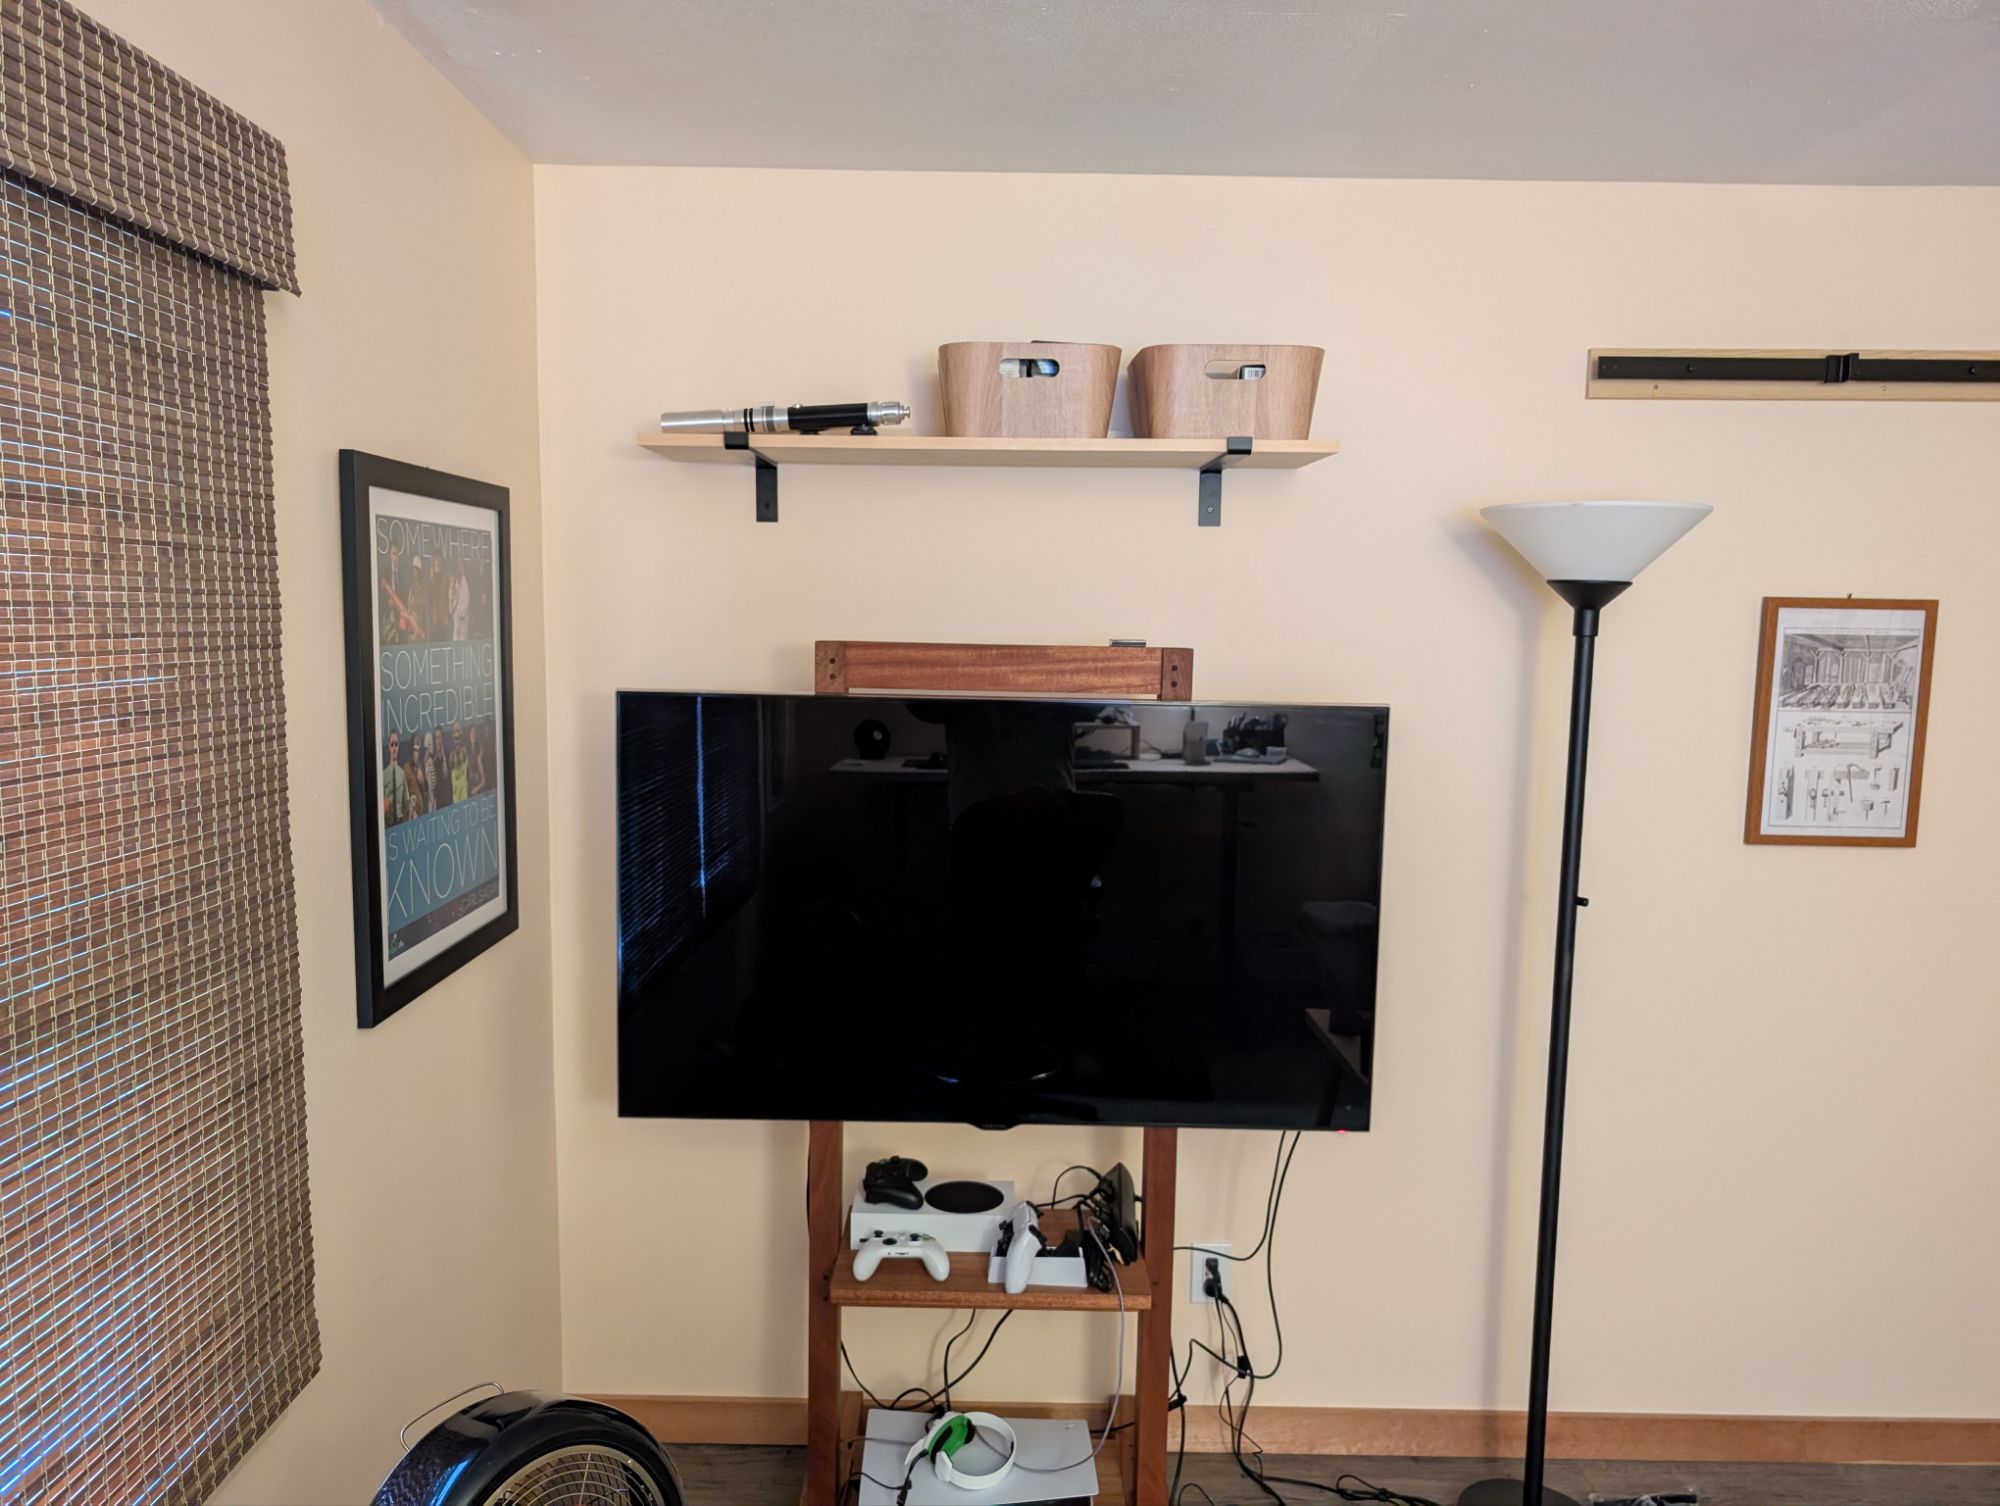
But then, the other day, I decided to hang a wall shelf and what do I notice? There is actually a 1/4″ downward slope in the floor across just 24 inches. I know for a fact the TV easel is square to the base; I built it myself. But you can clearly see the TV leans to the right compared to the wall hung shelf. Just look at it, face on. And the right side of the easel is exactly where the front of my workbench was when this was my shop.
That’s Benjamin Moore: Winter Melon for all paint.
So all this time, I thought maybe I over-flattened the front edge of the benchtop. Or perhaps I just measured the shoulder on the back legs badly when cutting the joinery. But, in fact, it was some mason in the 70’s fault. Not mine.
For those who know me personally (or who have followed me for long enough), you’re aware that I am atheist. I grew up very Catholic. And like all good Catholic boys, the only vestige of my Catholicism now is periodically invoking the name of the Father, the Son, the Blessed Mother, or whatever Saint fits the bill in the most violently profane torrent needed at the time. Never the Holy Spirit, though. Fuck that guy.
And as a vehement atheist, I have come to appreciate actual biblical scholarship. I feel like I know the Bible way better now than I did earlier (even as one of the few people who have actually read the motherfucker all the way through). For the record, “Then came Shamgar, son of Anath, who killed 600 Philistines with an oxgoad. He too saved Israel.” Shamgar: absolute fucking legend.
So as I was listening to the Data Over Dogma podcast the other day, Dan McClellan (a scholar of the Bible and Religion) said something that surprised me. He said that how he writes and how he speaks are very different. To the point where narrating an audiobook of his own work was a chore.
This is very strange to me. Except for drafting actual legal documents (I am an M&A attorney, after all), I write and speak in exactly the same way. Work emails, personal emails, this blog. National CLE’s where I teach the economics of Mergers and Acquisitions transactions. It’s all the same voice.
Perhaps it’s a luxury of being the kind of lawyer who never has to go to court, know any actual laws, or be particularly formal. Perhaps it’s just taking intellectual honesty to its logical conclusion.
But when you read these words, know that you’re getting the unvarnished and truthful James. That is my promise to you.
Editor’s Note: Buckle up. This will be a long one and will at times feel like James is just ranting. In an effort to pander to his international audience, James is also adding metric parentheticals. Even if using anything other than Freedom Units is anathema to him.
I’ve a number of small trips on my calendar for Fiscal Year 2025. Between concerts throughout the Northeast of the United States, a beach vacation in the Cape of Cod, and, of course, my spring pilgrimage to the house in Central Vermont, I will be away from my home shop quite a bit over the next 6 months. And I’d like to be able to do some vacation woodworking.
Vermont is not an issue. I have, over time, migrated a full size workbench and entire complement of essential woodworking handtools up to permanently live in the utility shed on the property. As a result, though, I don’t really have a travel tool kit anymore. I’ve never been much of a tool hoarder and I foolishly gave away my travel tool box once it did its job and moved everything up to the aforementioned utility shed.
So I’ve been forced to start at essentially square one in putting a new travel tool kit together.
Over the years of making many, many, many travel tool chests, and in refining my thinking on what specific tools one actually needs for casual, on-site, vacation woodworking, I’ve learned a couple lessons. Many the hard way.
First and foremost, vacation woodworking (for me) is not fine furnituremaking. I know of very talented folks who vacation carve beautiful and intricate panels. And I envy them. But that’s just not me. If I’m making furniture outside the home shop, it’s utilitarian: an extra table or a bench or stool. Or if you can’t sit on it, it’s probably a shelf or a rack or a quick shadow box to display some quirky knick-knack picked up at a local antique shop.
That is the long way of saying that my vacation tool kit can an should be small. And I mean small. One saw that crosscuts well and can rip decently (if not efficiently). One bench plane. Two chisels and a mallet. A knife, a square, a bevel gauge, an awl, and a way to bore small holes. Something to keep all of the above sharp. A small hammer and nail set, some pliers, and a measuring tape (although everyone should have one of these in their car anyway). That’s about it. And I’ll probably be tossing in a bag of nails, a bottle of glue, and other miscellany as well (because I just can’t help myself).
All told, that’s 30 lbs. or so of tools (or 14 kg for you metric cretins), before you add the container to store it all in. About that…
I grew up (and still live) by the coast in Southern New England. Between sailing and swimming and other salt-water related activities, canvas tote bags are second nature to me. I have many, and I love them for a broad range of holding and storage tasks. But you cannot just throw a bench plane into a canvas bag, even in a plane sock. No matter how careful, you’ll eventually break the tote or ding another tool. I have in the past made a plane box to keep the bench plane safe, but even that’s not ideal since it still rattles around and can crash into other tools.
And what about your hand saw? Even if you sheath it in a proper carpenter’s saw bag, you could still bend the plate if it bangs around too much in the bag (for instance, against the heavy bench plane). Folding saws are great, but they tend to cut on the pull stroke and I work in the English style (being a steadfast disciple of Paul Sellers).
You can spend money on a nice tool bag with storage pockets to segregate the edge tools and other small tools into pockets. I especially like CLC bags, and any of the Husky bags from the purse aisle at the Homeless Despot will work. But the big stuff is still rattling around inside, if they will even fit. And don’t get me started on metal toolboxes, which can hold a small arsenal in perfect organization but will undoubtedly snag and tear the upholstery in your back seat if you’re not careful.
So where does this leave you? Well, we are woodworkers after all. So I would suggest making a pine box that you can french fit to keep your tools safe.
It’s a travel tool chest, though, and will need to haul at most 50 lbs. (again, 23 kg for you metric types), inclusive of the box itself. The 3/4″ or even 7/8″ stock you might see in a proper English floor chest is way overkill here. For a travel tool chest, I typically take the thickness down to 9/16″ or even 1/2″ (13mm or so), with the actual thickness depending on wherever ends up actually flat across the width.
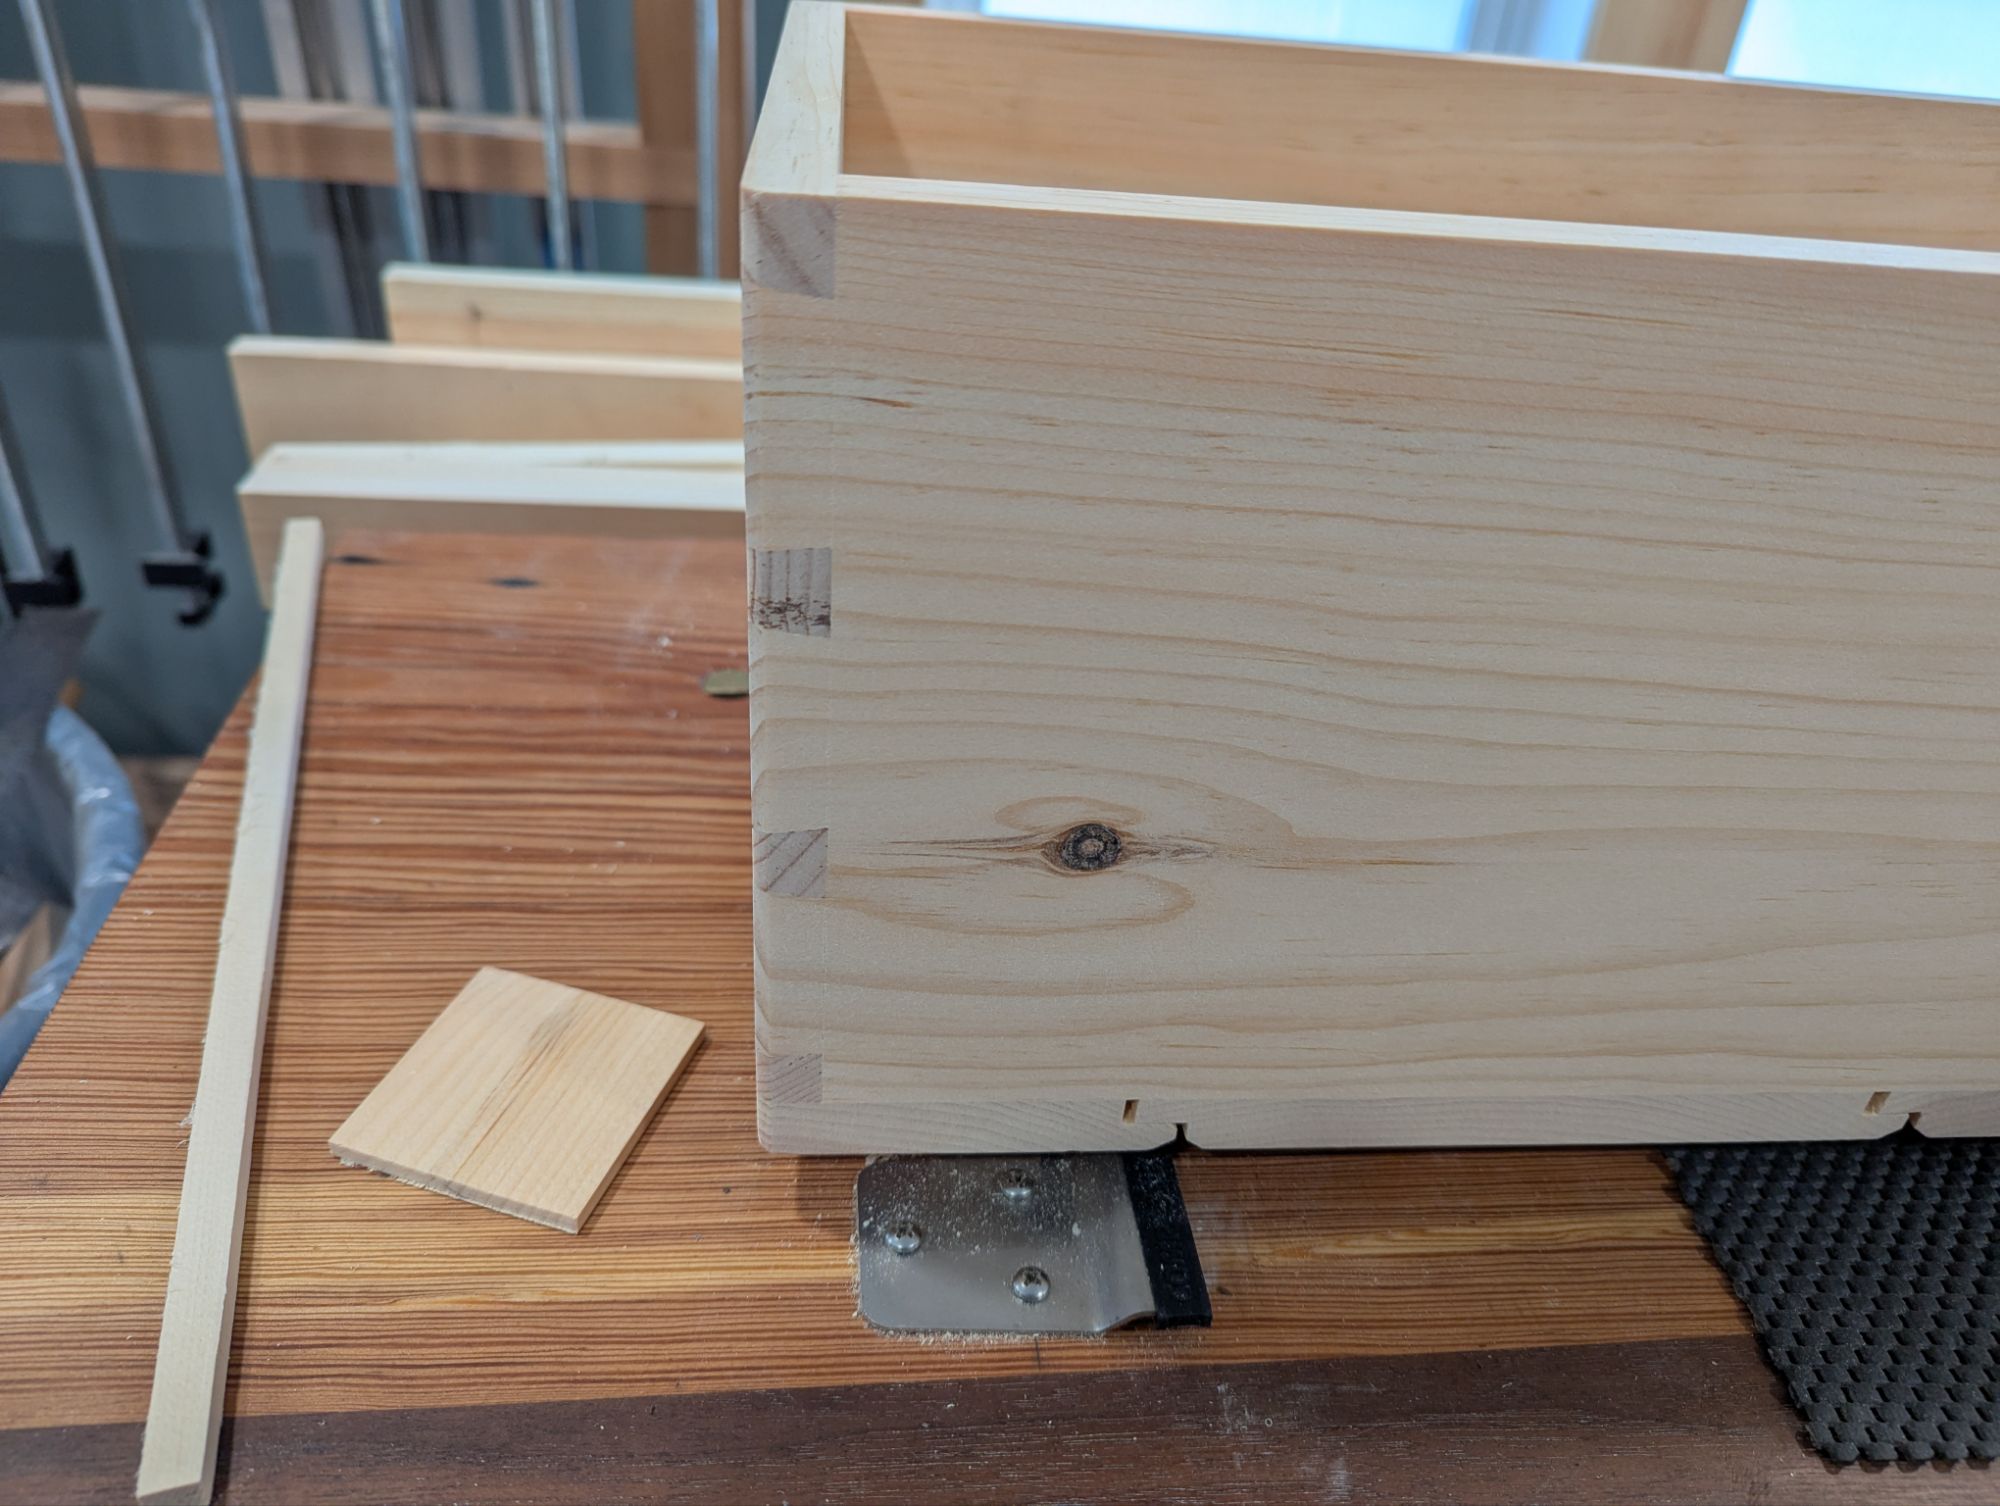
Funny thing is: when working in stock of that thickness and this application (where strength really matters), you really can’t do posh Western European dovetail patterns with super narrow pins. I like wider pins anyway and these travel tool chests are a good excuse to make the pins noticeably beefier. Like so:
Those heavy chamfers on the corners are prep for the iron angle reinforcement.
So how big should a travel tool chest be for the type of rustic vacation woodworking I tend to do? Well, your saw is always going to be your longest tool in the kit. Frankly, if you’re intent on hauling around one or more 20″ panel saws, you might as well just make a full size Dutch Tool Chest and bring an entire workshop with you. But I have found you only really need about 15 inches (380mm or so) of tooth line for most woodworking sawing tasks. It’s less efficient than a longer saw because of the shorter stroke, sure. But it still works fine.
A saw like that will fit into a tool box that’s got 19-20 inches (480-510mm) of internal length. You could buy a small home center hard point saw, and they work well. But they sure don’t look very nice and aren’t terribly comfortable to use for long periods, especially when ripping. So what are the other options?
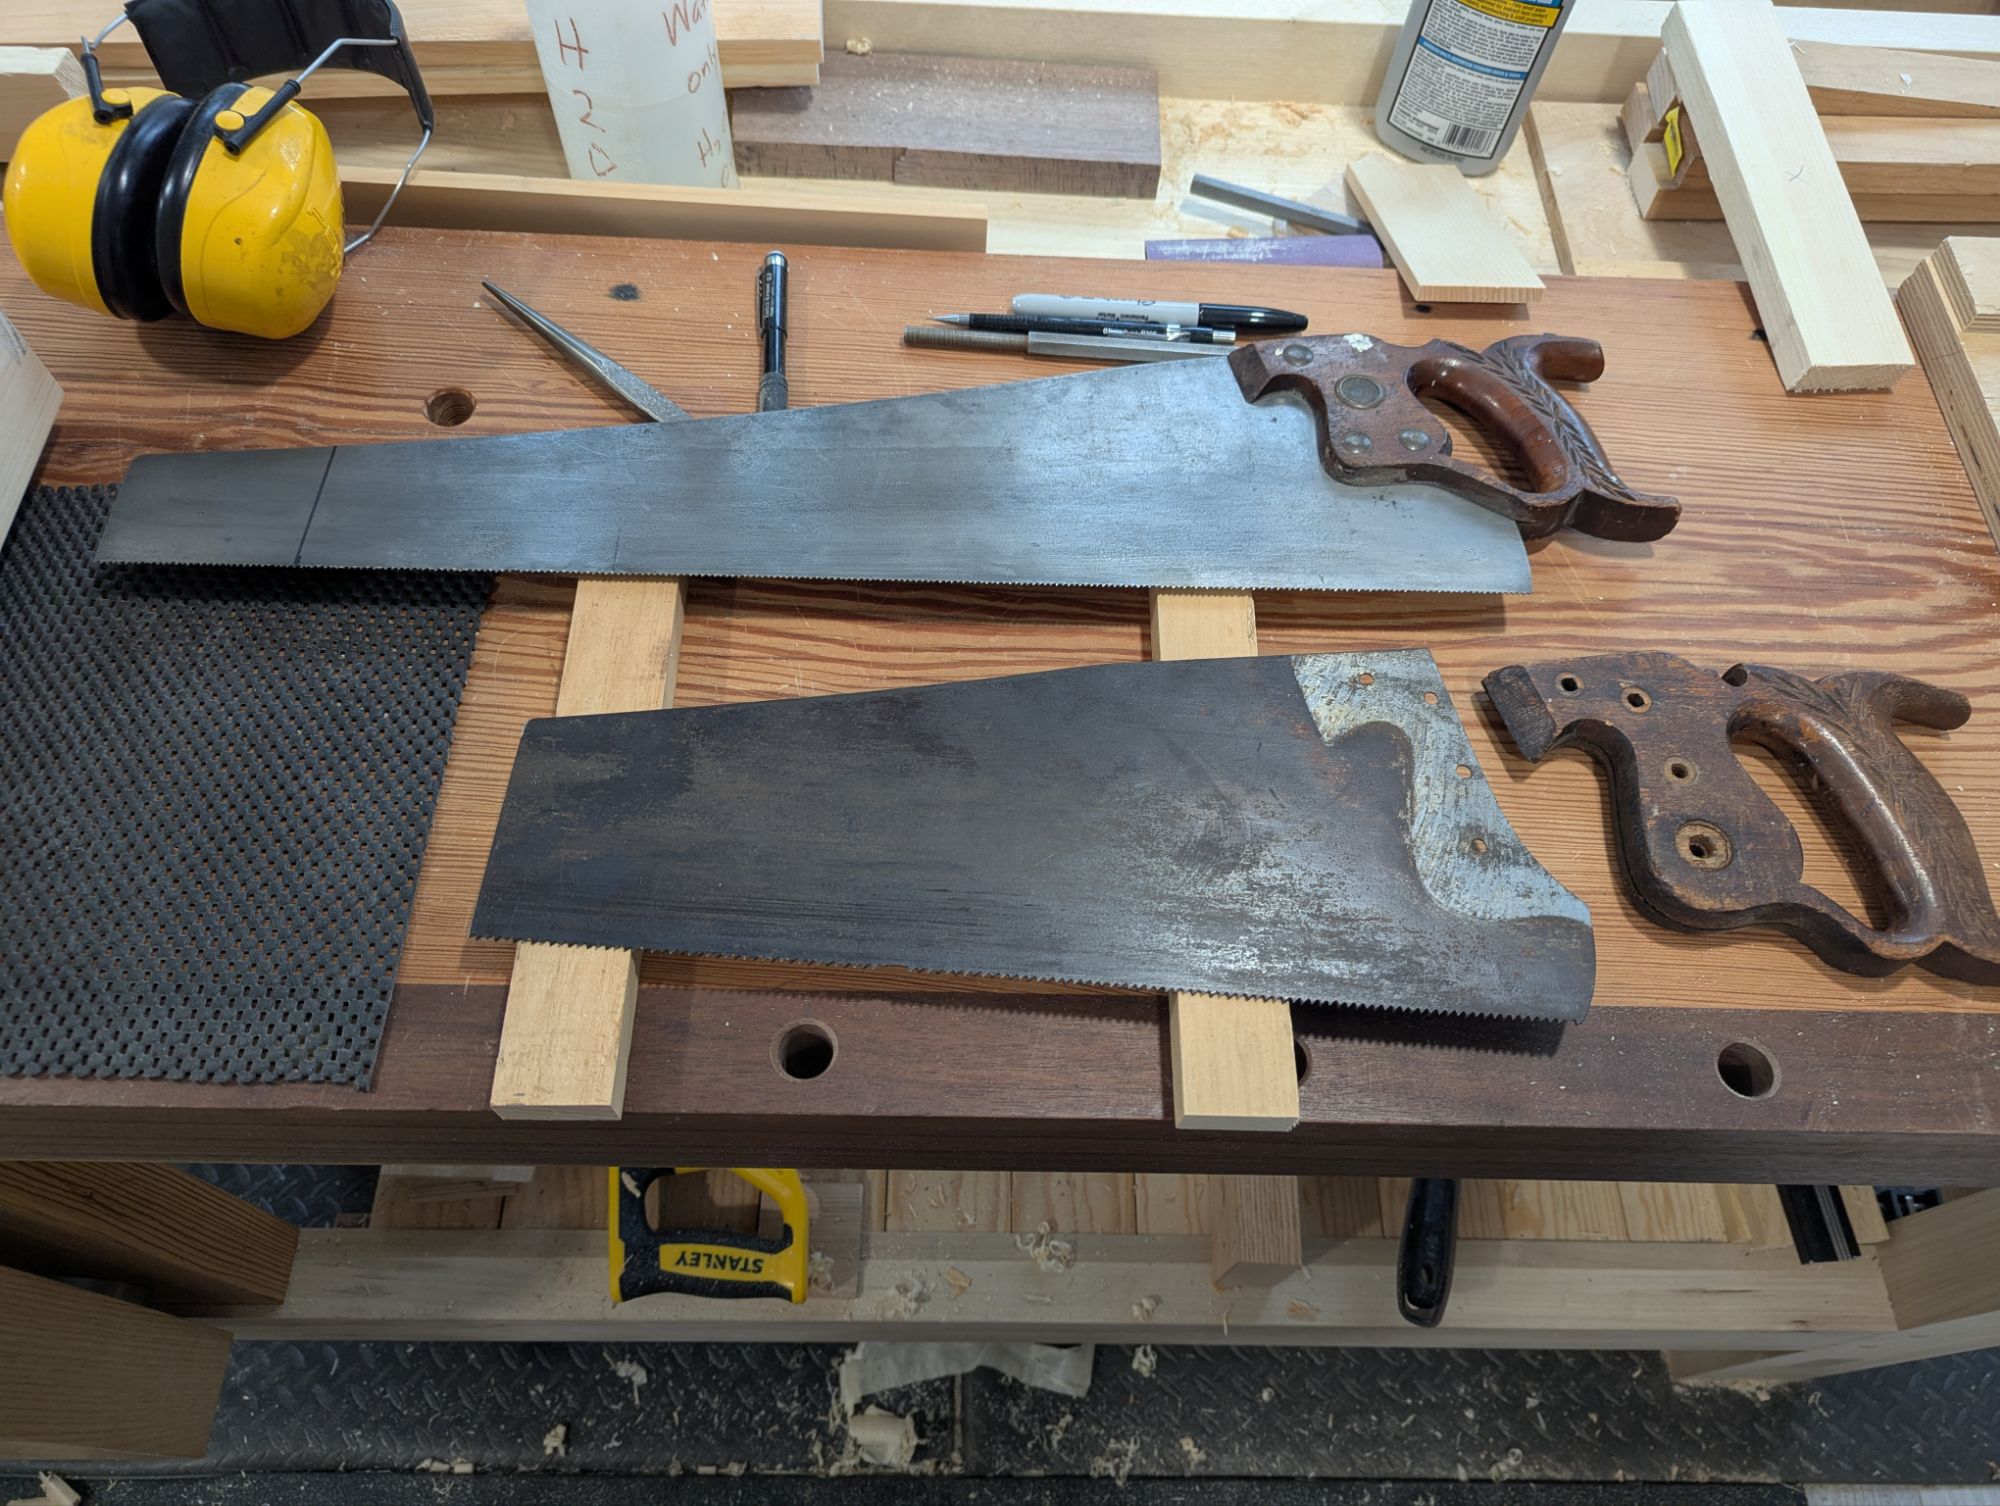
Well, vintage hand saws are abundant and cheap. If the tote is in decent shape, and the plate itself still has some life, odds are it’s got a kink in the tooth line. And that kink is probably around 1/4 or 1/3 of the way back from the toe. You’ll never get that kink out (and even if you do, you probably just work hardened the area around the kink so it will just kink again, or shear). But what if you could just angle grind off everything past the kink and make a shorter saw? Suddenly, that saw would fit into a travel tool box of manageable size.
Something like this, perhaps?
A 20 inch panel saw shown above for length comparison.
I find with shorter saw plates (physics for the win) that they are more rigid and more controllable. After making several travel saws of various tooth pitch this way, I’m starting to think that backsaws (and especially half back saws) are somewhat superfluous. You can do fine joinery tasks with a backless hand saw that’s short enough. The lost stroke length is meaningless when you’re aiming for precision. And 15 inches feels like the sweet spot for rigidity and control.
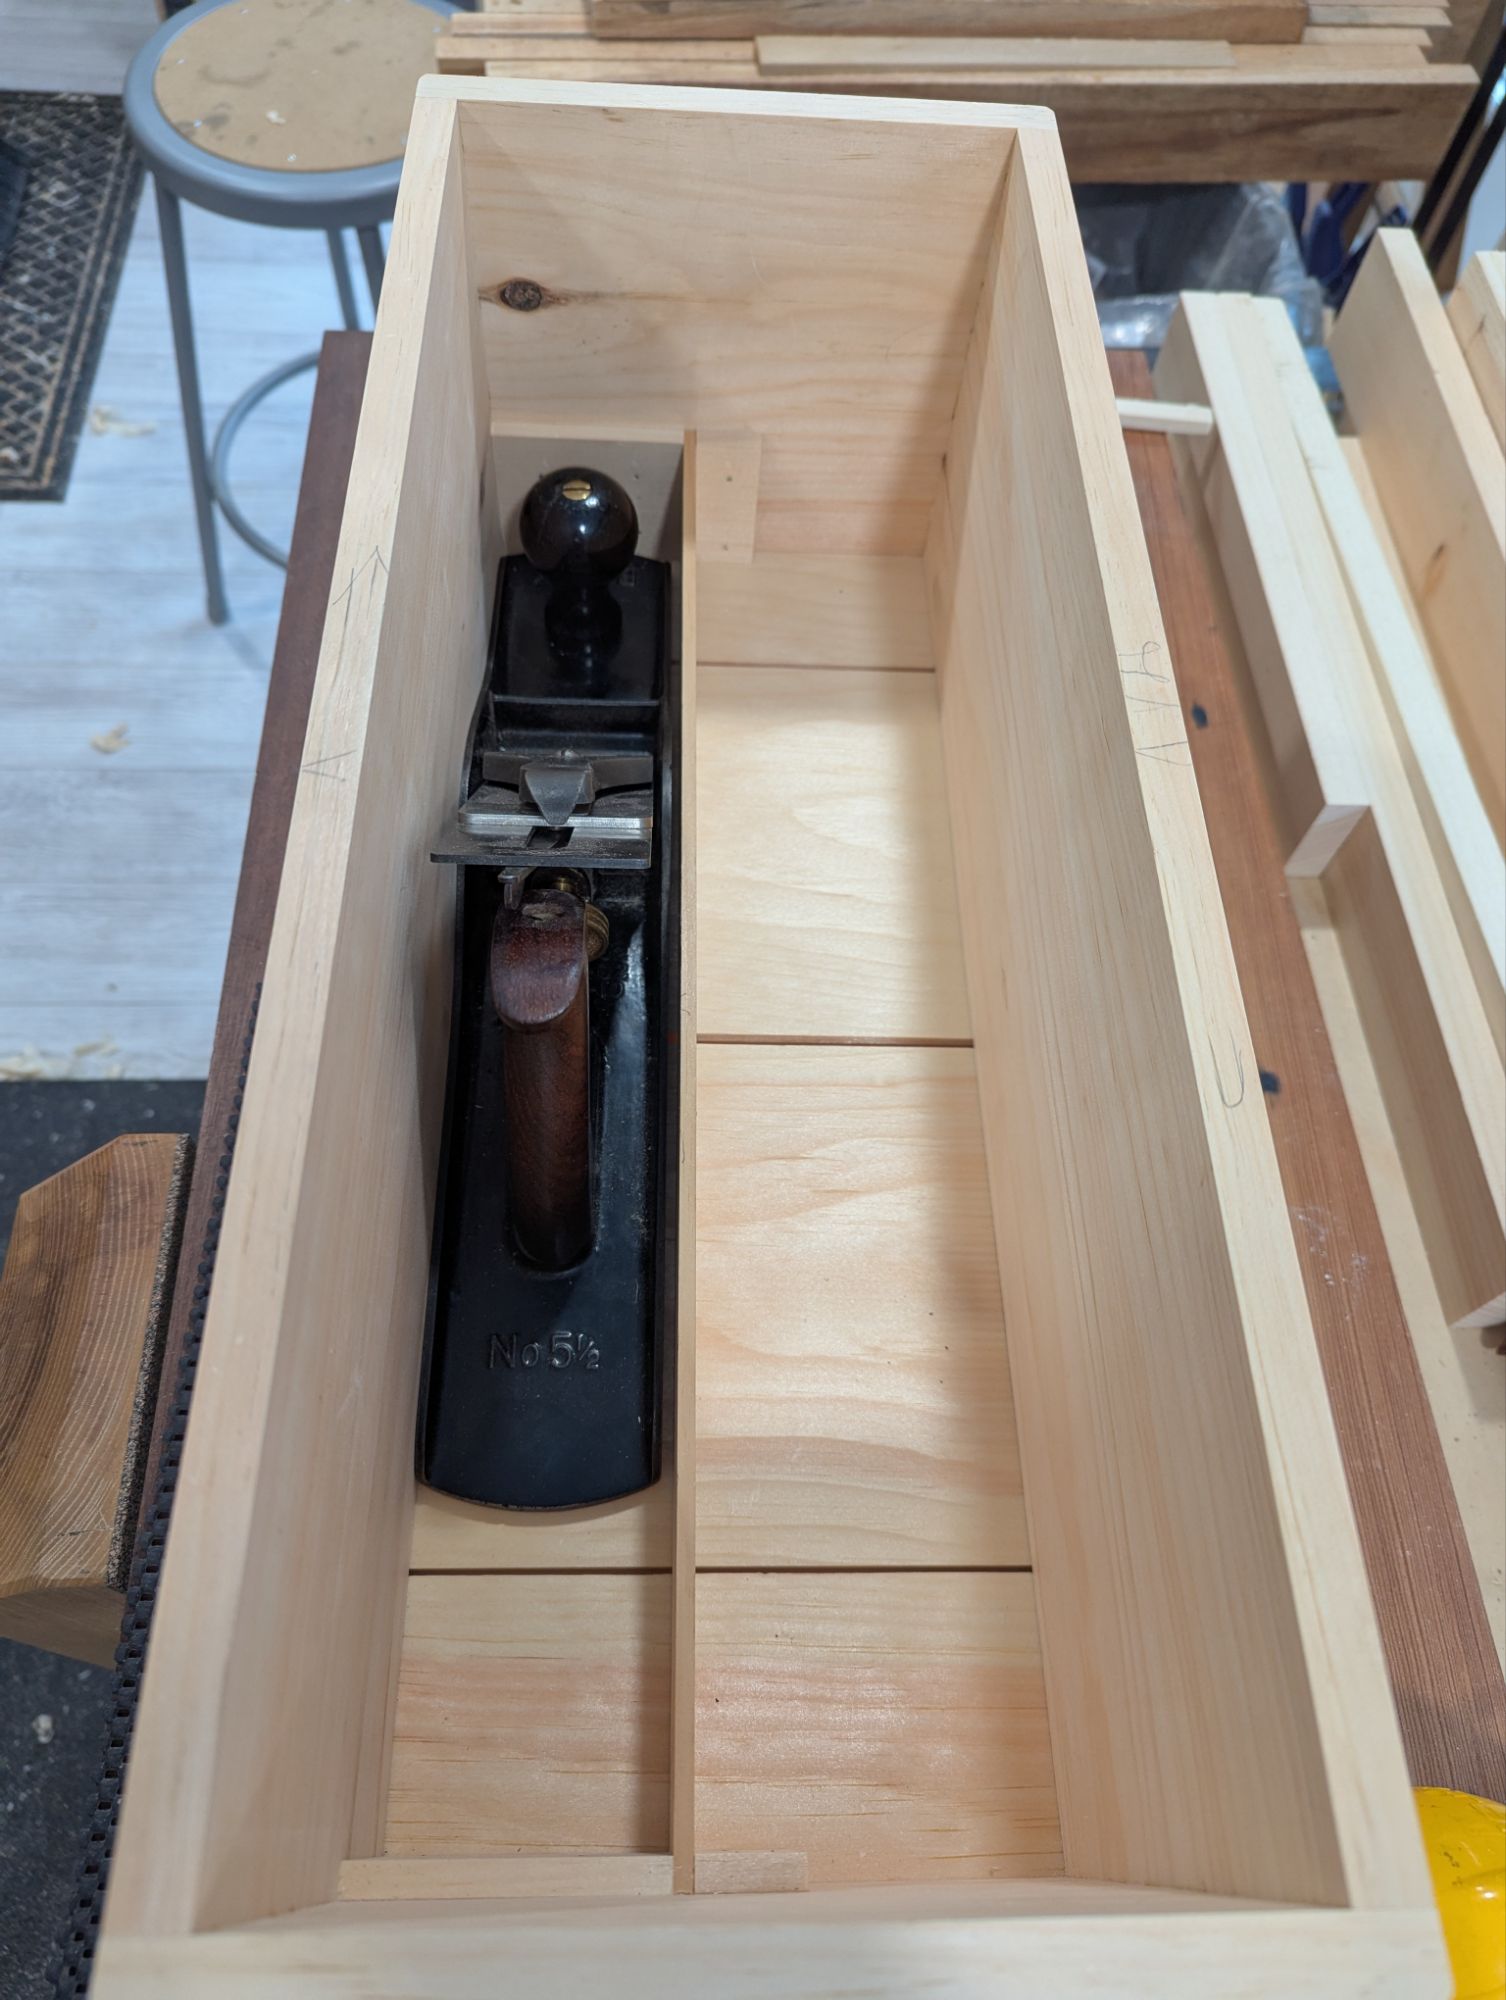
So when you allow for the saw and other tool kit described above, plus the french fitting, I find a tool chest that is about 20″ long (510mm) x 8″ wide (200mm) x 7″ high in the well (175mm) will hold everything I need, even if it’s a bit cramped. If you can get away with some more width, go for it. But remember to subtract about 1 inch (25mm) to determine the inside dimensions when planning out your tool storage.
The second lesson on travel tool kits, and probably even more important, is that you can’t bring a thickness planer with you to the beach. I mean, you can. But then you’re a psychopath. So you’re probably working with dimensional stock (home center pine or construction lumber) that needs to be flattened and/or trued on site. And unless you are a different type of psychopath, this rules out anything smaller than a No. 5. I typically use a No. 6 fore plane for everything in home shop (other than the absolute final smoothing before finish). However, I prefer a No. 5 1/2 jack plane for travel work. It’s the right combination of length and width (and heft) for being on the go. And this is where a corrugated sole really shines, in fairness.
That extra room is for a little box that will hold a measuring tape and some other bits and bobs.
In a 20 x 8 toolbox, your jack plane will take up less than half of the total width, and not all of the length either. A hand saw till is about 1 1/2″ (38mm) wide and you can cram a few smaller tools around the saw itself. So you have around 4″ of width for everything else, which I typically fit out with a rack (for the edge tools and pokey bits) and another well for sharpening gear). You can make a lid with some depth to it that will add a new dimension (pun intended) to your storage space.
But I’m going to stop there, before this becomes a veritable novella.
In the meantime, that cut off saw plate needs to sit in some Evapo-Rust for a day to get cleaned up. Pretty sure that saw was a Disston, but it could be an Atkins. It’s definitely not a Simmonds (my preferred brand of vintage saw).
We’ll see. In any event, Happy President’s Day, all!
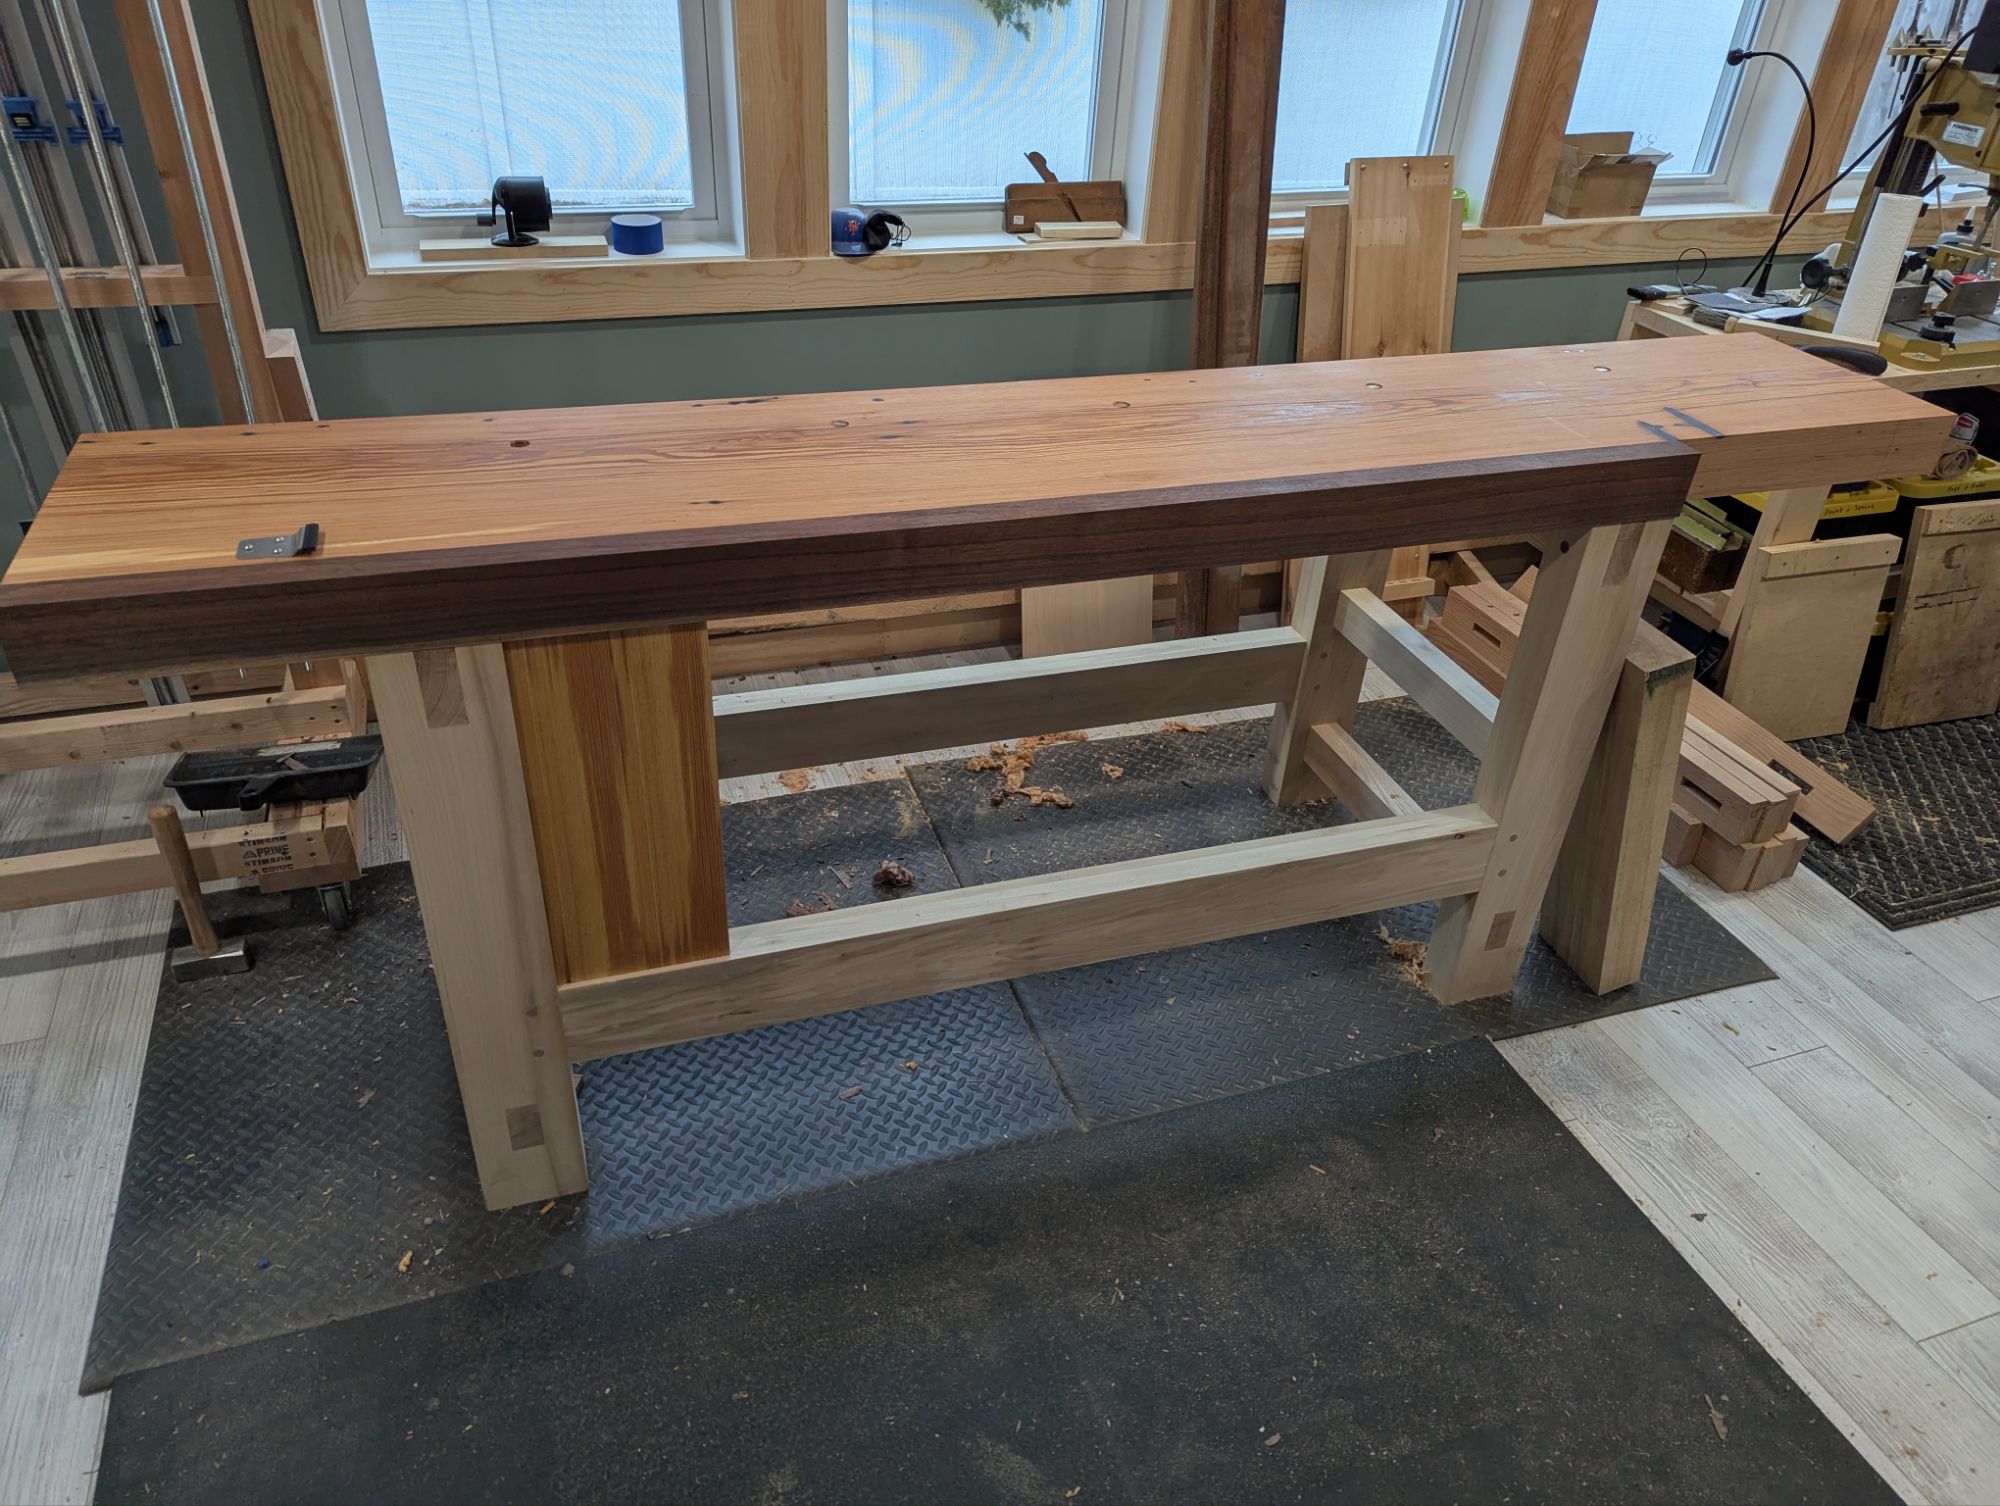
Just a quick update on my new workbench: I have attached the slab top (with pegs like a Moravian workbench) and oiled it a few times (with untinted Danish Oil), which I think looks super neat.
I’ve also bored holdfast holes in the top (12″ back from the front edge of the bench and 14.5″ on center, which I think is the right spacing for Grammercy Holdfasts) and attached a Compass Rose planing stop. Finally, the vise back is mortised into the stretcher and the underside of the top, so I’m ready to work on the vise chop itself.
I’m not one for sentiment, but that top sure looks nice with a couple coats of oil.
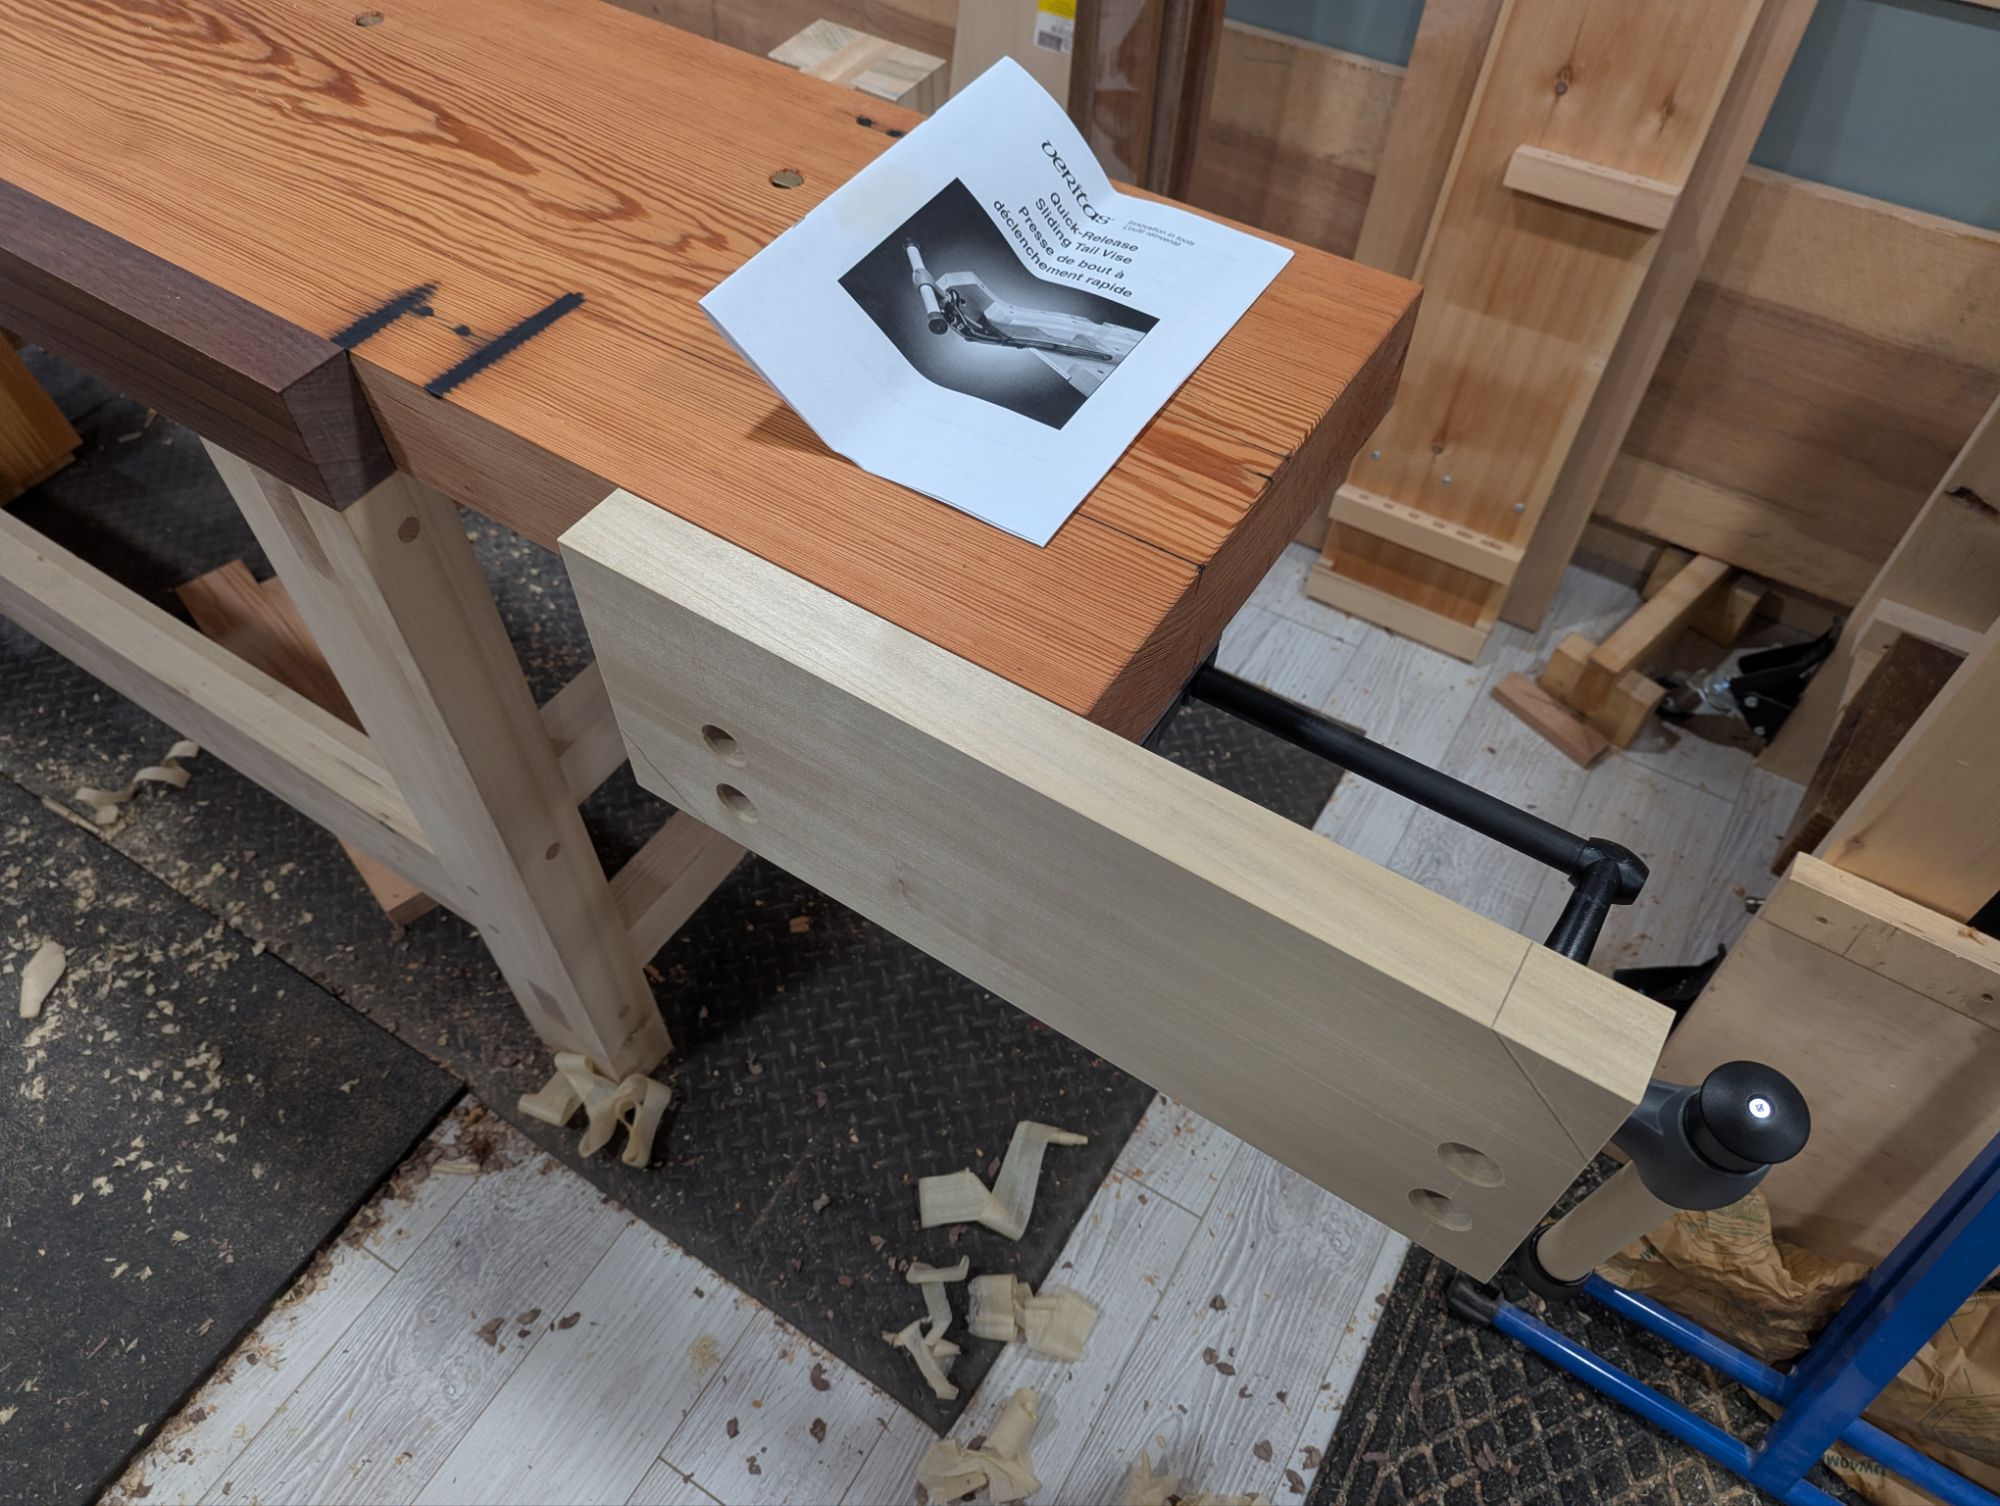
In addition, I finally unboxed my Veritas Quick Release Sliding Tail Vise and attached it to the workbench. I followed the directions exactly but I guess my vise (which I bought for myself in 2021, right in the thick of the pandemic) had some issues with the casting or the machining. The attachment points for the vise chop were not in plane (more than 1/16″ off) and the threaded holes for the bolts to attach the vise chop were not spaced as described in the instructions (exactly 1/8″ off). Perhaps there was a setup issue in the factory?
This meant I had to scrap the continuous grain walnut vise chop and laminate a new one out of poplar (again, trying not to buy new materials for any part of this workbench).
Kind of annoying but ultimately not an issue.
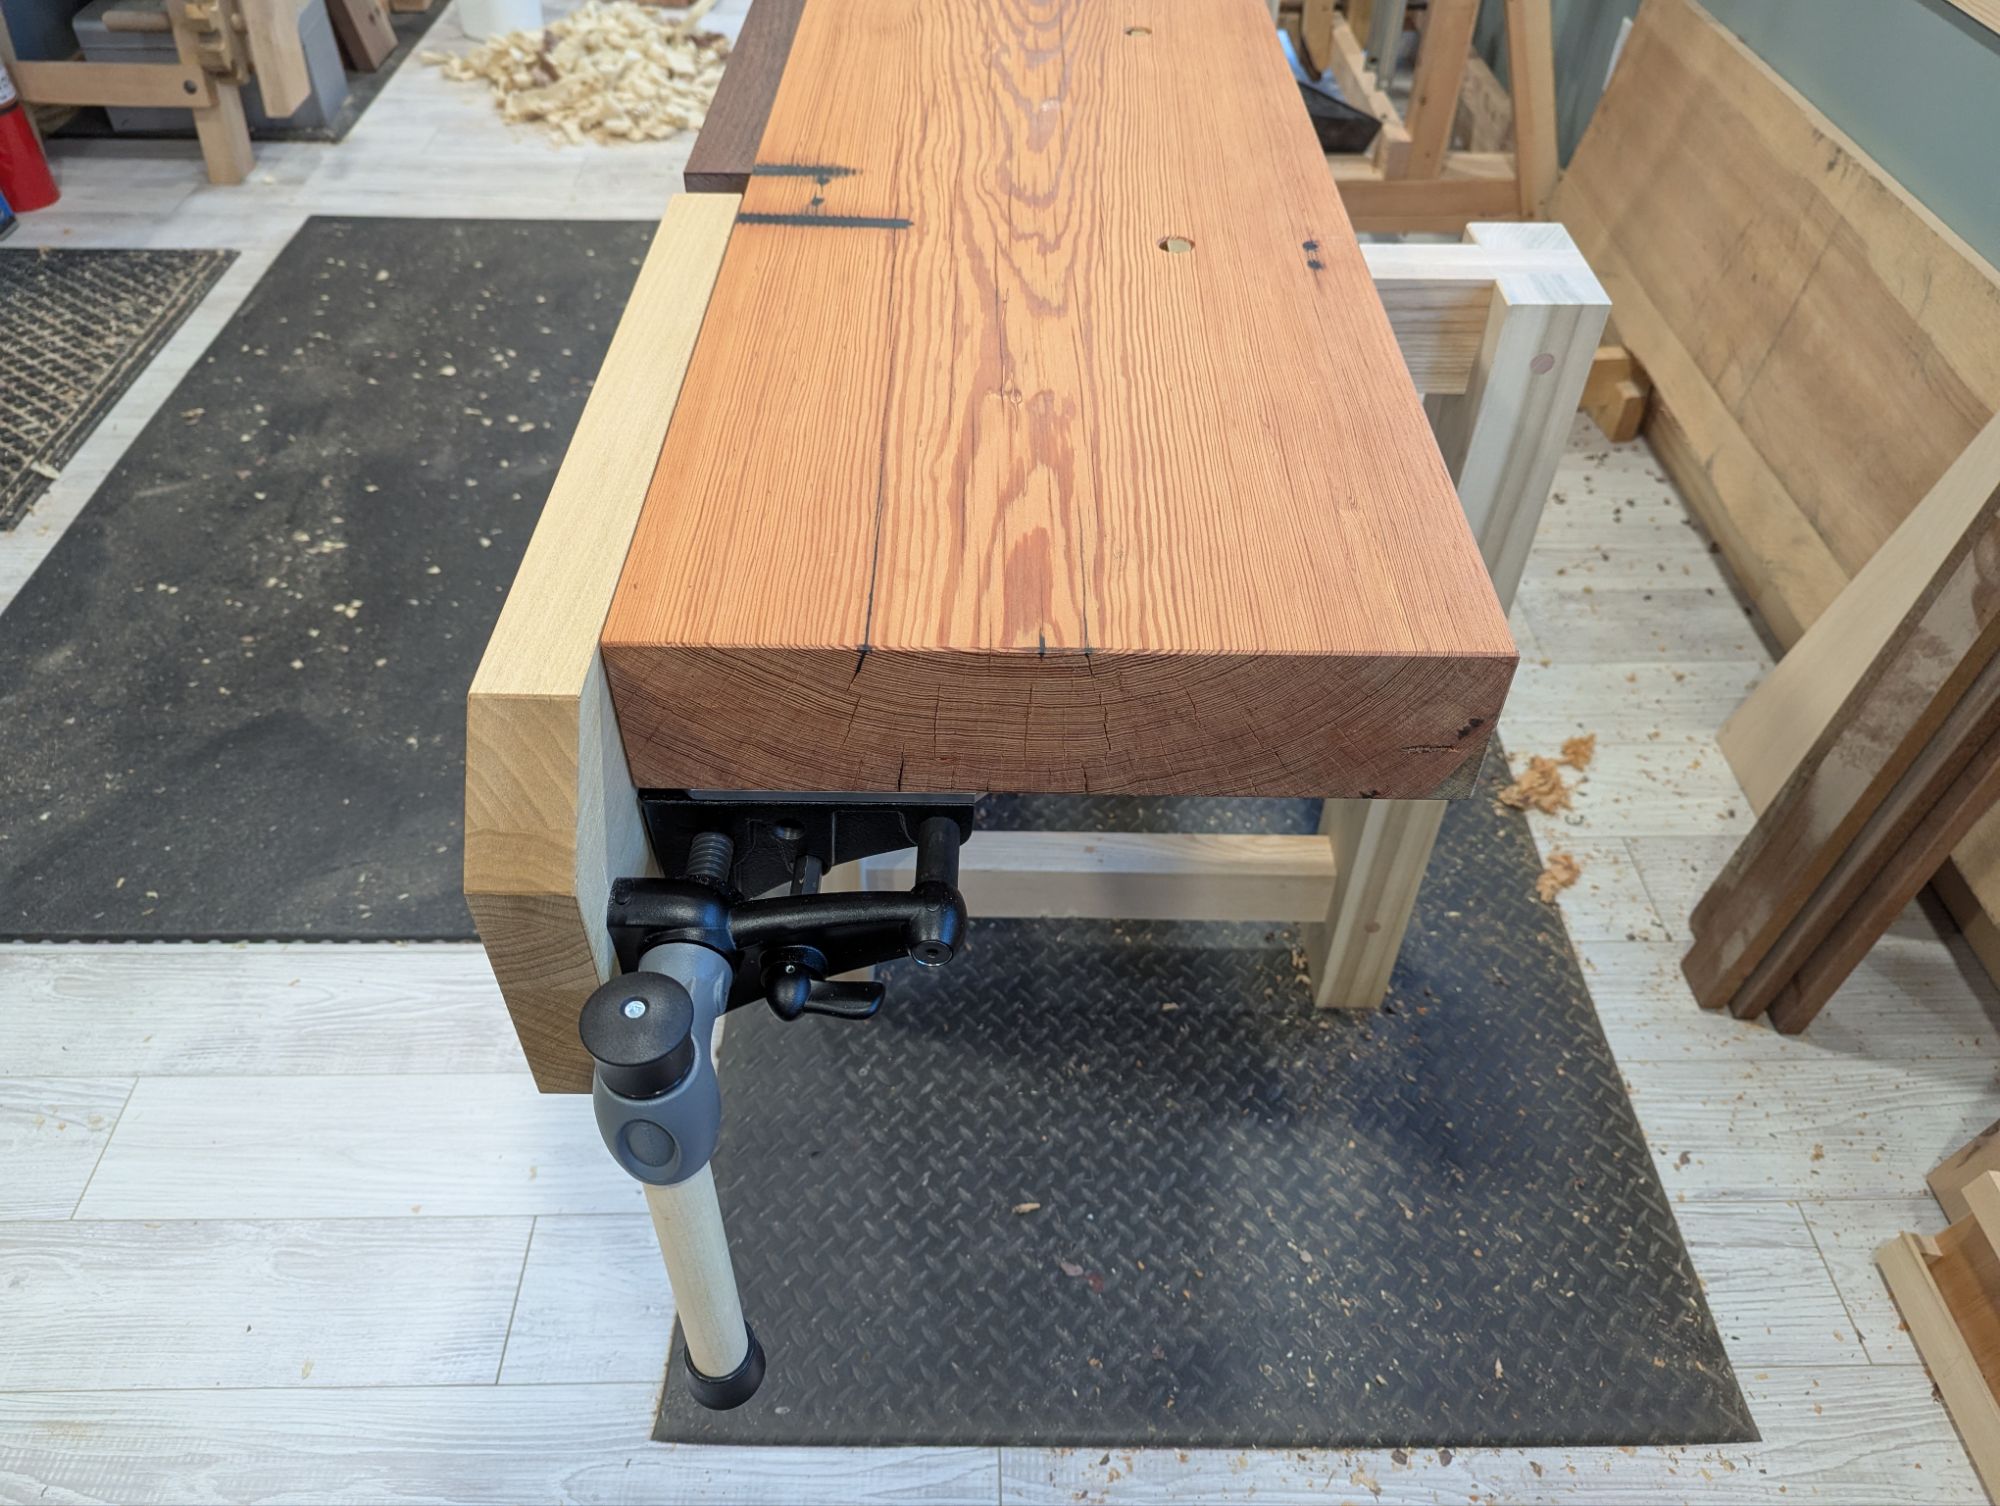
It’s still a very nice piece of hardware and works great (after I was able to sort out the problems with some fender washers as shims and the aforementioned replacement vise chop). Outside of the irregularities the build quality is great. I have no doubt it’s just a bum unit from the dark times when quality control wasn’t ideal. It happens.
I by no means intend to stop shopping at Lee Valley and I don’t want anyone to think I’m disparaging them. The instructions for the vise were detailed and super useful. If the mounting holes hadn’t also been off, I don’t think I’d even be posting this.
This thing is really becoming a Frankenbench, though.
Having used the finished vise for a few days, I’ve noticed a couple things, though. First, the vise is clearly designed for thinner workbench tops. The first attachment point is 5/8″ below the underside of the workbench, so there is a lot of unsupported chop on a 3 1/2″ workbench top. This leads to some vise chop lift. I’m not quite how much clamping pressure would be lost on an even thicker workbench top because of the twisting force on the unsupported part of the vise chop.
Second, everything is attached with screws (No. 14 wood screws for the mounting plate and 3/8″ lag screws for the vise assembly). They are beefy, for sure. But especially for softwood benchtops, I bet carriage bolts would be a better long term option. If it works for metal face vises, it should work for this.
That said, I am not a production woodworker. So I doubt I’ll ever put enough stress on this vise to test either of my theories.
This weekend, I’ll be building the leg vise. This one will be pinless, with a metal screw (also Lee Valley) and a 1 1/2″ linear bearing (and carbon steel shaft), both from McMaster-Carr.
Happy New Year, everyone! I realized I missed my usual “6am Eastern on New Years Day” post. I think that’s because I went to an actual party and didn’t get to bed right at 730pm like I have for as long as this blog existed. But anyway…
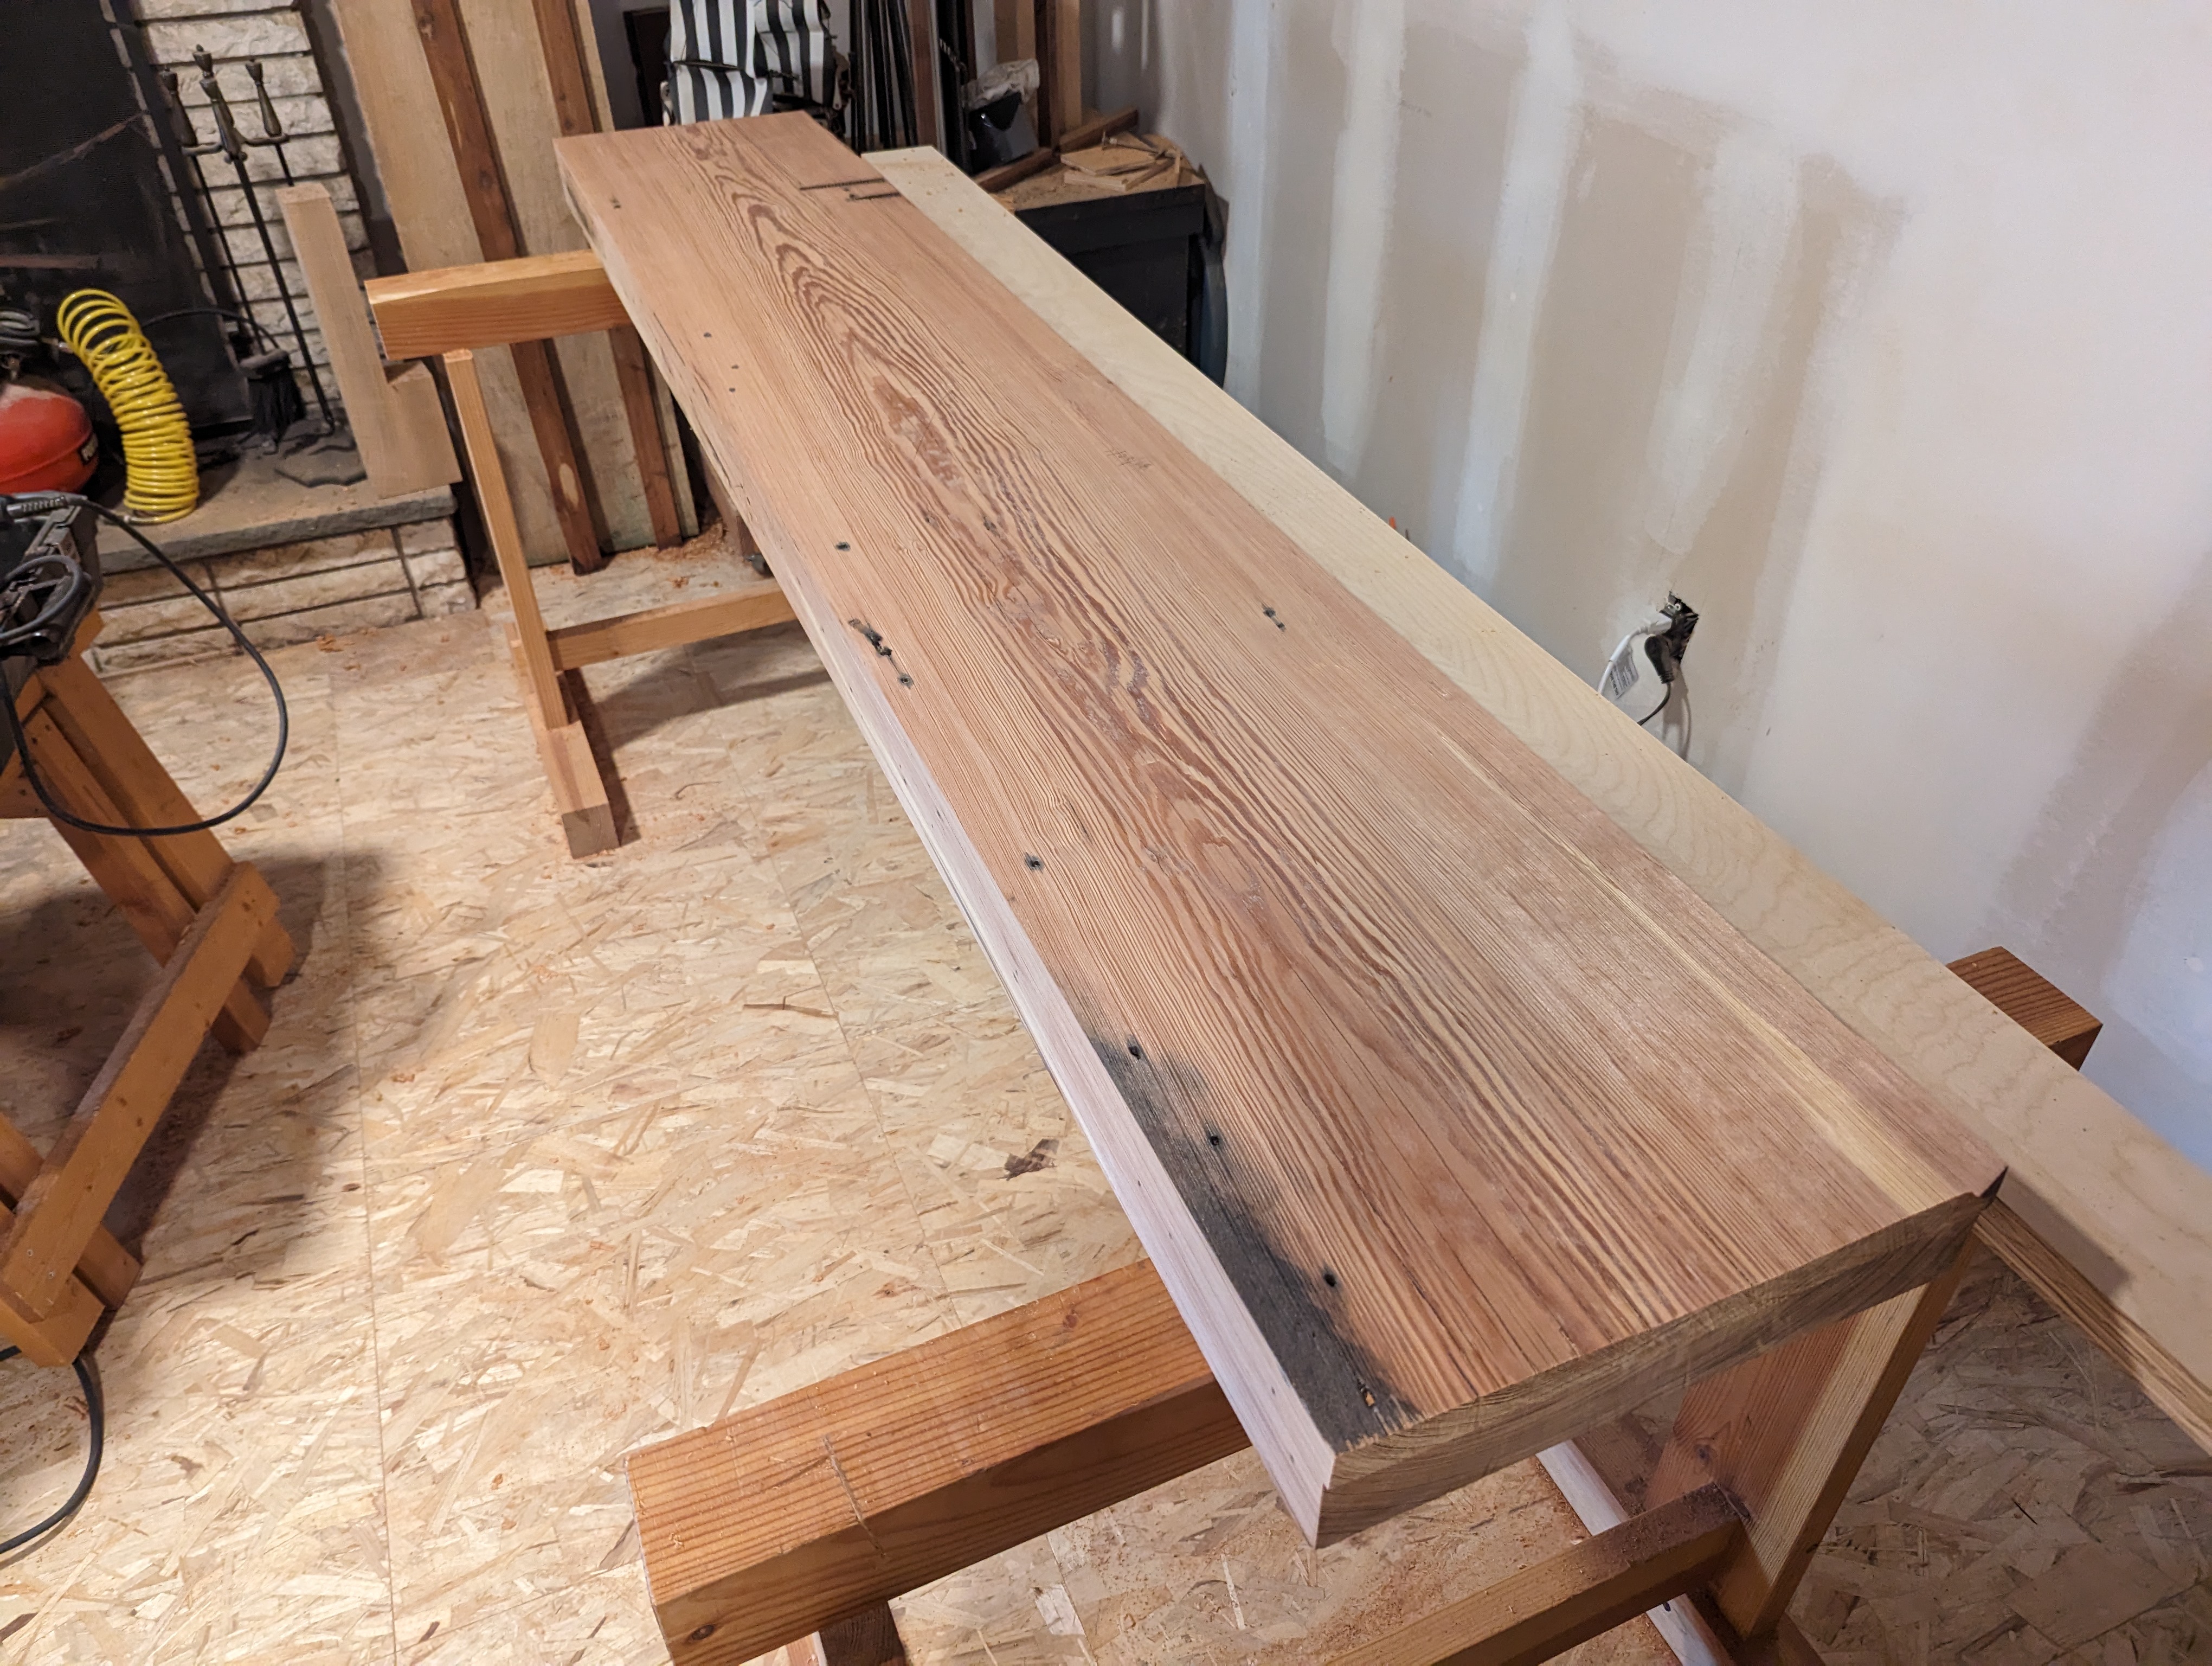
A while ago, I obtained an old growth slab of what I believe is Slash Pine (one of the species of Southern Yellow Pine) from a reclamation sawmill. It’s about 16 inches wide, 90 inches long, and after flattening is still a solid 3 1/2″ thick. It’s mostly flat at this point, anyway. I actually made an impromptu router sled because it’s so damned hard (the resin long ago crystallized and, between that and the barn grit in the checks, it was eating O1 steel for breakfast). This slab will make a wonderful workbench top once I laminate a fascia board along the front edge and square the ends, though.
And after I fill all the nail holes and bolt holes with tinted epoxy offscreen.
Another workbench, you say? Well yes, of course. I’ve been working on my 8 foot maple Nicholson which I made in the thick of the pandemic. It’s got the nicest leg vise I’ve made (it’s angled, uses a cog and screw instead of a pin board, and opens and closes very smoothly). But I’m kind of over front aprons again; it makes using bench dogs in the top too difficult, even if the apron is great for edge planing long, wide boards. And I have just the one workbench at home after giving all the others away. A second wouldn’t hurt.
This new bench will be in the Shaker style, like at Hancock Shaker Village. Leg vise, tail vise, sliding deadman, some drawers underneath. In fact, I’ve already made the leg assemblies. But unlike the Shakers, this bench will knock down (like a Moravian workbench). And I have a linear bearing and a 1 1/2″ hardened steel shaft to use as a parallel guide for the leg vise instead of a pin board (or even a cog and screw or crisscross). McMaster-Carr is the best.
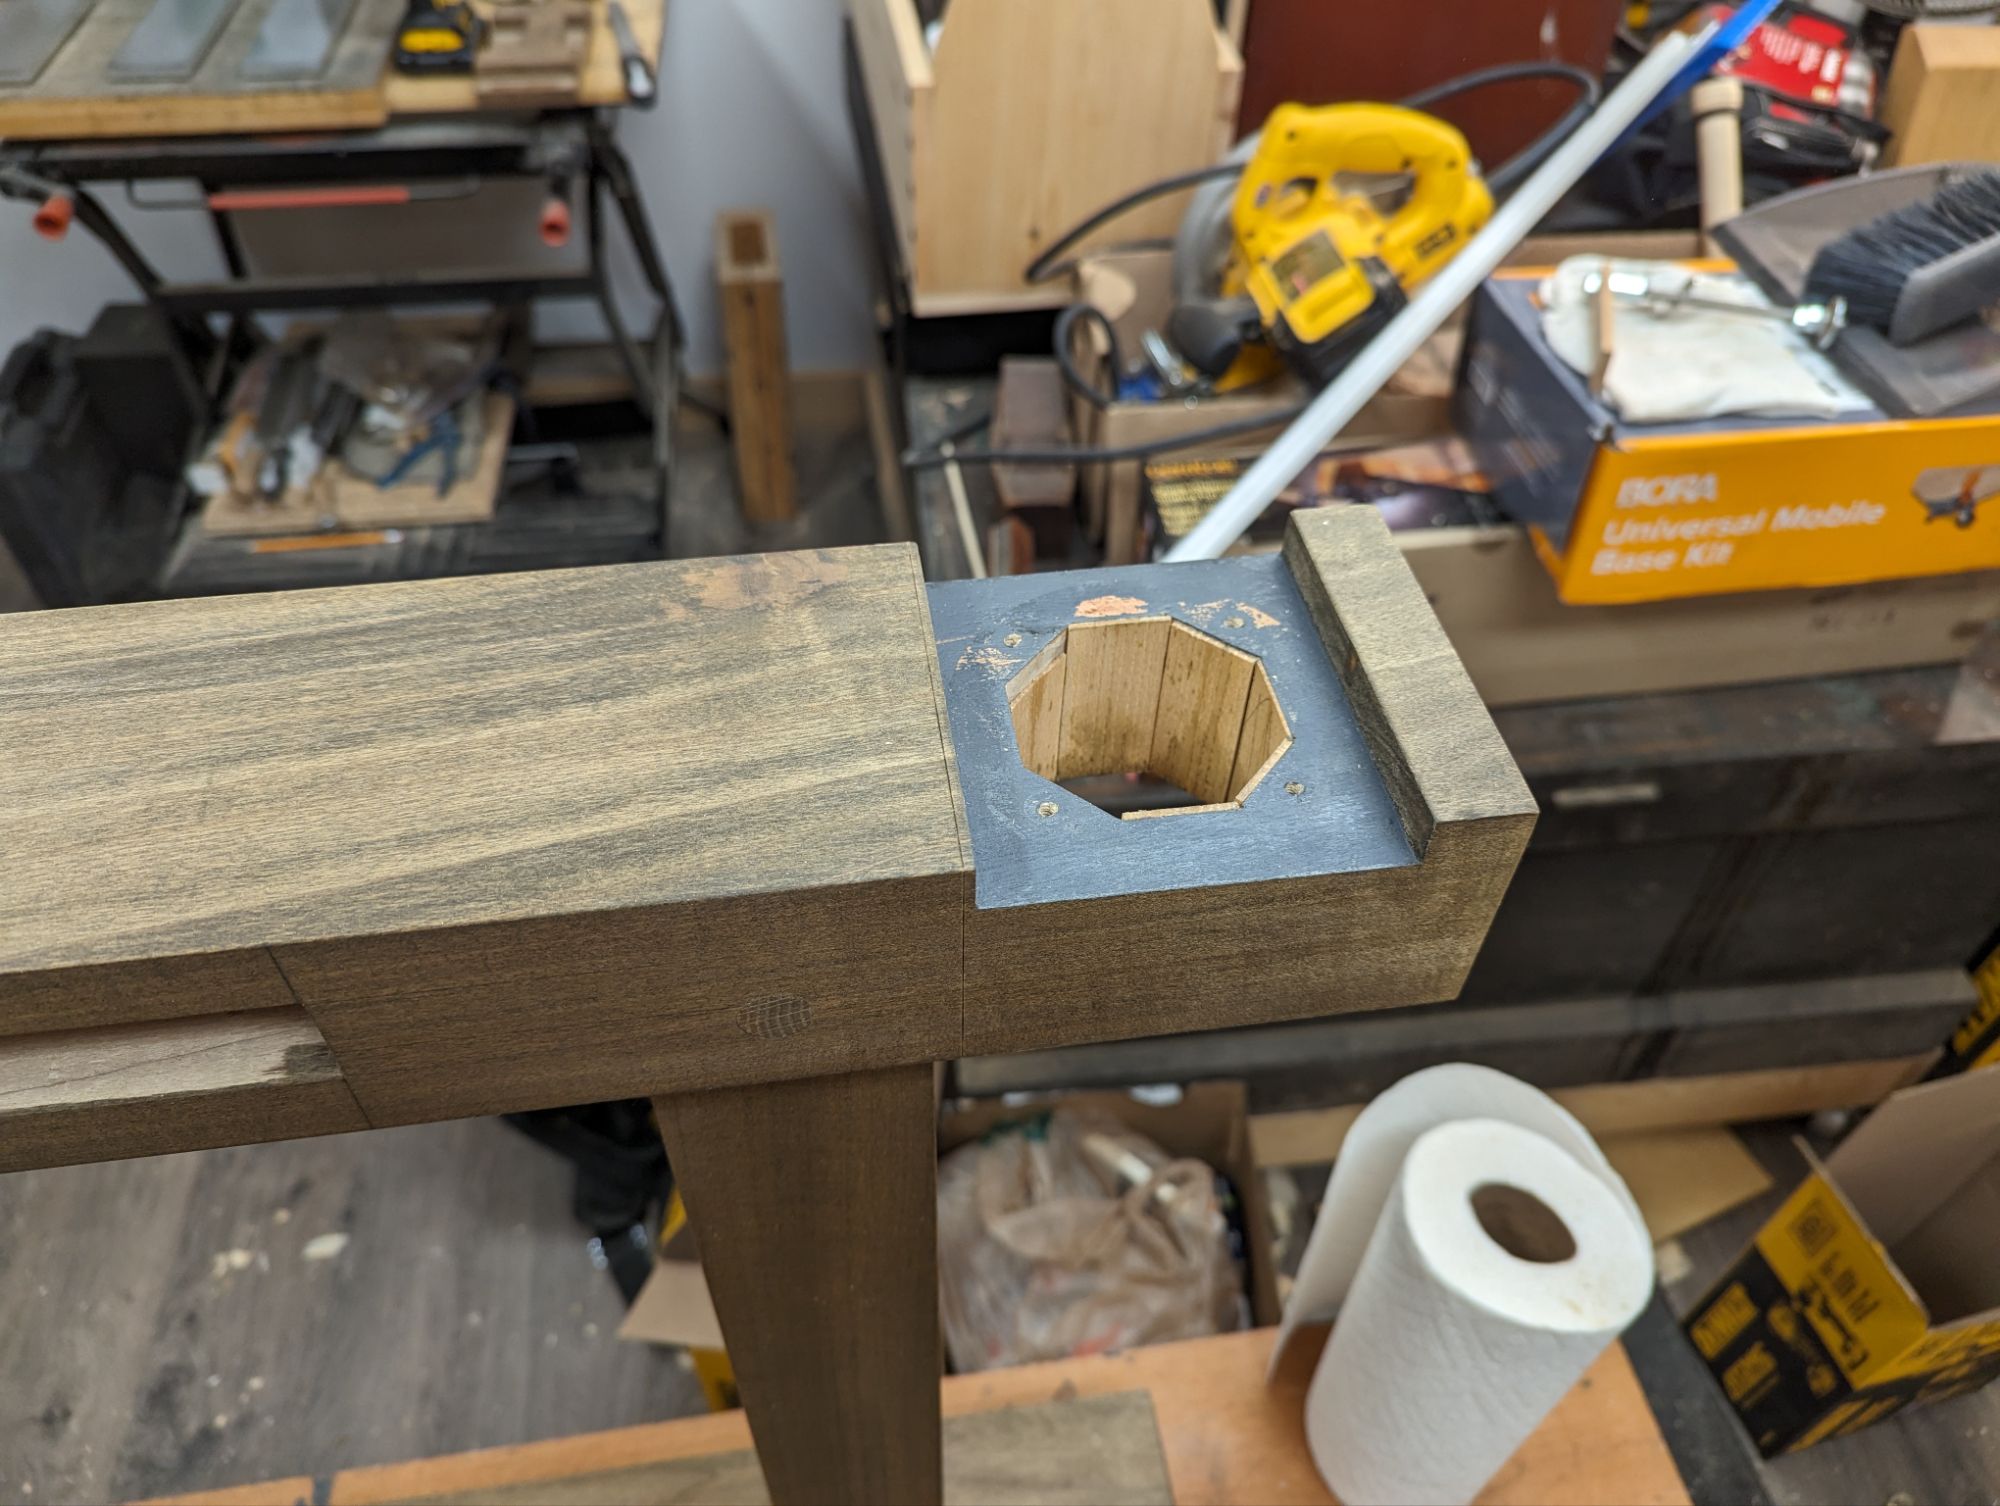
When making the recess for the linear bearing, though, I didn’t have a good way to make a 2 3/8″ hole. So I chopped it out octagonally. And it was scruffy and didn’t fit well and I had to shim it. All of which ate at my brain and caused me to set the whole project aside for a while.
I’ve finally come back to it. And it still eats my brain.
This is just not the quality I’m used to producing.
And what is a fellow to do when a bad bench installation is ruining a good time? Cut the offending portion of the leg off and add some wood back on, of course. About that…
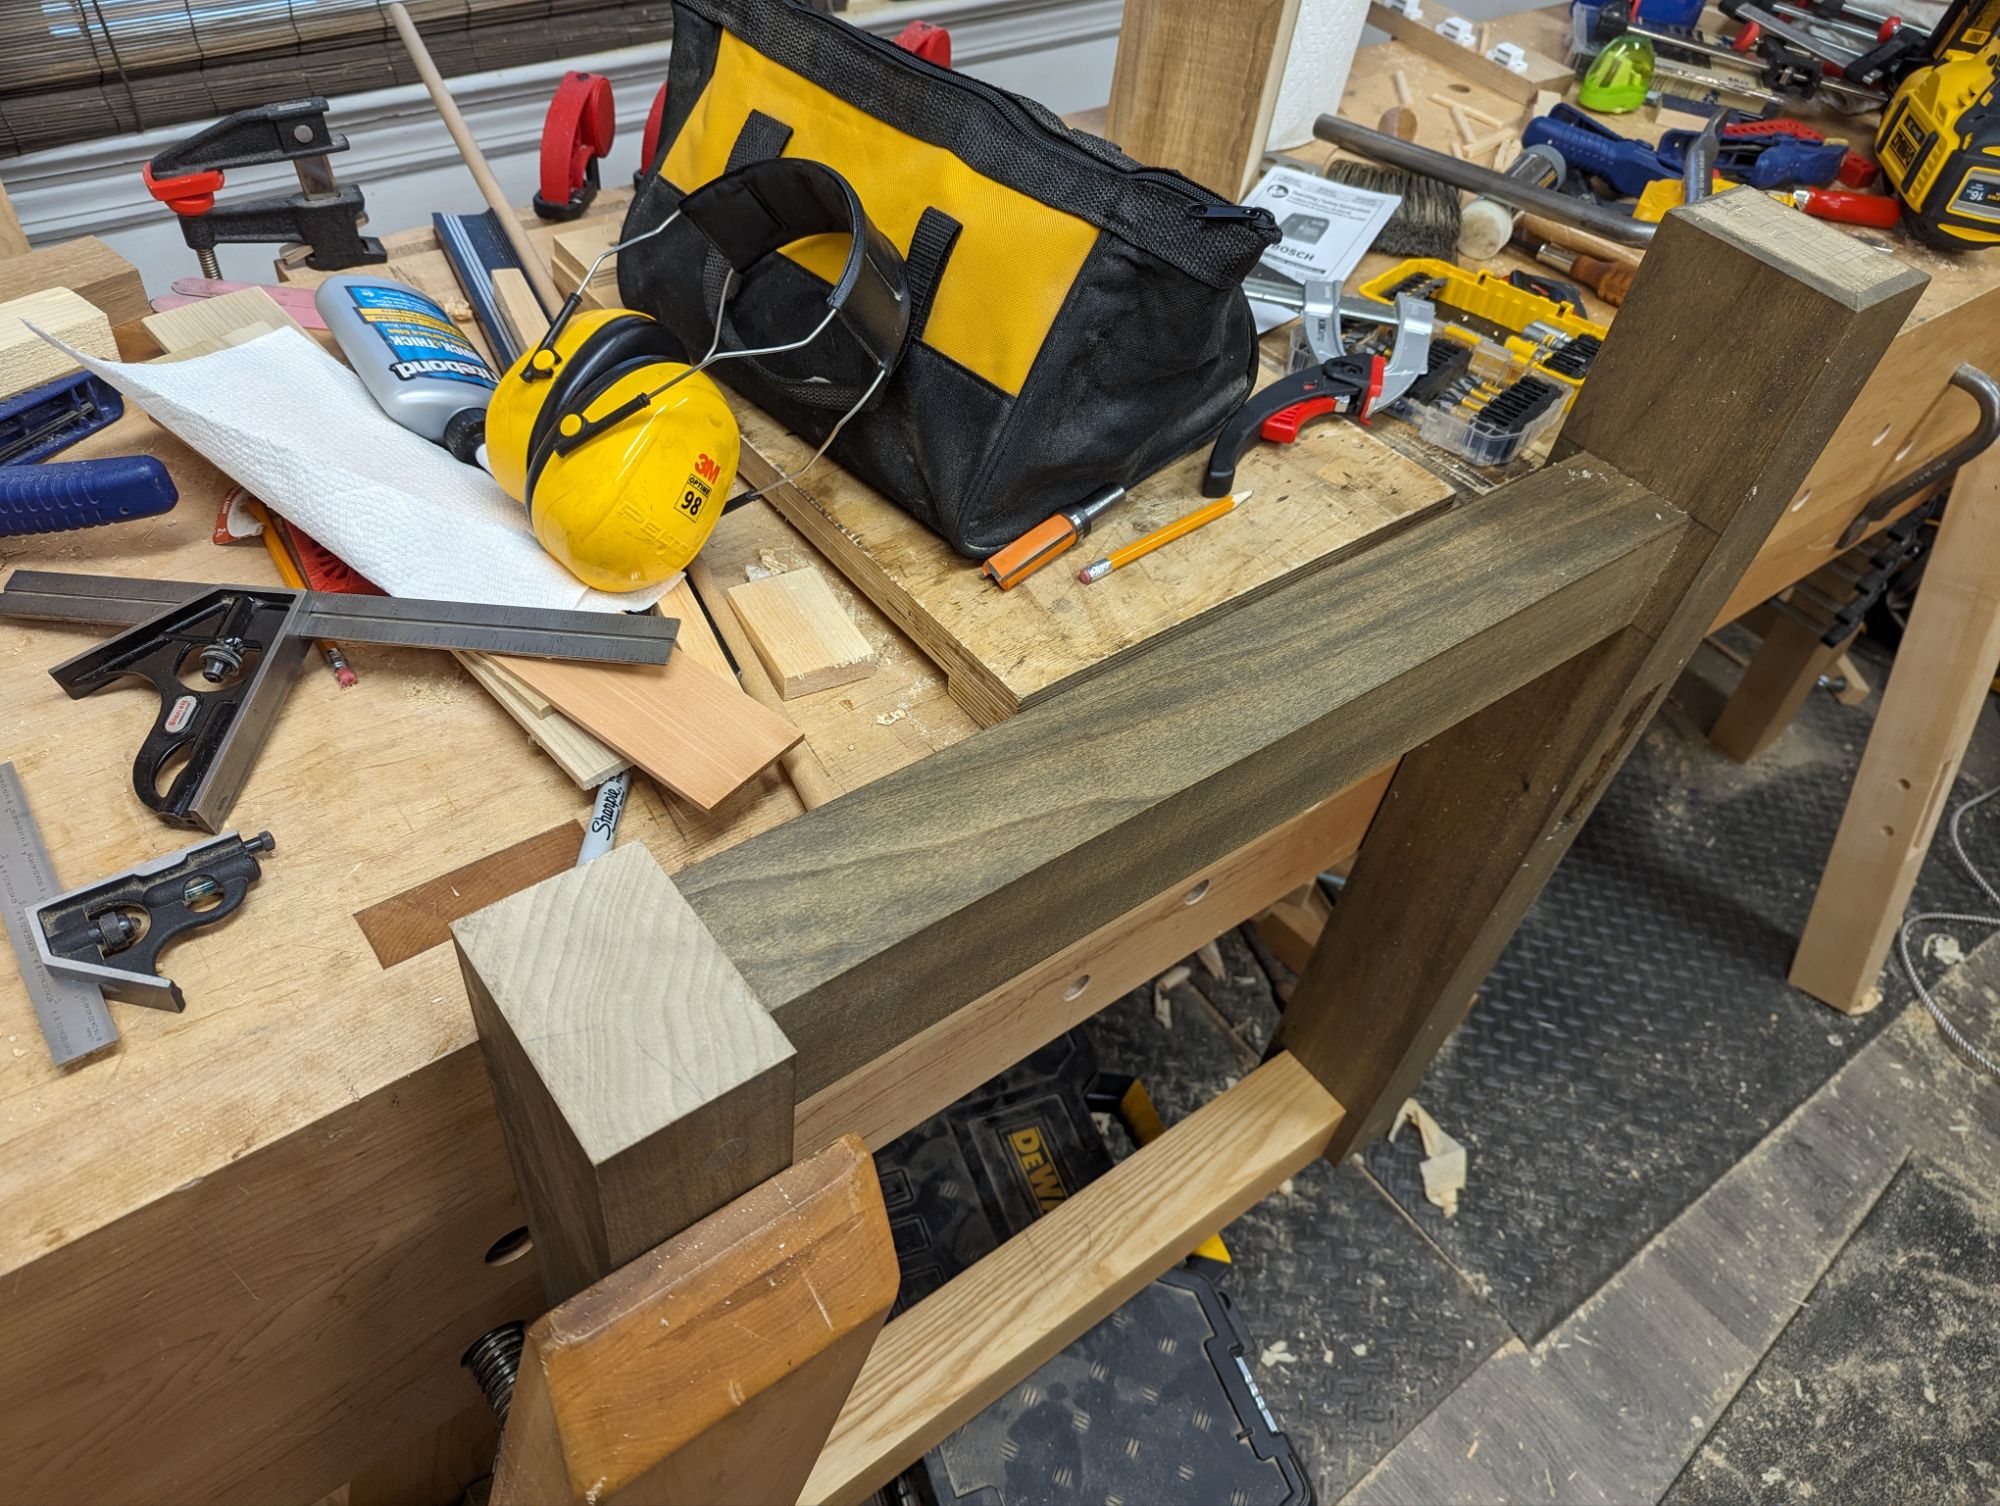
First step was to saw off the offending area and square up the end grain. And also dig out and prepare an offcut of the same species that has a decent grain match. If I had access to a Festool Domino, this would essentially be the end of the process. Four dominos and some glue: Bob’s your uncle.
My workbench is an absolute mess as I do a few renovations.
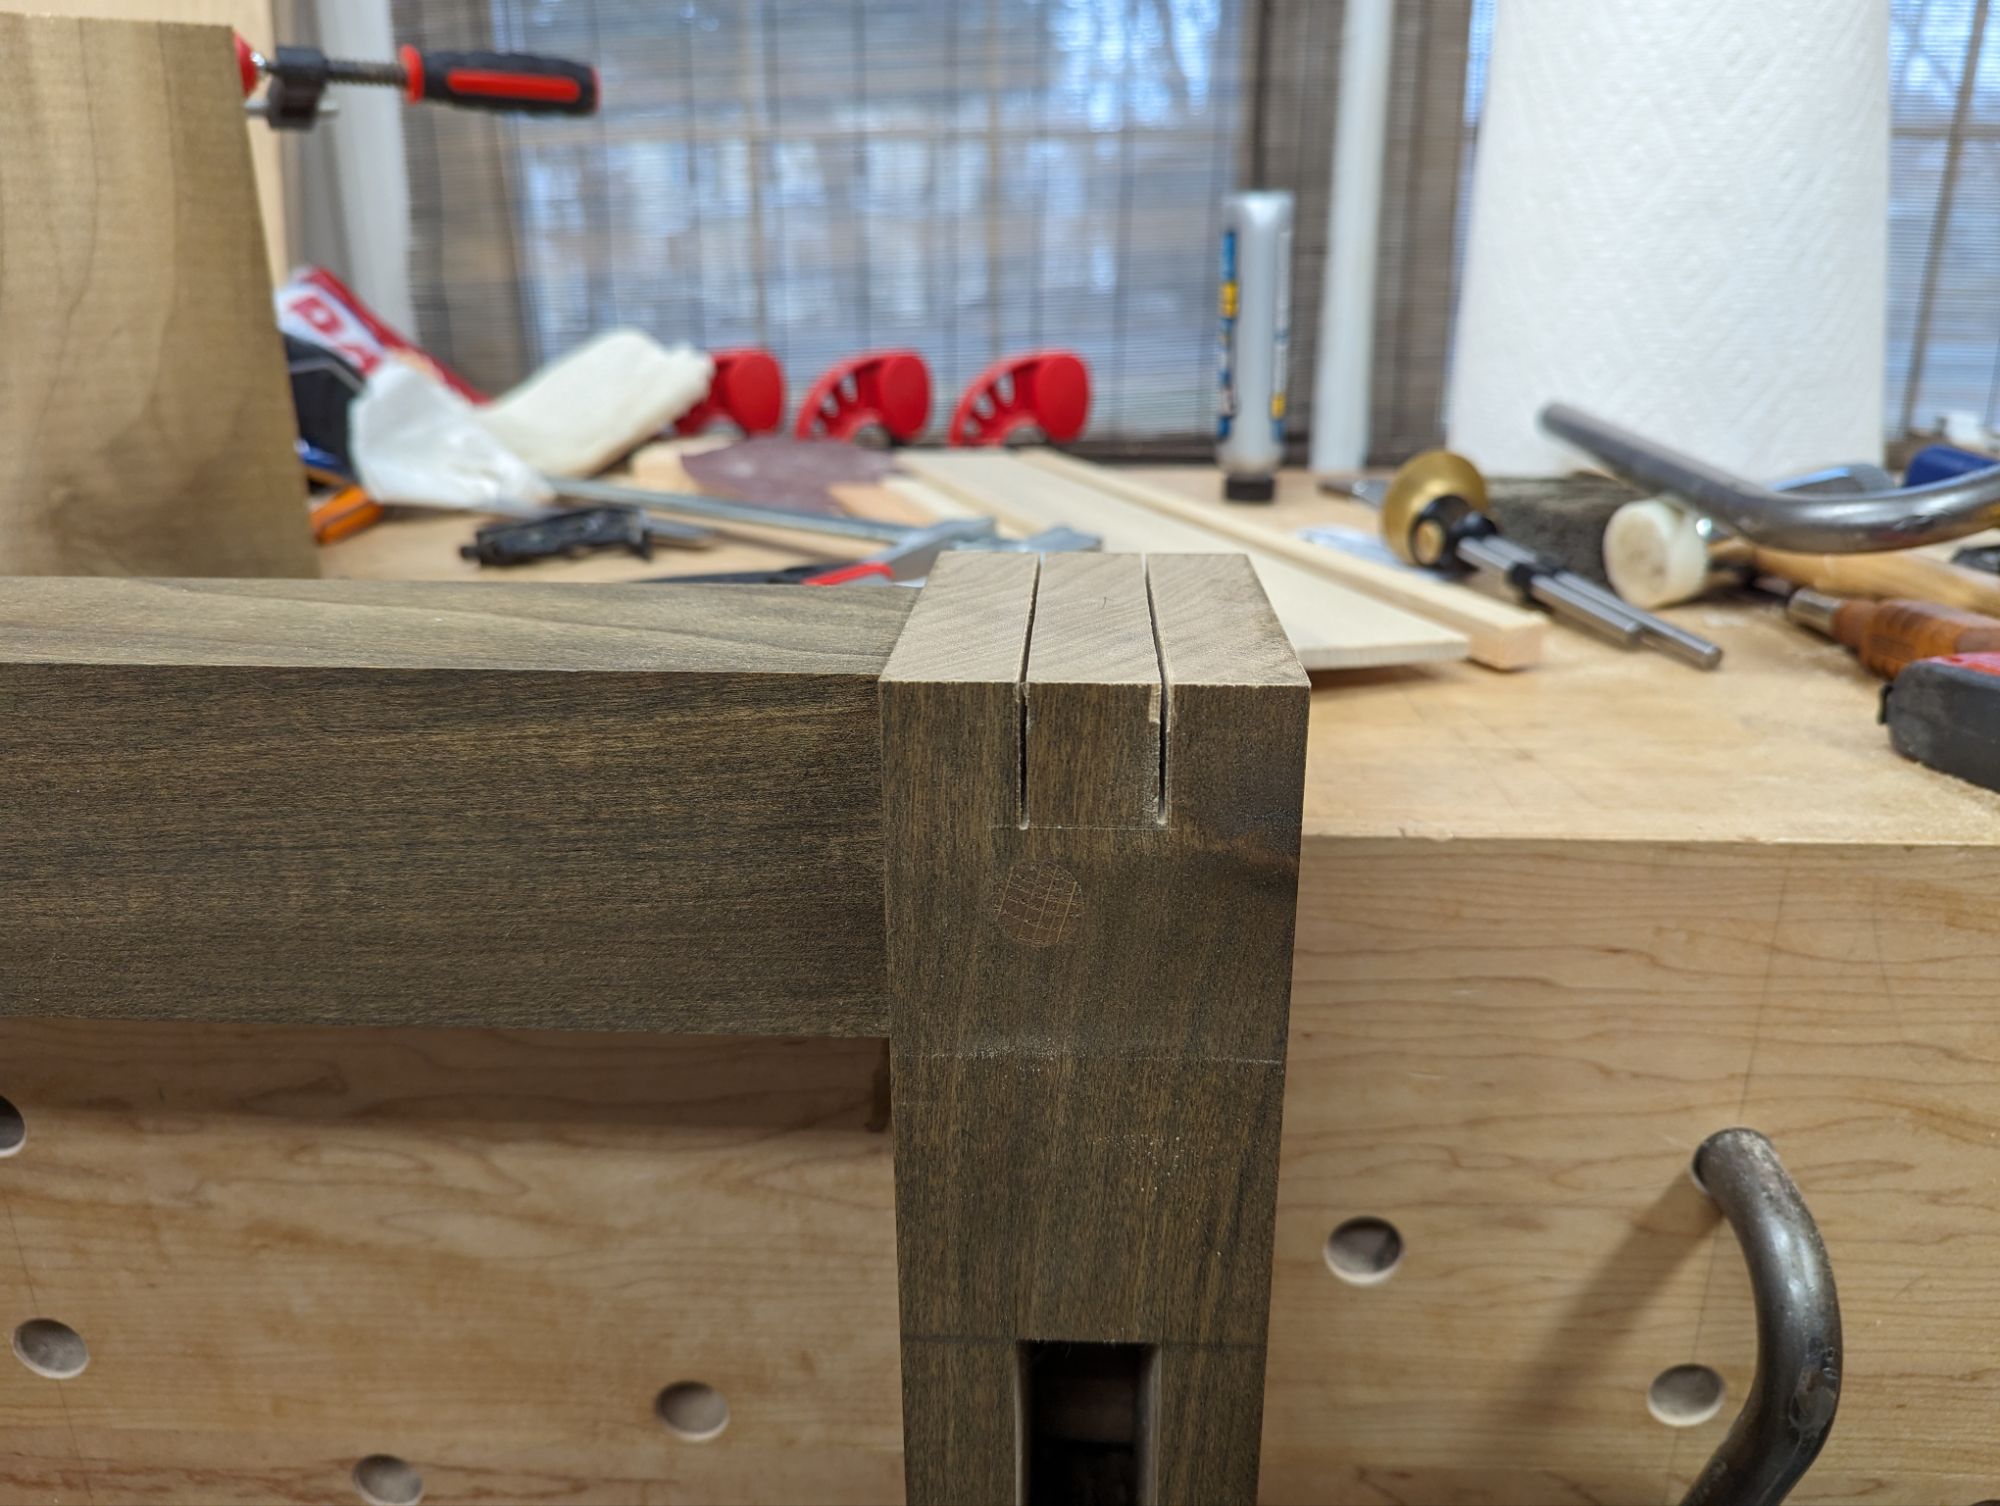
But absent a Festool Domino, how does one join two boards, end grain to end grain? Finger joints are probably the best option, because of the large amount of long grain gluing surface. For a hand tool guy like me, that’s essentially a bridle joint. I think in this application, it would be strongest if the mortise was in the remaining leg and the tenon on the added piece. I almost made bridle guides, but that probably would have taken longer than just sawing and paring.
Now to saw down the sides of the mortise.
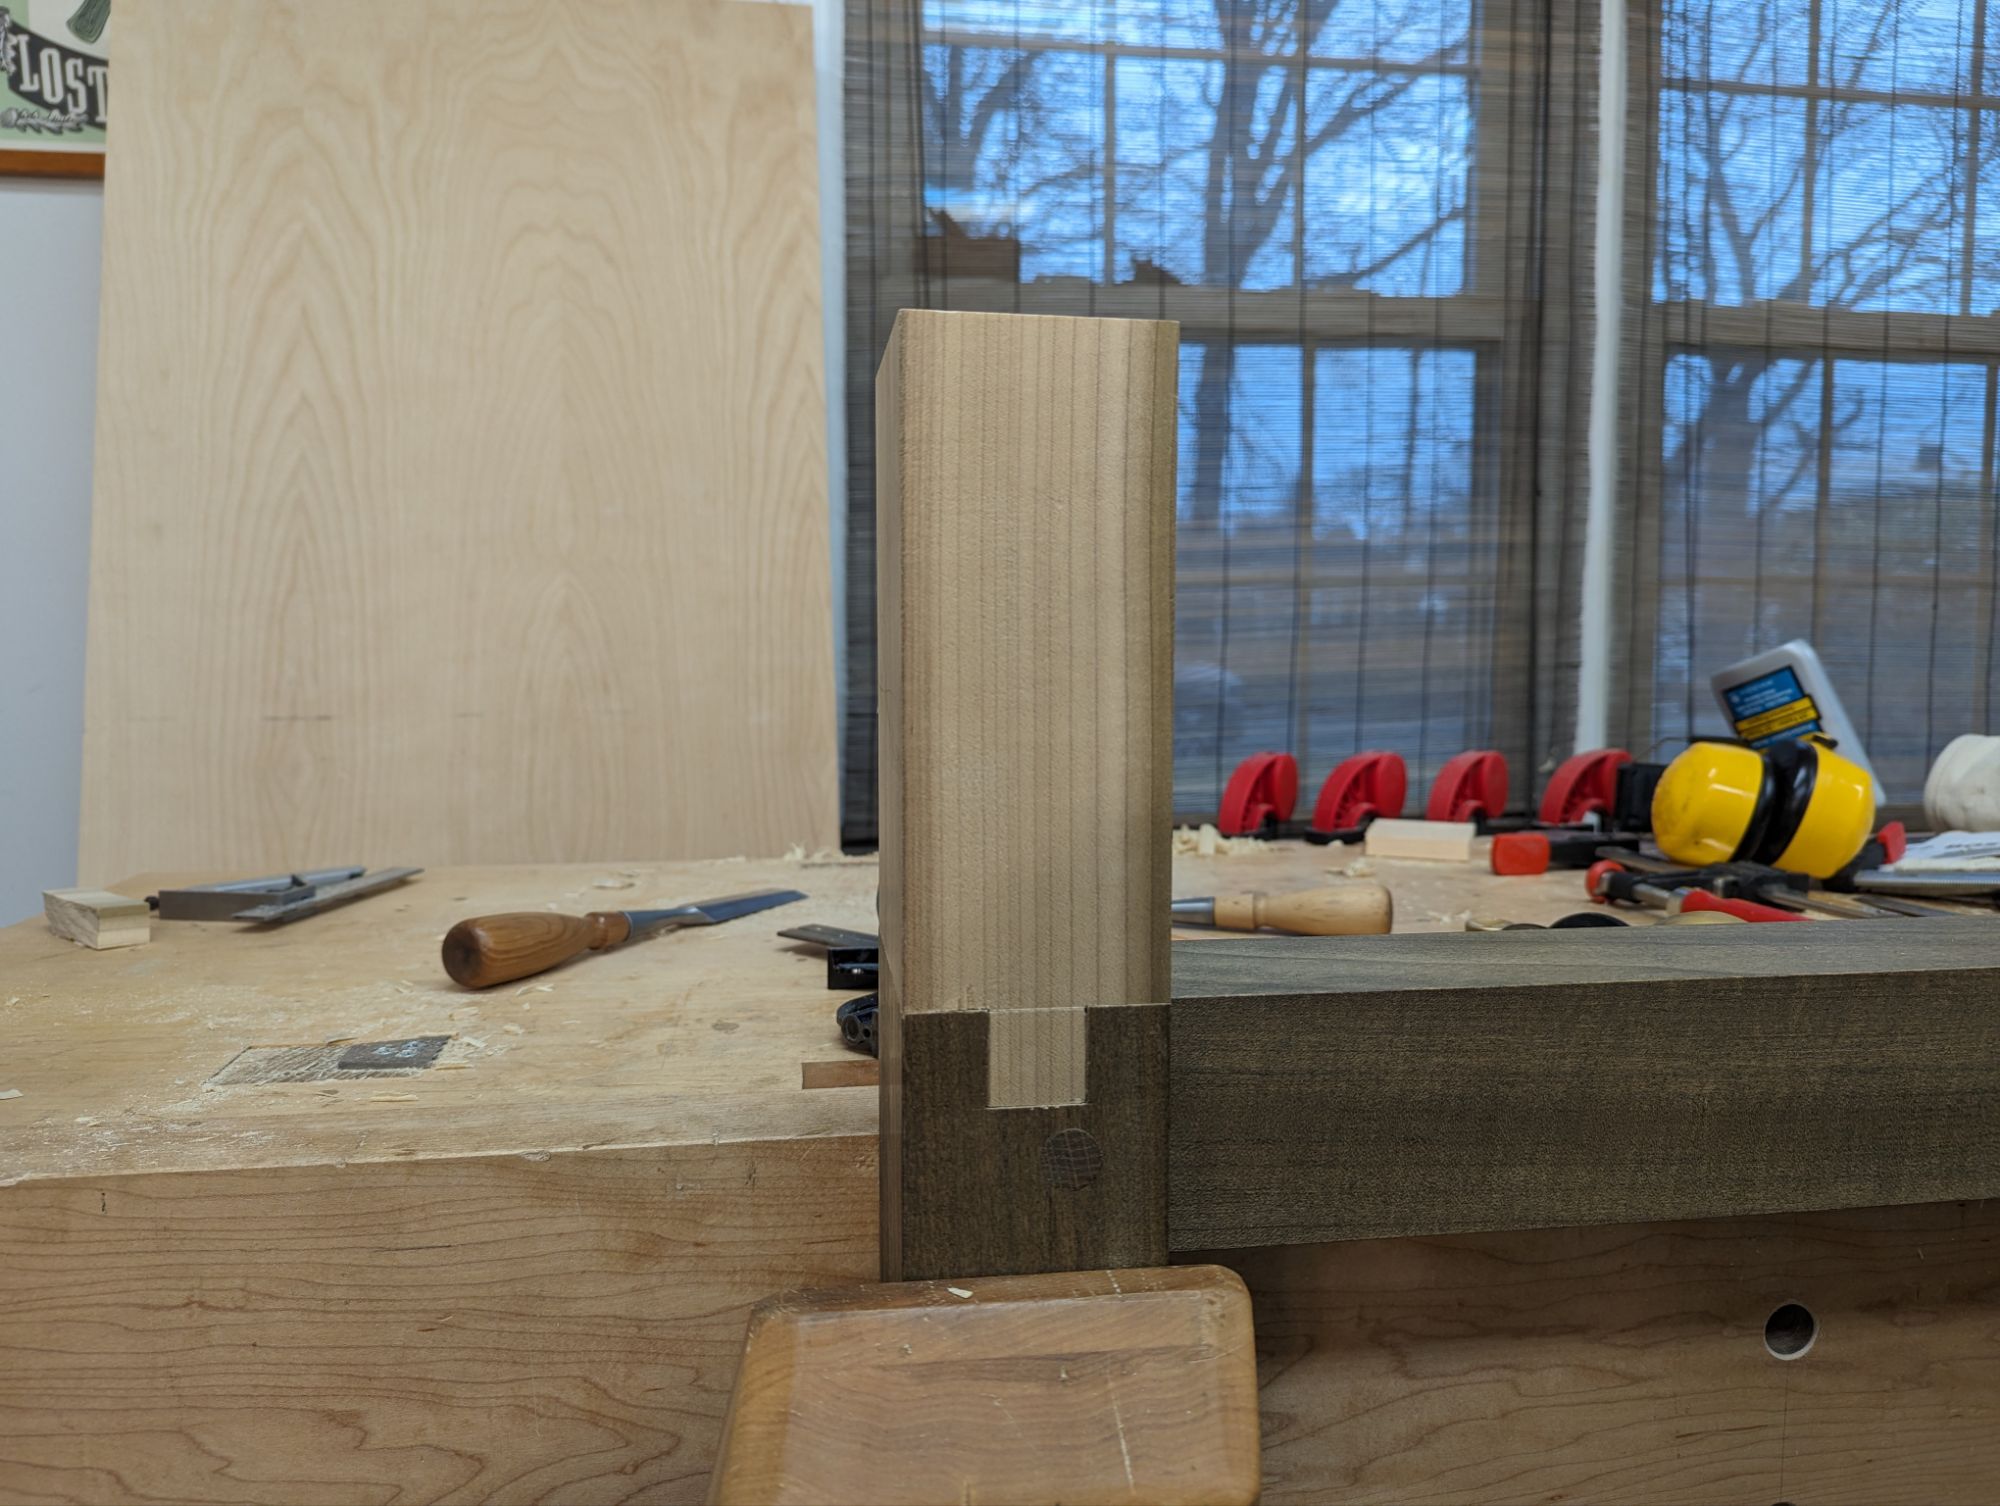
Once the mortise was nicely pared to the lines, I roughed out a tenon and finessed it to a friction fit with a router plane. Remember to ease the inner parts of the mortise to leave room for glue on the mating surfaces. A dry fit looked like so:
It was at this point when I realized the offcut was actually from the same board as rest of the leg. Fortuity!
Will a 1″x1″ tenon (with 7/8″ mortise walls) be strong enough for a front leg of a workbench, even with TiteBond Thick & Quick PVA? Fuck if I know. But this is poplar, which doesn’t split easily, so I think I’ll be okay. I plan to add a trio of 3/8 oak pegs as reinforcement along the length of the tenon, which should help. Maybe a couple of metal mending plates too just for luck. But I think it will be strong enough, even without pegs, as long as whatever parallel guide I use for the leg vise doesn’t bear just on the new wood.
Hopefully I can find the stain I used for the rest of the leg too.
To be clear, I almost bought a Festool Domino today. But I’m glad I stayed strong and didn’t. Not that having a Festool Domino is bad; I just kind of enjoy doing things the hard way. And I do think this fix is a good solution and should stand the test of time.
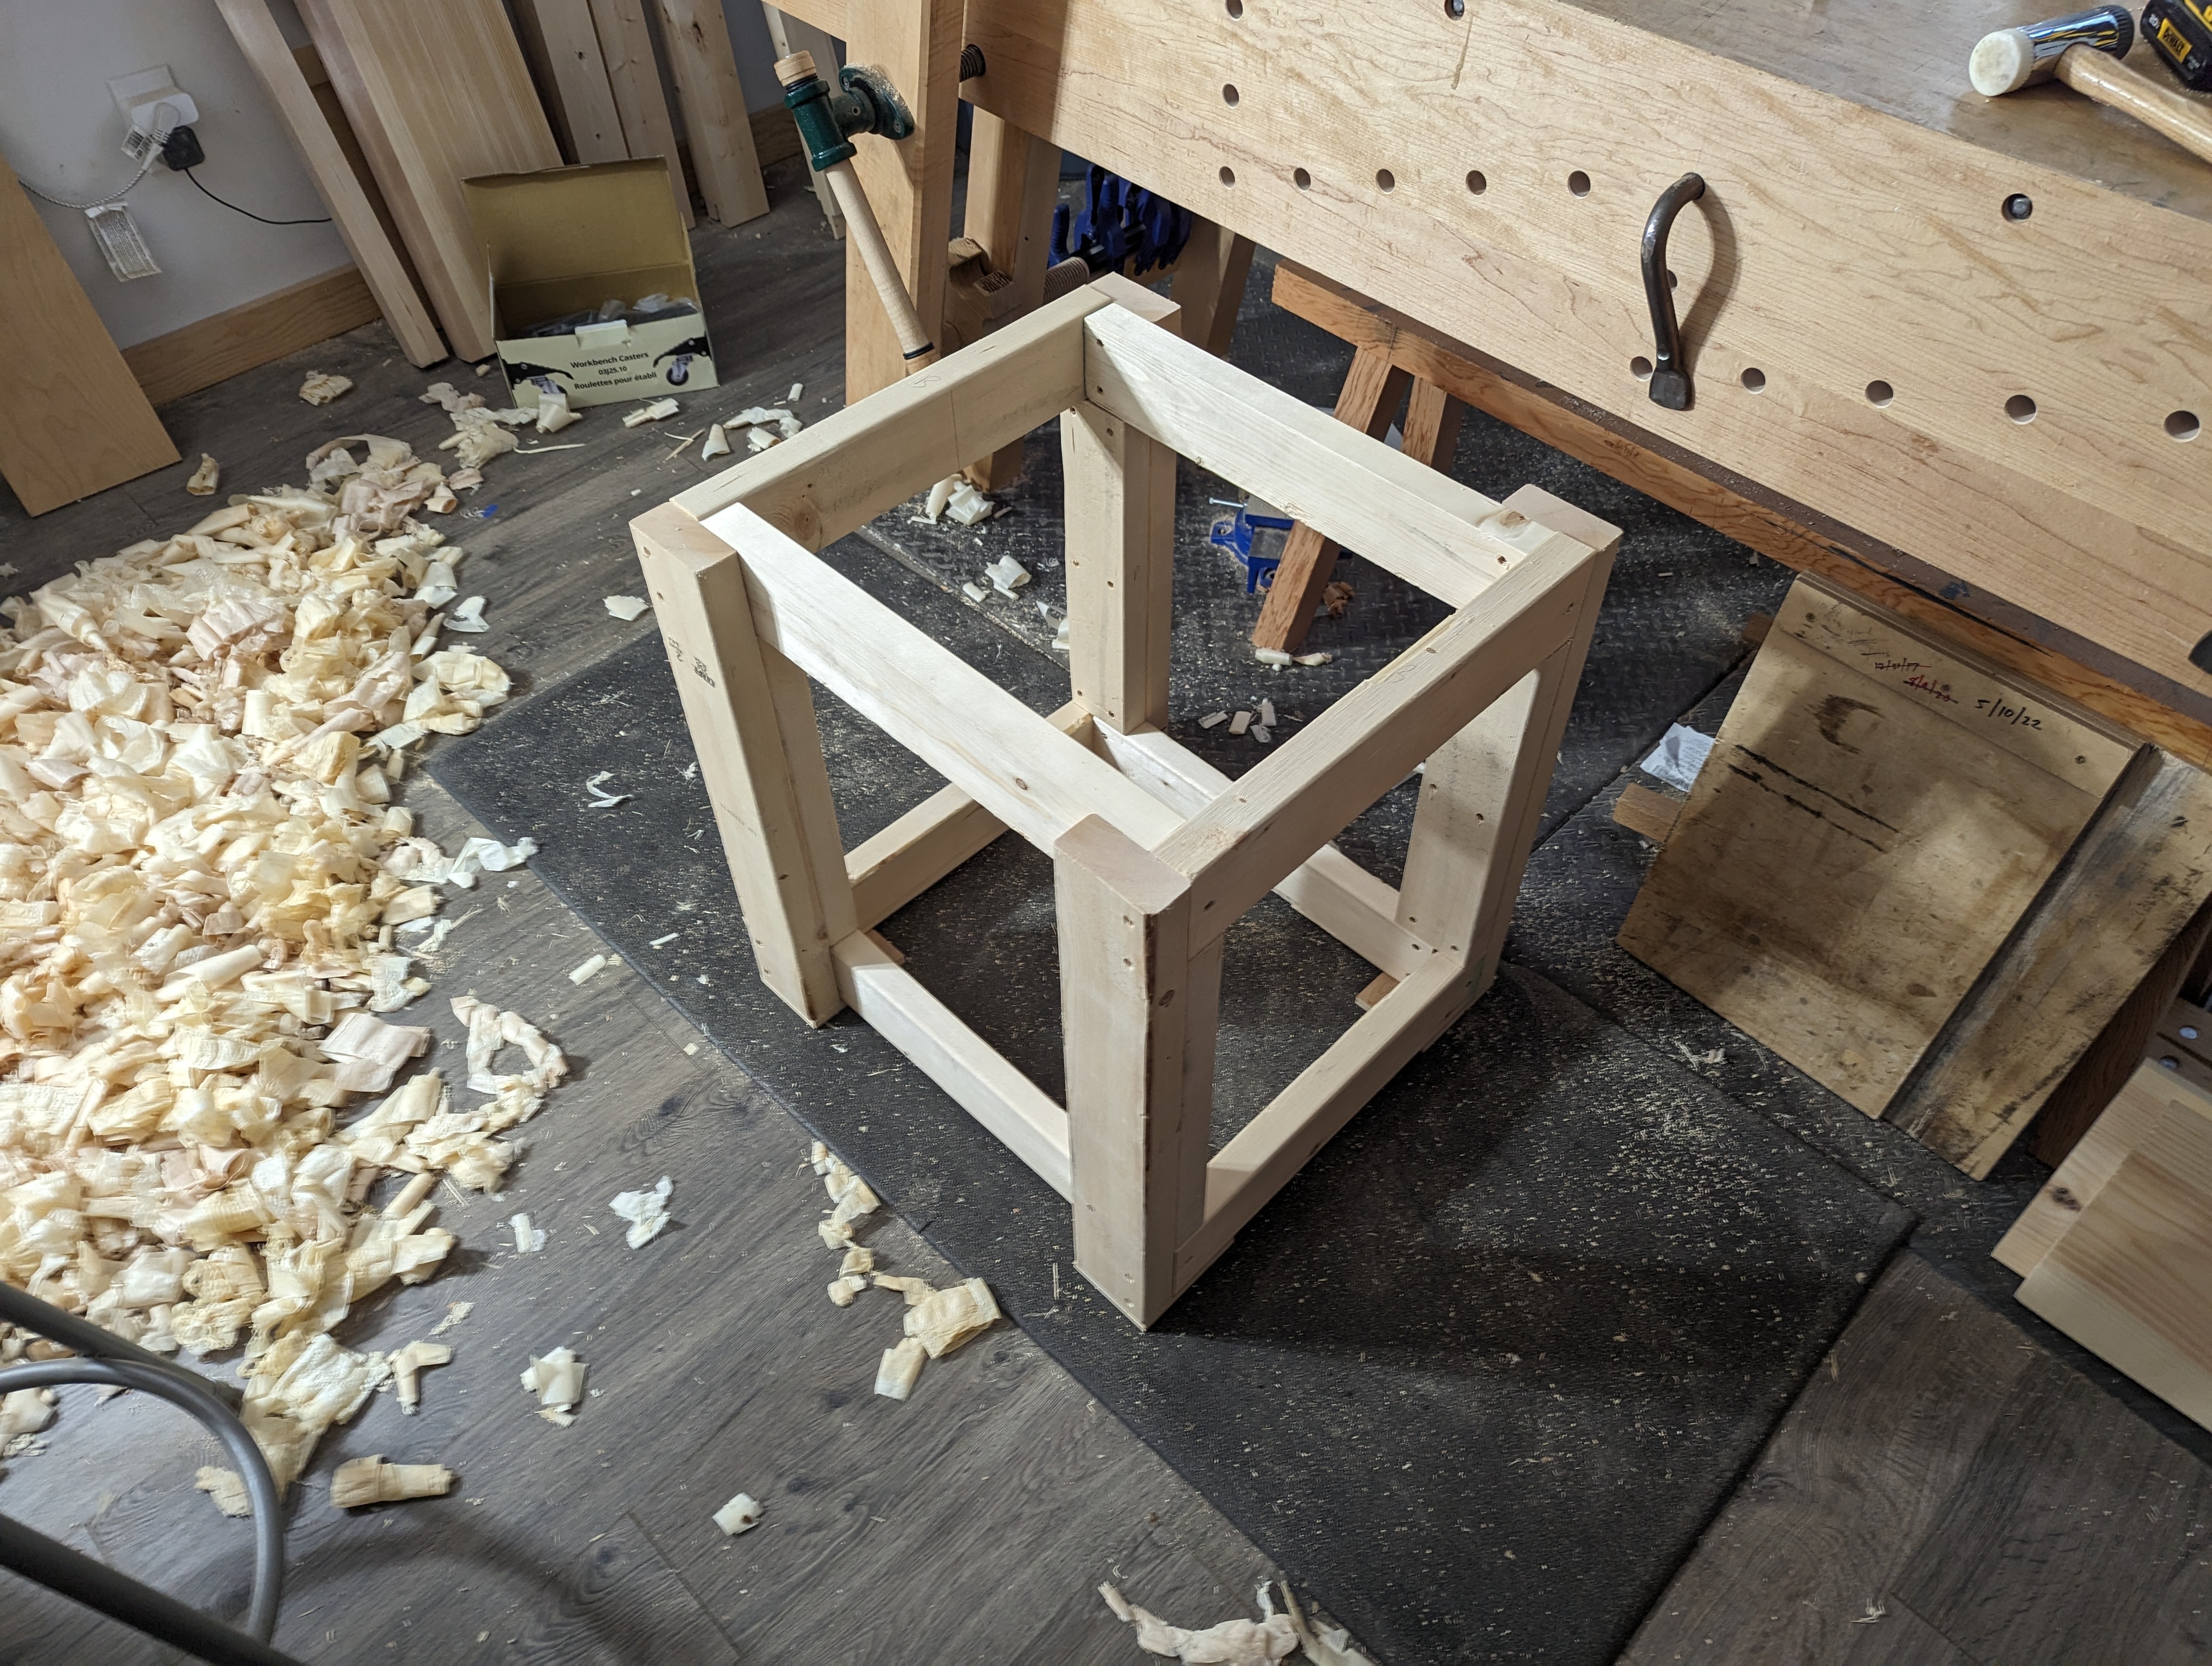
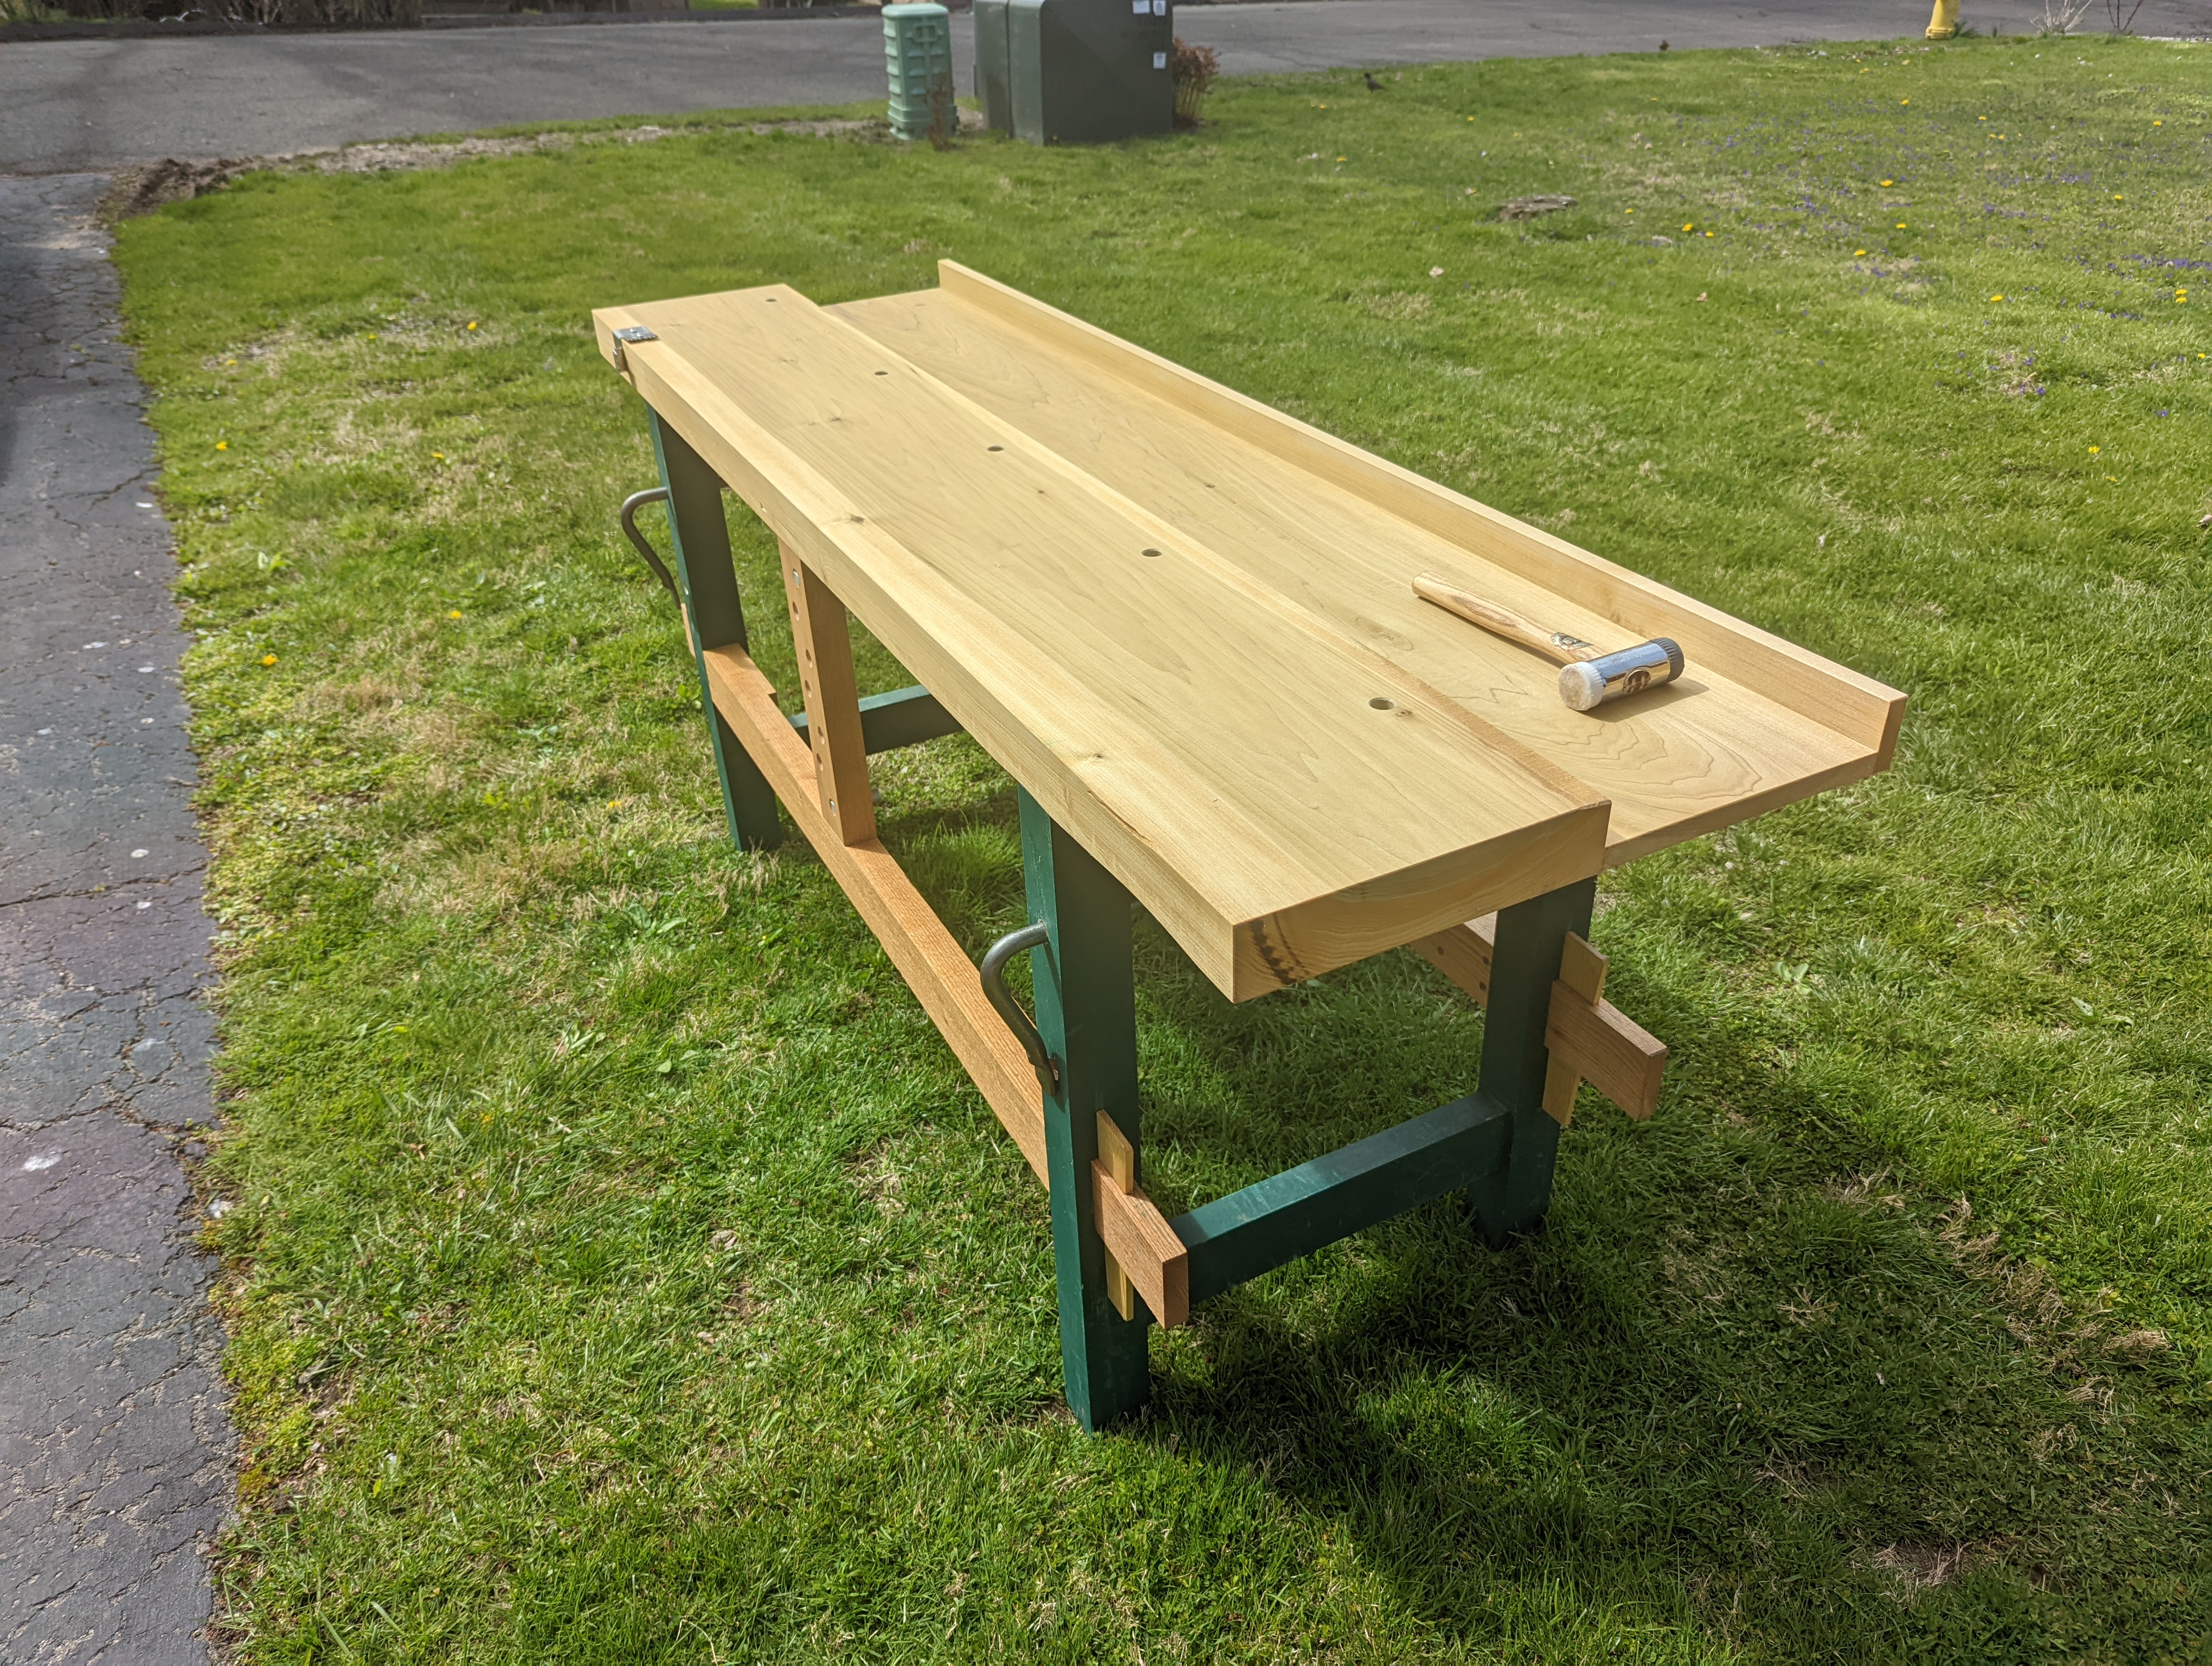
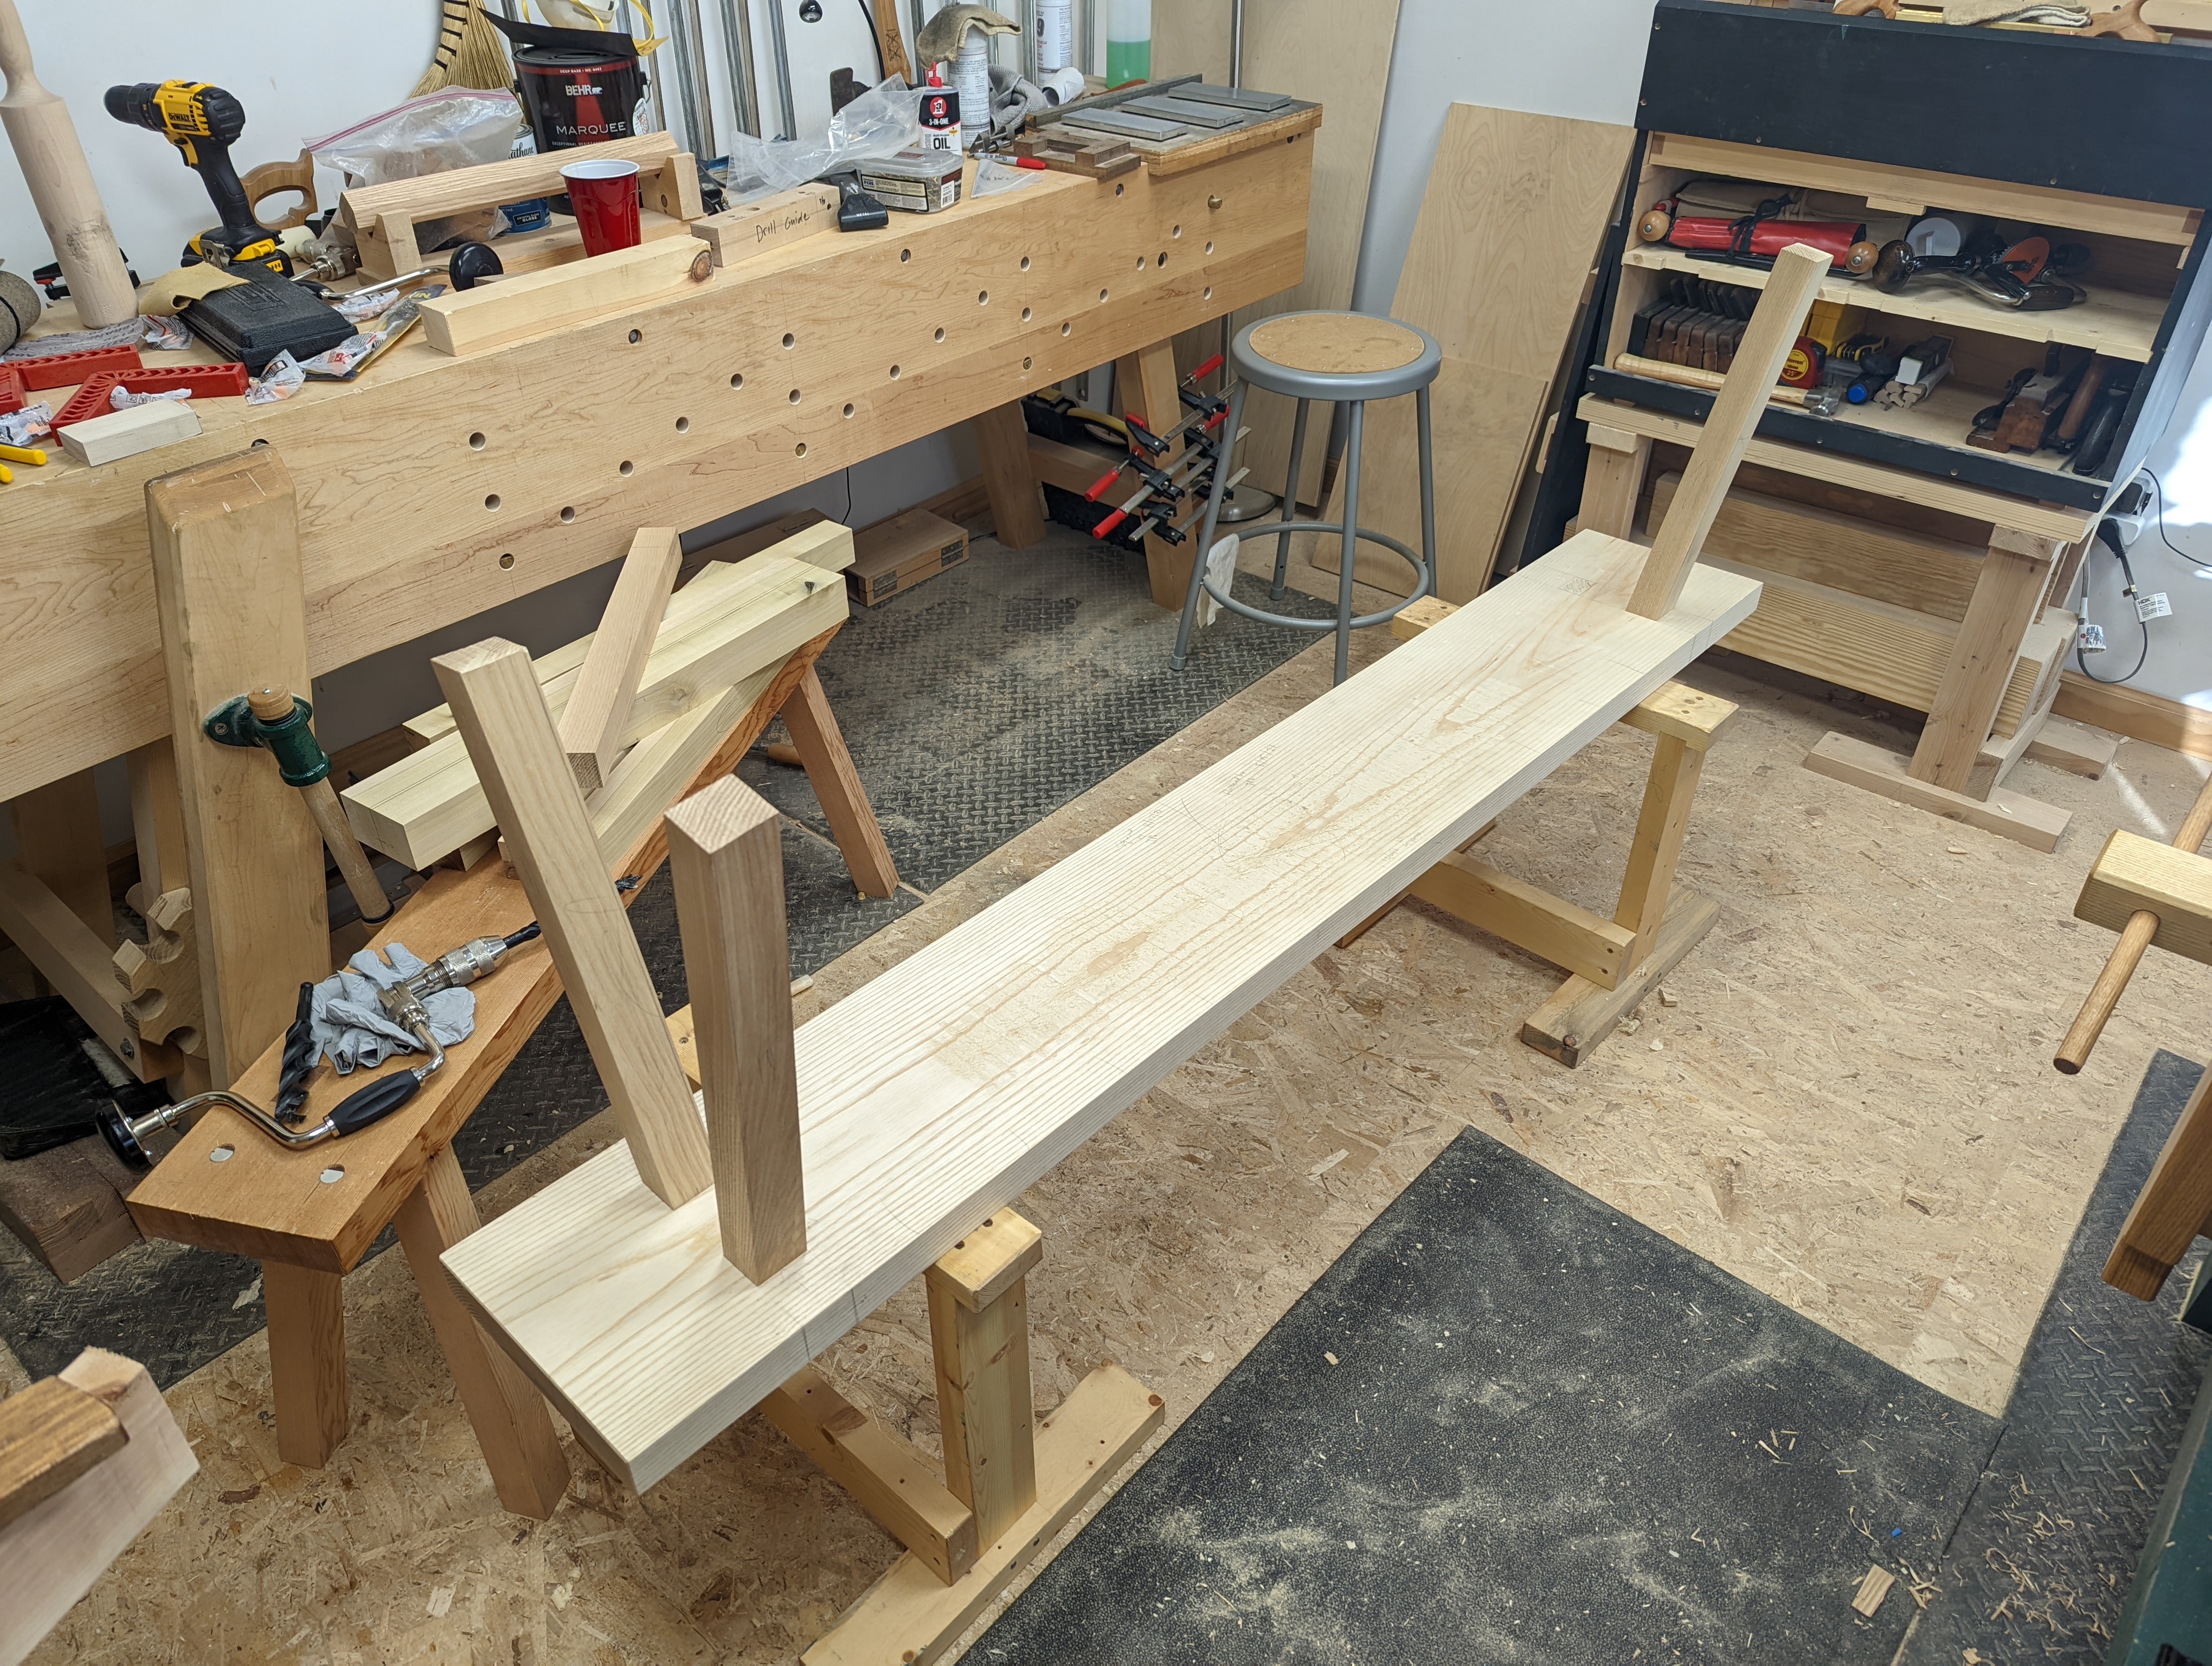
If anyone asks me what kind of workbench they should build when just getting into woodworking, I have only one answer: a Mike Siemsen-style Naked Woodworker English workbench. The video is an excellent step by step (my only complaint is that it doesn’t show cutting the lap joints on the lower stretchers for the leg assemblies). But more importantly, it is a design that a true beginner with a small set of tools can knock together with a reasonable chance of success.
I have built a few such workbenches. But I’ve noticed that pretty much all of my shop furniture pieces end up in the Naked Woodworker style too. Id est, glue and screw laminating various pieces to create the lap joints and other connections without having to cut any real joinery.
A bandsaw stand in potentia, illustrating the style.
One of the important things about Mike’s design is leaving the top rails a bit proud (shown above), so they can be leveled with a hand plane to form a flat plane to attach the tabletop. This is very useful when using rough construction lumber but still wanting precision in the final piece.
Abrupt segue:
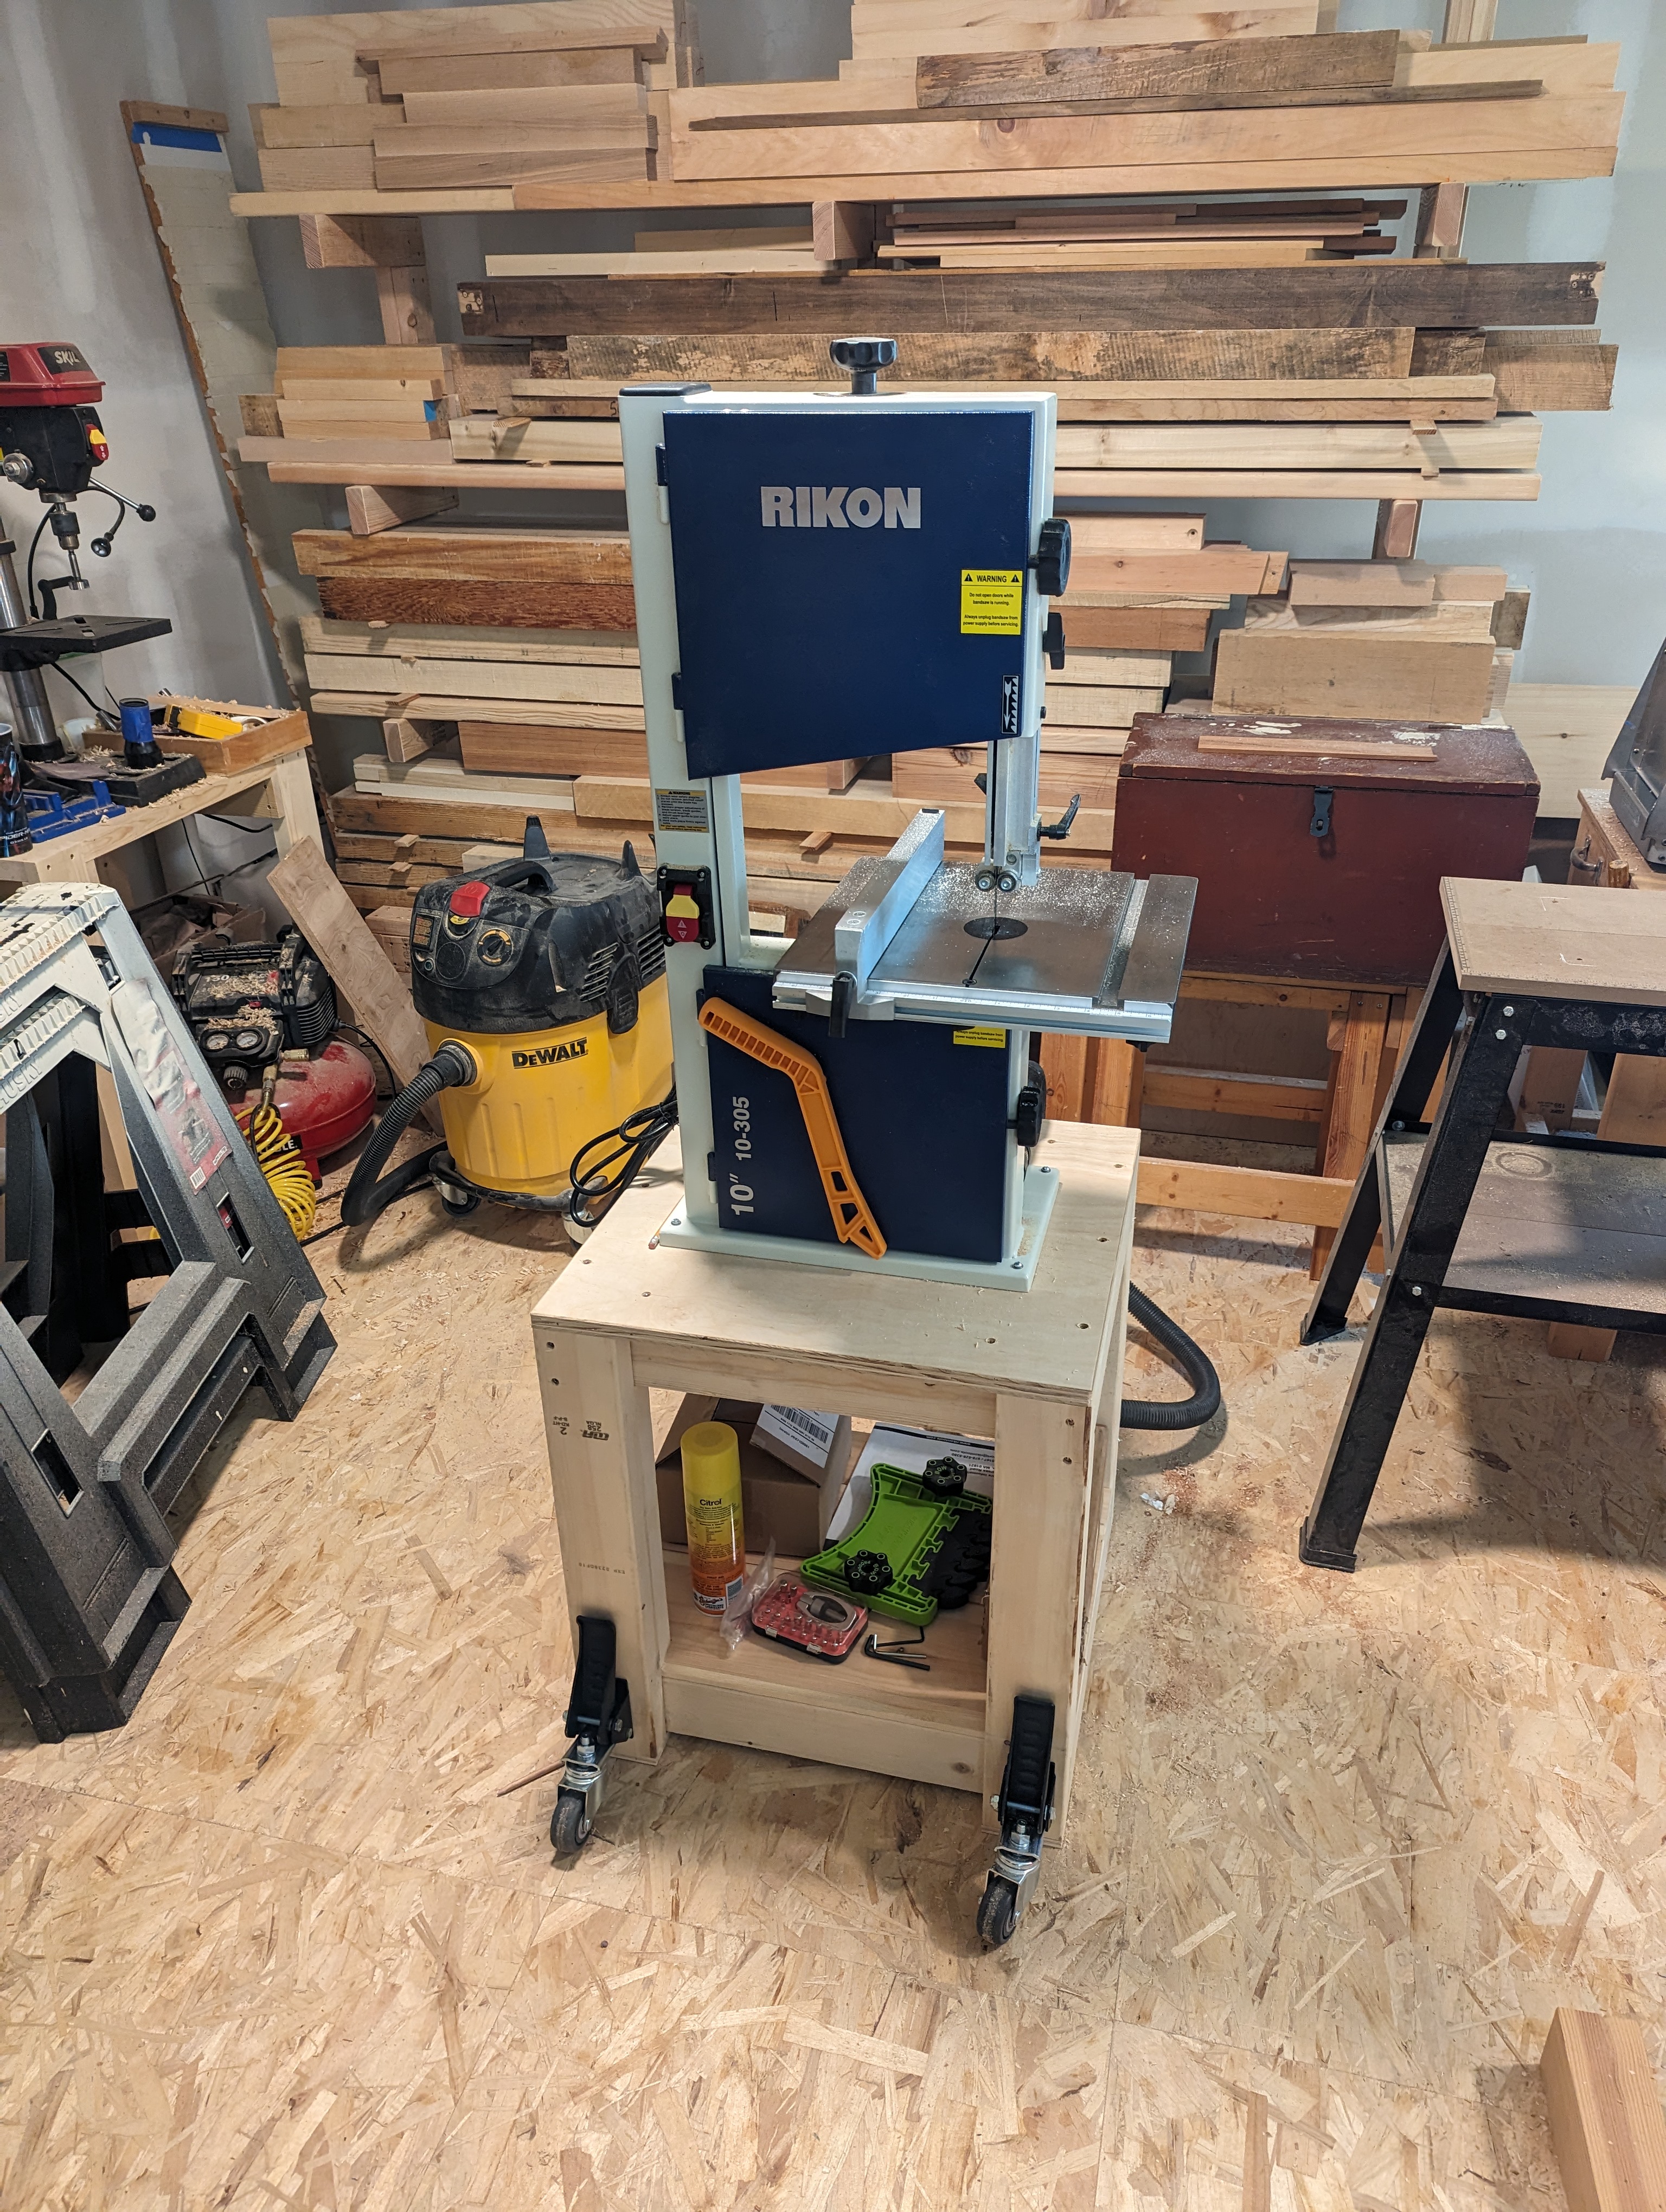
I fully subscribe to the hypothesis that the best woodworking hand tool is a band saw. I can absolutely spit a gauge line with a hand saw (although it has taken practice) and I am able to saw a perfect shoulder with a back saw (with a little bit of chisel paring). But a well tuned band saw just makes things go quicker (at least the cheek part of the cut).
I have the most basic version of a band saw with a coarse (skip tooth) blade, but it can cut as fine of joinery as I need. If I could go back in time, I would have bought this thing so much sooner. And now, it moves around.
Stationary stand seen to the right.
Sometimes I wonder if having a bandsaw will atrophy my hand sawing skills. But then I need to resaw some 16/4 stock and I forget about my previous qualms.
And that, my friends, is the true meaning of Christmas.
For several years, the floor of my workshop has been the OSB top of DriCore tongue and groove subfloor squares. DriCore is a modern miracle (not a sponsor, just to be clear) and going from working on the bare concrete of the basement to a fully insulated, slightly cushioned wood floor was nothing short of staggering. Not to mention eliminating the risk of a falling chisel needing a full regrind by landing edge down to the concrete. I’ve recently added some tongue and groove laminate on top of the DriCore which, even though it’s darker in color, it has actually brightened the room (I assume because the albedo of the shiner floor is higher than the OSB of the DriCore squares).
That lonely Veritas jointer plane on the back wall.
Since adding the laminate floor, I’ve been working off my 98″ Nicholson workbench, made of hard maple. This bench has by far the best leg vise I’ve ever made. It works smoothly, doesn’t bind and the foot operated cog gets real momentum because of the heft (8/4 white oak). It’s still too big for the space, and honestly could use another 2″ of benchtop depth (being a hair under 22″). But it’s the only bench currently in the room. My last buddy to buy a house needs a better workbench than the one I made him pre-pandemic. So I’m giving him my proper Moravian knockdown bench. And with my outdoor workbench neatly stacked in the garage, I’ve got room (and time) to make another full size workbench. But more on that later.
Blue skies and green grass are only a month or two away.
I like the vise on the maple Nicholson when cutting tenons. Unlike a pinboard variety, the cog and screw parallel guide easily adjusts between holding the tenon board widthwise to cut the tenon shoulders and cheeks and holding the mortise board lengthwise to chop and pare out the mortise. Although, in fairness, I’ve been using a hollow chisel mortiser more and more these days to do the mortise chopping.
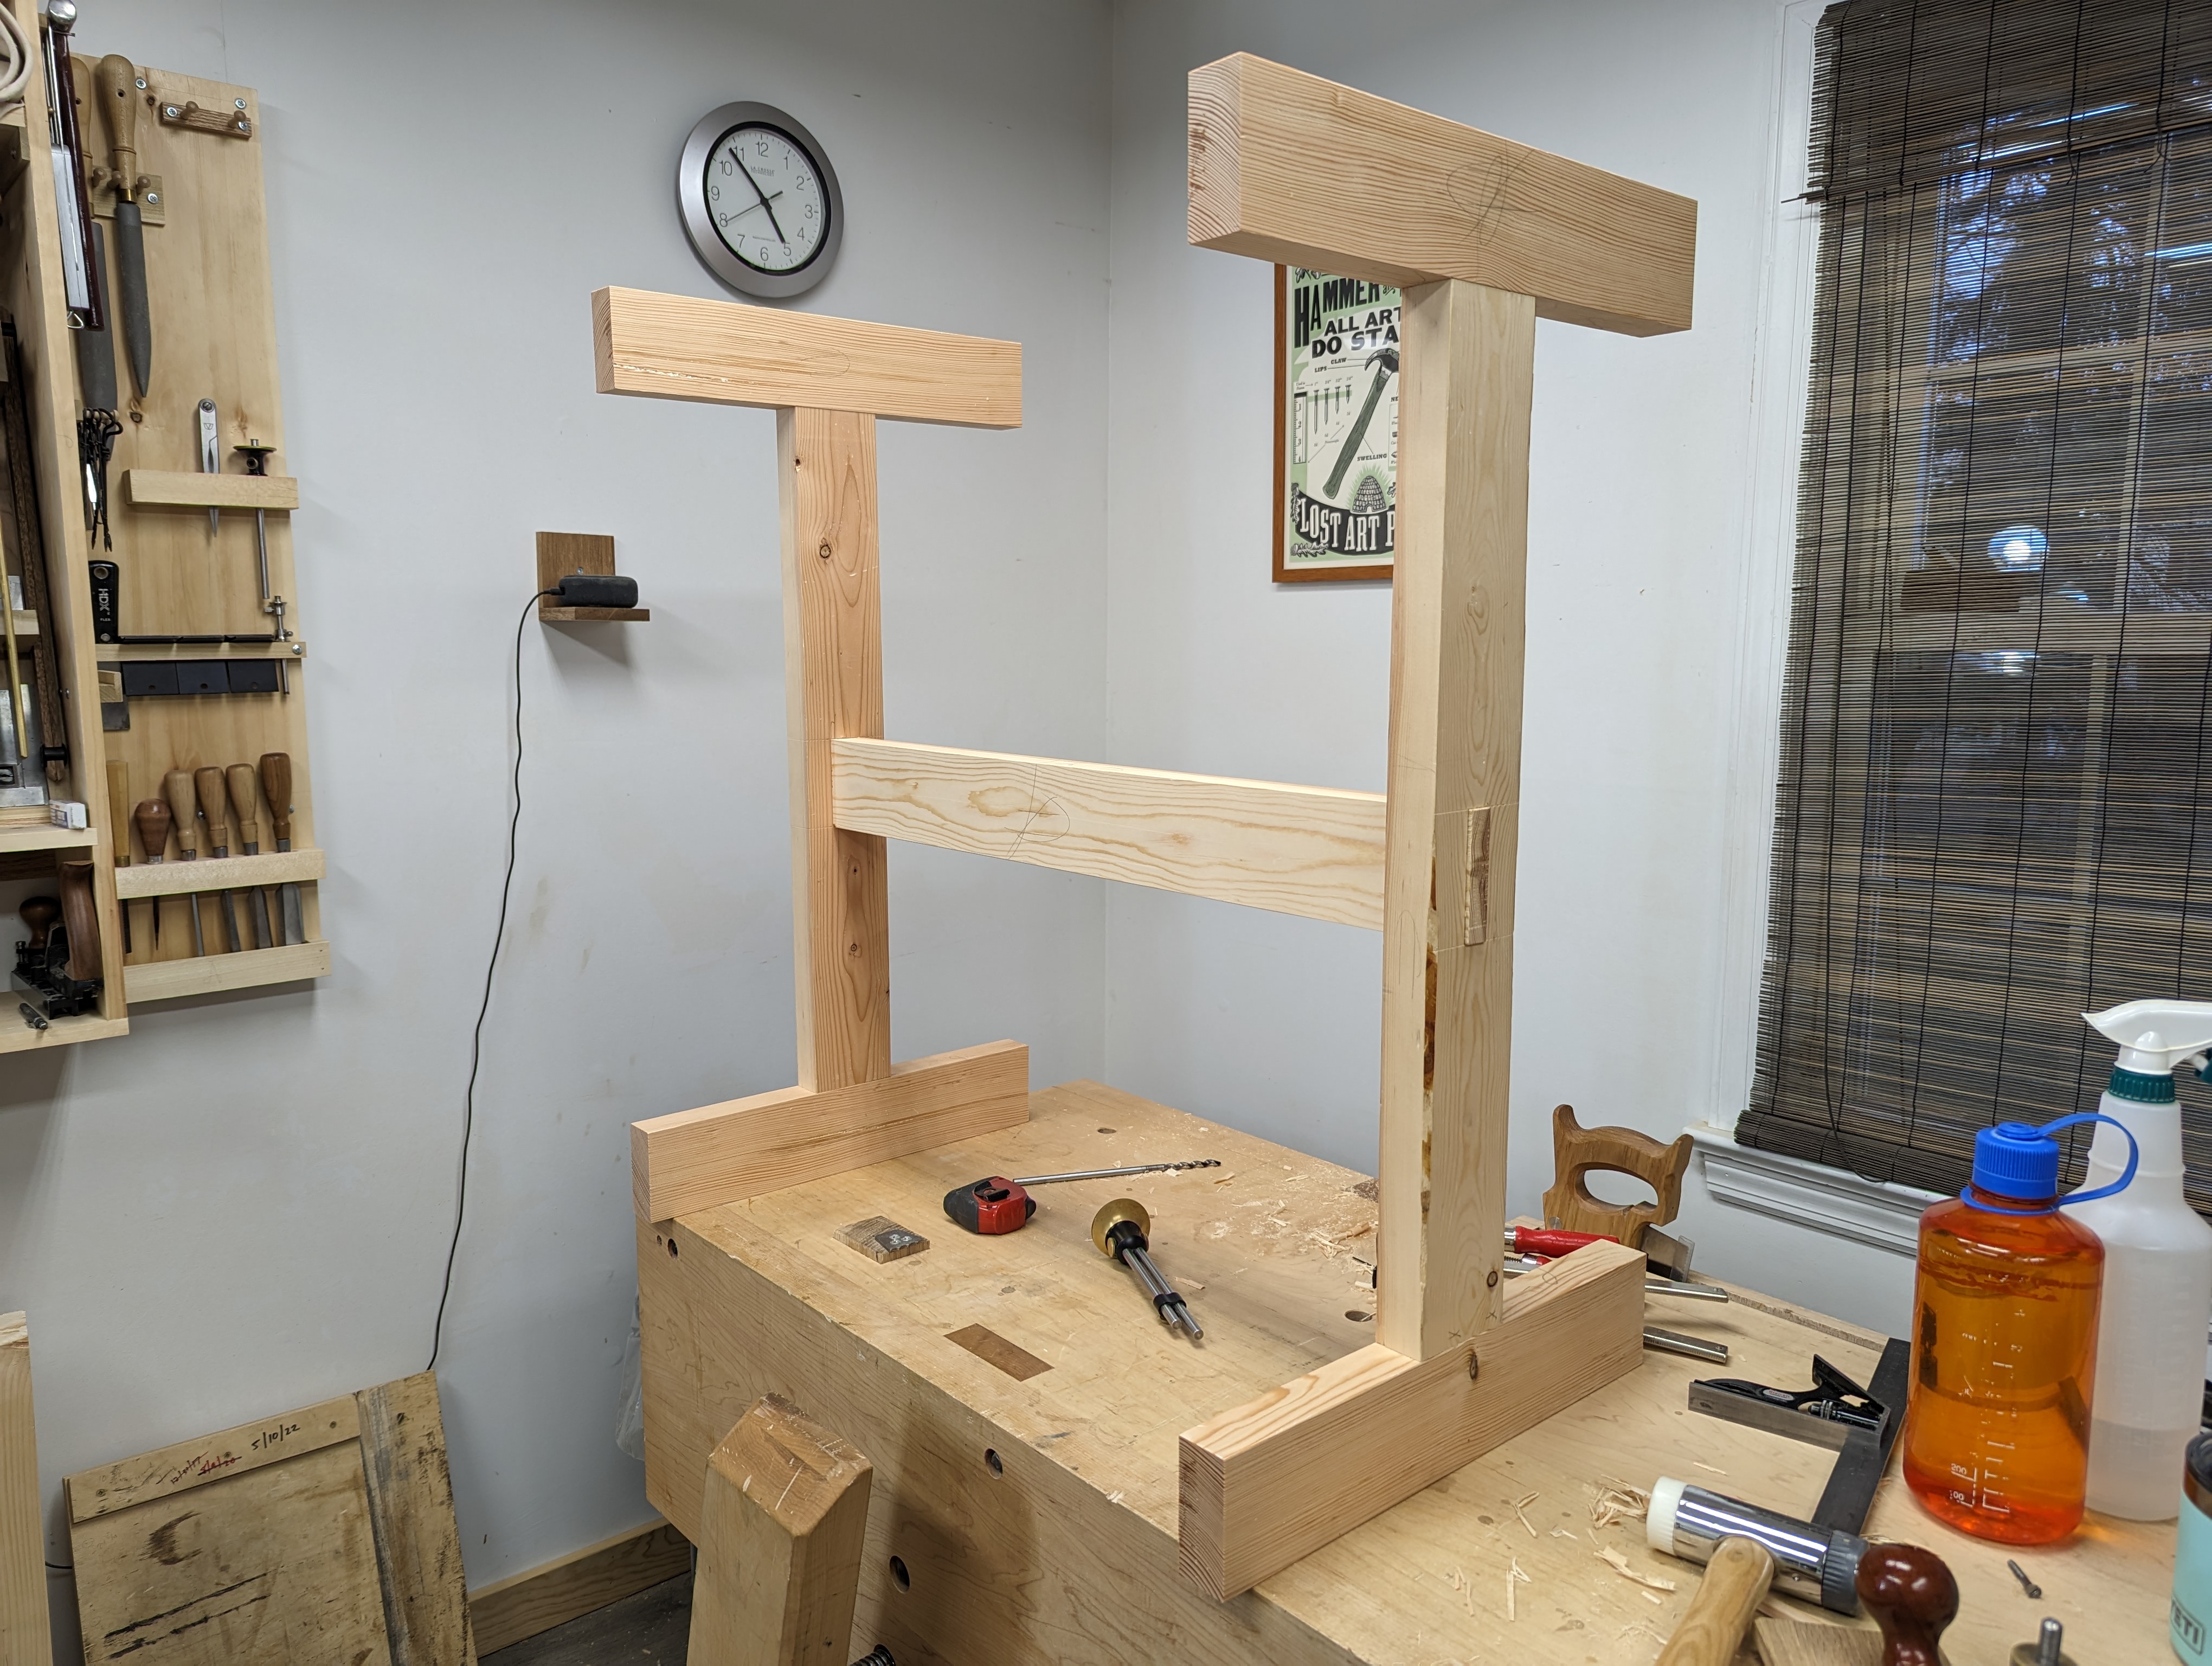
All those tenons are currently for a new sharpening station. Essentially a trestle table about the size of a sawhorse (and, quite frankly, patterned off a Krenov-style sawhorse). The frame is made of scrap Douglas Fir 2×4 leftover from the lumber rack build and the top will be Spruce offcuts from a planting table built up in Vermont. When it’s done, it will also have a drawer for saw sharpening gear. I might even use full extension, metal drawer glides that can open from either side.
Haven’t decided yet whether to angle the ends of the feet like Krenov did.
I had missed having a dedicated sharpening station that stashes in the corner. When I was working on the green Moravian, the maple Nicholson was pushed up against the wall and the sharpening station was all the way at the end. Besides having to squeeze in between my tool chest and whatever I was working on, the rest if the workbench top got super cluttered all the time. This new station will hold everything it needs to without any extra room to accumulate detritus. It will also be more accessible.
Just look in the background. What a mess. Also, a good shot of the leg vise cog mechanism.
After I finish the sharpening station, the next thing is to take down the lumber rack on the right wall. It barely stores any lumber and just collects clutter (seeing a theme here?). I’ll move whatever lumber (mostly reclaimed red pine) is on it to the new lumber rack (by, unironically, hanging the racks on the back side of the lumber rack posts). That will free up more than a foot of usable floor space (and force me to organize the other crap on the racks currently).
That’s all for now. Will share some pictures when the sharpening station is finished.
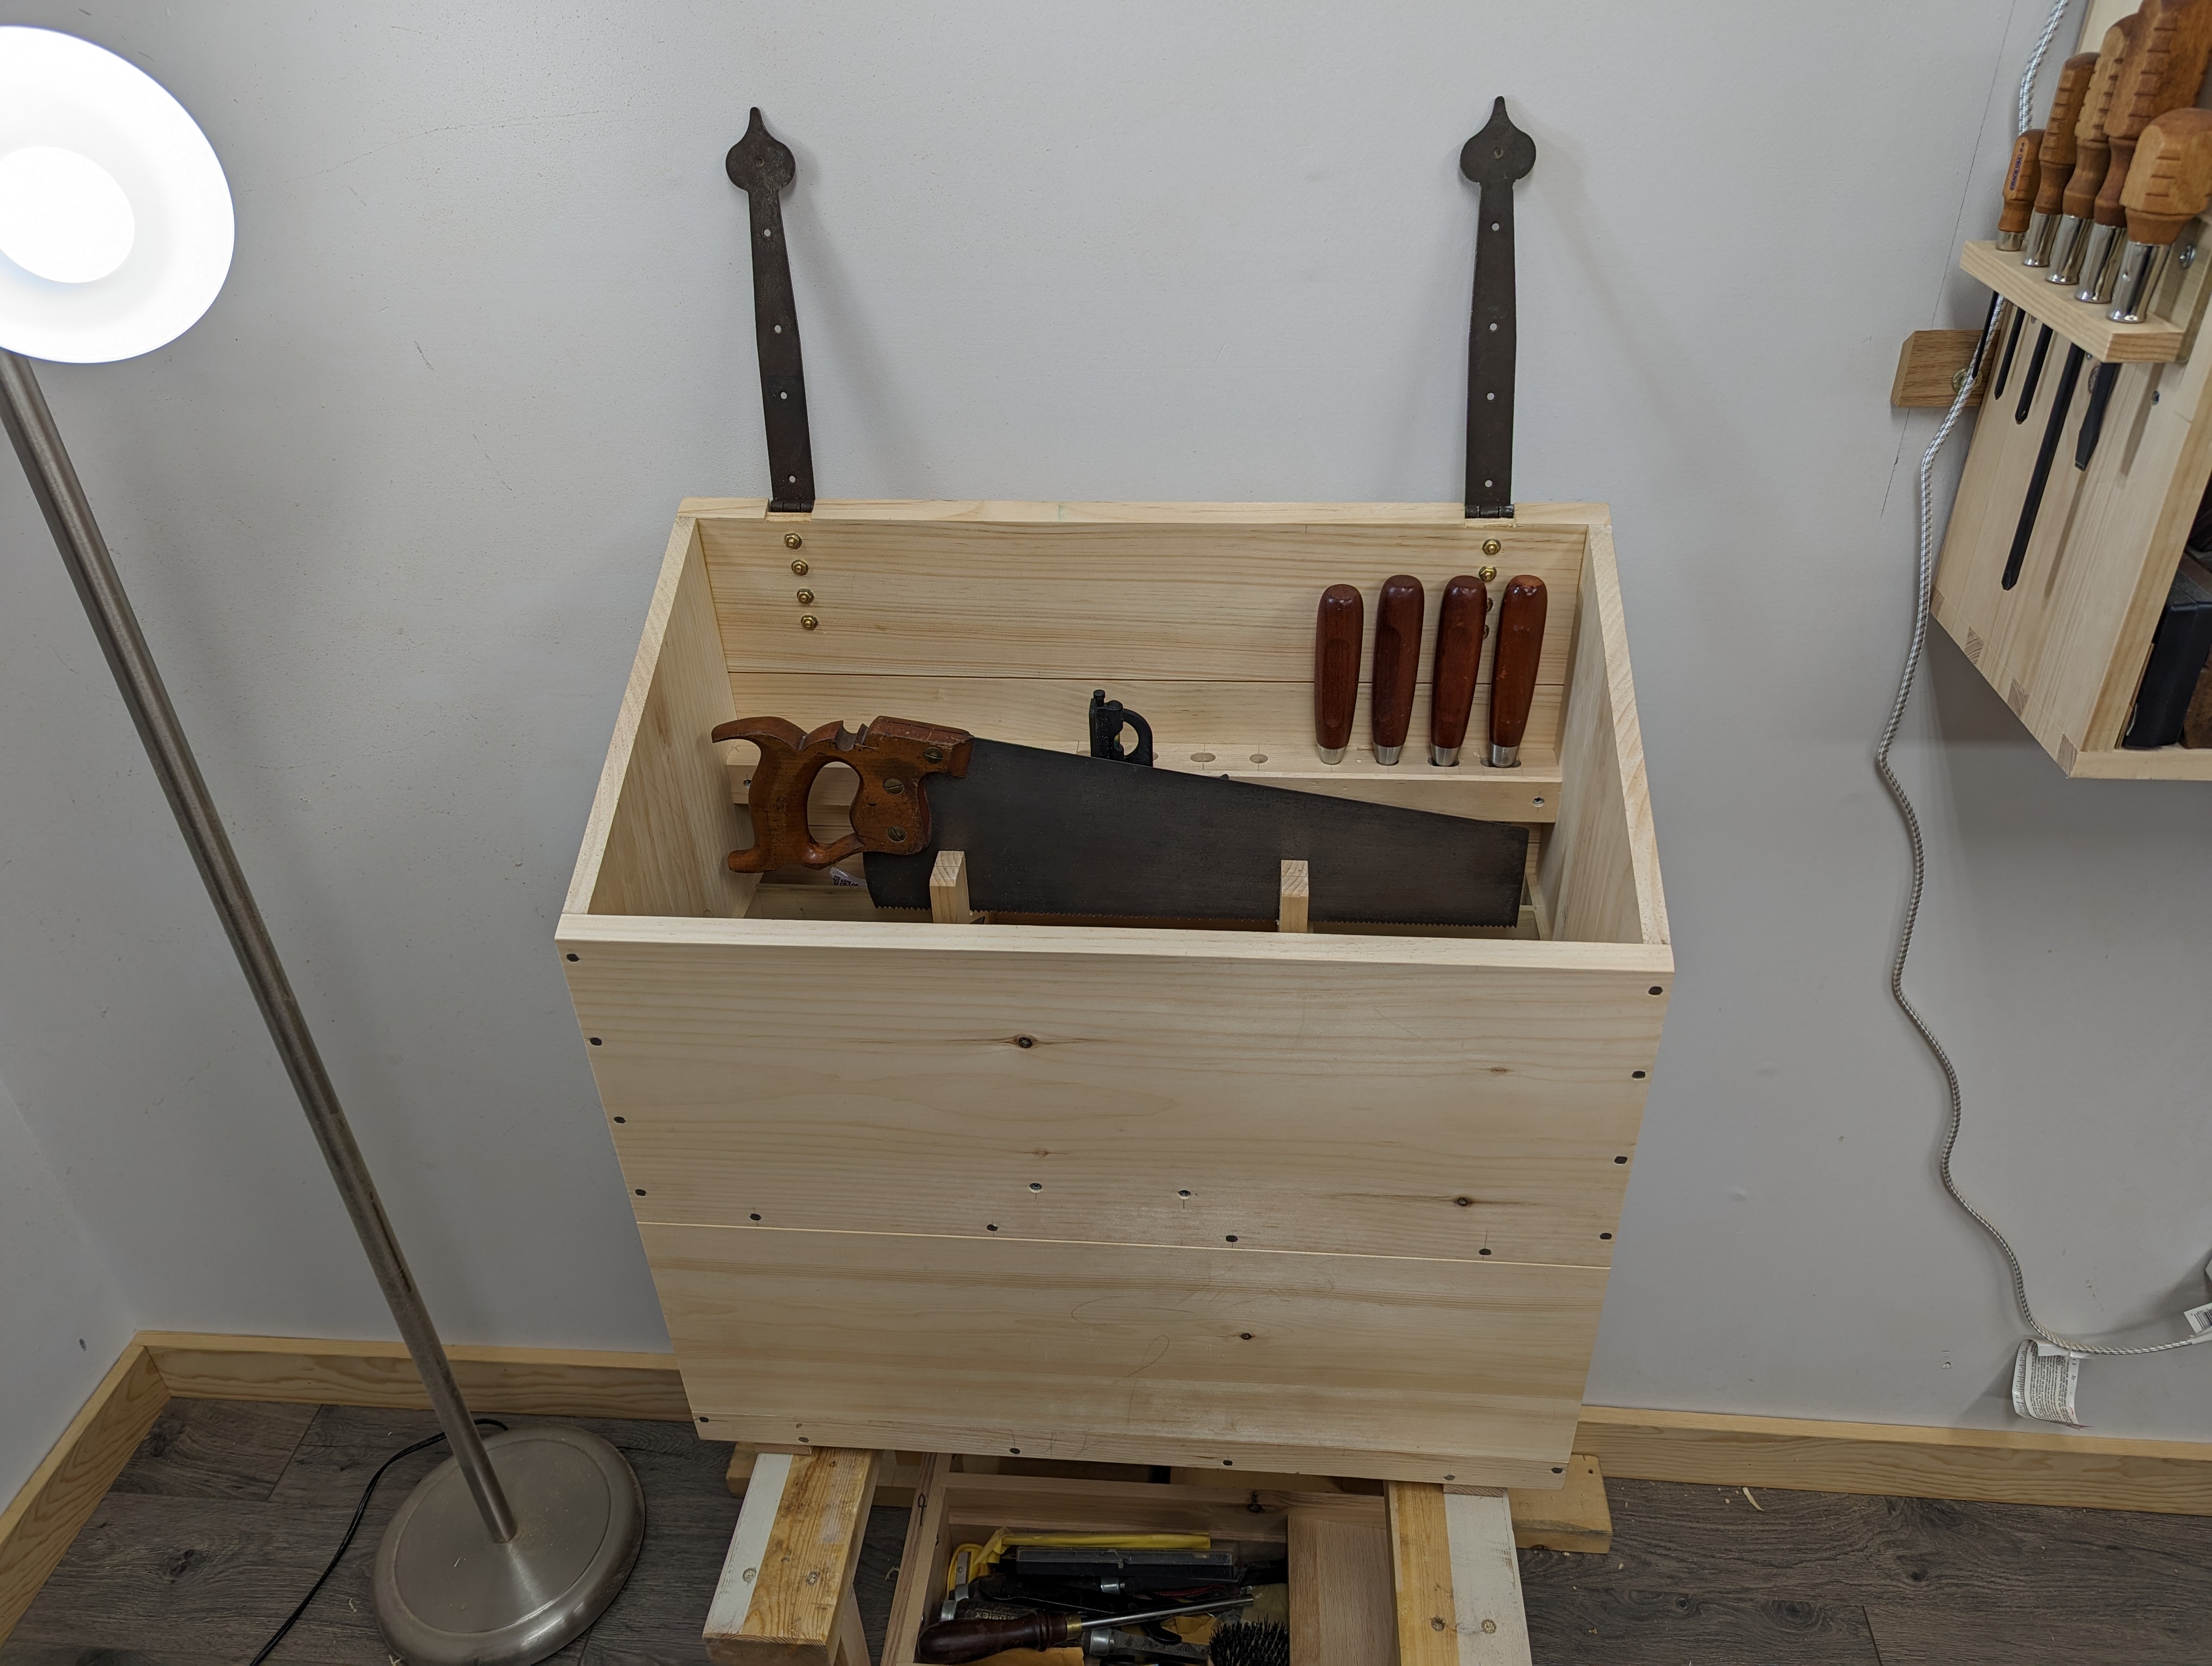
Before the new year, I essentially finished the carcass on a new, streamlined traveling tool chest. I had made a low profile Dutch Tool Chest fairly recently that, unfortunately, didn’t quite work out for its intended purpose. Long story short, I miscalculated the size of the lower compartment and nothing quite fits without effort. Another inch or so and it would be fine. It’s also a bit wider than it needs to be.
So that means it’s time to make another one!
Lee Valley strap hinges are great quality but they are never quite straight.
This isn’t a post about the new chest itself, but here are some quick details: 9/16″ Eastern White Pine carcass; 3/4″ EWP tongue and groove back boards; Southern Yellow Pine lock, battens and catches; Tremont Nail cut nails throughout. Overall size 24″ x 23″ x 12″. Lower compartment is 9″ high.
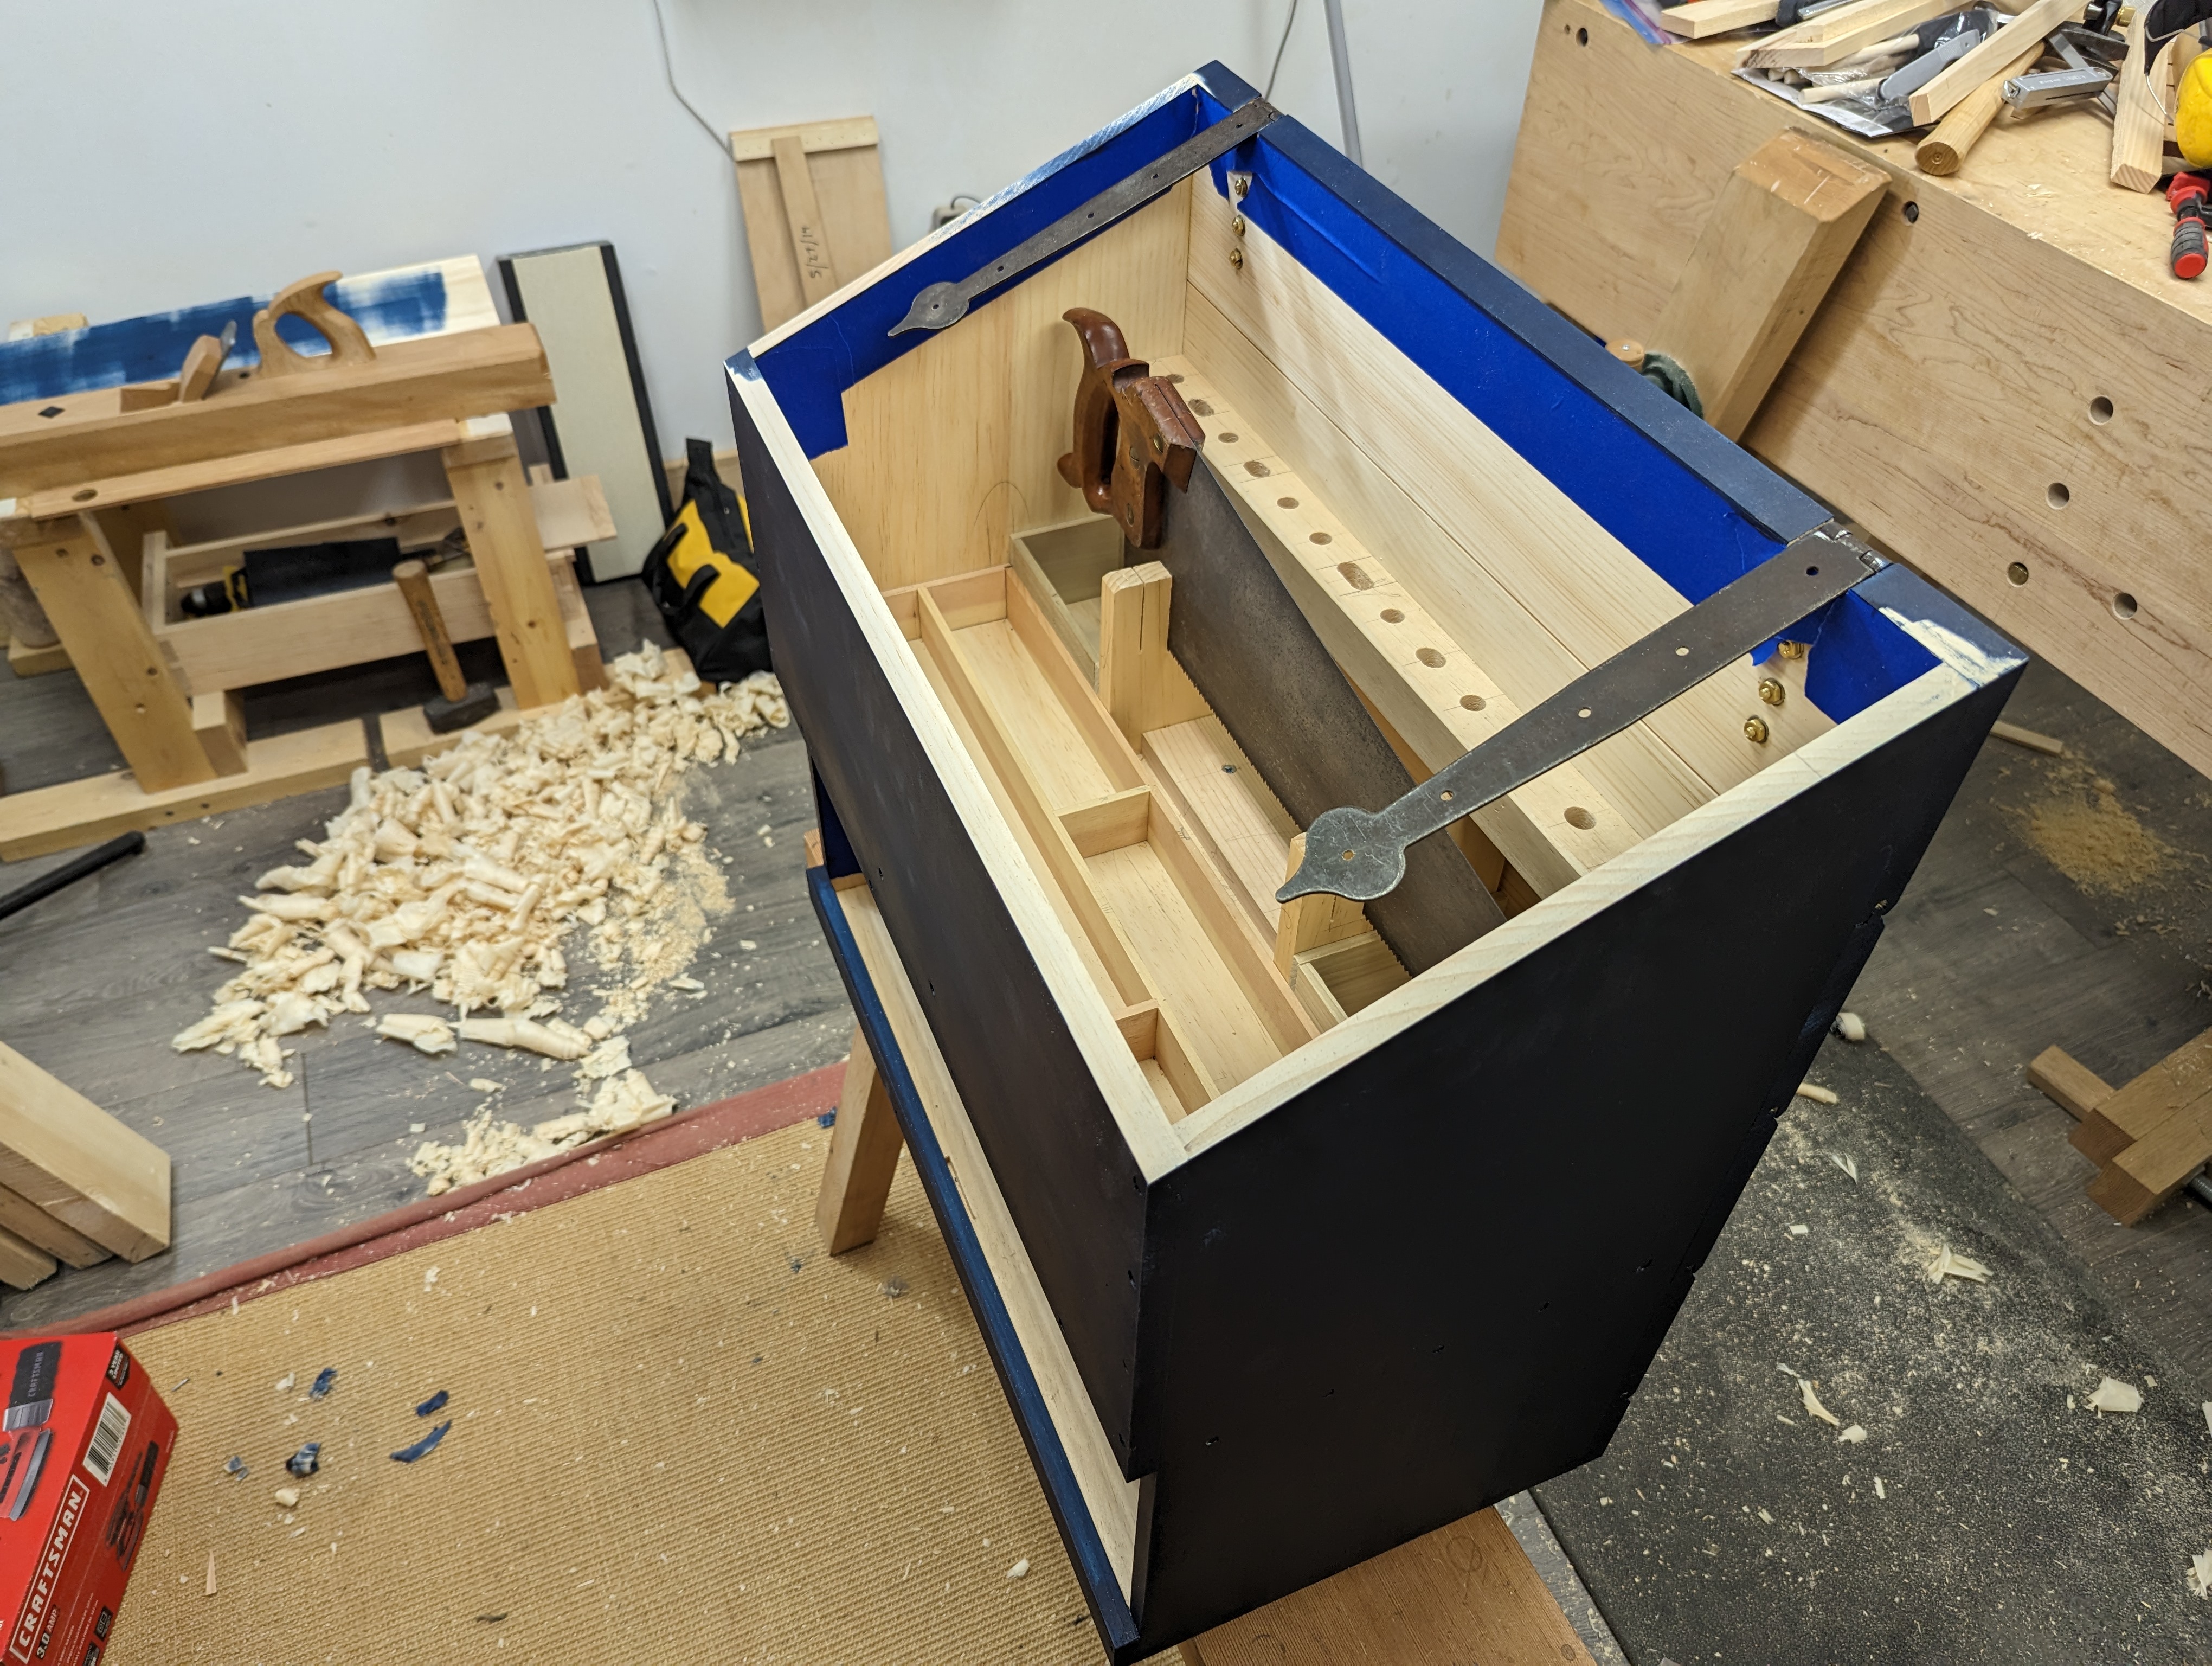
As I was making the lid (always the worst part of any tool chest build), I decided to start painting the case. Then, after three coats of paint, I dry fit the lid and discovered the top of the well is rather twisted. The front right corner was about 3/32″ higher than it should have been, so the lid rocked pretty badly. If you’ve never had to level the top of a Dutch Tool Chest after assembly, know that you can’t just continuously plane the top edge like you would with a traditional square box where it’s all edge grain. If you’re not careful, you’ll ram into the end grain of the side board and risk spelching the case side. And it’s awkward.
Instead, whenever I need to level a cross grain corner joint, I start with a chisel. Mark the depth with a gauge and chop, bevel down, until you scallop out enough of the end grain where the two boards meet to give clearance to your plane bed. You can now plane down the the long grain of the front board to depth without slamming into the end grain of the side board. Then, just take down the hump in the end grain of side board until it’s straight and flush with the new corner height. Once everything is about there, one long continuous pass starting from the far front corner and ending at the near back corner finishes it off.
I took a tiny bit off the far back corner as well.
Moral of the story: check for twist before you apply three coats of paint. Or, better yet, before you attach the front board at all.